
System Administration Guide
Page 4
... 32 Clone a Machine 32 Install Clone File to another Device 33 4 Print Drivers...35 Windows Printing 35 LPR Printing 35 Ensure Print Services for Unix is enabled 35 Install Printer Driver 37 Internet Printing Protocol (IPP) Port 38 Raw TCP/IP Printing (Port 9100...45 Configure your Print Driver 46 Information Checklist 46 Procedure 46 Configure the Windows Printer Driver 48 Bi-Directional Communication 48 Manual Print Driver Configuration 50 Apple Mac 50 TCP/IP Printing (OSX 50 Information Checklist 50 Install the Print Driver 50 iv Xerox WorkCentre 4250/4260 Series System ...
... 32 Clone a Machine 32 Install Clone File to another Device 33 4 Print Drivers...35 Windows Printing 35 LPR Printing 35 Ensure Print Services for Unix is enabled 35 Install Printer Driver 37 Internet Printing Protocol (IPP) Port 38 Raw TCP/IP Printing (Port 9100...45 Configure your Print Driver 46 Information Checklist 46 Procedure 46 Configure the Windows Printer Driver 48 Bi-Directional Communication 48 Manual Print Driver Configuration 50 Apple Mac 50 TCP/IP Printing (OSX 50 Information Checklist 50 Install the Print Driver 50 iv Xerox WorkCentre 4250/4260 Series System ...
System Administration Guide
Page 7
Automatically 102 Configure the Printer Driver - TABLE OF CONTENTS Information Checklist 89 Insert the Feature Enablement Key 90 Enable the Server Fax from the Machine 90 Configure a Server Fax Repository 90 ... from Phonebook 103 Setting up a Cover Sheet 104 Setup Fax Options 104 Setup Phonebook Preferences 105 User Preferences 105 Xerox WorkCentre 4250/4260 Series System Administration Guide vii Manually 102 Use the Feature 102 Windows 102 Mac OS Users 103 Add Fax Recipient 103 Add Recipient from the Machine 98 Test the Embedded Fax...
Automatically 102 Configure the Printer Driver - TABLE OF CONTENTS Information Checklist 89 Insert the Feature Enablement Key 90 Enable the Server Fax from the Machine 90 Configure a Server Fax Repository 90 ... from Phonebook 103 Setting up a Cover Sheet 104 Setup Fax Options 104 Setup Phonebook Preferences 105 User Preferences 105 Xerox WorkCentre 4250/4260 Series System Administration Guide vii Manually 102 Use the Feature 102 Windows 102 Mac OS Users 103 Add Fax Recipient 103 Add Recipient from the Machine 98 Test the Embedded Fax...
System Administration Guide
Page 8
... Vista 110 Mac OS X 111 Test Network Accounting 111 13 Xerox Standard Accounting 113 Overview 113 Information Checklist 114 Enable Xerox Standard Accounting in CentreWare Internet Services 114 Enable Xerox Standard Accounting from the Machine 115 Enable Xerox Standard Accounting in your Print Driver 115 Windows 115 Mac OS 116 Create a Group Account 116 Create a ...to Another Machine 122 Create Back-up file 122 Clone Settings to another machine 122 14 SMart eSolutions ...125 Overview 125 Information Checklist 125 viii Xerox WorkCentre 4250/4260 Series System Administration Guide
... Vista 110 Mac OS X 111 Test Network Accounting 111 13 Xerox Standard Accounting 113 Overview 113 Information Checklist 114 Enable Xerox Standard Accounting in CentreWare Internet Services 114 Enable Xerox Standard Accounting from the Machine 115 Enable Xerox Standard Accounting in your Print Driver 115 Windows 115 Mac OS 116 Create a Group Account 116 Create a ...to Another Machine 122 Create Back-up file 122 Clone Settings to another machine 122 14 SMart eSolutions ...125 Overview 125 Information Checklist 125 viii Xerox WorkCentre 4250/4260 Series System Administration Guide

System Administration Guide
Page 47
... page 46 • Bi-Directional Communication on page 48 • Manual Print Driver Configuration on page 50 • TCP/IP Printing (OSX) on page 50 • Configure your operating system: Windows XP 1. Xerox WorkCentre 4250/4260 Series System Administration Guide 35 Double-click on [Exit]. 2. If the CD autoruns, click on [Add or Remove Programs...
... page 46 • Bi-Directional Communication on page 48 • Manual Print Driver Configuration on page 50 • TCP/IP Printing (OSX) on page 50 • Configure your operating system: Windows XP 1. Xerox WorkCentre 4250/4260 Series System Administration Guide 35 Double-click on [Exit]. 2. If the CD autoruns, click on [Add or Remove Programs...
System Administration Guide
Page 48
... 13. If Print Services for Unix is not installed, refer to instructions from Microsoft to enable the service. 36 Xerox WorkCentre 4250/4260 Series System Administration Guide Click on [Windows Features]. 3. Double-click on the [Next] button. 7. If it is not present, install it . 8. ... to this page. 4. c) Click on [Details]. e) Click on [Add/Remove Win Components] in Chapter 4, LPR Printing, Install Printer Driver on [Properties]. 3. Windows Vista 1. Click on [Start], [Settings] then [Control Panel]. Verify that Print Services for Unix is loaded: a) Click on [LPR ...
... 13. If Print Services for Unix is not installed, refer to instructions from Microsoft to enable the service. 36 Xerox WorkCentre 4250/4260 Series System Administration Guide Click on [Windows Features]. 3. Double-click on the [Next] button. 7. If it is not present, install it . 8. ... to this page. 4. c) Click on [Details]. e) Click on [Add/Remove Win Components] in Chapter 4, LPR Printing, Install Printer Driver on [Properties]. 3. Windows Vista 1. Click on [Start], [Settings] then [Control Panel]. Verify that Print Services for Unix is loaded: a) Click on [LPR ...

System Administration Guide
Page 49
..., click on [Add Printer]. 3. Click on the [Next] button. 8. Click on the [Next] button. 5. Locate the Drivers folder on [Start], followed by [Control Panel] first. • Windows Vista - If you cannot see this computer]. b) Click on the [OK] button. 11. Select: • For... to my computer]. Select the following option from the list below: • Windows 2000/2003 - Click on the [Next] button for Windows XP/2000/2003 only. Click on [Create a new port]. 6. Xerox WorkCentre 4250/4260 Series System Administration Guide 37 From the [Start] menu, follow the appropriate...
..., click on [Add Printer]. 3. Click on the [Next] button. 8. Click on the [Next] button. 5. Locate the Drivers folder on [Start], followed by [Control Panel] first. • Windows Vista - If you cannot see this computer]. b) Click on the [OK] button. 11. Select: • For... to my computer]. Select the following option from the list below: • Windows 2000/2003 - Click on the [Next] button for Windows XP/2000/2003 only. Click on [Create a new port]. 6. Xerox WorkCentre 4250/4260 Series System Administration Guide 37 From the [Start] menu, follow the appropriate...
System Administration Guide
Page 50
... the settings: a) Enter a Printer Name. Windows XP/2003. Click on the [Connectivity] link. 5. 4 Print Drivers 17. How to step 25. 20. At your workstation, open the web browser and enter the TCP/IP address of the device. 38 Xerox WorkCentre 4250/4260 Series System Administration Guide Click on the ... the [Next] button. 23. The [Name your default printer, click on the [Properties] tab. 4. If you want to close the [Test Page] window. 28. Select [Enable]. Enter a Location name (and Comment if required.) 24. Click on the [Next] button. 27. Click on [Yes] to...
... the settings: a) Enter a Printer Name. Windows XP/2003. Click on the [Connectivity] link. 5. 4 Print Drivers 17. How to step 25. 20. At your workstation, open the web browser and enter the TCP/IP address of the device. 38 Xerox WorkCentre 4250/4260 Series System Administration Guide Click on the ... the [Next] button. 23. The [Name your default printer, click on the [Properties] tab. 4. If you want to close the [Test Page] window. 28. Select [Enable]. Enter a Location name (and Comment if required.) 24. Click on the [Next] button. 27. Click on [Yes] to...

System Administration Guide
Page 51
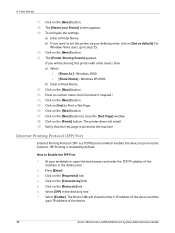
... the Host Name or the SMB Host Name as shown on the machine Configuration Report, depending on [Start]. The default is 300. 10. Install Printer Driver 1. Windows Printing 8. Windows 2000/2003 From your network (WINS or DNS). 12. b) Click on the [My Network Places] icon. Click on the [Next] button. Enter a number for... IP address of the printer. 9. To create an IPP printer, click on [Connect to Keep Jobs in the URL field. Click on the Internet...]. 11. Xerox WorkCentre 4250/4260 Series System Administration Guide 39
... the Host Name or the SMB Host Name as shown on the machine Configuration Report, depending on [Start]. The default is 300. 10. Install Printer Driver 1. Windows Printing 8. Windows 2000/2003 From your network (WINS or DNS). 12. b) Click on the [My Network Places] icon. Click on the [Next] button. Enter a number for... IP address of the printer. 9. To create an IPP printer, click on [Connect to Keep Jobs in the URL field. Click on the Internet...]. 11. Xerox WorkCentre 4250/4260 Series System Administration Guide 39
System Administration Guide
Page 52
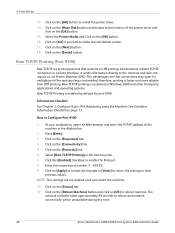
...open the Web browser and enter the TCP/IP address of the printer driver and click on [OK] to make this time. 40 Xerox WorkCentre 4250/4260 Series System Administration Guide Raw TCP/IP printing is contained in Windows 2000 and other third-party applications and operating systems. Raw TCP/IP ... does not require a Line Printer Daemon (LPD). Also known as a direct TCP/IP connection or sockets interface, it sends information directly to install the printer driver. 14. Click on the [Protocols] link. 6. Click on the [Properties] tab. 4. Click on the [OK] button. 16. Click on [Yes] ...
...open the Web browser and enter the TCP/IP address of the printer driver and click on [OK] to make this time. 40 Xerox WorkCentre 4250/4260 Series System Administration Guide Raw TCP/IP printing is contained in Windows 2000 and other third-party applications and operating systems. Raw TCP/IP ... does not require a Line Printer Daemon (LPD). Also known as a direct TCP/IP connection or sockets interface, it sends information directly to install the printer driver. 14. Click on the [Protocols] link. 6. Click on the [Properties] tab. 4. Click on the [OK] button. 16. Click on [Yes] ...

System Administration Guide
Page 53
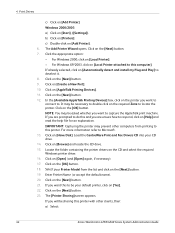
...e) Uncheck the box [Query]. Xerox WorkCentre 4250/4260 Series System Administration Guide 41 Click on the [Next] button. Follow the relevant steps for the print queue in the [Start] menu, then click on [Start], followed by [Control Panel] first. • For Windows Vista, click on the [OK... on the [Next] button. c) Enter the Printer Name or IP Address of the printer. Click on the [Finish] button. Windows Printing Install Printer Driver 1. d) Enter a name for your Workstation, from the [Start] menu, select the appropriate option from the Device Type drop down...
...e) Uncheck the box [Query]. Xerox WorkCentre 4250/4260 Series System Administration Guide 41 Click on the [Next] button. Follow the relevant steps for the print queue in the [Start] menu, then click on [Start], followed by [Control Panel] first. • For Windows Vista, click on the [OK... on the [Next] button. c) Enter the Printer Name or IP Address of the printer. Click on the [Finish] button. Windows Printing Install Printer Driver 1. d) Enter a name for your Workstation, from the [Start] menu, select the appropriate option from the Device Type drop down...

System Administration Guide
Page 54
... 20. Click on the [Browse] button. 13. Windows 2000. • [Share Name] - b) Enter a Share Name. Click on the [Next] button. 22. Verify that the test page is printed at the machine. Locate the CentreWare Print and Fax Drivers CD delivered with other clients, then: a) Select:...] button. 23. Select the model of your machine. 42 Xerox WorkCentre 4250/4260 Series System Administration Guide If you will return to support AppleTalk®. Close the Test Page window if necessary. 26. The printer driver will install. 28. AppleTalk Printing The Internet Services AppleTalk®...
... 20. Click on the [Browse] button. 13. Windows 2000. • [Share Name] - b) Enter a Share Name. Click on the [Next] button. 22. Verify that the test page is printed at the machine. Locate the CentreWare Print and Fax Drivers CD delivered with other clients, then: a) Select:...] button. 23. Select the model of your machine. 42 Xerox WorkCentre 4250/4260 Series System Administration Guide If you will return to support AppleTalk®. Close the Test Page window if necessary. 26. The printer driver will install. 28. AppleTalk Printing The Internet Services AppleTalk®...

System Administration Guide
Page 55
...click [OK] to configure AppleTalk on, and then click on the network connection you reboot the machine. b) Click on [Network Connections] Xerox WorkCentre 4250/4260 Series System Administration Guide 43 Right-click on [Properties]. 3. b) Click on the [Properties] tab. 4. If the AppleTalk protocol... Password [1111], and click on the [My Network Places] icon. Install the Printer Driver 1. Follow the steps below that are not applied until you want to reboot the machine. Windows Printing Configure AppleTalk 1. Windows 2000/2003 From the Desktop: a) Right-click on [Login]. 11.
...click [OK] to configure AppleTalk on, and then click on the network connection you reboot the machine. b) Click on [Network Connections] Xerox WorkCentre 4250/4260 Series System Administration Guide 43 Right-click on [Properties]. 3. b) Click on the [Properties] tab. 4. If the AppleTalk protocol... Password [1111], and click on the [My Network Places] icon. Install the Printer Driver 1. Follow the steps below that are not applied until you want to reboot the machine. Windows Printing Configure AppleTalk 1. Windows 2000/2003 From the Desktop: a) Right-click on [Login]. 11.
System Administration Guide
Page 56
... on [Add Printer]. 6. IMPORTANT: Capturing the printer may prevent other clients, then: a) Select: 44 Xerox WorkCentre 4250/4260 Series System Administration Guide Click on the CD and select the required Windows printer driver. 16. Locate the folder containing the printer drivers on [Browse] and locate the CD drive. 15. b) Click on the [Next] button. 12. Click...
... on [Add Printer]. 6. IMPORTANT: Capturing the printer may prevent other clients, then: a) Select: 44 Xerox WorkCentre 4250/4260 Series System Administration Guide Click on the CD and select the required Windows printer driver. 16. Locate the folder containing the printer drivers on [Browse] and locate the CD drive. 15. b) Click on the [Next] button. 12. Click...

System Administration Guide
Page 57
... supports USB connectivity. 3. Select the required USB printer driver. 11. A Workstation or laptop that the radio button is selected next to browse for your printer model. Click on the [Finish] button. Click on the [Next] button. 28. Xerox WorkCentre 4250/4260 Series System Administration Guide 45 Windows 2000. • [Share Name] - Enter the Location (Add...
... supports USB connectivity. 3. Select the required USB printer driver. 11. A Workstation or laptop that the radio button is selected next to browse for your printer model. Click on the [Finish] button. Click on the [Next] button. 28. Xerox WorkCentre 4250/4260 Series System Administration Guide 45 Windows 2000. • [Share Name] - Enter the Location (Add...
System Administration Guide
Page 58
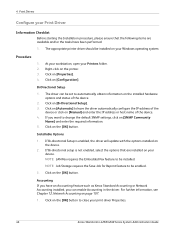
...your workstation, open your print driver Properties. 46 Xerox WorkCentre 4250/4260 Series System Administration Guide The driver can enable Accounting in the driver. Click on the [OK] button. Click on [Bi-Directional Setup]. 3. Accounting If you have the driver automatically configure the IP address of...on the device. 2. Click on [Automatic] to have an Accounting feature such as Xerox Standard Accounting or Network Accounting installed, you want to be installed on your Windows operating system. Installable Options 1. If Bi-directional Setup is not enabled, select the ...
...your workstation, open your print driver Properties. 46 Xerox WorkCentre 4250/4260 Series System Administration Guide The driver can enable Accounting in the driver. Click on the [OK] button. Click on [Bi-Directional Setup]. 3. Accounting If you have the driver automatically configure the IP address of...on the device. 2. Click on [Automatic] to have an Accounting feature such as Xerox Standard Accounting or Network Accounting installed, you want to be installed on your Windows operating system. Installable Options 1. If Bi-directional Setup is not enabled, select the ...

System Administration Guide
Page 59
... on the covers, select [Printed]. b) In [Cover Options], select the cover options you require. To set default settings for the driver. 1. Xerox WorkCentre 4250/4260 Series System Administration Guide 47 If you want to print images from your document on . c) Configure the paper size settings as ...require, then click the [OK] button. Click on the [Help] button in the driver to view information about each feature. Windows Printing Printing Preferences Printing Preferences contains all the driver features and allows you to input custom measurements for non-standard paper sizes, and also...
... on the covers, select [Printed]. b) In [Cover Options], select the cover options you require. To set default settings for the driver. 1. Xerox WorkCentre 4250/4260 Series System Administration Guide 47 If you want to print images from your document on . c) Configure the paper size settings as ...require, then click the [OK] button. Click on the [Help] button in the driver to view information about each feature. Windows Printing Printing Preferences Printing Preferences contains all the driver features and allows you to input custom measurements for non-standard paper sizes, and also...

System Administration Guide
Page 60
... to enable or disable the Banner Sheet. 1. c) Click [OK]. 7. Saved Settings 1. Configure the Windows Printer Driver Bi-Directional Communication 1. Configure any other print settings, such as required. 2. You can be selected from the [Saved Settings] menu. Windows XP 48 Xerox WorkCentre 4250/4260 Series System Administration Guide To add transparencies separators: a) In [Paper] select [Transparency Separators...
... to enable or disable the Banner Sheet. 1. c) Click [OK]. 7. Saved Settings 1. Configure the Windows Printer Driver Bi-Directional Communication 1. Configure any other print settings, such as required. 2. You can be selected from the [Saved Settings] menu. Windows XP 48 Xerox WorkCentre 4250/4260 Series System Administration Guide To add transparencies separators: a) In [Paper] select [Transparency Separators...

System Administration Guide
Page 61
...g) Click on the [OK] button. e) Change any default printer settings, as required. f) Click on the [OK] button. The driver's Printing Preferences will report information about the printer is printed at the bottom of the machine. Follow the steps below that are specific to... the test page is available. h) Verify that the test page is selected and click on [Automatic] to close the [Test Page] window. Xerox WorkCentre 4250/4260 Series System Administration Guide 49 Click on [Printing Preferences]. d) Click on [Bi-Directional Setup]. 4. Click on [Manual] and enter...
...g) Click on the [OK] button. e) Change any default printer settings, as required. f) Click on the [OK] button. The driver's Printing Preferences will report information about the printer is printed at the bottom of the machine. Follow the steps below that are specific to... the test page is available. h) Verify that the test page is selected and click on [Automatic] to close the [Test Page] window. Xerox WorkCentre 4250/4260 Series System Administration Guide 49 Click on [Printing Preferences]. d) Click on [Bi-Directional Setup]. 4. Click on [Manual] and enter...
System Administration Guide
Page 62
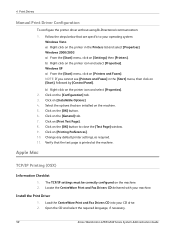
... on [Printers and Faxes]. Select the options that are specific to close the [Test Page] window. 9. Click on the machine. 5. Install the Print Driver 1. Click on the printer icon and select [Properties]. Verify that are installed on [Printing Preferences...the Printers list and select [Properties]. 4 Print Drivers Manual Print Driver Configuration To configure the printer driver without using Bi-Directional communication: 1. Open the CD and select the required language, if necessary. 50 Xerox WorkCentre 4250/4260 Series System Administration Guide Click on [Settings]...
... on [Printers and Faxes]. Select the options that are specific to close the [Test Page] window. 9. Click on the machine. 5. Install the Print Driver 1. Click on the printer icon and select [Properties]. Verify that are installed on [Printing Preferences...the Printers list and select [Properties]. 4 Print Drivers Manual Print Driver Configuration To configure the printer driver without using Bi-Directional communication: 1. Open the CD and select the required language, if necessary. 50 Xerox WorkCentre 4250/4260 Series System Administration Guide Click on [Settings]...

System Administration Guide
Page 127
... [Printers]. • For Windows XP - Touch [Tools]. 6. Touch [Authentication Mode]. 9. Touch [Save]. 11. click on [Configuration]. 5. If you cannot see this setting include: 1) [Save Accounting Codes] allows the inputted codes to be prompted to exit the Tools Pathway. Users will be saved as the default Accounting Codes. Xerox WorkCentre 4250/4260 Series System Administration...
... [Printers]. • For Windows XP - Touch [Tools]. 6. Touch [Authentication Mode]. 9. Touch [Save]. 11. click on [Configuration]. 5. If you cannot see this setting include: 1) [Save Accounting Codes] allows the inputted codes to be prompted to exit the Tools Pathway. Users will be saved as the default Accounting Codes. Xerox WorkCentre 4250/4260 Series System Administration...


