
User Guide
Page 13
Phaser® 4510 Laser Printer 1-7 Control Panel Control Panel This section includes: ■ Control Panel Features on page 1-7 ■ Control Panel Layout on page 1-8 ■ Menu Map on page 1-8 ■ Information Pages on page 1-8 ■ Sample Pages on page 1-9 ■ Power Saver Settings on page 1-9 Control Panel Features The control panel: ■ Displays the printer's operating status (for example, Printing, Ready to...
Phaser® 4510 Laser Printer 1-7 Control Panel Control Panel This section includes: ■ Control Panel Features on page 1-7 ■ Control Panel Layout on page 1-8 ■ Menu Map on page 1-8 ■ Information Pages on page 1-8 ■ Sample Pages on page 1-9 ■ Power Saver Settings on page 1-9 Control Panel Features The control panel: ■ Displays the printer's operating status (for example, Printing, Ready to...

User Guide
Page 14
... the control panel, select Information, and then press the OK button. 2. Note: This print icon appears before the titles of information pages to see where these pages from your printer, do the following: Phaser® 4510 Laser Printer 1-8 about your printer. For example... Arrow button Green: Printer is busy or warming up. Cancel button Cancels the current print job. Control Panel Layout 1 2 34 5 6 Phaser 4510 Control Panel 78 4510-068 1. Status Indicator LED: 5. Displays a help you navigate the control panel menus. Graphic display indicates status messages ...
... the control panel, select Information, and then press the OK button. 2. Note: This print icon appears before the titles of information pages to see where these pages from your printer, do the following: Phaser® 4510 Laser Printer 1-8 about your printer. For example... Arrow button Green: Printer is busy or warming up. Cancel button Cancels the current print job. Control Panel Layout 1 2 34 5 6 Phaser 4510 Control Panel 78 4510-068 1. Status Indicator LED: 5. Displays a help you navigate the control panel menus. Graphic display indicates status messages ...

User Guide
Page 52
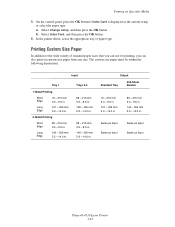
... on page 3-25 Printing Custom Size Paper on the control panel. Insert the tray into the tray slot, and push the tray completely into the printer. 4510-079 9. To use the current tray setup, press the OK button on page 3-43 Phaser® 4510 Laser Printer 3-16 If you load a new type of paper in... the tray: a. Select Use current setup if the correct paper type and size is displayed as the current setup, or change the paper type: ■ Select Change...
... on page 3-25 Printing Custom Size Paper on the control panel. Insert the tray into the tray slot, and push the tray completely into the printer. 4510-079 9. To use the current tray setup, press the OK button on page 3-43 Phaser® 4510 Laser Printer 3-16 If you load a new type of paper in... the tray: a. Select Use current setup if the correct paper type and size is displayed as the current setup, or change the paper type: ■ Select Change...
User Guide
Page 64
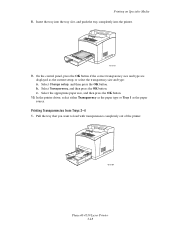
... load with transparencies completely out of the printer. 4510-089 Phaser® 4510 Laser Printer 3-28 Select Transparency, and then press the OK button. Select Change setup, and then press the OK button. On the control panel, press the OK button if the correct transparency size and type are displayed as the paper source. In the...
... load with transparencies completely out of the printer. 4510-089 Phaser® 4510 Laser Printer 3-28 Select Transparency, and then press the OK button. Select Change setup, and then press the OK button. On the control panel, press the OK button if the correct transparency size and type are displayed as the paper source. In the...
User Guide
Page 67
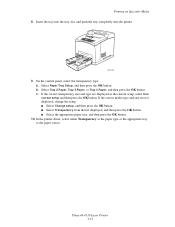
...panel, select the transparency type: a. Select Tray 2 Paper, Tray 3 Paper, or Tray 4 Paper, and then press the OK button. If the correct transparency size and type are not displayed, change the setup: ■ Select Change setup, and then press the OK button. ■ Select Transparency from the list displayed...and then press the OK button. b. Insert the tray into the tray slot, and push the tray completely into the printer. 4510-102 9. Phaser® 4510 Laser Printer 3-31 c. Select Paper Tray Setup, and then press the OK button. Printing on Specialty Media 8. If the correct ...
...panel, select the transparency type: a. Select Tray 2 Paper, Tray 3 Paper, or Tray 4 Paper, and then press the OK button. If the correct transparency size and type are not displayed, change the setup: ■ Select Change setup, and then press the OK button. ■ Select Transparency from the list displayed...and then press the OK button. b. Insert the tray into the tray slot, and push the tray completely into the printer. 4510-102 9. Phaser® 4510 Laser Printer 3-31 c. Select Paper Tray Setup, and then press the OK button. Printing on Specialty Media 8. If the correct ...
User Guide
Page 70
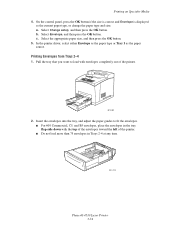
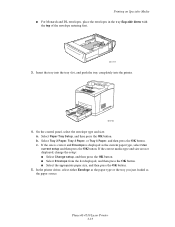
... B5 envelopes, place the envelopes in Trays 2-4 at any time. 4510-108 Phaser® 4510 Laser Printer 3-34 c. Select Envelope, and then press the OK button. On the control panel, press the OK button if the size is correct and Envelope is displayed as the paper source. Printing Envelopes from Trays 2-4 1. Printing on Specialty Media...
... B5 envelopes, place the envelopes in Trays 2-4 at any time. 4510-108 Phaser® 4510 Laser Printer 3-34 c. Select Envelope, and then press the OK button. On the control panel, press the OK button if the size is correct and Envelope is displayed as the paper source. Printing Envelopes from Trays 2-4 1. Printing on Specialty Media...
User Guide
Page 71
...from the list displayed, and then press the OK button. ■ Select the appropriate paper size, and then press the OK button. 5. Phaser® 4510 Laser Printer 3-35 Insert the tray into the tray slot, and push the tray completely into the printer. 4510-152 4. On the control panel, select the ...envelope type and size: a. If the size is correct and Envelope is displayed as the paper source.
...from the list displayed, and then press the OK button. ■ Select the appropriate paper size, and then press the OK button. 5. Phaser® 4510 Laser Printer 3-35 Insert the tray into the tray slot, and push the tray completely into the printer. 4510-152 4. On the control panel, select the ...envelope type and size: a. If the size is correct and Envelope is displayed as the paper source.

User Guide
Page 74
... labels may become misaligned and cause a jam. 4510-099 6. On the control panel, press the OK button if the correct paper size and Labels are displayed as the paper source. Select Labels, and then press the OK button. c. Phaser® 4510 Laser Printer 3-38 Select the appropriate paper size, and then press the OK button...
... labels may become misaligned and cause a jam. 4510-099 6. On the control panel, press the OK button if the correct paper size and Labels are displayed as the paper source. Select Labels, and then press the OK button. c. Phaser® 4510 Laser Printer 3-38 Select the appropriate paper size, and then press the OK button...

User Guide
Page 77
...type and size are displayed as the paper source. x 5 in . Insert the tray into the tray slot, and push the tray completely into the printer. 4510-111 7. c. In the printer driver, select either ...to www.xerox.com/office/4510supplies. Printing on Specialty Media 6. Phaser® 4510 Laser Printer 3-41 Select Paper Tray Setup, and then press the OK button. b. If the correct paper size and Labels are not displayed, change... Cards Index cards (3 in .) can not be printed from the list displayed, and then press the OK button. ■ Select the appropriate paper size, and then press the ...
...type and size are displayed as the paper source. x 5 in . Insert the tray into the tray slot, and push the tray completely into the printer. 4510-111 7. c. In the printer driver, select either ...to www.xerox.com/office/4510supplies. Printing on Specialty Media 6. Phaser® 4510 Laser Printer 3-41 Select Paper Tray Setup, and then press the OK button. b. If the correct paper size and Labels are not displayed, change... Cards Index cards (3 in .) can not be printed from the list displayed, and then press the OK button. ■ Select the appropriate paper size, and then press the ...
User Guide
Page 79
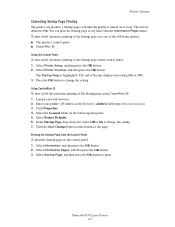
... - 216 mm 3.0 - 8.5 in. 127 - 356 mm 5.0 - 14.0 in. 2-Sided Printing Short Edge Long Edge 89 - 216 mm 3.5 - 8.5 in. 140 - 356 mm 5.5 - 14.0 in . In the printer driver, select the appropriate tray or paper type. Select Index Card, and then press the OK button. 6. The custom size paper must be within the... - 356 mm 5.0 - 14.0 in. 89 - 216 mm 3.5 - 8.5 in. 140 - 356 mm 5.5 - 14.0 in. Select Change setup, and then press the OK button. On the control panel, press the OK button if Index Card is displayed as Input Phaser® 4510 Laser Printer 3-43
... - 216 mm 3.0 - 8.5 in. 127 - 356 mm 5.0 - 14.0 in. 2-Sided Printing Short Edge Long Edge 89 - 216 mm 3.5 - 8.5 in. 140 - 356 mm 5.5 - 14.0 in . In the printer driver, select the appropriate tray or paper type. Select Index Card, and then press the OK button. 6. The custom size paper must be within the... - 356 mm 5.0 - 14.0 in. 89 - 216 mm 3.5 - 8.5 in. 140 - 356 mm 5.5 - 14.0 in. Select Change setup, and then press the OK button. On the control panel, press the OK button if Index Card is displayed as Input Phaser® 4510 Laser Printer 3-43

User Guide
Page 104
...your printing. Verify that you have replacements on Xerox supplies recycling programs, go to Order Supplies The control panel displays a warning when the supply nears its replacement time. Select Supplies Usage Page to print. The Xerox Warranty, Service Agreements, and Total Satisfaction Guarantee do...damage, malfunction, or degradation of performance caused by use of non-Xerox supplies, or the use of non-Xerox supplies is available in the United States and Canada. Phaser® 4510 Laser Printer 5-6 On the control panel, select Information, and then press the OK button. 2. please...
...your printing. Verify that you have replacements on Xerox supplies recycling programs, go to Order Supplies The control panel displays a warning when the supply nears its replacement time. Select Supplies Usage Page to print. The Xerox Warranty, Service Agreements, and Total Satisfaction Guarantee do...damage, malfunction, or degradation of performance caused by use of non-Xerox supplies, or the use of non-Xerox supplies is available in the United States and Canada. Phaser® 4510 Laser Printer 5-6 On the control panel, select Information, and then press the OK button. 2. please...
User Guide
Page 130
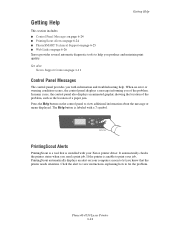
...printer needs attention. See also: Xerox Support Centre on page 1-11 Control Panel Messages The control panel provides you with a ? When an error or warning condition occurs, the control panel displays a message informing you send a print job. Click the alert to view instructions explaining how to view additional information about the message or menu displayed. Phaser® 4510 Laser Printer... 6-24 symbol. In many cases, the control panel also displays an animated graphic showing the location...
...printer needs attention. See also: Xerox Support Centre on page 1-11 Control Panel Messages The control panel provides you with a ? When an error or warning condition occurs, the control panel displays a message informing you send a print job. Click the alert to view instructions explaining how to view additional information about the message or menu displayed. Phaser® 4510 Laser Printer... 6-24 symbol. In many cases, the control panel also displays an animated graphic showing the location...

Advanced Features Guide
Page 24
...Walk-Up Features, and then press the OK button. 2. Phaser® 4510 Laser Printer 1-19 Select Walk-Up Features, and then press the OK button. 2. Note: If you entered 222 in the driver's Password field, enter zeros before your user name on the control panel: 1. Use the Back button to return to print or...Delete (for proof prints), Print and Save (for saved prints), or Delete, and then press the OK button. 5. If you are four digits displayed on the control panel. Select Walk-Up Features, and then press the OK button. 2. For example, if you enter less than one secure print job with that ...
...Walk-Up Features, and then press the OK button. 2. Phaser® 4510 Laser Printer 1-19 Select Walk-Up Features, and then press the OK button. 2. Note: If you entered 222 in the driver's Password field, enter zeros before your user name on the control panel: 1. Use the Back button to return to print or...Delete (for proof prints), Print and Save (for saved prints), or Delete, and then press the OK button. 5. If you are four digits displayed on the control panel. Select Walk-Up Features, and then press the OK button. 2. For example, if you enter less than one secure print job with that ...

Advanced Features Guide
Page 25
...OK button. 7. Printing or Deleting Personal Saved Jobs To print or delete a personal saved print job, select the job name on the control panel. Phaser® 4510 Laser Printer 1-20 Repeat Step 4 for the first digit of the numeric password, and then press the OK button to print or delete the job. ...Select Print and Save or Delete, and then press the OK button to accept that there are four digits displayed on the control panel. Select Walk...
...OK button. 7. Printing or Deleting Personal Saved Jobs To print or delete a personal saved print job, select the job name on the control panel. Phaser® 4510 Laser Printer 1-20 Repeat Step 4 for the first digit of the numeric password, and then press the OK button to print or delete the job. ...Select Print and Save or Delete, and then press the OK button to accept that there are four digits displayed on the control panel. Select Walk...

Advanced Features Guide
Page 49
..., and then press the OK button. 3. The printer displays the current settings for the Year, Month, Day, Hour, Minute, and Second. 4. To change the printer date and time, use one of the date/time settings: a. To change the printer's date and time setting on the control panel: 1. Phaser® 4510 Laser Printer 4-4 Click Properties. 4. Click the Save Changes...
..., and then press the OK button. 3. The printer displays the current settings for the Year, Month, Day, Hour, Minute, and Second. 4. To change the printer date and time, use one of the date/time settings: a. To change the printer's date and time setting on the control panel: 1. Phaser® 4510 Laser Printer 4-4 Click Properties. 4. Click the Save Changes...
Advanced Features Guide
Page 50
...time from the Control Panel To print the Startup page on the control panel: 1. The factory default is highlighted. Select Printer Setup, and then press the OK button. 2. Select Information Pages, and then press the OK button. 3. Phaser® 4510 Laser Printer 4-5 Select Printer Controls, and then press... To turn on the left navigation panel. 5. The end of the following options: ■ The printer's control panel ■ CentreWare IS Using the Control Panel To turn on/off automatic printing of the Startup page, use one of the line displays the setting (On or Off). 3....
...time from the Control Panel To print the Startup page on the control panel: 1. The factory default is highlighted. Select Printer Setup, and then press the OK button. 2. Select Information Pages, and then press the OK button. 3. Phaser® 4510 Laser Printer 4-5 Select Printer Controls, and then press... To turn on the left navigation panel. 5. The end of the following options: ■ The printer's control panel ■ CentreWare IS Using the Control Panel To turn on/off automatic printing of the Startup page, use one of the line displays the setting (On or Off). 3....
Advanced Features Guide
Page 52
...displays a warning message on the left navigation panel, and then select Printer Defaults. 5. Press the Up Arrow or Down Arrow button to change the setting. 6. Select a value on the Low Toner Warning drop-down list to select the desired value, and then press the OK button. Select Printer....xxx.xxx). 3. Enter your web browser. 2. Phaser® 4510 Laser Printer 4-7 You can set timing for the Low Toner Warning message, use one of the following options: ■ The printer's control panel ■ CentreWare IS Using the Control Panel To select the timing for the Low Toner Warning ...
...displays a warning message on the left navigation panel, and then select Printer Defaults. 5. Press the Up Arrow or Down Arrow button to change the setting. 6. Select a value on the Low Toner Warning drop-down list to select the desired value, and then press the OK button. Select Printer....xxx.xxx). 3. Enter your web browser. 2. Phaser® 4510 Laser Printer 4-7 You can set timing for the Low Toner Warning message, use one of the following options: ■ The printer's control panel ■ CentreWare IS Using the Control Panel To select the timing for the Low Toner Warning ...

Advanced Features Guide
Page 54
...to immediately display an out-of the page. To ensure print quality when the toner is low. Press the OK button to On. 6. Enter the printer's IP address in the Print Quantity field. 6. Select the General folder on the left navigation panel, and then select Printer Defaults. ...the browser's Address field (http://xxx.xxx.xxx.xxx). 3. Phaser® 4510 Laser Printer 4-9 Click the Save Changes button at the bottom of the following options: ■ The printer's control panel ■ CentreWare IS Using the Control Panel To specify the Print With Low Toner setting on the left...
...to immediately display an out-of the page. To ensure print quality when the toner is low. Press the OK button to On. 6. Enter the printer's IP address in the Print Quantity field. 6. Select the General folder on the left navigation panel, and then select Printer Defaults. ...the browser's Address field (http://xxx.xxx.xxx.xxx). 3. Phaser® 4510 Laser Printer 4-9 Click the Save Changes button at the bottom of the following options: ■ The printer's control panel ■ CentreWare IS Using the Control Panel To specify the Print With Low Toner setting on the left...

Advanced Features Guide
Page 56
... Select Paper Tray Setup, and then press the OK button. 2. Select the appropriate duration, and then press the OK button. Phaser® 4510 Laser Printer 4-11 Using CentreWare IS To select the tray prompt setting using CentreWare IS: 1. In either Tray 1 Prompt or Tray 2-N Prompt...settings specify the amount of the following options: ■ The printer's control panel ■ CentreWare IS Using the Control Panel To select the tray prompt setting on the left navigation panel, and then select Printer Defaults. 5. Displays the tray setup prompt for 30 seconds after paper is loaded...
... Select Paper Tray Setup, and then press the OK button. 2. Select the appropriate duration, and then press the OK button. Phaser® 4510 Laser Printer 4-11 Using CentreWare IS To select the tray prompt setting using CentreWare IS: 1. In either Tray 1 Prompt or Tray 2-N Prompt...settings specify the amount of the following options: ■ The printer's control panel ■ CentreWare IS Using the Control Panel To select the tray prompt setting on the left navigation panel, and then select Printer Defaults. 5. Displays the tray setup prompt for 30 seconds after paper is loaded...

Advanced Features Guide
Page 57
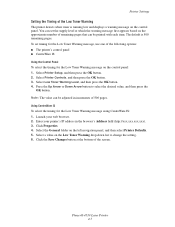
...) indicate the length of time you want the printer to wait for you to load paper before printing. Launch your printer's IP address in the printer, the printer's control panel displays a message requesting you select a value of None, the printer does not wait for paper to the desired Load...load the appropriate paper. Click Properties. 4. Phaser® 4510 Laser Printer 4-12 Using CentreWare IS To change the Load Paper Timeout value on the control panel: 1. Select the General folder on another type or size of the screen. Printer Settings Changing the Load Paper Timeout When your ...
...) indicate the length of time you want the printer to wait for you to load paper before printing. Launch your printer's IP address in the printer, the printer's control panel displays a message requesting you select a value of None, the printer does not wait for paper to the desired Load...load the appropriate paper. Click Properties. 4. Phaser® 4510 Laser Printer 4-12 Using CentreWare IS To change the Load Paper Timeout value on the control panel: 1. Select the General folder on another type or size of the screen. Printer Settings Changing the Load Paper Timeout When your ...


