
Troubleshooting Guide
Page 9
...Light Color Balance page until the desired adjustment is printing lighter than normal, the circle will appear redder. 40 Phaser 7300 Color Printer Light Color ...image. Select Lighten/Darken Colors from the Calibrate Colors Menu. Lighten/Darken Colors The Lighten/Darken Colors procedure uniformly increases or decreases each primary color (cyan, magenta and yellow and black) to the Main Menu. Use the printed Color...Color settings may need adjustment upon initial printer set-up or when toners and imaging units are two procedures: Lighten/Darken Colors and Balance Colors. The Color...
...Light Color Balance page until the desired adjustment is printing lighter than normal, the circle will appear redder. 40 Phaser 7300 Color Printer Light Color ...image. Select Lighten/Darken Colors from the Calibrate Colors Menu. Lighten/Darken Colors The Lighten/Darken Colors procedure uniformly increases or decreases each primary color (cyan, magenta and yellow and black) to the Main Menu. Use the printed Color...Color settings may need adjustment upon initial printer set-up or when toners and imaging units are two procedures: Lighten/Darken Colors and Balance Colors. The Color...

Troubleshooting Guide
Page 15
...TekColor Correction set to visually inspect the shiny green surface underneath. PHASER 7300 COLOR PRINTER Diagnosing Print Quality Review the five test pages printed with a each new toner cartridge. Light Lines in One Color Thin, light or white lines appear in an upright position (... that align with black. 2. Set the Imaging Unit on a hard flat surface only as scratching or damage can occur causing more than 10 minutes without covering the Imaging Unit as a cover. Follow the procedure Lighten/Darken Colors. Not all four colors. b. From the printer's front panel Support...
...TekColor Correction set to visually inspect the shiny green surface underneath. PHASER 7300 COLOR PRINTER Diagnosing Print Quality Review the five test pages printed with a each new toner cartridge. Light Lines in One Color Thin, light or white lines appear in an upright position (... that align with black. 2. Set the Imaging Unit on a hard flat surface only as scratching or damage can occur causing more than 10 minutes without covering the Imaging Unit as a cover. Follow the procedure Lighten/Darken Colors. Not all four colors. b. From the printer's front panel Support...

Troubleshooting Guide
Page 16
...Lines/Smudges or Streaks All Colors Black and/or colored areas appear on the back side of the smudges. From the printer's front panel Support Menu select Improve Print Quality?, then select Remove Print Smears and press OK. From the printer's front panel Printer Setup Menu select Tray Setup ...where it should be. 1. Page 2 of any color or voids recur uniformly in all colors and/or in non-printed areas. 3. Five cleaning pages will run through the printer. 6. If the problem continues, replace the Imaging Unit in the computer's printer driver. 4. If the problem continues, replace the...
...Lines/Smudges or Streaks All Colors Black and/or colored areas appear on the back side of the smudges. From the printer's front panel Support Menu select Improve Print Quality?, then select Remove Print Smears and press OK. From the printer's front panel Printer Setup Menu select Tray Setup ...where it should be. 1. Page 2 of any color or voids recur uniformly in all colors and/or in non-printed areas. 3. Five cleaning pages will run through the printer. 6. If the problem continues, replace the Imaging Unit in the computer's printer driver. 4. If the problem continues, replace the...

Troubleshooting Guide
Page 27
... direct sunlight. Copyright © 2002 Xerox Corporation. Caution Do not use detergents or solvents when cleaning the printer. Caution Keep the printer and supplies out of the LED bars and replacing the following Customer-Replaceable Consumables (CRCs): I I I I Toner cartridges (black, cyan, magenta and yellow) Imaging units (black, cyan, magenta and yellow) Transfer unit Fuser Clean the LED bars...
... direct sunlight. Copyright © 2002 Xerox Corporation. Caution Do not use detergents or solvents when cleaning the printer. Caution Keep the printer and supplies out of the LED bars and replacing the following Customer-Replaceable Consumables (CRCs): I I I I Toner cartridges (black, cyan, magenta and yellow) Imaging units (black, cyan, magenta and yellow) Transfer unit Fuser Clean the LED bars...

Service Manual
Page 37
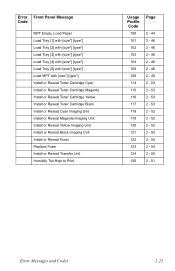
... Failure Duplex Interface Failure Tray 3 Interface Failure Tray 2 Interface Failure Tray 4 Interface Failure Tray 5 Interface Failure Yellow LED Failure Magenta LED Failure Cyan LED Failure Black LED Failure Yellow Imaging Unit Failure Magenta Imaging Unit Failure Cyan Imaging Unit Failure Black Imaging Unit Failure Flash Hardware Failure Flash Software Failure Fuser Fan Failure Fuser 110v/220v Mismatch Failure Unsupported Duplex...
... Failure Duplex Interface Failure Tray 3 Interface Failure Tray 2 Interface Failure Tray 4 Interface Failure Tray 5 Interface Failure Yellow LED Failure Magenta LED Failure Cyan LED Failure Black LED Failure Yellow Imaging Unit Failure Magenta Imaging Unit Failure Cyan Imaging Unit Failure Black Imaging Unit Failure Flash Hardware Failure Flash Software Failure Fuser Fan Failure Fuser 110v/220v Mismatch Failure Unsupported Duplex...

Service Manual
Page 38
... 59 Replace Cyan Toner Cartridge 65 Replace Magenta Toner Cartridge 66 Replace Yellow Toner Cartridge 67 Replace Black Toner Cartridge 68 Replace Cyan Imaging Unit 69 Replace Magenta Imaging Unit 70 Replace Yellow Imaging Unit 71 Replace Black Imaging Unit 72 Replace Transfer Unit 73 Close Right Door A 74 Close Right Door B 75 Close Right Door C 76 Close Right ...47 2 - 47 2 - 53 2 - 53 2 - 53 2 - 53 2 - 52 2 - 52 2 - 52 2 - 52 2 - 55 2 - 49 2 - 49 2 - 49 2 - 49 2 - 49 2 - 49 2 - 48 2 - 50 2 - 44 2 - 44 2 - 44 2 - 44 2 - 44 2-22 Phaser 7300 Color Printer Service Manual
... 59 Replace Cyan Toner Cartridge 65 Replace Magenta Toner Cartridge 66 Replace Yellow Toner Cartridge 67 Replace Black Toner Cartridge 68 Replace Cyan Imaging Unit 69 Replace Magenta Imaging Unit 70 Replace Yellow Imaging Unit 71 Replace Black Imaging Unit 72 Replace Transfer Unit 73 Close Right Door A 74 Close Right Door B 75 Close Right Door C 76 Close Right ...47 2 - 47 2 - 53 2 - 53 2 - 53 2 - 53 2 - 52 2 - 52 2 - 52 2 - 52 2 - 55 2 - 49 2 - 49 2 - 49 2 - 49 2 - 49 2 - 49 2 - 48 2 - 50 2 - 44 2 - 44 2 - 44 2 - 44 2 - 44 2-22 Phaser 7300 Color Printer Service Manual
Service Manual
Page 39
... Cartridge Magenta Install or Reseat Toner Cartridge Yellow Install or Reseat Toner Cartridge Black Install or Reseat Cyan Imaging Unit Install or Reseat Magenta Imaging Unit Install or Reseat Yellow Imaging Unit Install or Reseat Black Imaging Unit Install or Reseat Fuser Replace Fuser Install or Reseat Transfer Unit Humidity Too High to Print Usage Profile Code 100 101 102 103...
... Cartridge Magenta Install or Reseat Toner Cartridge Yellow Install or Reseat Toner Cartridge Black Install or Reseat Cyan Imaging Unit Install or Reseat Magenta Imaging Unit Install or Reseat Yellow Imaging Unit Install or Reseat Black Imaging Unit Install or Reseat Fuser Replace Fuser Install or Reseat Transfer Unit Humidity Too High to Print Usage Profile Code 100 101 102 103...

Service Manual
Page 45
...to energize/de-energize the motors and fans one at a time. Motor is On/Off If MPT media present, will jam Imaging Unit Motors (CMYK) [Black] [Yellow] [Magenta] [Cyan] IU Motor is On/Off Motor A Registration Motor B Remove MPT Media! Registration Motor is ...On/Off Remove the appropriate Imaging Unit before proceeding with the test. After removing the IU, defeat the interlock switch, then resume the test....
...to energize/de-energize the motors and fans one at a time. Motor is On/Off If MPT media present, will jam Imaging Unit Motors (CMYK) [Black] [Yellow] [Magenta] [Cyan] IU Motor is On/Off Motor A Registration Motor B Remove MPT Media! Registration Motor is ...On/Off Remove the appropriate Imaging Unit before proceeding with the test. After removing the IU, defeat the interlock switch, then resume the test....
Service Manual
Page 47
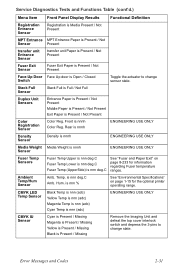
... and Codes 2-31 is nnn % See "Environmental Specifications" on page 8-233 for the optimal printer operating range. Front is Present / Not Present Color Registration Sensor Color Reg. is nnn deg.C Amb. Black Temp is nnn (adc) Yellow Temp is nnn (adc) Magenta Temp is nnn (adc) Cyan... Temp is nnn (adc) ENGINEERING USE ONLY Cyan is Present / Missing Magenta is Present / Missing Yellow is Present / Missing Black is Present / Missing Remove the Imaging Unit...
... and Codes 2-31 is nnn % See "Environmental Specifications" on page 8-233 for the optimal printer operating range. Front is Present / Not Present Color Registration Sensor Color Reg. is nnn deg.C Amb. Black Temp is nnn (adc) Yellow Temp is nnn (adc) Magenta Temp is nnn (adc) Cyan... Temp is nnn (adc) ENGINEERING USE ONLY Cyan is Present / Missing Magenta is Present / Missing Yellow is Present / Missing Black is Present / Missing Remove the Imaging Unit...

Service Manual
Page 78
.... Cyan = F5 Magenta = F2 Yellow = F3 Black = F4 2-62 Phaser 7300 Color Printer Service Manual Does the sensor function correctly? 4 Verify continuity between the IU Sensor Replace the Go to step [4]. Assembly. 3 Use service diagnostics to test the CMYK Go to step [6} Go to step [5]. [Yellow] [Magenta] [Cyan] [Black] Imaging Unit Failure U26: Yellow U27: Magenta U28...
.... Cyan = F5 Magenta = F2 Yellow = F3 Black = F4 2-62 Phaser 7300 Color Printer Service Manual Does the sensor function correctly? 4 Verify continuity between the IU Sensor Replace the Go to step [4]. Assembly. 3 Use service diagnostics to test the CMYK Go to step [6} Go to step [5]. [Yellow] [Magenta] [Cyan] [Black] Imaging Unit Failure U26: Yellow U27: Magenta U28...
Service Manual
Page 81
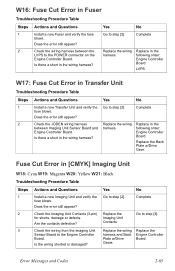
... harness. Replace in the following order: Engine Controller Board LVPS W17: Fuse Cut Error in [CMYK] Imaging Unit W18: Cyan W19: Magenta W20: Yellow W21: Black Troubleshooting Procedure Table Steps Actions and Questions Yes No 1 Install a new Imaging Unit and verify the Go to step [3]. for shorts, damage or defects. Does the error still appear...
... harness. Replace in the following order: Engine Controller Board LVPS W17: Fuse Cut Error in [CMYK] Imaging Unit W18: Cyan W19: Magenta W20: Yellow W21: Black Troubleshooting Procedure Table Steps Actions and Questions Yes No 1 Install a new Imaging Unit and verify the Go to step [3]. for shorts, damage or defects. Does the error still appear...
Service Manual
Page 99
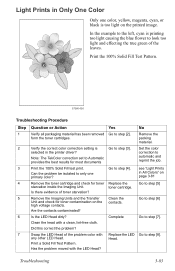
... of the leaves. Remove the Imaging Units and the Transfer Unit and check for toner contamination on the printed image. Is the LED Head dirty? Swap the LED Head of the problem color with the LED Head? Print ...with a clean, lint-free cloth. Did this correct the problem? see "Light Prints in the printer driver? Print the 100% Solid Fill Test Pattern. Clean the contacts. In the example to ...left, cyan is printing too light causing the blue flower to only one color, yellow, magenta, cyan, or black is selected in All Colors" on page 3-81 Go to step [5] Go to step [6] Go ...
... of the leaves. Remove the Imaging Units and the Transfer Unit and check for toner contamination on the printed image. Is the LED Head dirty? Swap the LED Head of the problem color with the LED Head? Print ...with a clean, lint-free cloth. Did this correct the problem? see "Light Prints in the printer driver? Print the 100% Solid Fill Test Pattern. Clean the contacts. In the example to ...left, cyan is printing too light causing the blue flower to only one color, yellow, magenta, cyan, or black is selected in All Colors" on page 3-81 Go to step [5] Go to step [6] Go ...

Service Manual
Page 103
... using "Black" only color. Most mottled prints occur in the printer driver and try a different print quality mode. Go to step [3] 3 Set the Color Correction to verify the printers operating within it's environmental specifications. Did this correct the problem? 4 Remove the Imaging Units and the Transfer Clean the Unit and check for this printer and that the printer front panel...
... using "Black" only color. Most mottled prints occur in the printer driver and try a different print quality mode. Go to step [3] 3 Set the Color Correction to verify the printers operating within it's environmental specifications. Did this correct the problem? 4 Remove the Imaging Units and the Transfer Clean the Unit and check for this printer and that the printer front panel...

Service Manual
Page 129
...lines that would indicate a dirty or damaged Imaging Unit. 5. Cold or hot offset fusing could indicate the incorrect paper weight has been selected. No separation or misconvergence where each primary color. Each bar is separated by a thin black line. 3. Look for : ■... Repeating defects or banding ■ Missing Color(s) ■ Streaks ■ Voids 1. Look for thin white lines that would indicate a dirty LED lens or a scratched Imaging Unit. 4. Consistent fills...
...lines that would indicate a dirty or damaged Imaging Unit. 5. Cold or hot offset fusing could indicate the incorrect paper weight has been selected. No separation or misconvergence where each primary color. Each bar is separated by a thin black line. 3. Look for : ■... Repeating defects or banding ■ Missing Color(s) ■ Streaks ■ Voids 1. Look for thin white lines that would indicate a dirty LED lens or a scratched Imaging Unit. 4. Consistent fills...

Service Manual
Page 248
Arm Gears Transfer Unit S7300-186 8-232 Phaser 7300 Color Printer Service Manual Plate Pin Board Spring Imaging Drum Contact S7300-140 Transfer Unit Arm and Gear Up/Down Movement of the Imaging Units Note: The Black Imaging Unit does not move.
Arm Gears Transfer Unit S7300-186 8-232 Phaser 7300 Color Printer Service Manual Plate Pin Board Spring Imaging Drum Contact S7300-140 Transfer Unit Arm and Gear Up/Down Movement of the Imaging Units Note: The Black Imaging Unit does not move.
Service Manual
Page 263
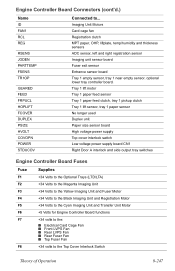
... Volts to the Optional Trays (LTD/LTA) F2 +34 Volts to the Magenta Imaging Unit F3 +34 Volts to the Yellow Imaging Unit and Fuser Motor F4 +34 Volts to the Black Imaging Unit and Registration Motor F5 +34 Volts to the Cyan Imaging Unit and Transfer Unit Motor F6 +5 Volts for Engine Controller Board functions F7 +34 volts to...
... Volts to the Optional Trays (LTD/LTA) F2 +34 Volts to the Magenta Imaging Unit F3 +34 Volts to the Yellow Imaging Unit and Fuser Motor F4 +34 Volts to the Black Imaging Unit and Registration Motor F5 +34 Volts to the Cyan Imaging Unit and Transfer Unit Motor F6 +5 Volts for Engine Controller Board functions F7 +34 volts to...
Service Manual
Page 266
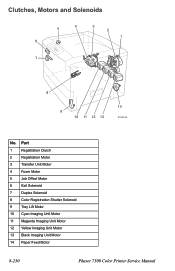
Part 1 Registration Clutch 2 Registration Motor 3 Transfer Unit Motor 4 Fuser Motor 5 Job Offset Motor 6 Exit Solenoid 7 Duplex Solenoid 8 Color Registration Shutter Solenoid 9 Tray Lift Motor 10 Cyan Imaging Unit Motor 11 Magenta Imaging Unit Motor 12 Yellow Imaging Unit Motor 13 Black Imaging Unit Motor 14 Paper Feed Motor 8-250 Phaser 7300 Color Printer Service Manual Clutches, Motors and Solenoids 4 3 5 2 1 6 7 8 9 10 11 12 13 14 S7300-08 No.
Part 1 Registration Clutch 2 Registration Motor 3 Transfer Unit Motor 4 Fuser Motor 5 Job Offset Motor 6 Exit Solenoid 7 Duplex Solenoid 8 Color Registration Shutter Solenoid 9 Tray Lift Motor 10 Cyan Imaging Unit Motor 11 Magenta Imaging Unit Motor 12 Yellow Imaging Unit Motor 13 Black Imaging Unit Motor 14 Paper Feed Motor 8-250 Phaser 7300 Color Printer Service Manual Clutches, Motors and Solenoids 4 3 5 2 1 6 7 8 9 10 11 12 13 14 S7300-08 No.

Study Guide
Page 25
... yellow, black) ■ Imaging Units (cyan, magenta, yellow, black) ■ Fuser ■ Transfer Unit Fuser Transfer Unit Toner Cartridges (4) Imaging Units (4) PHASER 7300 CARE WORKSHEET 0 page 21 There are used during normal operation. PHASER 7300 CARE WORKSHEET Prerequisites ❑ Care section Equipment Checklist ❑ Phaser 7300 Laser Printer ❑... step of all manuals and instruction sheets are located on the Phaser 7300 Color Laser Printer Interactive Documentation CD-ROM. Replace Consumables During this worksheet for detailed instructions to access the manuals and...
... yellow, black) ■ Imaging Units (cyan, magenta, yellow, black) ■ Fuser ■ Transfer Unit Fuser Transfer Unit Toner Cartridges (4) Imaging Units (4) PHASER 7300 CARE WORKSHEET 0 page 21 There are used during normal operation. PHASER 7300 CARE WORKSHEET Prerequisites ❑ Care section Equipment Checklist ❑ Phaser 7300 Laser Printer ❑... step of all manuals and instruction sheets are located on the Phaser 7300 Color Laser Printer Interactive Documentation CD-ROM. Replace Consumables During this worksheet for detailed instructions to access the manuals and...
Study Guide
Page 28
... of troubleshooting procedures for Information on a hard, flat surface to the printer. 1. The Error Messages and Codes section of the Phaser 7300 Color Printer Service Manual contains a comprehensive list of the colors used for more than most color laser printers. To avoid damage to the Imaging Units that may continue, but will remove and replace Imaging Units. Remove and replace the magenta...
... of troubleshooting procedures for Information on a hard, flat surface to the printer. 1. The Error Messages and Codes section of the Phaser 7300 Color Printer Service Manual contains a comprehensive list of the colors used for more than most color laser printers. To avoid damage to the Imaging Units that may continue, but will remove and replace Imaging Units. Remove and replace the magenta...
Study Guide
Page 31
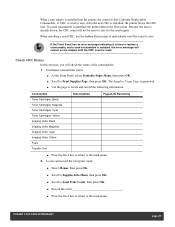
... Consumable Toner Cartridges: Black Toner Cartridges: Magenta Toner Cartridges: Cyan Toner Cartridges: Yellow Imaging Units: Black Imaging Units: Magenta Imaging Units: Cyan Imaging Units: Yellow Fuser Transfer Unit Date Installed Pages/Life Remaining ■ Press the Back key to return to the main menu. 2. When a new supply is installed into the printer, the count for... ■ Record the value ■ Press the Back key to return to Print Supplies Page, then press OK. PHASER 7300 CARE WORKSHEET 0 page 27 When installing a used supply. The Supplies Usage Page is installed, the...
... Consumable Toner Cartridges: Black Toner Cartridges: Magenta Toner Cartridges: Cyan Toner Cartridges: Yellow Imaging Units: Black Imaging Units: Magenta Imaging Units: Cyan Imaging Units: Yellow Fuser Transfer Unit Date Installed Pages/Life Remaining ■ Press the Back key to return to the main menu. 2. When a new supply is installed into the printer, the count for... ■ Record the value ■ Press the Back key to return to Print Supplies Page, then press OK. PHASER 7300 CARE WORKSHEET 0 page 27 When installing a used supply. The Supplies Usage Page is installed, the...


