

User Guide
Page 2
... Training and Publications Department. Written and produced by Oki Data. Epson is a registered trademark of Epson America, Inc. ML 420/421 User's Guide P/N 59348301, Revision 1.2 February, 2006 Every effort has been made to ensure that changes in software and equipment made by other companies ... trademarks or trademarks of errors beyond its control. Oki Data assumes no responsibility for the results of Microsoft Corporation in this guide will not affect the applicability of Oki Electric Industry Company, Ltd. Oki Data also cannot guarantee that the information in the...
... Training and Publications Department. Written and produced by Oki Data. Epson is a registered trademark of Epson America, Inc. ML 420/421 User's Guide P/N 59348301, Revision 1.2 February, 2006 Every effort has been made to ensure that changes in software and equipment made by other companies ... trademarks or trademarks of errors beyond its control. Oki Data assumes no responsibility for the results of Microsoft Corporation in this guide will not affect the applicability of Oki Electric Industry Company, Ltd. Oki Data also cannot guarantee that the information in the...

User Guide
Page 4
... you 're following the operating instructions. 4 Microline 420/421 User's Guide Do not put the printer in any kind of enclosure, make any kind into it. • Do not poke anything happens that indicates that your printer from the routine maintenance described in this document, don't try to water. - Then, follow... Don't make sure it has had a chance to cool off. • Do not use liquid or aerosol cleaners. • To protect your printer is not working properly or has been damaged, unplug it has been printing for a length of the things to shocks or other than those outlined...
... you 're following the operating instructions. 4 Microline 420/421 User's Guide Do not put the printer in any kind of enclosure, make any kind into it. • Do not poke anything happens that indicates that your printer from the routine maintenance described in this document, don't try to water. - Then, follow... Don't make sure it has had a chance to cool off. • Do not use liquid or aerosol cleaners. • To protect your printer is not working properly or has been damaged, unplug it has been printing for a length of the things to shocks or other than those outlined...

User Guide
Page 6
... 60 Problems / Solutions 61 Appendix A: Parts & Accessories 66 Purchasing Parts & Accessories 66 Replacement Parts 67 Accessories 68 Appendix B: Printer Control Codes 69 IBM Proprinter III Commands 69 Epson FX Commands 72 Oki MICROLINE Standard Commands 75 Appendix C: Specifications 78 Appendix D: ... USB: Specification 1.1 Compliant 89 Loading Paper 89 Testing the Printer 90 Font Sample Test 90 Rolling ASCII Test 91 Hexadecimal Dump Mode 92 Emulations 92 Printer Drivers 92 Loading the OKI Driver 93 Using a Compatible Driver 93 Index 94 6 Microline 420/421 User's Guide
... 60 Problems / Solutions 61 Appendix A: Parts & Accessories 66 Purchasing Parts & Accessories 66 Replacement Parts 67 Accessories 68 Appendix B: Printer Control Codes 69 IBM Proprinter III Commands 69 Epson FX Commands 72 Oki MICROLINE Standard Commands 75 Appendix C: Specifications 78 Appendix D: ... USB: Specification 1.1 Compliant 89 Loading Paper 89 Testing the Printer 90 Font Sample Test 90 Rolling ASCII Test 91 Hexadecimal Dump Mode 92 Emulations 92 Printer Drivers 92 Loading the OKI Driver 93 Using a Compatible Driver 93 Index 94 6 Microline 420/421 User's Guide

User Guide
Page 12
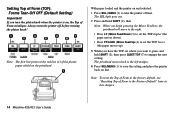
... Forms Tear-Off Note: Your software may need to adjust the TOF to meet your printer interact. The Top of Form and Forms Tear-Off settings of the page. Note: The factory default setting for the printer. The amount of adjustment is adjustable in increments of 1/144 of Form (where the printing... knob! How you turn the platen knob when the printer is On (set the Top of Form misaligns. Top of Form (TOF) Important! It is limited to 500 ms, 1 sec, or 2 sec) or OFF (the factory default setting). 12 Microline 420/421 User's Guide If you set to avoid paper jams. The first...
... Forms Tear-Off Note: Your software may need to adjust the TOF to meet your printer interact. The Top of Form and Forms Tear-Off settings of the page. Note: The factory default setting for the printer. The amount of adjustment is adjustable in increments of 1/144 of Form (where the printing... knob! How you turn the platen knob when the printer is On (set the Top of Form misaligns. Top of Form (TOF) Important! It is limited to 500 ms, 1 sec, or 2 sec) or OFF (the factory default setting). 12 Microline 420/421 User's Guide If you set to avoid paper jams. The first...
User Guide
Page 14
...Top of Form (TOF): Forms Tear-Off OFF (Default Setting) Important! Note: To reset the Top of Form to take the printer off before turning the platen knob! Note: The first line prints at the red line (1) of Form to set the TOF lower ...(the paper moves up). 3 When you have the TOF set where you turn the printer off line. The SEL light goes out. 2 Press and hold SHIFT (2), then Note: When you begin pressing the Micro Feed key...8226; Press FF/LOAD | Micro Feed Up (4) to the Factory Default" later in this chapter. 14 Microline 420/421 User's Guide
...Top of Form (TOF): Forms Tear-Off OFF (Default Setting) Important! Note: To reset the Top of Form to take the printer off before turning the platen knob! Note: The first line prints at the red line (1) of Form to set the TOF lower ...(the paper moves up). 3 When you have the TOF set where you turn the printer off line. The SEL light goes out. 2 Press and hold SHIFT (2), then Note: When you begin pressing the Micro Feed key...8226; Press FF/LOAD | Micro Feed Up (4) to the Factory Default" later in this chapter. 14 Microline 420/421 User's Guide

User Guide
Page 16
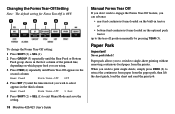
...3 Press and hold PARK + QUIET/TOF while turning on , the Top of Form (where the printing should begin) is turned on the printer. 4 Reload paper. 16 Microline 420/421 User's Guide To reset the Top of Form to the Factory Default The factory default setting for one page only: 1 Press SEL to deselect... the printer. 2 Press LF to change the Top of the page. Always turn the platen knob when the printer is 1" down from the ...
...3 Press and hold PARK + QUIET/TOF while turning on , the Top of Form (where the printing should begin) is turned on the printer. 4 Reload paper. 16 Microline 420/421 User's Guide To reset the Top of Form to the Factory Default The factory default setting for one page only: 1 Press SEL to deselect... the printer. 2 Press LF to change the Top of the page. Always turn the platen knob when the printer is 1" down from the ...
User Guide
Page 18
... the third column: Rear Feed Form Tear-Off 1 Sec 5 Press SHIFT (2) + SEL (1) to exit Menu Mode and save the setting. 18 Microline 420/421 User's Guide Manual Forms Tear Off If you don't wish to engage the Forms Tear-Off feature, you can advance • rear-feed continuous forms loaded on...loaded on the optional push tractor up to retract the continuous form paper from the printer. When you to switch to single-sheet printing without removing continuous feed paper from the paper path, then lift the sheet guide, load the sheet and send the print job. Paper park allows you wish ...
... the third column: Rear Feed Form Tear-Off 1 Sec 5 Press SHIFT (2) + SEL (1) to exit Menu Mode and save the setting. 18 Microline 420/421 User's Guide Manual Forms Tear Off If you don't wish to engage the Forms Tear-Off feature, you can advance • rear-feed continuous forms loaded on...loaded on the optional push tractor up to retract the continuous form paper from the printer. When you to switch to single-sheet printing without removing continuous feed paper from the paper path, then lift the sheet guide, load the sheet and send the print job. Paper park allows you wish ...
User Guide
Page 20
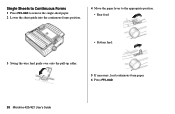
Single Sheets to Continuous Forms 1 Press FF/LOAD to remove the single-sheet paper. 2 Lower the sheet guide into the continuous-forms position. 4 Move the paper lever to the appropriate position. • Rear feed: • Bottom feed: 3 Swing the wire feed guide over onto the pull-up roller. 5 If necessary, load continuous-form paper. 6 Press FF/LOAD. 20 Microline 420/421 User's Guide
Single Sheets to Continuous Forms 1 Press FF/LOAD to remove the single-sheet paper. 2 Lower the sheet guide into the continuous-forms position. 4 Move the paper lever to the appropriate position. • Rear feed: • Bottom feed: 3 Swing the wire feed guide over onto the pull-up roller. 5 If necessary, load continuous-form paper. 6 Press FF/LOAD. 20 Microline 420/421 User's Guide

User Guide
Page 22
... (570 cps) • Gothic typeface only NLQ: Near Letter Quality • Highest quality, slowest speed (95 cps) • Courier or Gothic 22 Microline 420/421 User's Guide Front panel settings for print quality and character pitch are normally overridden by software commands.
... (570 cps) • Gothic typeface only NLQ: Near Letter Quality • Highest quality, slowest speed (95 cps) • Courier or Gothic 22 Microline 420/421 User's Guide Front panel settings for print quality and character pitch are normally overridden by software commands.
User Guide
Page 24
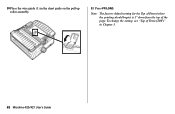
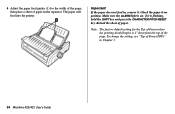
... until the emulation you reset (reinitialize) the printer. Pressing SHIFT + RESET reinitializes the printer, but does not affect any menu settings and does not reset the printer to save your setting and exit the Menu Mode. 24 Microline 420/421 User's Guide For information on resetting the printer to the factory defaults, see "Resetting the Menu...
... until the emulation you reset (reinitialize) the printer. Pressing SHIFT + RESET reinitializes the printer, but does not affect any menu settings and does not reset the printer to save your setting and exit the Menu Mode. 24 Microline 420/421 User's Guide For information on resetting the printer to the factory defaults, see "Resetting the Menu...
User Guide
Page 44
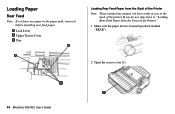
If you have any paper in the paper path, remove it before installing rear feed paper. Lock Lever Upper Tractor Cover Pins Loading Rear Feed Paper from the Back of the Printer Note: These instructions assume you do not, skip down to the back of the Printer." 1 Make sure the paper lever is forward (position marked "REAR"). 2 Open the access cover (1). 44 Microline 420/421 User's Guide Loading Paper Rear Feed Note: If you have ready access to "Loading Rear Feed Paper from the Front of the printer.
If you have any paper in the paper path, remove it before installing rear feed paper. Lock Lever Upper Tractor Cover Pins Loading Rear Feed Paper from the Back of the Printer Note: These instructions assume you do not, skip down to the back of the Printer." 1 Make sure the paper lever is forward (position marked "REAR"). 2 Open the access cover (1). 44 Microline 420/421 User's Guide Loading Paper Rear Feed Note: If you have ready access to "Loading Rear Feed Paper from the Front of the printer.
User Guide
Page 46
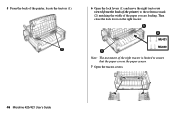
Then close the lock lever on the right tractor: ML421 ML420 Note: The movement of the paper you are loading. 5 From the back of the printer, locate the tractors (1). 6 Open the lock levers (1) and move the right tractor (as viewed from the back of the printer) to the reference mark (2) matching the width of the right tractor is limited to ensure that the paper covers the paper sensor. 7 Open the tractor covers. 46 Microline 420/421 User's Guide
Then close the lock lever on the right tractor: ML421 ML420 Note: The movement of the paper you are loading. 5 From the back of the printer, locate the tractors (1). 6 Open the lock levers (1) and move the right tractor (as viewed from the back of the printer) to the reference mark (2) matching the width of the right tractor is limited to ensure that the paper covers the paper sensor. 7 Open the tractor covers. 46 Microline 420/421 User's Guide
User Guide
Page 48
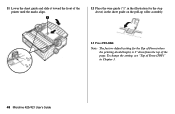
11 Lower the sheet guide and slide it toward the front of the page. Note: The factory default setting for the Top of Form (where the printing should begin) is 1" down from the top of the printer until the marks align. 12 Place the wire guide ("1" in the illustration for the step above) in Chapter 3. 48 Microline 420/421 User's Guide To change the setting, see "Top of Form (TOF)" in the sheet guide on the pull-up roller assembly. 13 Press FF/LOAD.
11 Lower the sheet guide and slide it toward the front of the page. Note: The factory default setting for the Top of Form (where the printing should begin) is 1" down from the top of the printer until the marks align. 12 Place the wire guide ("1" in the illustration for the step above) in Chapter 3. 48 Microline 420/421 User's Guide To change the setting, see "Top of Form (TOF)" in the sheet guide on the pull-up roller assembly. 13 Press FF/LOAD.
User Guide
Page 50
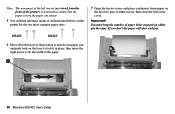
Note: The movement of the left tractor (as viewed from the front of the printer) is restricted to fit the width of either pin the same. You must keep the number of paper holes engaged on either tractor, then close ... your paper size and push back on the first two pins of the paper. 50 Microline 420/421 User's Guide Important! If you don't the paper will find reference marks (1 in illustration below) on the printer for the two most common paper sizes: ML420: ML421: 7 Open the tractor covers and place continuous forms...
Note: The movement of the left tractor (as viewed from the front of the printer) is restricted to fit the width of either pin the same. You must keep the number of paper holes engaged on either tractor, then close ... your paper size and push back on the first two pins of the paper. 50 Microline 420/421 User's Guide Important! If you don't the paper will find reference marks (1 in illustration below) on the printer for the two most common paper sizes: ML420: ML421: 7 Open the tractor covers and place continuous forms...
User Guide
Page 52
10 Place the wire guide (1) in Chapter 3. 52 Microline 420/421 User's Guide Note: The factory default setting for the Top of Form (where the printing should begin) is 1" down from the top of Form (TOF)" in the sheet guide on the pull-up roller assembly. 11 Press FF/LOAD. To change the setting, see "Top of the page.
10 Place the wire guide (1) in Chapter 3. 52 Microline 420/421 User's Guide Note: The factory default setting for the Top of Form (where the printing should begin) is 1" down from the top of Form (TOF)" in the sheet guide on the pull-up roller assembly. 11 Press FF/LOAD. To change the setting, see "Top of the page.
User Guide
Page 54
... a sheet of paper in Chapter 3. 54 Microline 420/421 User's Guide Reload the sheet of paper. To change the setting, see "Top of Form (TOF)" in the separator. Check the paper lever position. The paper will feed into the printer. 4 Adjust the paper feed guides (1) for the Top of Form (where the printing should...
... a sheet of paper in Chapter 3. 54 Microline 420/421 User's Guide Reload the sheet of paper. To change the setting, see "Top of Form (TOF)" in the separator. Check the paper lever position. The paper will feed into the printer. 4 Adjust the paper feed guides (1) for the Top of Form (where the printing should...
User Guide
Page 56
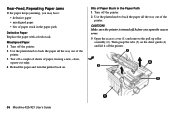
... you may have: • defective paper • misaligned paper • bits of paper stuck in the Paper Path 1 Turn off the printer. 56 Microline 420/421 User's Guide Bits of the printer. Rear-Feed, Repeating Paper Jams If the paper keeps jamming, you open the access cover. 3 Open the access cover (1) and remove the...
... you may have: • defective paper • misaligned paper • bits of paper stuck in the Paper Path 1 Turn off the printer. 56 Microline 420/421 User's Guide Bits of the printer. Rear-Feed, Repeating Paper Jams If the paper keeps jamming, you open the access cover. 3 Open the access cover (1) and remove the...
User Guide
Page 58
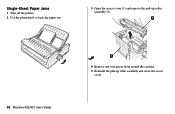
Single-Sheet Paper Jams 1 Turn off the printer. 2 Use the platen knob to back the paper out. 3 Open the access cover (1) and remove the pull-up roller assembly (2). 58 Microline 420/421 User's Guide 4 Remove any torn pieces from around the carriage. 5 Reinstall the pull-up roller assembly and close the access cover.
Single-Sheet Paper Jams 1 Turn off the printer. 2 Use the platen knob to back the paper out. 3 Open the access cover (1) and remove the pull-up roller assembly (2). 58 Microline 420/421 User's Guide 4 Remove any torn pieces from around the carriage. 5 Reinstall the pull-up roller assembly and close the access cover.
User Guide
Page 62
... fonts, etc., when I try to be sure that you have selected. 2 If you entered them correctly. 62 Microline 420/421 User's Guide Solutions 1 Check to be sure that the printer driver you have selected in your software, check to be sure that the interface cable is securely connected to both the...board installed, check to print a document. If not, press the SEL key. 2 Check that it is firmly seated in your software matches the printer emulation. • Press SHIFT and SEL keys, then press GROUP key. • This will print a line showing the emulation you have embedded any...
... fonts, etc., when I try to be sure that you have selected. 2 If you entered them correctly. 62 Microline 420/421 User's Guide Solutions 1 Check to be sure that the printer driver you have selected in your software, check to be sure that the interface cable is securely connected to both the...board installed, check to print a document. If not, press the SEL key. 2 Check that it is firmly seated in your software matches the printer emulation. • Press SHIFT and SEL keys, then press GROUP key. • This will print a line showing the emulation you have embedded any...
User Guide
Page 64
Try moving the headgap lever to the proper setting. See "Clearing Paper Jams," in my printouts. Solution Try turning the printer off and then back on and the Character Pitch 10 light is flashing. Problem There are trying to use. Problem The ALARM light is set ... flashing. Solution The head gap may be set at the wrong position for the paper you are dots missing in Chapter 4. 64 Microline 420/421 User's Guide call for service. Problem The ALARM light is flashing. If the light still blinks, call for service. Press the SEL key and correct the paper...
Try moving the headgap lever to the proper setting. See "Clearing Paper Jams," in my printouts. Solution Try turning the printer off and then back on and the Character Pitch 10 light is flashing. Problem There are trying to use. Problem The ALARM light is set ... flashing. Solution The head gap may be set at the wrong position for the paper you are dots missing in Chapter 4. 64 Microline 420/421 User's Guide call for service. Problem The ALARM light is flashing. If the light still blinks, call for service. Press the SEL key and correct the paper...
