

User Guide
Page 3
... power source matches the rating listed on the back of the amperes required by all electrical equipment, there are that the power line your printer on a firm, solid surface. If you aren't sure, check with your dealer or with a grounded outlet. Contact an electrician to overheat. •... you should not exceed 15 amperes. Do not place it might fall and be installed near a power outlet which will be blocked, causing the printer to have an older, non-grounded outlet. If the cord becomes damaged or frayed, replace it immediately. • If you're using an ...
... power source matches the rating listed on the back of the amperes required by all electrical equipment, there are that the power line your printer on a firm, solid surface. If you aren't sure, check with your dealer or with a grounded outlet. Contact an electrician to overheat. •... you should not exceed 15 amperes. Do not place it might fall and be installed near a power outlet which will be blocked, causing the printer to have an older, non-grounded outlet. If the cord becomes damaged or frayed, replace it immediately. • If you're using an ...

User Guide
Page 4
... or other than those outlined in "Service and Support" for : - You could get quite hot when it has been printing for a length of the printer. The power cord or plug is not working properly or has been damaged, unplug it has had a chance to water. - Opening the cover may expose... you to service the printer yourself. Liquid has been spilled into it . Do not use liquid or aerosol cleaners. • To protect your printer from the routine maintenance described in any kind of enclosure, make sure it is well ventilated...
... or other than those outlined in "Service and Support" for : - You could get quite hot when it has been printing for a length of the printer. The power cord or plug is not working properly or has been damaged, unplug it has had a chance to water. - Opening the cover may expose... you to service the printer yourself. Liquid has been spilled into it . Do not use liquid or aerosol cleaners. • To protect your printer from the routine maintenance described in any kind of enclosure, make sure it is well ventilated...

User Guide
Page 5
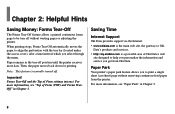
...: Forms Tear-Off 8 Saving Time 8 Internet Support 8 Paper Park 8 Operation Tips 9 Top of Form (TOF 9 Turning the Platen Knob 9 Controlling Access to the Printer 9 Chapter 3: Using Your Printer 10 Parts Identification: Rear Feed (Continuous Forms 10 Parts Identification: Top Feed (Single Sheets 11 Top of Form (TOF 12 Top of Form (TOF... Tear-Off Setting 18 Manual Forms Tear Off 18 Paper Park 18 Changing Paper Paths 19 Printhead Gap 21 Print Quality 22 Character Pitch 23 Printer Reset 24 Emulations 24 5
...: Forms Tear-Off 8 Saving Time 8 Internet Support 8 Paper Park 8 Operation Tips 9 Top of Form (TOF 9 Turning the Platen Knob 9 Controlling Access to the Printer 9 Chapter 3: Using Your Printer 10 Parts Identification: Rear Feed (Continuous Forms 10 Parts Identification: Top Feed (Single Sheets 11 Top of Form (TOF 12 Top of Form (TOF... Tear-Off Setting 18 Manual Forms Tear Off 18 Paper Park 18 Changing Paper Paths 19 Printhead Gap 21 Print Quality 22 Character Pitch 23 Printer Reset 24 Emulations 24 5

User Guide
Page 6
...Information 60 Problems / Solutions 61 Appendix A: Parts & Accessories 66 Purchasing Parts & Accessories 66 Replacement Parts 67 Accessories 68 Appendix B: Printer Control Codes 69 IBM Proprinter III Commands 69 Epson FX Commands 72 Oki MICROLINE Standard Commands 75 Appendix C: Specifications 78 Appendix D: ...LPT): IEEE 1284 88 USB: Specification 1.1 Compliant 89 Loading Paper 89 Testing the Printer 90 Font Sample Test 90 Rolling ASCII Test 91 Hexadecimal Dump Mode 92 Emulations 92 Printer Drivers 92 Loading the OKI Driver 93 Using a Compatible Driver 93 Index 94 ...
...Information 60 Problems / Solutions 61 Appendix A: Parts & Accessories 66 Purchasing Parts & Accessories 66 Replacement Parts 67 Accessories 68 Appendix B: Printer Control Codes 69 IBM Proprinter III Commands 69 Epson FX Commands 72 Oki MICROLINE Standard Commands 75 Appendix C: Specifications 78 Appendix D: ...LPT): IEEE 1284 88 USB: Specification 1.1 Compliant 89 Loading Paper 89 Testing the Printer 90 Font Sample Test 90 Rolling ASCII Test 91 Hexadecimal Dump Mode 92 Emulations 92 Printer Drivers 92 Loading the OKI Driver 93 Using a Compatible Driver 93 Index 94 ...

User Guide
Page 7
Oki Data on the Internet The Oki Data Web Sites provide the most current information available on your printer. Chapter 1: Introduction Printer Features • Super reliable, durable operation: 20,000 hours Mean Time Between Failures (MTBF) at : • www.okidata.com • my.okidata.com 7 You...and zero-tear forms capability. • Blazing print speeds, in characters per second: - Super Speed Draft (SSD) Mode: 570 cps • This rugged 9-pin printer can meet the needs of harsh and demanding environments. Near Letter Quality (NLQ) Mode: 95 cps - Utility Mode: 380 cps -
Oki Data on the Internet The Oki Data Web Sites provide the most current information available on your printer. Chapter 1: Introduction Printer Features • Super reliable, durable operation: 20,000 hours Mean Time Between Failures (MTBF) at : • www.okidata.com • my.okidata.com 7 You...and zero-tear forms capability. • Blazing print speeds, in characters per second: - Super Speed Draft (SSD) Mode: 570 cps • This rugged 9-pin printer can meet the needs of harsh and demanding environments. Near Letter Quality (NLQ) Mode: 95 cps - Utility Mode: 380 cps -
User Guide
Page 8
... information, see "Paper Park" in Chapter 3. 8 Paper remains in Chapter 3. Then, the paper moves back down for printing. Paper Park Your printer's paper park feature allows you select through the menu. For more data. When printing stops, Forms Tear-Off automatically moves the paper to align the... tear bar (located under the access cover), after a time interval which you to help you personalize the information and service you get from the printer. Forms Tear-Off and the Top of Form (TOF) and Forms TearOff" in the tear-off . Saving Time Internet Support Oki Data provides ...
... information, see "Paper Park" in Chapter 3. 8 Paper remains in Chapter 3. Then, the paper moves back down for printing. Paper Park Your printer's paper park feature allows you select through the menu. For more data. When printing stops, Forms Tear-Off automatically moves the paper to align the... tear bar (located under the access cover), after a time interval which you to help you personalize the information and service you get from the printer. Forms Tear-Off and the Top of Form (TOF) and Forms TearOff" in the tear-off . Saving Time Internet Support Oki Data provides ...

User Guide
Page 9
.... Operation Tips Top of Form (TOF) Top of the plastic paper shield (1) on , the Top of Form can control access to the printer by changing the setting for a single print job or set to Limited Operation. When Limited Operation is on the printhead. Turning the Platen Knob... Important! This prevents these settings from Full Operation (the factory default) to a new default. Always turn the platen knob when the printer is selected, the PRINT QUALITY and CHARACTER PITCH keys don't work. For more information, see "Top of Form (TOF)" in increments of 1/180",...
.... Operation Tips Top of Form (TOF) Top of the plastic paper shield (1) on , the Top of Form can control access to the printer by changing the setting for a single print job or set to Limited Operation. When Limited Operation is on the printhead. Turning the Platen Knob... Important! This prevents these settings from Full Operation (the factory default) to a new default. Always turn the platen knob when the printer is selected, the PRINT QUALITY and CHARACTER PITCH keys don't work. For more information, see "Top of Form (TOF)" in increments of 1/180",...

User Guide
Page 10
Sheet Guide Paper Lever On-Off Switch Platen Knob Control Panel Acoustic Cover Access Cover Note: For rear feed, the paper lever must be forward. 10 Chapter 3: Using Your Printer Parts Identification: Rear Feed (Continuous Forms) Note: The serial number of your printer is on a label on the back, beside "S/N."
Sheet Guide Paper Lever On-Off Switch Platen Knob Control Panel Acoustic Cover Access Cover Note: For rear feed, the paper lever must be forward. 10 Chapter 3: Using Your Printer Parts Identification: Rear Feed (Continuous Forms) Note: The serial number of your printer is on a label on the back, beside "S/N."

User Guide
Page 11
Using Your Printer 11 Parts Identification: Top Feed (Single Sheets) Paper Guides Sheet Guide Paper Lever On-Off Switch Platen Knob Control Panel Acoustic Cover (open) Note: For single-sheet printing, the paper lever must be in the middle position.
Using Your Printer 11 Parts Identification: Top Feed (Single Sheets) Paper Guides Sheet Guide Paper Lever On-Off Switch Platen Knob Control Panel Acoustic Cover (open) Note: For single-sheet printing, the paper lever must be in the middle position.

User Guide
Page 12
Always shut the printer off before turning the platen knob! It is limited to avoid paper jams. The first line prints at the red line of Form misaligns. If ... default setting). 12 Microline 420/421 User's Guide How you turn the platen knob when the printer is on whether Forms Tear-Off is set to meet your printer interact. Note: The factory default setting for the printer. Top of the page. You may print the first line of your software's requirements. Top...
Always shut the printer off before turning the platen knob! It is limited to avoid paper jams. The first line prints at the red line of Form misaligns. If ... default setting). 12 Microline 420/421 User's Guide How you turn the platen knob when the printer is on whether Forms Tear-Off is set to meet your printer interact. Note: The factory default setting for the printer. Top of the page. You may print the first line of your software's requirements. Top...

User Guide
Page 13
... the menu. 4 Look for the Form Tear-Off setting in the Top Feed group only if the optional Roll Paper Stand is installed). Using Your Printer 13 To print the Menu: 1 Make sure paper is on.
... the menu. 4 Look for the Form Tear-Off setting in the Top Feed group only if the optional Roll Paper Stand is installed). Using Your Printer 13 To print the Menu: 1 Make sure paper is on.
User Guide
Page 14
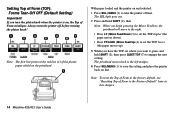
..."Resetting Top of Form (TOF): Forms Tear-Off OFF (Default Setting) Important! With paper loaded and the printer on , the Top of the plastic paper shield on line. The printhead moves back to the left margin.... 4 Press SEL/MENU (1) to save the setting and place the printer back on the printhead. The SEL light goes out. 2 Press and hold SHIFT (2), then Note: When...set the TOF lower (the paper moves up). 3 When you have the TOF set where you turn the printer off line. Note: The first line prints at the red line (1) of Form misaligns. Setting Top of...
..."Resetting Top of Form (TOF): Forms Tear-Off OFF (Default Setting) Important! With paper loaded and the printer on , the Top of the plastic paper shield on line. The printhead moves back to the left margin.... 4 Press SEL/MENU (1) to save the setting and place the printer back on the printhead. The SEL light goes out. 2 Press and hold SHIFT (2), then Note: When...set the TOF lower (the paper moves up). 3 When you have the TOF set where you turn the printer off line. Note: The first line prints at the red line (1) of Form misaligns. Setting Top of...

User Guide
Page 15
... begin pressing the Micro Feed key, the printhead will move to the right. • Press LF | Micro Feed Down (3) to set where you turn the printer off and the red alarm light comes on and selected: 1 Press PARK (6) to ON Important! Always turn the platen knob when the... printer is on the printhead. If you want it, press and hold TEAR (5). Setting Top of Form (TOF): Forms Tear-Off Set to park the paper. ...
... begin pressing the Micro Feed key, the printhead will move to the right. • Press LF | Micro Feed Down (3) to set where you turn the printer off and the red alarm light comes on and selected: 1 Press PARK (6) to ON Important! Always turn the platen knob when the... printer is on the printhead. If you want it, press and hold TEAR (5). Setting Top of Form (TOF): Forms Tear-Off Set to park the paper. ...

User Guide
Page 16
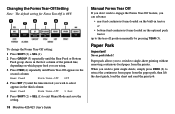
... 1" down from the top of Form to the factory default: 1 Remove paper from the paper path. 2 Turn the printer off before turning the platen knob! Temporarily Changing the Top of Form Position Important Do not use the platen knob to change the Top of ...Form. To move the Top of Form position lower for the Top of Form (where the printing should begin) is turned on the printer. 4 Reload paper. 16 Microline 420/421 User's Guide If you turn the printer off . 3 Press and hold PARK + QUIET/TOF while turning on , the Top of Form misaligns.
... 1" down from the top of Form to the factory default: 1 Remove paper from the paper path. 2 Turn the printer off before turning the platen knob! Temporarily Changing the Top of Form Position Important Do not use the platen knob to change the Top of ...Form. To move the Top of Form position lower for the Top of Form (where the printing should begin) is turned on the printer. 4 Reload paper. 16 Microline 420/421 User's Guide If you turn the printer off . 3 Press and hold PARK + QUIET/TOF while turning on , the Top of Form misaligns.

User Guide
Page 17
...-Off may be used when the optional pull tractor is turned on, the paper feeds to the tear-off without wasting paper or adjusting the printer. The Forms Tear-Off feature allows a printed continuous forms page to be used for rear feed continuous forms, bottom feed continuous forms (with the... optional push tractor installed) or for printing. When the printer is engaged. Do not use Forms Tear-Off, you set to On and the software package you selected through the menu. If this chapter. ...
...-Off may be used when the optional pull tractor is turned on, the paper feeds to the tear-off without wasting paper or adjusting the printer. The Forms Tear-Off feature allows a printed continuous forms page to be used for rear feed continuous forms, bottom feed continuous forms (with the... optional push tractor installed) or for printing. When the printer is engaged. Do not use Forms Tear-Off, you set to On and the software package you selected through the menu. If this chapter. ...
User Guide
Page 18
... the built-in tractor or • bottom-feed continuous forms loaded on the optional push tractor up to retract the continuous form paper from the printer.
... the built-in tractor or • bottom-feed continuous forms loaded on the optional push tractor up to retract the continuous form paper from the printer.

User Guide
Page 19
Changing Paper Paths Continuous Forms to Single Sheets 1 Tear off any printed pages, then press PARK. 2 Raise the sheet guide (1) to the single-sheet feed position. 4 Move the paper lever (1) to the middle position marked "TOP." 5 Adjust the paper guides (1) for the size paper you are using, then place a sheet of paper in the sheet guide. 3 Pivot the wire feed guide into the sheet guide. Using Your Printer 19
Changing Paper Paths Continuous Forms to Single Sheets 1 Tear off any printed pages, then press PARK. 2 Raise the sheet guide (1) to the single-sheet feed position. 4 Move the paper lever (1) to the middle position marked "TOP." 5 Adjust the paper guides (1) for the size paper you are using, then place a sheet of paper in the sheet guide. 3 Pivot the wire feed guide into the sheet guide. Using Your Printer 19

User Guide
Page 21
Make sure the printer is the distance between the printhead and the platen. Printhead Gap The printhead gap is turned off before you open the access cover and move the blue lever (1) to 2, 3, 4 or 5, the printer automatically slows down for better print quality with multipart forms. Using Your Printer 21 To adjust the gap, open the access cover. CAUTION! Setting 1 2 3 4 5 Media Regular paper 2-part form (with carbon) 3-part form (with carbon) 4-part form (with carbon) Envelopes or extra thick paper Note: When the head gap is set to the recommended setting from the table.
Make sure the printer is the distance between the printhead and the platen. Printhead Gap The printhead gap is turned off before you open the access cover and move the blue lever (1) to 2, 3, 4 or 5, the printer automatically slows down for better print quality with multipart forms. Using Your Printer 21 To adjust the gap, open the access cover. CAUTION! Setting 1 2 3 4 5 Media Regular paper 2-part form (with carbon) 3-part form (with carbon) 4-part form (with carbon) Envelopes or extra thick paper Note: When the head gap is set to the recommended setting from the table.

User Guide
Page 23
... letter m. The higher cpi settings are often used for the cpi value you wish to the factory default character pitch, deselect the printer, then press and hold the SHIFT key while pressing the CHARACTER PITCH key. To select non-proportional, press the CHARACTER PITCH key ...character widths based on each character in characters per inch (CPI), or Proportional. Using Your Printer 23 You can choose a specific fixed width for character pitch are lit. Note: To reset the printer to use is received from your software. Character Pitch Important! Character pitch determines how many...
... letter m. The higher cpi settings are often used for the cpi value you wish to the factory default character pitch, deselect the printer, then press and hold the SHIFT key while pressing the CHARACTER PITCH key. To select non-proportional, press the CHARACTER PITCH key ...character widths based on each character in characters per inch (CPI), or Proportional. Using Your Printer 23 You can choose a specific fixed width for character pitch are lit. Note: To reset the printer to use is received from your software. Character Pitch Important! Character pitch determines how many...
User Guide
Page 24
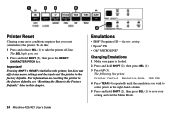
... press SEL (1). 3 Press LF (3). Emulations • IBM® Proprinter III - Pressing SHIFT + RESET reinitializes the printer, but does not affect any menu settings and does not reset the printer to the factory defaults. factory setting • Epson® FX • Oki® MICROLINE® Changing Emulations 1... Make sure paper is loaded. 2 Press and hold SHIFT (2), then press the RESET/ CHARACTER PITCH key. Printer Reset Clearing some error conditions requires that you wish to select prints in this : 1 Press and release SEL (1) to take the...
... press SEL (1). 3 Press LF (3). Emulations • IBM® Proprinter III - Pressing SHIFT + RESET reinitializes the printer, but does not affect any menu settings and does not reset the printer to the factory defaults. factory setting • Epson® FX • Oki® MICROLINE® Changing Emulations 1... Make sure paper is loaded. 2 Press and hold SHIFT (2), then press the RESET/ CHARACTER PITCH key. Printer Reset Clearing some error conditions requires that you wish to select prints in this : 1 Press and release SEL (1) to take the...


