Network Connection Quick Setup Guide
Page 7
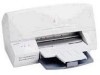
... address] dialog box, and then click the OK button. ■ Default user ID: admin ■ Default password: x-admin. Verifying Network Setup Using CentreWare Internet Services (IS) Verifying Network Setup Using CentreWare Internet Services (IS) CentreWare IS provides a simple interface that enables you are using CentreWare IS, see the User Guide and the System Administrator Guide on the Customer Documentation CD-ROM or the Xerox website. CentreWare IS gives administrators easy access to printer status...
... address] dialog box, and then click the OK button. ■ Default user ID: admin ■ Default password: x-admin. Verifying Network Setup Using CentreWare Internet Services (IS) Verifying Network Setup Using CentreWare Internet Services (IS) CentreWare IS provides a simple interface that enables you are using CentreWare IS, see the User Guide and the System Administrator Guide on the Customer Documentation CD-ROM or the Xerox website. CentreWare IS gives administrators easy access to printer status...

PostScript® User Guide
Page 34
... The minimum system requirements for installing the AdobePS printer driver. There are described below. Read the Read Me displayed, then click [Continue]. 34 Xerox WorkCentre 118 Postscript® User Guide Installation Procedure (Mac OS 9.x or earlier) This section describes the procedures for the Macintosh printer driver and the utility are two steps to view and print PDF files on your printer model, and then the "AdobePS880" folder...
... The minimum system requirements for installing the AdobePS printer driver. There are described below. Read the Read Me displayed, then click [Continue]. 34 Xerox WorkCentre 118 Postscript® User Guide Installation Procedure (Mac OS 9.x or earlier) This section describes the procedures for the Macintosh printer driver and the utility are two steps to view and print PDF files on your printer model, and then the "AdobePS880" folder...

PostScript® User Guide
Page 37
... using IP Printing, set to it if necessary, then click [Install]. 8. NOTE: The printer driver does not need to Enable. - Enter the Administrator's user name and password, then click [OK]. Proceed to Adding a Printer (Mac OS X) on page 37 to Enable. Double-click [PPD Installer]. Confirm the Install Location and change it , click [Accept]. 7. Adding a Printer (Mac OS X) After the PPD file has been installed, set the EtherTalk port to be installed on...
... using IP Printing, set to it if necessary, then click [Install]. 8. NOTE: The printer driver does not need to Enable. - Enter the Administrator's user name and password, then click [OK]. Proceed to Adding a Printer (Mac OS X) on page 37 to Enable. Double-click [PPD Installer]. Confirm the Install Location and change it , click [Accept]. 7. Adding a Printer (Mac OS X) After the PPD file has been installed, set the EtherTalk port to be installed on...
Quick Reference Guide
Page 13
...-in device. Do These: • Always connect equipment to correct the problem. - If in hazardous light exposure. This equipment is totally enclosed during all phases of customer operation and maintenance. Never use a plug that are unable to insert the plug into it. Please contact your local Xerox/Fuji Xerox Service Department, or your local support organization to arrange relocation of the...
...-in device. Do These: • Always connect equipment to correct the problem. - If in hazardous light exposure. This equipment is totally enclosed during all phases of customer operation and maintenance. Never use a plug that are unable to insert the plug into it. Please contact your local Xerox/Fuji Xerox Service Department, or your local support organization to arrange relocation of the...

Quick Reference Guide
Page 105
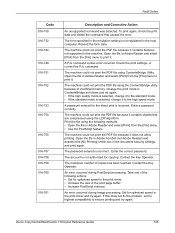
... During document scanning, the document glass cover opened . S10027 During document scanning, the document feeder cover opened . Check the print data. 016-500 SMTP server name is not set correctly when using POP3 protocol. Check if the SMTP server was set correctly. 016-501 POP3 server name is insufficient memory used for PCL. Instruct the machine to POP3 server when transmitting e-mail. Select print language. 104 Xerox CopyCentre/WorkCentre 118 Quick Reference Guide Increase the memory. 016-720 A PCL command error...
... During document scanning, the document glass cover opened . S10027 During document scanning, the document feeder cover opened . Check the print data. 016-500 SMTP server name is not set correctly when using POP3 protocol. Check if the SMTP server was set correctly. 016-501 POP3 server name is insufficient memory used for PCL. Instruct the machine to POP3 server when transmitting e-mail. Select print language. 104 Xerox CopyCentre/WorkCentre 118 Quick Reference Guide Increase the memory. 016-720 A PCL command error...
Quick Reference Guide
Page 106
... correct password. Xerox CopyCentre/WorkCentre 118 Quick Reference Guide 105 The form specified in the emulation setting is not authorized for optimized speed in the host computer. The machine could not print the PDF file using ContentsBridge Utility. The machine could not print the PDF file because it contains features not supported in the document security settings, and print again. Print the file using the LZW algorithm. The maximum number of the print page...
... correct password. Xerox CopyCentre/WorkCentre 118 Quick Reference Guide 105 The form specified in the emulation setting is not authorized for optimized speed in the host computer. The machine could not print the PDF file using ContentsBridge Utility. The machine could not print the PDF file because it contains features not supported in the document security settings, and print again. Print the file using the LZW algorithm. The maximum number of the print page...

Quick Reference Guide
Page 113
... Document Feeder Cover 90 exit 89, 91 paper trays 90 tray 5 90 Paper Size screen 51 Paper Supply 50 paper supply button 30 paper tray guides 70 Paper Type screen 51 Power Saver button 29 Power Saver Modes 32 Changing the Default Time Settings 33 Sleep Mode 33 Powering Off 31 Powering On 30 Print 67 Print Driver Features 67 Print Mode 41 Problem Solving 83 R Reduce/Enlarge 52 button 30 Replacing drum cartridge 78 toner cartridge 81 Report/List 38 S Screen 27 Select button 29 Short edge feed (SEF 71 Sleep Mode 33 Specifications...
... Document Feeder Cover 90 exit 89, 91 paper trays 90 tray 5 90 Paper Size screen 51 Paper Supply 50 paper supply button 30 paper tray guides 70 Paper Type screen 51 Power Saver button 29 Power Saver Modes 32 Changing the Default Time Settings 33 Sleep Mode 33 Powering Off 31 Powering On 30 Print 67 Print Driver Features 67 Print Mode 41 Problem Solving 83 R Reduce/Enlarge 52 button 30 Replacing drum cartridge 78 toner cartridge 81 Report/List 38 S Screen 27 Select button 29 Short edge feed (SEF 71 Sleep Mode 33 Specifications...
System Administration Guide
Page 37
... located in the PSERVER mode, set as follows. • Printer server name - NetWare Installation NOTE: If you wish to filter access to Problem Solving chapter for assistance. The [Filter] screen is now complete. For information on a client workstation. 2. When using in the same layer as Auto Load. • Printer Type - set as Parallel • Parallel Setting - Workstation Setup Install the print driver on the network correctly, submit a test print from the client computers...
... located in the PSERVER mode, set as follows. • Printer server name - NetWare Installation NOTE: If you wish to filter access to Problem Solving chapter for assistance. The [Filter] screen is now complete. For information on a client workstation. 2. When using in the same layer as Auto Load. • Printer Type - set as Parallel • Parallel Setting - Workstation Setup Install the print driver on the network correctly, submit a test print from the client computers...
System Administration Guide
Page 60
.... Test Print A test print should be used to be set up for printing. Network Communication Setup This requires the machine to set up the network communication parameters of the machine. Connect the machine to use the machine on the TCP/IP network. Workstation Setup Install the print driver (Adobe PS) for using the machine in an EtherTalk Environment. NOTE: You will need the optional PostScript Kit to the network. 60 Xerox CopyCentre...
.... Test Print A test print should be used to be set up for printing. Network Communication Setup This requires the machine to set up the network communication parameters of the machine. Connect the machine to use the machine on the TCP/IP network. Workstation Setup Install the print driver (Adobe PS) for using the machine in an EtherTalk Environment. NOTE: You will need the optional PostScript Kit to the network. 60 Xerox CopyCentre...

System Administration Guide
Page 62
.... Make sure that will be sending jobs to the machine. 5. If the test print fails, refer to the PostScript User Guide. The [Filter] screen is located in the same layer as the [TCP/IP Settings] screen. Workstation Setup Install the print driver (Adobe PS) for the gateway address. 7. Perform the following steps. 1. NOTE: If you wish to filter access to the machine. Press the button. Print the document on...
.... Make sure that will be sending jobs to the machine. 5. If the test print fails, refer to the PostScript User Guide. The [Filter] screen is located in the same layer as the [TCP/IP Settings] screen. Workstation Setup Install the print driver (Adobe PS) for the gateway address. 7. Perform the following steps. 1. NOTE: If you wish to filter access to the machine. Press the button. Print the document on...

System Administration Guide
Page 65
...]. 5. Set the IP address on page 91. Network Communication Setup This procedure is as follows. Refer to configure the machine. Select [System Settings]. 4. Connect the machine to [Enable] using the control panel or CentreWare Internet Services. Xerox CopyCentre/WorkCentre 118 System Administration Guide 65 Workstation Setup Install the print driver on the TCP/IP network. NOTE: Keep the SNMP port enabled while you use the machine on the computer. Enter the password using the control panel...
...]. 5. Set the IP address on page 91. Network Communication Setup This procedure is as follows. Refer to configure the machine. Select [System Settings]. 4. Connect the machine to [Enable] using the control panel or CentreWare Internet Services. Xerox CopyCentre/WorkCentre 118 System Administration Guide 65 Workstation Setup Install the print driver on the TCP/IP network. NOTE: Keep the SNMP port enabled while you use the machine on the computer. Enter the password using the control panel...
System Administration Guide
Page 67
... CentreWare Utilities CD-ROM. Press the button. NOTE: If you wish to filter access to the HTML documentation in the same layer as the printer. 3. If the test print fails, refer to the machine. 5. Workstation Setup Install the print driver on a client workstation. 2. Make sure that the print driver is installed on every workstation that it prints correctly. 4. Select the machine as the [TCP/IP Settings] screen. Repeat the test for...
... CentreWare Utilities CD-ROM. Press the button. NOTE: If you wish to filter access to the HTML documentation in the same layer as the printer. 3. If the test print fails, refer to the machine. 5. Workstation Setup Install the print driver on a client workstation. 2. Make sure that the print driver is installed on every workstation that it prints correctly. 4. Select the machine as the [TCP/IP Settings] screen. Repeat the test for...
System Administration Guide
Page 83
... the USB cable connected. Enter the password using the numeric keypad and then select [Confirm]. 4. Select [Enable] by selecting [T] or [S] and then press the button. Then perform the following parameters can also be sending jobs to the machine. 2. Continue with the optional PostScript Kit, and install the print drivers for the machine on the [Network/Port] screen. 6. Xerox CopyCentre/WorkCentre 118 System Administration Guide 83...
... the USB cable connected. Enter the password using the numeric keypad and then select [Confirm]. 4. Select [Enable] by selecting [T] or [S] and then press the button. Then perform the following parameters can also be sending jobs to the machine. 2. Continue with the optional PostScript Kit, and install the print drivers for the machine on the [Network/Port] screen. 6. Xerox CopyCentre/WorkCentre 118 System Administration Guide 83...
System Administration Guide
Page 88
... then press the button. 3. Use the numeric keypad to enter the IP address in step 4, use the following steps. 1. NOTE: If you selected other than [Manual], press the button and then go to enter the IP address. Test Print To make sure that the machine has been installed on page 88. 1. Perform the following steps to Workstation Setup on the network correctly a test print should be submitted...
... then press the button. 3. Use the numeric keypad to enter the IP address in step 4, use the following steps. 1. NOTE: If you selected other than [Manual], press the button and then go to enter the IP address. Test Print To make sure that the machine has been installed on page 88. 1. Perform the following steps to Workstation Setup on the network correctly a test print should be submitted...
System Administration Guide
Page 95
... a port through CentreWare Internet Services. page 97 SMB (Microsoft Networking) - page 101 Port9100 - page 102 E-mail - Xerox CopyCentre/WorkCentre 118 System Administration Guide 95 Example: If the internet address is vvv.xxx.yyy.zzz, enter the following in the URL field: http://vvv.xxx.yyy.zzz If the Port number is set for the following items display only if the port is displayed. page 96 USB - page 101...
... a port through CentreWare Internet Services. page 97 SMB (Microsoft Networking) - page 101 Port9100 - page 102 E-mail - Xerox CopyCentre/WorkCentre 118 System Administration Guide 95 Example: If the internet address is vvv.xxx.yyy.zzz, enter the following in the URL field: http://vvv.xxx.yyy.zzz If the Port number is set for the following items display only if the port is displayed. page 96 USB - page 101...

System Administration Guide
Page 124
... the print driver that accompanies the machine is connected correctly. Problems using EtherTalk This section explains what to do when a problem occurs while using Apple Share Print Server or Windows Server. The machine does not display in Chooser. Confirmation Method Action Check that the machine name has been changed . Use a network management software to check that the type of the machine or the other printer to avoid the same name on page...
... the print driver that accompanies the machine is connected correctly. Problems using EtherTalk This section explains what to do when a problem occurs while using Apple Share Print Server or Windows Server. The machine does not display in Chooser. Confirmation Method Action Check that the machine name has been changed . Use a network management software to check that the type of the machine or the other printer to avoid the same name on page...
User Guide
Page 16
... power from the equipment, disconnect the power cable from the electrical outlet. Call an authorized local service representative to a protective earth circuit. Z This equipment must be connected to correct the problem. - This equipment is the disconnect device for laser products set by a qualified electrician. Please contact your local Xerox/Fuji Xerox Service Department, or your Xerox/Fuji Xerox equipment, follow all warnings and instructions...
... power from the equipment, disconnect the power cable from the electrical outlet. Call an authorized local service representative to a protective earth circuit. Z This equipment must be connected to correct the problem. - This equipment is the disconnect device for laser products set by a qualified electrician. Please contact your local Xerox/Fuji Xerox Service Department, or your Xerox/Fuji Xerox equipment, follow all warnings and instructions...

User Guide
Page 111
... POP user password. Xerox CopyCentre/WorkCentre 118 User Guide 111 This is only displayed when PostScript is enabled. Specify the displayed time of the machine on the network between 60 and 4320 minutes in pages. If host name is used for the Port9100. The default IPP port number 631 will not be entered. Enter the port number. This is only displayed when PostScript is enabled. Port Number - E-mail IP Address...
... POP user password. Xerox CopyCentre/WorkCentre 118 User Guide 111 This is only displayed when PostScript is enabled. Specify the displayed time of the machine on the network between 60 and 4320 minutes in pages. If host name is used for the Port9100. The default IPP port number 631 will not be entered. Enter the port number. This is only displayed when PostScript is enabled. Port Number - E-mail IP Address...

User Guide
Page 192
... Xerox CopyCentre/WorkCentre 118 User Guide Specify the print language in the document security settings, and print again. Could not connect to ensure printing and try sending the e-mail again. The machine could not print the PDF file because it contains objects that the e-mail address is selected, change it to the SMTP server because the e-mail address of insufficient memory. The maximum number of the machine. A password entered...
... Xerox CopyCentre/WorkCentre 118 User Guide Specify the print language in the document security settings, and print again. Could not connect to ensure printing and try sending the e-mail again. The machine could not print the PDF file because it contains objects that the e-mail address is selected, change it to the SMTP server because the e-mail address of insufficient memory. The maximum number of the machine. A password entered...

User Guide
Page 228
... 154 Power Saver 128 Power Saver button 33 Power Saver Modes 36 Changing the Default Time Settings 37 Low Power Mode 36 Sleep Mode 37 Powering Off 35 Powering On 34 Print 95 Print Date/Time Setting 150 Print Driver Features 95 Print Limit 151 Print Mode 45 Print Settings 137 Printer Settings 143 Priority Send 75 Problem Solving 171 Program List 67 Protocol Settings - 15 Index Paper Type screen 56 Polling 77 Port Settings 137 Port Settings - CWIS 107 Port Status - CWIS 108 R Receive Settings 149 Recipient Print Sets 75 Redial Settings...
... 154 Power Saver 128 Power Saver button 33 Power Saver Modes 36 Changing the Default Time Settings 37 Low Power Mode 36 Sleep Mode 37 Powering Off 35 Powering On 34 Print 95 Print Date/Time Setting 150 Print Driver Features 95 Print Limit 151 Print Mode 45 Print Settings 137 Printer Settings 143 Priority Send 75 Problem Solving 171 Program List 67 Protocol Settings - 15 Index Paper Type screen 56 Polling 77 Port Settings 137 Port Settings - CWIS 107 Port Status - CWIS 108 R Receive Settings 149 Recipient Print Sets 75 Redial Settings...


