User Manual
Page 2
...Machine Chapter 1 Getting Started Set Up Your Machine 1-1 Unpacking 1-1 Control Locations and Functions 1-2 Choosing a Location 1-4 Setting Up Your Machine 1-4 Document Inpute Tray 1-4 Printer Exit Tray 1-5 Document Exit Tray 1-5 Installing the Laser Printer Cartridge 1-6 Telephone Line 1-9 Extension Phone 1-9 PC Cable 1-10 AC Power Cord 1-12 Print Media Specifications 1-13 Core media List 1-14 Loading Paper 1-15 Using the Automatic Paper Feeder 1-15 Using the Manual Paper Feeder 1-20 Paper Guidelines 1-22 Installing Software 1-24 System Requirements 1-24 Overview of the WorkCentre 385 Drivers...
...Machine Chapter 1 Getting Started Set Up Your Machine 1-1 Unpacking 1-1 Control Locations and Functions 1-2 Choosing a Location 1-4 Setting Up Your Machine 1-4 Document Inpute Tray 1-4 Printer Exit Tray 1-5 Document Exit Tray 1-5 Installing the Laser Printer Cartridge 1-6 Telephone Line 1-9 Extension Phone 1-9 PC Cable 1-10 AC Power Cord 1-12 Print Media Specifications 1-13 Core media List 1-14 Loading Paper 1-15 Using the Automatic Paper Feeder 1-15 Using the Manual Paper Feeder 1-20 Paper Guidelines 1-22 Installing Software 1-24 System Requirements 1-24 Overview of the WorkCentre 385 Drivers...
User Manual
Page 36
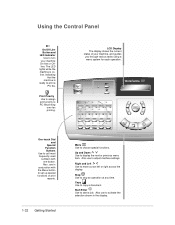
... set up special functions or print reports. 1-32 Getting Started Menu Use to choose special functions. Copy Use to PC file printing over fax printing. Up and Down Use to move cursor left or right across the display. Right and Left Use to display the next or previous menu item. The LED lights while the machine is online, indicating that the machine is ready to stop an operation at any time. Also use to adjust machine settings. Using the Control Panel On/Off Line Button...
... set up special functions or print reports. 1-32 Getting Started Menu Use to choose special functions. Copy Use to PC file printing over fax printing. Up and Down Use to move cursor left or right across the display. Right and Left Use to display the next or previous menu item. The LED lights while the machine is online, indicating that the machine is ready to stop an operation at any time. Also use to adjust machine settings. Using the Control Panel On/Off Line Button...
User Manual
Page 44
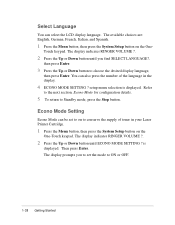
... the number of toner in the display. 4 ECONO MODE SETTING ? You can select the LCD display language. Refer to the next section, Econo Mode for configuration details. 5 To return to choose the desired display language, then press Enter. Then press Enter. Econo Mode Setting Econo Mode can be set the mode to conserve the supply of the language in your Laser Printer Cartridge. 1 Press the Menu button, then press the System Setup button...
... the number of toner in the display. 4 ECONO MODE SETTING ? You can select the LCD display language. Refer to the next section, Econo Mode for configuration details. 5 To return to choose the desired display language, then press Enter. Then press Enter. Econo Mode Setting Econo Mode can be set the mode to conserve the supply of the language in your Laser Printer Cartridge. 1 Press the Menu button, then press the System Setup button...
User Manual
Page 59
... the line quality is poor, transmission time may be printed out on a single page. Press 1 to fit on a second page. 1-50 Getting Started This mode compensates for poor line quality and ensures accurate, error-free communication with this feature off . n ECM MODE (Error Correction Mode) - When receiving a document as long as or longer than the paper installed in your machine, the machine can reduce the data in the document to turn this...
... the line quality is poor, transmission time may be printed out on a single page. Press 1 to fit on a second page. 1-50 Getting Started This mode compensates for poor line quality and ensures accurate, error-free communication with this feature off . n ECM MODE (Error Correction Mode) - When receiving a document as long as or longer than the paper installed in your machine, the machine can reduce the data in the document to turn this...
User Manual
Page 91
... page 3-23. 2 Press the Menu button. 3 Press the Add/Cancel button on the following day. 9 After entering the time, press the Enter button. 10 The machine scans the document into memory. 1 Place the document face down in the LCD display. The LCD display prompts you set . Note: If you want to Standby mode and displays a reminder that a Delayed Transmission is already selected in the Automatic Document Feeder. Add is set a time earlier than the current time...
... page 3-23. 2 Press the Menu button. 3 Press the Add/Cancel button on the following day. 9 After entering the time, press the Enter button. 10 The machine scans the document into memory. 1 Place the document face down in the LCD display. The LCD display prompts you set . Note: If you want to Standby mode and displays a reminder that a Delayed Transmission is already selected in the Automatic Document Feeder. Add is set a time earlier than the current time...

User Manual
Page 92
... entered into memory, returns to Standby mode and displays a reminder that 1. If you want to cancel the Delayed Transmission, see Resolution on page 3-21 and Contrast on page 3-23. 2 Press the Menu button. 3 Press the Add/Cancel button on the One-Touch keypad. If necessary, adjust the resolution and contrast. The LCD display prompts you to switch between AM and PM. OPERATION 1.ADD 2.CANCEL Manual Faxing 3-13 8 Using the Number keypad, enter the time...
... entered into memory, returns to Standby mode and displays a reminder that 1. If you want to cancel the Delayed Transmission, see Resolution on page 3-21 and Contrast on page 3-23. 2 Press the Menu button. 3 Press the Add/Cancel button on the One-Touch keypad. If necessary, adjust the resolution and contrast. The LCD display prompts you to switch between AM and PM. OPERATION 1.ADD 2.CANCEL Manual Faxing 3-13 8 Using the Number keypad, enter the time...
User Manual
Page 176
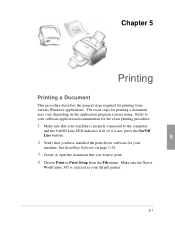
... computer, and the On/Off Line LED indicator is lit (if it is selected as your software application documentation for the exact printing procedure. 1 Make sure that you are using. Refer to print. 4 Choose Print or Print Setup from various Windows applications. Chapter 5 Printing Printing a Document This procedure describes the general steps required for printing from the File menu. See Installing Software on the application program you want to your default printer. 5-1
... computer, and the On/Off Line LED indicator is lit (if it is selected as your software application documentation for the exact printing procedure. 1 Make sure that you are using. Refer to print. 4 Choose Print or Print Setup from various Windows applications. Chapter 5 Printing Printing a Document This procedure describes the general steps required for printing from the File menu. See Installing Software on the application program you want to your default printer. 5-1
User Manual
Page 184
... changing general Windows 95 printer information (see your Windows 95/98 User Guide for paper sources and sizes, number of copies, etc. n Image Quality Tab - for details). for your Windows 95/98 User Guide for image quality n About Tab - Or n Select the printer from the Printers folder, and then select the Properties command from within any of these methods: n Select the Print or Print Setup command from the File menu. n Details Tab - In Windows...
... changing general Windows 95 printer information (see your Windows 95/98 User Guide for paper sources and sizes, number of copies, etc. n Image Quality Tab - for details). for your Windows 95/98 User Guide for image quality n About Tab - Or n Select the printer from the Printers folder, and then select the Properties command from within any of these methods: n Select the Print or Print Setup command from the File menu. n Details Tab - In Windows...

User Manual
Page 204
... accessed through the Printers folder, the Printer Properties consists of these methods: n Select the Print or Print Setup command from within any Windows application. for your print job. for details) n Paper/Output Tab - This method will provide access to the General and Details tabs, as well as the Paper/ Output, Image Quality and About tabs only. for viewing and changing port and timeout parameters (see your Windows 95/98 User Guide...
... accessed through the Printers folder, the Printer Properties consists of these methods: n Select the Print or Print Setup command from within any Windows application. for your print job. for details) n Paper/Output Tab - This method will provide access to the General and Details tabs, as well as the Paper/ Output, Image Quality and About tabs only. for viewing and changing port and timeout parameters (see your Windows 95/98 User Guide...

User Manual
Page 266
n Do not mix paper types. n Use only recommended print paper. You can press Start to immediately redial, or Stop to automatically redial a previously busy station. COMM. If jams occur frequently, make sure that the recommended print side is facing up when loading paper into the feeder. Make sure the adjustable paper guides are following these tips to avoid jams. n Follow the procedures in Loading Paper on page 7-2. n Ensure that you should be able...
n Do not mix paper types. n Use only recommended print paper. You can press Start to immediately redial, or Stop to automatically redial a previously busy station. COMM. If jams occur frequently, make sure that the recommended print side is facing up when loading paper into the feeder. Make sure the adjustable paper guides are following these tips to avoid jams. n Follow the procedures in Loading Paper on page 7-2. n Ensure that you should be able...
User Manual
Page 278
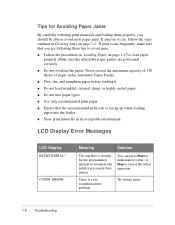
... Paper Feeder. ERROR Meaning Solution The machine is waiting for Avoiding Paper Jams By carefully selecting print materials and loading them properly, you are positioned correctly. You can press Start to immediately redial, or Stop to load paper properly. Never exceed the maximum capacity of 150 sheets of paper in an acceptable environment. If jams occur frequently, make sure that the recommended print side is a fax communications problem. Try faxing again. 7-8 Troubleshooting...
... Paper Feeder. ERROR Meaning Solution The machine is waiting for Avoiding Paper Jams By carefully selecting print materials and loading them properly, you are positioned correctly. You can press Start to immediately redial, or Stop to load paper properly. Never exceed the maximum capacity of 150 sheets of paper in an acceptable environment. If jams occur frequently, make sure that the recommended print side is a fax communications problem. Try faxing again. 7-8 Troubleshooting...

User Manual
Page 279
... 150 sheets of paper in an acceptable environment. n Flex, fan, and straighten paper before loading it. LCD Display Error Messages LCD Display RETRY REDIAL? n Do not mix paper types. You can press Start to immediately redial, or Stop to cancel the redial operation. n Do not load wrinkled, creased, damp, or highly curled paper. n Use only recommended print paper. n Ensure that you should be able to avoid most paper jams. If jams do...
... 150 sheets of paper in an acceptable environment. n Flex, fan, and straighten paper before loading it. LCD Display Error Messages LCD Display RETRY REDIAL? n Do not mix paper types. You can press Start to immediately redial, or Stop to cancel the redial operation. n Do not load wrinkled, creased, damp, or highly curled paper. n Use only recommended print paper. n Ensure that you should be able to avoid most paper jams. If jams do...
User Manual
Page 285
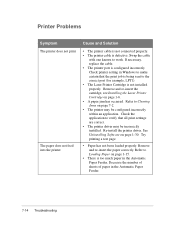
... correct port (for example, LPT1). • The Laser Printer Cartridge is too much paper in the Automatic Paper Feeder. Decrease the number of sheets of paper in Windows to Clearing Jams on page 1-15. • There is not installed properly. The paper does not feed into the printer. Remove and re-insert the cartridge, see Installing the Laser Printer Cartridge on page 1-30. Cause and Solution • The printer cable is not connected properly. • The printer cable is configured incorrectly...
... correct port (for example, LPT1). • The Laser Printer Cartridge is too much paper in the Automatic Paper Feeder. Decrease the number of sheets of paper in Windows to Clearing Jams on page 1-15. • There is not installed properly. The paper does not feed into the printer. Remove and re-insert the cartridge, see Installing the Laser Printer Cartridge on page 1-30. Cause and Solution • The printer cable is not connected properly. • The printer cable is configured incorrectly...
User Manual
Page 287
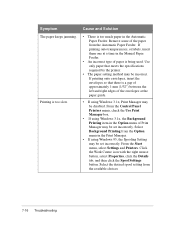
... envelopes at a time in the Option menu of paper is too slow. Select Background Printing from the Option menu in the Automatic Paper Feeder. Use only paper that there is too much paper in the Print Manager. • If using Windows 3.1x, the Background Printing item in the Manual Paper Feeder. • An incorrect type of Print Manager may be disabled. From the Start menu, select Settings and Printers. Click the Work Centre icon with the right mouse button...
... envelopes at a time in the Option menu of paper is too slow. Select Background Printing from the Option menu in the Automatic Paper Feeder. Use only paper that there is too much paper in the Print Manager. • If using Windows 3.1x, the Background Printing item in the Manual Paper Feeder. • An incorrect type of Print Manager may be disabled. From the Start menu, select Settings and Printers. Click the Work Centre icon with the right mouse button...
User Manual
Page 316
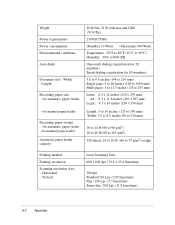
for automatic paper feeder -for manual paper feeder Automatic paper feeder capacity 20 lb Net, 31 lb with tray and CRU (9/14 Kg) 230VAC/50Hz (Standby) 13 Watts (Maximum) 490 Watts Temperature : 50°F to 86°F (10°C to 30°C) Humidity : 30% to 75 g/m2) weight Printing method Printing resolution Scanning resolution (fax) - Vertical Laser Scanning Unit 600 x 600 dpi (23.6 x 23.6 lines/mm) 300...
for automatic paper feeder -for manual paper feeder Automatic paper feeder capacity 20 lb Net, 31 lb with tray and CRU (9/14 Kg) 230VAC/50Hz (Standby) 13 Watts (Maximum) 490 Watts Temperature : 50°F to 86°F (10°C to 30°C) Humidity : 30% to 75 g/m2) weight Printing method Printing resolution Scanning resolution (fax) - Vertical Laser Scanning Unit 600 x 600 dpi (23.6 x 23.6 lines/mm) 300...
User Manual
Page 337
... is a device in your machine that supports bi-directional communications (IEEE standard 1284) between light and dark areas of printer cable needed for fax purposes. The Document Exit Tray holds those sheets scanned for this machine. Document Guides Also called a Centronics parallel interface cable that scans your machine: Dial or pulse mode. Document Scanner The Document Scanner is a Contrast button on the control panel, to increase or decrease image contrast on these buttons. You open the front cover by simultaneously...
... is a device in your machine that supports bi-directional communications (IEEE standard 1284) between light and dark areas of printer cable needed for fax purposes. The Document Exit Tray holds those sheets scanned for this machine. Document Guides Also called a Centronics parallel interface cable that scans your machine: Dial or pulse mode. Document Scanner The Document Scanner is a Contrast button on the control panel, to increase or decrease image contrast on these buttons. You open the front cover by simultaneously...

User Manual
Page 338
... enabled, transmission time may be scanned for fax or copy purposes. When ECM Mode is a telephone company service that will be reduced. EXT. A unit of measure indicating the resolution of the image. ECM MODE This refers to Error Correction Mode, and lets you use toner in the top of the machine where you use a single phone line to answer several different phone numbers. dpi Dots per inch abbreviation. Econo Mode This setting...
... enabled, transmission time may be scanned for fax or copy purposes. When ECM Mode is a telephone company service that will be reduced. EXT. A unit of measure indicating the resolution of the image. ECM MODE This refers to Error Correction Mode, and lets you use toner in the top of the machine where you use a single phone line to answer several different phone numbers. dpi Dots per inch abbreviation. Econo Mode This setting...
User Manual
Page 352
... Printing 4-7, 5-1 Clearing document jams 7-3 Documents 5-1 Printer settings 5-2 Printing last fax data 4-7 Priority Term 1-55 Priority Transmission 3-32 Product Marking Requirements 9-14 R Receive Button 1-33 Receiving faxes Out of paper 4-6 To PC 4-13 Too light to read 4-7 Reception Modes 4-2 Redial 3-28 Interval 1-52 Last number 3-28 number of tries 1-52 Searching redial memory 3-28 Redial Button 1-33 Redial Interval 1-52 Reduce/Enlarge when scanning 6-15 Reducing copies 2-4 Remote Code 1-49 Remote Diagnosis Protection 1-37 Reports 1-44 Auto...
... Printing 4-7, 5-1 Clearing document jams 7-3 Documents 5-1 Printer settings 5-2 Printing last fax data 4-7 Priority Term 1-55 Priority Transmission 3-32 Product Marking Requirements 9-14 R Receive Button 1-33 Receiving faxes Out of paper 4-6 To PC 4-13 Too light to read 4-7 Reception Modes 4-2 Redial 3-28 Interval 1-52 Last number 3-28 number of tries 1-52 Searching redial memory 3-28 Redial Button 1-33 Redial Interval 1-52 Reduce/Enlarge when scanning 6-15 Reducing copies 2-4 Remote Code 1-49 Remote Diagnosis Protection 1-37 Reports 1-44 Auto...
User Manual
Page 354
... Sending a fax Clearing document jams 7-2 From a PC 3-39 Manually 3-3 Setting Options Answer on ring 1-52 Auto Journal 1-48 Dial Mode 1-49 Discard Size 1-52 DRPD 1-53 ECM Mode 1-50 Horizontal Reduction 1-51 Message conf. 1-48 Paper size 1-48 Power Saving 1-49 Priority Term 1-55 Redial Interval 1-52 Redial tries 1-52 Remote Code 1-49 RX Reduction 1-50 Setting the number of copies 2-3 Setting up your machine 1-1 AC Power Cord connection 1-12 Document Exit Tray 1-5 Document Tray 1-4 Extension Phone 1-9 Installing the Printer Cartridge 1-6 Printer Cable 1-10 Printer Exit Tray 1-5 Telephone Line...
... Sending a fax Clearing document jams 7-2 From a PC 3-39 Manually 3-3 Setting Options Answer on ring 1-52 Auto Journal 1-48 Dial Mode 1-49 Discard Size 1-52 DRPD 1-53 ECM Mode 1-50 Horizontal Reduction 1-51 Message conf. 1-48 Paper size 1-48 Power Saving 1-49 Priority Term 1-55 Redial Interval 1-52 Redial tries 1-52 Remote Code 1-49 RX Reduction 1-50 Setting the number of copies 2-3 Setting up your machine 1-1 AC Power Cord connection 1-12 Document Exit Tray 1-5 Document Tray 1-4 Extension Phone 1-9 Installing the Printer Cartridge 1-6 Printer Cable 1-10 Printer Exit Tray 1-5 Telephone Line...

User Manual
Page 367
... data will be increased when ECM is poor, transmission time may be printed out on two or more sheets. If the line quality is enabled. Press 2 to the copy mode. Use this feature if you want to fit the paper size currently loaded in the document to automatically reduce an incoming page (that this feature on . This mode compensates for poor line quality and ensures accurate, error-free...
... data will be increased when ECM is poor, transmission time may be printed out on two or more sheets. If the line quality is enabled. Press 2 to the copy mode. Use this feature if you want to fit the paper size currently loaded in the document to automatically reduce an incoming page (that this feature on . This mode compensates for poor line quality and ensures accurate, error-free...


