User Manual
Page 9
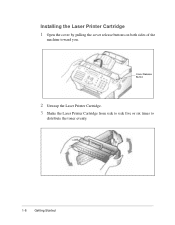
Installing the Laser Printer Cartridge 1 Open the cover by pulling the cover release buttons on both sides of the machine toward you. Cover Release Button 2 Unwrap the Laser Printer Cartridge. 3 Shake the Laser Printer Cartridge from side to side five or six times to distribute the toner evenly. 1-6 Getting Started
Installing the Laser Printer Cartridge 1 Open the cover by pulling the cover release buttons on both sides of the machine toward you. Cover Release Button 2 Unwrap the Laser Printer Cartridge. 3 Shake the Laser Printer Cartridge from side to side five or six times to distribute the toner evenly. 1-6 Getting Started
User Manual
Page 44
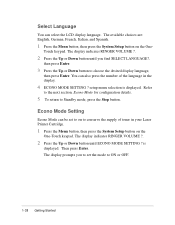
..., Italian, and Spanish. 1 Press the Menu button, then press the System Setup button on the One-Touch keypad. You can also press the number of toner in the display. 4 ECONO MODE SETTING ? Then press Enter. The display prompts you find SELECT LANGUAGE?, then press Enter. 3 Press the Up or Down button...
..., Italian, and Spanish. 1 Press the Menu button, then press the System Setup button on the One-Touch keypad. You can also press the number of toner in the display. 4 ECONO MODE SETTING ? Then press Enter. The display prompts you find SELECT LANGUAGE?, then press Enter. 3 Press the Up or Down button...
User Manual
Page 45
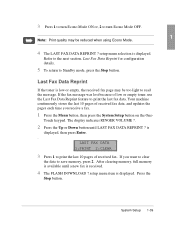
... message. setup menu selection is available until LAST FAX DATA REPRINT ? Last Fax Data Reprint If the toner is received. 4 The FLASH DOWNLOAD ? Your machine continuously stores the last 10 pages of low or empty toner, use the Last Fax Data Reprint feature to save memory, press 2. Touch keypad. After clearing memory...
... message. setup menu selection is available until LAST FAX DATA REPRINT ? Last Fax Data Reprint If the toner is received. 4 The FLASH DOWNLOAD ? Your machine continuously stores the last 10 pages of low or empty toner, use the Last Fax Data Reprint feature to save memory, press 2. Touch keypad. After clearing memory...

User Manual
Page 46
... memory, full memory is low or empty, the received fax page may be too light to read the message. Last Fax Data Reprint If the toner is available until LAST FAX DATA REPRINT ? If the fax message was lost because of received fax data, and updates the pages each time you... RINGER VOLUME ?. 2 Press the Up or Down button until a new fax is displayed. Your machine continuously stores the last 10 pages of low or empty toner, use the Last Fax Data Reprint feature to save memory, press 2. Touch keypad.
... memory, full memory is low or empty, the received fax page may be too light to read the message. Last Fax Data Reprint If the toner is available until LAST FAX DATA REPRINT ? If the fax message was lost because of received fax data, and updates the pages each time you... RINGER VOLUME ?. 2 Press the Up or Down button until a new fax is displayed. Your machine continuously stores the last 10 pages of low or empty toner, use the Last Fax Data Reprint feature to save memory, press 2. Touch keypad.

User Manual
Page 159
...shows LAST FAX DATA REPRINT ?. 3 Press Enter. 4 The LED display screen shown below to print the Last Fax Data or to Read If the toner level in memory. After receiving documents, the machine displays MEMORY RECEIVED and the cause. If you may receive a fax which is printed too light to... low or empty toner. Fortunately, the machine stores the last 10 pages of received fax data, continuously updating the pages whenever a fax is always enabled to prevent loss ...
...shows LAST FAX DATA REPRINT ?. 3 Press Enter. 4 The LED display screen shown below to print the Last Fax Data or to Read If the toner level in memory. After receiving documents, the machine displays MEMORY RECEIVED and the cause. If you may receive a fax which is printed too light to... low or empty toner. Fortunately, the machine stores the last 10 pages of received fax data, continuously updating the pages whenever a fax is always enabled to prevent loss ...

User Manual
Page 160
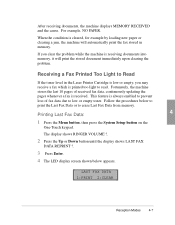
... is receiving documents into memory, it will automatically print the fax stored in memory. Receiving a Fax Printed Too Light to Read If the toner level in the Laser Printer Cartridge is low or empty, you clear the problem while the machine is printed too light to prevent loss of... LAST FAX DATA REPRINT ?. 3 Press Enter. 4 The LED display screen shown below to print the Last Fax Data or to low or empty toner. Follow the procedures below appears. After receiving documents, the machine displays MEMORY RECEIVED and the cause. Fortunately, the machine stores the last 10 pages ...
... is receiving documents into memory, it will automatically print the fax stored in memory. Receiving a Fax Printed Too Light to Read If the toner level in the Laser Printer Cartridge is low or empty, you clear the problem while the machine is printed too light to prevent loss of... LAST FAX DATA REPRINT ?. 3 Press Enter. 4 The LED display screen shown below to print the Last Fax Data or to low or empty toner. Follow the procedures below appears. After receiving documents, the machine displays MEMORY RECEIVED and the cause. Fortunately, the machine stores the last 10 pages ...
User Manual
Page 161
... updating the pages whenever a fax is received. Receiving a Fax Printed Too Light to read. When the condition is printed too light to Read If the toner level in memory. Follow the procedures below appears. Printing Last Fax Data: 4 1 Press the Menu button, then press the System Setup button on the One... display shows LAST FAX DATA REPRINT ?. 3 Press Enter. 4 The LED display screen shown below to print the Last Fax Data or to low or empty toner.
... updating the pages whenever a fax is received. Receiving a Fax Printed Too Light to read. When the condition is printed too light to Read If the toner level in memory. Follow the procedures below appears. Printing Last Fax Data: 4 1 Press the Menu button, then press the System Setup button on the One... display shows LAST FAX DATA REPRINT ?. 3 Press Enter. 4 The LED display screen shown below to print the Last Fax Data or to low or empty toner.

User Manual
Page 183
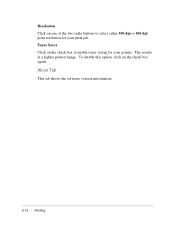
Resolution Click on the check box again. To disable this option, click on one of the two radio buttons to save toner when you are printing. This results in a lighter printed image. About Tab This tab shows product version information. 5 Printer Settings 5-7 Toner Saver Click on the check box to select either 300 dpi or 600 dpi print resolution for your print job.
Resolution Click on the check box again. To disable this option, click on one of the two radio buttons to save toner when you are printing. This results in a lighter printed image. About Tab This tab shows product version information. 5 Printer Settings 5-7 Toner Saver Click on the check box to select either 300 dpi or 600 dpi print resolution for your print job.
User Manual
Page 188
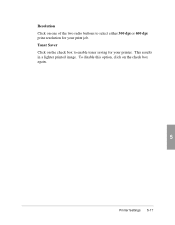
This results in a lighter printed image. To disable this option, click on one of the two radio buttons to enable toner saving for your printer. About Tab This tab shows the software version information. 5-12 Printing Resolution Click on the check box again. Toner Saver Click on the check box to select either 300 dpi or 600 dpi print resolution for your print job.
This results in a lighter printed image. To disable this option, click on one of the two radio buttons to enable toner saving for your printer. About Tab This tab shows the software version information. 5-12 Printing Resolution Click on the check box again. Toner Saver Click on the check box to select either 300 dpi or 600 dpi print resolution for your print job.

User Manual
Page 193
To disable this option, click on the check box to select either 300 dpi or 600 dpi print resolution for your print job. This results in a lighter printed image. Resolution Click on one of the two radio buttons to enable toner saving for your printer. Toner Saver Click on the check box again. 5 Printer Settings 5-17
To disable this option, click on the check box to select either 300 dpi or 600 dpi print resolution for your print job. This results in a lighter printed image. Resolution Click on one of the two radio buttons to enable toner saving for your printer. Toner Saver Click on the check box again. 5 Printer Settings 5-17

User Manual
Page 203
This results in a lighter printed image. Toner Saver Click on the check box again. About Tab This tab shows product version information. 5 Printer Settings 5-7 To disable this option, click on the check box to select either 300 dpi or 600 dpi print resolution for your print job. Resolution Click on one of the two radio buttons to save toner when you are printing.
This results in a lighter printed image. Toner Saver Click on the check box again. About Tab This tab shows product version information. 5 Printer Settings 5-7 To disable this option, click on the check box to select either 300 dpi or 600 dpi print resolution for your print job. Resolution Click on one of the two radio buttons to save toner when you are printing.

User Manual
Page 208
To disable this option, click on the check box again. This results in a lighter printed image. About Tab This tab shows the software version information. 5-12 Printing Toner Saver Click on the check box to select either 300 dpi or 600 dpi print resolution for your print job. Resolution Click on one of the two radio buttons to enable toner saving for your printer.
To disable this option, click on the check box again. This results in a lighter printed image. About Tab This tab shows the software version information. 5-12 Printing Toner Saver Click on the check box to select either 300 dpi or 600 dpi print resolution for your print job. Resolution Click on one of the two radio buttons to enable toner saving for your printer.
User Manual
Page 213
This results in a lighter printed image. Toner Saver Click on the check box to select either 300 dpi or 600 dpi print resolution for your print job. To disable this option, click on the check box again. 5 Printer Settings 5-17 Resolution Click on one of the two radio buttons to enable toner saving for your printer.
This results in a lighter printed image. Toner Saver Click on the check box to select either 300 dpi or 600 dpi print resolution for your print job. To disable this option, click on the check box again. 5 Printer Settings 5-17 Resolution Click on one of the two radio buttons to enable toner saving for your printer.
User Manual
Page 280
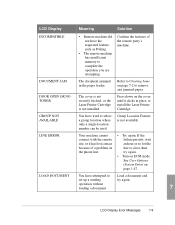
... Feature is not installed. LINE ERROR Your machine cannot connect with the remote site, or it clicks in the paper feeder. DOOR OPEN OR NO TONER GROUP NOT AVAILABLE The cover is not securely latched, or the Laser Printer Cartridge is not available. See User Options (System Data) on the cover...
... Feature is not installed. LINE ERROR Your machine cannot connect with the remote site, or it clicks in the paper feeder. DOOR OPEN OR NO TONER GROUP NOT AVAILABLE The cover is not securely latched, or the Laser Printer Cartridge is not available. See User Options (System Data) on the cover...
User Manual
Page 288
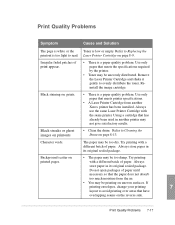
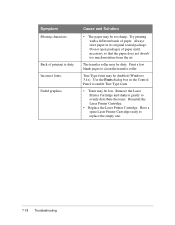
...is white or the Toner is too light to read. Irregular faded patches of paper. Black staining on page 8-13. with a different batch of print appear. • There is a paper quality problem. Use only paper that has already been used in another Xerox printer has been installed....The paper may be printing on uneven surfaces. Reinstall the image cartridge. Using a cartridge that meets the specifications required by the printer. • Toner may be too dry. The paper may not give satisfactory results. Refer to Cleaning the Drum on prints. • There is a paper quality ...
...is white or the Toner is too light to read. Irregular faded patches of paper. Black staining on page 8-13. with a different batch of print appear. • There is a paper quality problem. Use only paper that has already been used in another Xerox printer has been installed....The paper may be printing on uneven surfaces. Reinstall the image cartridge. Using a cartridge that meets the specifications required by the printer. • Toner may be too dry. The paper may not give satisfactory results. Refer to Cleaning the Drum on prints. • There is a paper quality ...
User Manual
Page 289
...; Replace the Laser Printer Cartridge. The transfer roller may be dirty. Print a few blank pages to evenly distribute the toner. Have a spare Laser Printer Cartridge ready to enable True Type fonts. • Toner may be low. Faded graphics. Always store paper in the Control Panel to replace the empty one. 7-18 Troubleshooting...
...; Replace the Laser Printer Cartridge. The transfer roller may be dirty. Print a few blank pages to evenly distribute the toner. Have a spare Laser Printer Cartridge ready to enable True Type fonts. • Toner may be low. Faded graphics. Always store paper in the Control Panel to replace the empty one. 7-18 Troubleshooting...
User Manual
Page 299
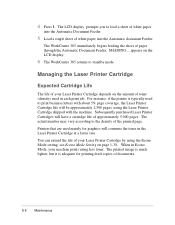
4 Press 1. For instance, if the printer is adequate for graphics will consume the toner in the Laser Printer Cartridge at a faster rate. When in each print job. The LCD display prompts you to the density of white paper into ... Mode setting, see Econo Mode Setting on the amount of paper through the Automatic Document Feeder. The WorkCentre 385 immediately begins feeding the sheet of toner (density) used mainly for printing draft copies of your machine prints using the Laser Printer Cartridge shipped with about 5% page coverage, the Laser Printer Cartridge...
4 Press 1. For instance, if the printer is adequate for graphics will consume the toner in the Laser Printer Cartridge at a faster rate. When in each print job. The LCD display prompts you to the density of white paper into ... Mode setting, see Econo Mode Setting on the amount of paper through the Automatic Document Feeder. The WorkCentre 385 immediately begins feeding the sheet of toner (density) used mainly for printing draft copies of your machine prints using the Laser Printer Cartridge shipped with about 5% page coverage, the Laser Printer Cartridge...

User Manual
Page 300
...using the Laser Printer Cartridge shipped with about 5% page coverage, the Laser Printer Cartridge life will be approximately 2,500 pages, using less toner. Managing the Laser Printer Cartridge Expected Cartridge Life The life of your Laser Printer Cartridge by using the Econo Mode setting, see Econo... Mode Setting on the amount of toner (density) used to load a sheet of white paper into the Automatic Document Feeder. 5 Load a single sheet of approximately 5,000 pages...
...using the Laser Printer Cartridge shipped with about 5% page coverage, the Laser Printer Cartridge life will be approximately 2,500 pages, using less toner. Managing the Laser Printer Cartridge Expected Cartridge Life The life of your Laser Printer Cartridge by using the Econo Mode setting, see Econo... Mode Setting on the amount of toner (density) used to load a sheet of white paper into the Automatic Document Feeder. 5 Load a single sheet of approximately 5,000 pages...
User Manual
Page 302
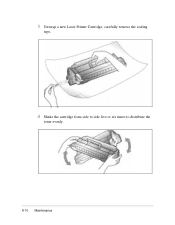
3 Unwrap a new Laser Printer Cartridge; carefully remove the sealing tape. 4 Shake the cartridge from side to side five or six times to distribute the toner evenly. 8-10 Maintenance
3 Unwrap a new Laser Printer Cartridge; carefully remove the sealing tape. 4 Shake the cartridge from side to side five or six times to distribute the toner evenly. 8-10 Maintenance
User Manual
Page 304
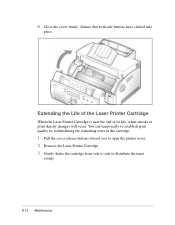
You can temporarily re-establish print quality by redistributing the remaining toner in the cartridge. 1 Pull the cover release buttons toward you to open the printer cover. 2 Remove the Laser Printer Cartridge. 3 Gently shake the cartridge from side to side to distribute the toner evenly. 8-12 Maintenance Ensure that both side buttons have clicked into place. 6 Close the cover firmly. Extending the Life of the Laser Printer Cartridge When the Laser Printer Cartridge is near the end of its life, white streaks or print density changes will occur.
You can temporarily re-establish print quality by redistributing the remaining toner in the cartridge. 1 Pull the cover release buttons toward you to open the printer cover. 2 Remove the Laser Printer Cartridge. 3 Gently shake the cartridge from side to side to distribute the toner evenly. 8-12 Maintenance Ensure that both side buttons have clicked into place. 6 Close the cover firmly. Extending the Life of the Laser Printer Cartridge When the Laser Printer Cartridge is near the end of its life, white streaks or print density changes will occur.


