
Owner's Manual
Page 1
... PROGRAM PARAMETERS 33 3-2. DIGITAL SOUND FIELD PROGRAMS 28 2-4. CONTROLS & ADJUSTMENTS 16 1-4. DESCRIPTIONS OF THE SOUND FIELD PROGRAMS 29 CREATING YOUR OWN SOUND FIELDS 33 3-1. RECORDING A SOURCE TO AUDIO/VIDEO TAPE (OR DUBBING FROM A TAPE TO ANOTHER 25 2-3. DESCRIPTIONS OF THE DIGITAL SOUND FIELD PARAMETERS 35 TROUBLESHOOTING 37 SPECIFICATIONS 38 DIGITAL SOUND FIELD PROCESSING AMPLIFIER DSP-A780 OPERATION MANUAL NATURAL SOUND DIGITAL SOUND FIELD PROCESSING AMPLIFIER DSP-A780 PRO LOGIC DSP CONTENTS PRECAUTIONS & SAFETY INSTRUCTIONS Inside Front Cover SETUP...
... PROGRAM PARAMETERS 33 3-2. DIGITAL SOUND FIELD PROGRAMS 28 2-4. CONTROLS & ADJUSTMENTS 16 1-4. DESCRIPTIONS OF THE SOUND FIELD PROGRAMS 29 CREATING YOUR OWN SOUND FIELDS 33 3-1. RECORDING A SOURCE TO AUDIO/VIDEO TAPE (OR DUBBING FROM A TAPE TO ANOTHER 25 2-3. DESCRIPTIONS OF THE DIGITAL SOUND FIELD PARAMETERS 35 TROUBLESHOOTING 37 SPECIFICATIONS 38 DIGITAL SOUND FIELD PROCESSING AMPLIFIER DSP-A780 OPERATION MANUAL NATURAL SOUND DIGITAL SOUND FIELD PROCESSING AMPLIFIER DSP-A780 PRO LOGIC DSP CONTENTS PRECAUTIONS & SAFETY INSTRUCTIONS Inside Front Cover SETUP...
Owner's Manual
Page 2
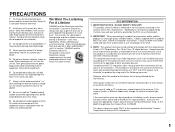
... Damage Requiring Service - or D. The user should be taken so that may impede the flow of air through the ventilation openings. 9 Heat - Please record the serial number of this Owner's Manual in performance; All the safety and operating instructions should not attempt to service the unit beyond those means described in the operating instructions. The power-supply cord or the plug has been damaged...
... Damage Requiring Service - or D. The user should be taken so that may impede the flow of air through the ventilation openings. 9 Heat - Please record the serial number of this Owner's Manual in performance; All the safety and operating instructions should not attempt to service the unit beyond those means described in the operating instructions. The power-supply cord or the plug has been damaged...
Owner's Manual
Page 3
... "Troubleshooting" section on common operating errors before concluding that your dealer. 5 Do not use force on switches, knobs or cords. Follow all installations. This equipment generates/uses radio frequencies and, if not installed and used . Utilize power outlets that are on the rear panel if that equipment requires more power than the outlets are rated to accessories and/or another product use this product in the users manual, may...
... "Troubleshooting" section on common operating errors before concluding that your dealer. 5 Do not use force on switches, knobs or cords. Follow all installations. This equipment generates/uses radio frequencies and, if not installed and used . Utilize power outlets that are on the rear panel if that equipment requires more power than the outlets are rated to accessories and/or another product use this product in the users manual, may...

Owner's Manual
Page 4
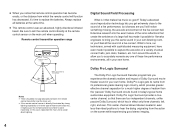
... hall to the business of digital sound field processing, however, let's get incredible realism from Dolby-Surround encoded video sources using the built-in the field of digital audio processing to bring you get right down to a cozy jazz club. You are the proud owner of listening experiences. Congratulations! The DSP system takes full advantage of Yamaha's undisputed leadership in Dolby Pro Logic Surround Decoder.
... hall to the business of digital sound field processing, however, let's get incredible realism from Dolby-Surround encoded video sources using the built-in the field of digital audio processing to bring you get right down to a cozy jazz club. You are the proud owner of listening experiences. Congratulations! The DSP system takes full advantage of Yamaha's undisputed leadership in Dolby Pro Logic Surround Decoder.
Owner's Manual
Page 6
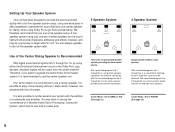
... concert hall. q If the remote control sensor is it 's time to bring you 'll still notice something missing, the acoustic environment of Dolby Surround movie theater sound in today's typical home audio/video equipment. In this same sound in effect only three channels: left, right, and rear. from which provides greater effective channel separation for Yamaha engineers to replace the batteries. This center channel allows listeners seated in...
... concert hall. q If the remote control sensor is it 's time to bring you 'll still notice something missing, the acoustic environment of Dolby Surround movie theater sound in today's typical home audio/video equipment. In this same sound in effect only three channels: left, right, and rear. from which provides greater effective channel separation for Yamaha engineers to replace the batteries. This center channel allows listeners seated in...
Owner's Manual
Page 7
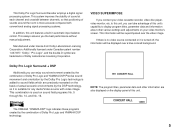
... is no video source connected or it is turned off, the information will be displayed over the video image. This always assures you connect your video monitor's screen. VIDEO SUPERIMPOSE If you the best performance without manual adjustment. This Dolby Pro Logic Surround Decoder employs a digital signal processing system. Dolby Pro Logic Surround + DSP Additionally you can enjoy sound environment created by the DSP technology, so it is suitable for any Audio/Video source with conventional analog signal processing systems...
... is no video source connected or it is turned off, the information will be displayed over the video image. This always assures you connect your video monitor's screen. VIDEO SUPERIMPOSE If you the best performance without manual adjustment. This Dolby Pro Logic Surround Decoder employs a digital signal processing system. Dolby Pro Logic Surround + DSP Additionally you can enjoy sound environment created by the DSP technology, so it is suitable for any Audio/Video source with conventional analog signal processing systems...
Owner's Manual
Page 8
... one center speaker for dialog, when using Dolby Pro Logic Surround decoding. You can be obtained. This is output from the center channel. Therefore, if you use the center speaker unit. If for some reason it is not practical to use a center speaker, it . With sound field programs No. 1 through No. 4, a sound effect matching that you want to upgrade the Audio/Video home theater system, it is possible to enjoy movie viewing without center speaker...
... one center speaker for dialog, when using Dolby Pro Logic Surround decoding. You can be obtained. This is output from the center channel. Therefore, if you use the center speaker unit. If for some reason it is not practical to use a center speaker, it . With sound field programs No. 1 through No. 4, a sound effect matching that you want to upgrade the Audio/Video home theater system, it is possible to enjoy movie viewing without center speaker...
Owner's Manual
Page 11
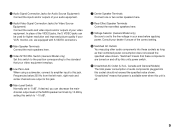
... components are equipped with S-VIDEO connectors. 3 Main Speaker Terminals Connect the main speakers here. 4 Video NTSC/PAL Switch (General Model only) Set this unit is off by setting this switch to "-10 dB". 7 Center Speaker Terminals Connect one or two center speakers here. 8 Rear Effect Speaker Terminals Connect the rear effect speakers here. 9 Voltage Selector (General Model only) Be sure to set to this unit's power switch. 1 Audio Signal Connection Jacks (for Audio Source Equipment) Connect the inputs and/or outputs of your audio equipment. 2 Audio/Video Signal Connection Jacks...
... components are equipped with S-VIDEO connectors. 3 Main Speaker Terminals Connect the main speakers here. 4 Video NTSC/PAL Switch (General Model only) Set this unit is off by setting this switch to "-10 dB". 7 Center Speaker Terminals Connect one or two center speakers here. 8 Rear Effect Speaker Terminals Connect the rear effect speakers here. 9 Voltage Selector (General Model only) Be sure to set to this unit's power switch. 1 Audio Signal Connection Jacks (for Audio Source Equipment) Connect the inputs and/or outputs of your audio equipment. 2 Audio/Video Signal Connection Jacks...
Owner's Manual
Page 13
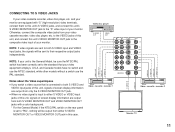
.../PAL switch on the rear panel is input to either S VIDEO MONITOR OUT or VIDEO MONITOR OUT jack in this unit, signals of screen display information are output from your video cassette recorder, video disc player, etc. Otherwise, connect the composite video jacks from both S VIDEO and VIDEO input jacks of this unit, signals of screen display information are output from either S VIDEO or VIDEO input jacks of this case. Video disc player S-VIDEO OUT VIDEO OUT NOTE: If your monitor. and Canada models have no video signal is set to the "S" video input...
.../PAL switch on the rear panel is input to either S VIDEO MONITOR OUT or VIDEO MONITOR OUT jack in this unit, signals of screen display information are output from your video cassette recorder, video disc player, etc. Otherwise, connect the composite video jacks from both S VIDEO and VIDEO input jacks of this unit, signals of screen display information are output from either S VIDEO or VIDEO input jacks of this case. Video disc player S-VIDEO OUT VIDEO OUT NOTE: If your monitor. and Canada models have no video signal is set to the "S" video input...
Owner's Manual
Page 18
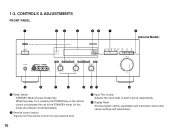
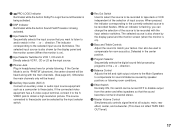
CONTROLS & ADJUSTMENTS FRONT PANEL 1 23 4 56 7 NATURAL SOUND DIGITAL SOUND FIELD PROCESSING AMPLIFIER DSP-A780 PRO LOGIC DSP 8 (General Model) 9 0 A B C DE F 1 Power Switch * STANDBY Mode (Europe model only) While the power is on, pressing the POWER key on the remote control unit switches the unit to the STANDBY mode. (In this mode, the indicator is half illuminated.) 2 Remote control sensor Signals from the remote control unit are received here. 3 Input Trim Control Adjusts the input level of each source respectively. 4 Display Panel Shows program names, parameters and ...
CONTROLS & ADJUSTMENTS FRONT PANEL 1 23 4 56 7 NATURAL SOUND DIGITAL SOUND FIELD PROCESSING AMPLIFIER DSP-A780 PRO LOGIC DSP 8 (General Model) 9 0 A B C DE F 1 Power Switch * STANDBY Mode (Europe model only) While the power is on, pressing the POWER key on the remote control unit switches the unit to the STANDBY mode. (In this mode, the indicator is half illuminated.) 2 Remote control sensor Signals from the remote control unit are received here. 3 Input Trim Control Adjusts the input level of each source respectively. 4 Display Panel Shows program names, parameters and ...
Owner's Manual
Page 19
... Out Switch Used to select the source to be heard. 0 Auxiliary Input Jacks (AUX 2) Connect an auxiliary video or audio input source equipment such as the input source. 9 Phones Jack Plug in headphones here for room acoustics. The selected source is also shown by speaker positions or listening room conditions. B Bass and Treble Controls Adjust the sound to compensate for sound imbalance caused by the display panel and the monitor screen (when the monitor is on ). direction. D Balance Control Adjusts the left and right output volume...
... Out Switch Used to select the source to be heard. 0 Auxiliary Input Jacks (AUX 2) Connect an auxiliary video or audio input source equipment such as the input source. 9 Phones Jack Plug in headphones here for room acoustics. The selected source is also shown by speaker positions or listening room conditions. B Bass and Treble Controls Adjust the sound to compensate for sound imbalance caused by the display panel and the monitor screen (when the monitor is on ). direction. D Balance Control Adjusts the left and right output volume...
Owner's Manual
Page 20
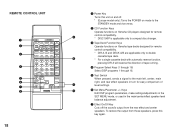
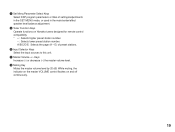
... only to double cassette tape deck. * For a single cassette deck with automatic reverse function, pressing DIR A will reverse the direction of tape running. 4 Program Select Keys (1 through 16) Select DSP programs 1 through 16. 5 Test Switch When pressed, sends a signal to the main left, center, main right, and rear effect speakers in turn for easy comparison of level settings. 6 Set Menu/Parameter +/- REMOTE CONTROL UNIT 1 2 3 4 5 6 7 8 SKIP POWER PAUSE/STOP PLAY CD DISC SKIP PRESET A/B/C/D/E TUNER DECK A/B DIR A PLAY DIR B TAPE REC/PAUSE STOP...
... only to double cassette tape deck. * For a single cassette deck with automatic reverse function, pressing DIR A will reverse the direction of tape running. 4 Program Select Keys (1 through 16) Select DSP programs 1 through 16. 5 Test Switch When pressed, sends a signal to the main left, center, main right, and rear effect speakers in turn for easy comparison of level settings. 6 Set Menu/Parameter +/- REMOTE CONTROL UNIT 1 2 3 4 5 6 7 8 SKIP POWER PAUSE/STOP PLAY CD DISC SKIP PRESET A/B/C/D/E TUNER DECK A/B DIR A PLAY DIR B TAPE REC/PAUSE STOP...
Owner's Manual
Page 21
...the indicator on the master VOLUME control flashes on Yamaha tuners designed for remote control compatibility. * +: Selects higher preset station number. -: Selects lower preset station number. 8 Set Menu/Parameter Select Keys Select DSP program parameters or titles of preset stations. 0 Input Selector Keys Select the input sources to this unit. B Muting Key Mutes the master volume level by 20 dB. A Master Volume +/- E) of settings/adjustments in the SET MENU mode, or used in the main/center/effect speaker level balance adjustment. 9 Tuner Function Keys Operate functions on and off...
...the indicator on the master VOLUME control flashes on Yamaha tuners designed for remote control compatibility. * +: Selects higher preset station number. -: Selects lower preset station number. 8 Set Menu/Parameter Select Keys Select DSP program parameters or titles of preset stations. 0 Input Selector Keys Select the input sources to this unit. B Muting Key Mutes the master volume level by 20 dB. A Master Volume +/- E) of settings/adjustments in the SET MENU mode, or used in the main/center/effect speaker level balance adjustment. 9 Tuner Function Keys Operate functions on and off...
Owner's Manual
Page 22
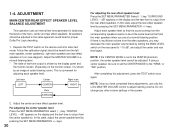
... test-tone output is shown by the display panel and the monitor screen. (Especially on the rear panel to "-10 dB", and adjust the center and rear level again. ADJUSTMENT MAIN/CENTER/REAR EFFECT SPEAKER LEVEL BALANCE ADJUSTMENT This operation uses an internal test-tone generator for adjusting each speaker level. All speakers should be sure to set to enter test mode. Left main LEFT Center CENTER Right main RIGHT Rear SURROUND For adjusting the rear effect speaker level: Press the SET MENU/PARAMETER Select (w) key. Do not change any other volume settings in turn (see diagram...
... test-tone output is shown by the display panel and the monitor screen. (Especially on the rear panel to "-10 dB", and adjust the center and rear level again. ADJUSTMENT MAIN/CENTER/REAR EFFECT SPEAKER LEVEL BALANCE ADJUSTMENT This operation uses an internal test-tone generator for adjusting each speaker level. All speakers should be sure to set to enter test mode. Left main LEFT Center CENTER Right main RIGHT Rear SURROUND For adjusting the rear effect speaker level: Press the SET MENU/PARAMETER Select (w) key. Do not change any other volume settings in turn (see diagram...
Owner's Manual
Page 24
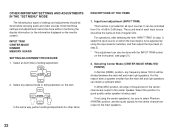
... monitor screen). Select this reason even a speaker smaller than the main left and main right speakers. SET MENU PARAMETER In the same way, perform settings/adjustments for the center channel are output to select Phantom (PHNTM) position, and the audio signals for other items. DESCRIPTIONS OF THE ITEMS 1. For operations, after selecting the item "INPUT TRIM" (in step 2). * This adjustment can obtain a sufficient effect. INPUT TRIM CENTER MODE DIMMER MEMORY GUARD SETTING/ADJUSTMENT PROCEDURE 1. Select...
... monitor screen). Select this reason even a speaker smaller than the main left and main right speakers. SET MENU PARAMETER In the same way, perform settings/adjustments for the center channel are output to select Phantom (PHNTM) position, and the audio signals for other items. DESCRIPTIONS OF THE ITEMS 1. For operations, after selecting the item "INPUT TRIM" (in step 2). * This adjustment can obtain a sufficient effect. INPUT TRIM CENTER MODE DIMMER MEMORY GUARD SETTING/ADJUSTMENT PROCEDURE 1. Select...
Owner's Manual
Page 26
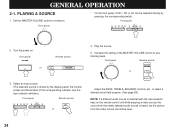
... panel POWER or Remote control POWER 4. GENERAL OPERATION 2-1. Front panel 2. Increase the setting of the corresponding indicator over the input selector switches.) Front panel Remote control CD or Adjust the BASS, TREBLE, BALANCE controls, etc., or select a desired sound field program. (See page 28.) NOTE: If a different audio source is selected with the input selector keys on . Front panel * On the front panel, VCR 1, CD or LD can still be selected directly by the display panel, the monitor screen and illumination of the MASTER VOLUME control...
... panel POWER or Remote control POWER 4. GENERAL OPERATION 2-1. Front panel 2. Increase the setting of the corresponding indicator over the input selector switches.) Front panel Remote control CD or Adjust the BASS, TREBLE, BALANCE controls, etc., or select a desired sound field program. (See page 28.) NOTE: If a different audio source is selected with the input selector keys on . Front panel * On the front panel, VCR 1, CD or LD can still be selected directly by the display panel, the monitor screen and illumination of the MASTER VOLUME control...
Owner's Manual
Page 27
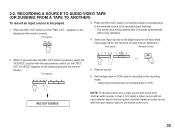
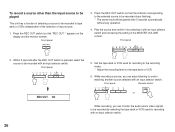
... selected source to be recorded stops flashing). * The same result will be played 1. Set the tape deck or VCR used for the method of input source selection.) Front panel Remote Control 2. RECORDING A SOURCE TO AUDIO/VIDEO TAPE (OR DUBBING FROM A TAPE TO ANOTHER) To record an input source to the recording mode. * Adjust the recording level on the display and the monitor screen). Press the REC OUT switch (so that "REC OUT..." Front panel CD or 5. Select an input source to be played...
... selected source to be recorded stops flashing). * The same result will be played 1. Set the tape deck or VCR used for the method of input source selection.) Front panel Remote Control 2. RECORDING A SOURCE TO AUDIO/VIDEO TAPE (OR DUBBING FROM A TAPE TO ANOTHER) To record an input source to the recording mode. * Adjust the recording level on the display and the monitor screen). Press the REC OUT switch (so that "REC OUT..." Front panel CD or 5. Select an input source to be played...
Owner's Manual
Page 28
... selecting it by selecting the tape deck or VCR used for recording with an input selector switch. Set the tape deck or VCR used for recording to the recording mode. * Adjust the recording level on the display and the monitor screen). Play the source and confirm it with an input selector switch. Front panel Remote control TUNER or While recording, you can monitor the audio and/or video signals to and/or watching another source selected with an input selector switch. 26 Front panel...
... selecting it by selecting the tape deck or VCR used for recording with an input selector switch. Set the tape deck or VCR used for recording to the recording mode. * Adjust the recording level on the display and the monitor screen). Play the source and confirm it with an input selector switch. Front panel Remote control TUNER or While recording, you can monitor the audio and/or video signals to and/or watching another source selected with an input selector switch. 26 Front panel...
Owner's Manual
Page 30
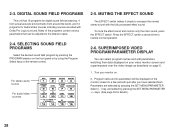
... switch a second time to the listener's taste. 2-4. Turn your video monitor screen and superimposed over the video image as described on the remote control. DIGITAL SOUND FIELD PROGRAMS This unit has 16 programs for digital sound field processing, 4 from actual acoustic environments from around the world, and 12 programs for details.) 28 For stereo audio source For audio/video sources HALL CHURCH JAZZ CLUB ROCK CNCT CONCERT VIDEO OPERA CLASSIC FILM ANIMATION TV THEATER...
... switch a second time to the listener's taste. 2-4. Turn your video monitor screen and superimposed over the video image as described on the remote control. DIGITAL SOUND FIELD PROGRAMS This unit has 16 programs for digital sound field processing, 4 from actual acoustic environments from around the world, and 12 programs for details.) 28 For stereo audio source For audio/video sources HALL CHURCH JAZZ CLUB ROCK CNCT CONCERT VIDEO OPERA CLASSIC FILM ANIMATION TV THEATER...
Owner's Manual
Page 39
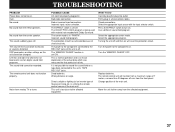
... speakers. DSP parameters or other settings on . Left rear and right rear channels not balanced in "PHNTM". The remote control unit does not function properly. Bad or incorrect input connection. The power to the component connected to the REC OUT jacks of short circuit etc. Turn the "MEMORY GUARD" OFF. Replace batteries. No sound. The sound suddenly goes off -axis from the front panel. The EFFECT switch is off. Select the appropriate input source with Dolby Surround. Select...
... speakers. DSP parameters or other settings on . Left rear and right rear channels not balanced in "PHNTM". The remote control unit does not function properly. Bad or incorrect input connection. The power to the component connected to the REC OUT jacks of short circuit etc. Turn the "MEMORY GUARD" OFF. Replace batteries. No sound. The sound suddenly goes off -axis from the front panel. The EFFECT switch is off. Select the appropriate input source with Dolby Surround. Select...


