
Owner's Manual
Page 2
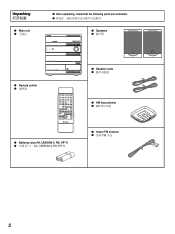
... TAPE REC/PAUSE KEY/ECHO YMERSION BASS BOOST MUSIC LEVEL POWER SLEEP /I INPUT VOLUME q AM loop antenna q q Batteries (size AA, UM/SUM-3, R6, HP-7) q q Indoor FM antenna q 2 Unpacking q Main unit q q After unpacking, check that the following parts are contained. q 3-DISC VCD CHANGER STANDBY TIMER MINI COMPONENT SYSTEM GX-500VCD AUTO REVERSE CASSETTE DECK DOLBY B NR DISC 1 DISC 2 DISC 3 DISC CHANGE OPEN / CLOSE PRESET/ TUNING/ BAND A/B/C/D/E VOLUME DOWN UP YMERSION B.BOOST MUSIC INPUT INPUT STANDBY/ON DIRECTION q Speakers q q Speaker cords q q Remote control...
... TAPE REC/PAUSE KEY/ECHO YMERSION BASS BOOST MUSIC LEVEL POWER SLEEP /I INPUT VOLUME q AM loop antenna q q Batteries (size AA, UM/SUM-3, R6, HP-7) q q Indoor FM antenna q 2 Unpacking q Main unit q q After unpacking, check that the following parts are contained. q 3-DISC VCD CHANGER STANDBY TIMER MINI COMPONENT SYSTEM GX-500VCD AUTO REVERSE CASSETTE DECK DOLBY B NR DISC 1 DISC 2 DISC 3 DISC CHANGE OPEN / CLOSE PRESET/ TUNING/ BAND A/B/C/D/E VOLUME DOWN UP YMERSION B.BOOST MUSIC INPUT INPUT STANDBY/ON DIRECTION q Speakers q q Speaker cords q q Remote control...
Owner's Manual
Page 8
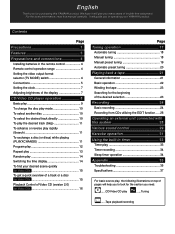
... and connections 4 Installing batteries in the remote control 4 Remote control operation range 4 Setting the video output format selector (TV MODE) switch 4 Connections 5 Setting the clock 7 Adjusting brightness of the display 7 CD/Video CD player operation 8 Basic play 9 To change the disc play mode 10 To select another disc 10 To select the desired track directly 10 To play the desired track (Skip 11 To advance or reverse play rapidly (Search 11 To exchange a disc (or discs) while playing (PLAYXCHANGE 11 Program play 12 Repeat play 13 Random play ......Tuning ......Tape...
... and connections 4 Installing batteries in the remote control 4 Remote control operation range 4 Setting the video output format selector (TV MODE) switch 4 Connections 5 Setting the clock 7 Adjusting brightness of the display 7 CD/Video CD player operation 8 Basic play 9 To change the disc play mode 10 To select another disc 10 To select the desired track directly 10 To play the desired track (Skip 11 To advance or reverse play rapidly (Search 11 To exchange a disc (or discs) while playing (PLAYXCHANGE 11 Program play 12 Repeat play 13 Random play ......Tuning ......Tape...
Owner's Manual
Page 9
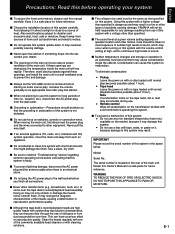
... direct sunlight or close to sudden high levels of sound, which may damage this system. • Do not use of accidents causing damage. s To prevent a malfunction of sound. Model: Serial No.: The serial number is located on with no tape loaded until normal play has started. Keep it may result. If something drops into the set the VOLUME control to minimum before starting an audio source play: increase the volume...
... direct sunlight or close to sudden high levels of sound, which may damage this system. • Do not use of accidents causing damage. s To prevent a malfunction of sound. Model: Serial No.: The serial number is located on with no tape loaded until normal play has started. Keep it may result. If something drops into the set the VOLUME control to minimum before starting an audio source play: increase the volume...
Owner's Manual
Page 10
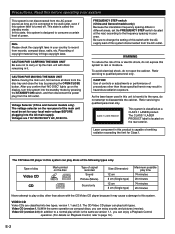
..., compact discs, radio, etc. The CLASS 1 LASER PRODUCT label is located on the rear panel of emitting radiation exceeding the limit for your local main voltage BEFORE plugging into the standby mode by pressing the STANDBY/ON switch, and then disconnect the power plug from the disc tray and close the tray by pressing the OPEN/CLOSE button. Type of disc Video CD CD Mark printed on the disc Type of signal recorded Sound...
..., compact discs, radio, etc. The CLASS 1 LASER PRODUCT label is located on the rear panel of emitting radiation exceeding the limit for your local main voltage BEFORE plugging into the standby mode by pressing the STANDBY/ON switch, and then disconnect the power plug from the disc tray and close the tray by pressing the OPEN/CLOSE button. Type of disc Video CD CD Mark printed on the disc Type of signal recorded Sound...
Owner's Manual
Page 11
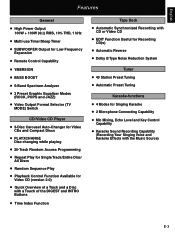
... Power Output 100W + 100W (6Ω) RMS, 10% THD, 1 kHz ● Multi-use Timer/Sleep Timer ● SUBWOOFER Output for Low Frequency Expansion ● Remote Control Capability ● YMERSION ● BASS BOOST ● 5-Band Spectrum Analyzer ● 3 Preset Graphic Equalizer Modes (ROCK, POPS and JAZZ) ● Video Output Format Selector (TV MODE) Switch CD/Video CD Player ● 3-Disc Carousel Auto-Changer for Video CDs and Compact Discs ● PLAYXCHANGE Disc changing while playing ● 20-Track Random Access Programming ● Repeat Play...
... Power Output 100W + 100W (6Ω) RMS, 10% THD, 1 kHz ● Multi-use Timer/Sleep Timer ● SUBWOOFER Output for Low Frequency Expansion ● Remote Control Capability ● YMERSION ● BASS BOOST ● 5-Band Spectrum Analyzer ● 3 Preset Graphic Equalizer Modes (ROCK, POPS and JAZZ) ● Video Output Format Selector (TV MODE) Switch CD/Video CD Player ● 3-Disc Carousel Auto-Changer for Video CDs and Compact Discs ● PLAYXCHANGE Disc changing while playing ● 20-Track Random Access Programming ● Repeat Play...
Owner's Manual
Page 12
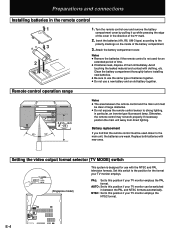
Remote control operation range 3-DISC VCD CHANGER DISC 1 DISC 2 DISC 3 DISC CHANGE OPEN / CLOSE PRESET/ TUNING/ BAND A/B/C/D/E VOLUME DOWN UP MINI COMPONENT SYSTEM GX-700 PUSH OPEN SET MD REC/PAUSE TAPE MODE- Set this position if your TV monitor employs. Preparations and connections Installing batteries in the direction of the battery compartment. 3. Avoid touching the leaked material and contact with new ones. START MD MINIDISC RECORDER 0.2 m - 6 m (8" -20') 30° 30° Notes ● The area between the remote control and the...
Remote control operation range 3-DISC VCD CHANGER DISC 1 DISC 2 DISC 3 DISC CHANGE OPEN / CLOSE PRESET/ TUNING/ BAND A/B/C/D/E VOLUME DOWN UP MINI COMPONENT SYSTEM GX-700 PUSH OPEN SET MD REC/PAUSE TAPE MODE- Set this position if your TV monitor employs. Preparations and connections Installing batteries in the direction of the battery compartment. 3. Avoid touching the leaked material and contact with new ones. START MD MINIDISC RECORDER 0.2 m - 6 m (8" -20') 30° 30° Notes ● The area between the remote control and the...
Owner's Manual
Page 13
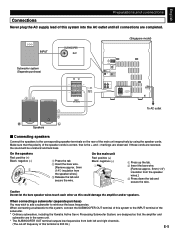
... OPTICAL TV MODE PAL AUTO NTSC SUBWOOFER OUT VIDEO SIGNAL MONITOR OUT AUX/MD R L OUT IN R L FRONT SPEAKERS 6 Ω MIN./SPEAKER SEE OWNER'S MANUAL FOR CONNECTION. When connecting a subwoofer (separate purchase) You may wish to add a subwoofer to the corresponding speaker terminals on the rear of the speaker cords is correct, that the amplifier and subwoofer are completed. Make sure that the polarity of the main unit respectively by using the speaker cords. On the speakers Red...
... OPTICAL TV MODE PAL AUTO NTSC SUBWOOFER OUT VIDEO SIGNAL MONITOR OUT AUX/MD R L OUT IN R L FRONT SPEAKERS 6 Ω MIN./SPEAKER SEE OWNER'S MANUAL FOR CONNECTION. When connecting a subwoofer (separate purchase) You may wish to add a subwoofer to the corresponding speaker terminals on the rear of the speaker cords is correct, that the amplifier and subwoofer are completed. Make sure that the polarity of the main unit respectively by using the speaker cords. On the speakers Red...
Owner's Manual
Page 14
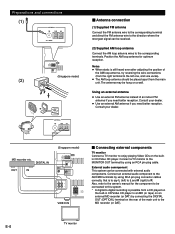
... loop antenna for the component to be placed apart from a CD played on the built-in CD/Video CD player to an MD (or tape) on the rear of the main unit to the AUX/MD terminals by using an RCA pin plug cable. Preparations and connections (1) ANTENNA FM GND AM 75Ω UNBAL. (2) ANTENNA FM GND AM 75Ω UNBAL. DEGITAL OUT OPTICAL TV MODE PAL AUTO NTSC SUBWOOFER VIDEO SIGNAL...
... loop antenna for the component to be placed apart from a CD played on the built-in CD/Video CD player to an MD (or tape) on the rear of the main unit to the AUX/MD terminals by using an RCA pin plug cable. Preparations and connections (1) ANTENNA FM GND AM 75Ω UNBAL. (2) ANTENNA FM GND AM 75Ω UNBAL. DEGITAL OUT OPTICAL TV MODE PAL AUTO NTSC SUBWOOFER VIDEO SIGNAL...

Owner's Manual
Page 15
... Changes. Singapore model uses a 24-hour display. Press and hold DISPLAY for about 5 minutes without any power supply. Note In the event of the display. English Setting the clock DISC 1 DISC 2 DISC 3 DISC CHANGE OPEN / CLOSE 3-DISC VCD CHANGER STANDBY TIMER PRESET/ TUNING/ BAND A/B/C/D/E VOLUME DOWN UP PHONES 1 MIC 2 BASS TREBLE MIC MIXING MIN MAX YMERSION B.BOOST MUSIC INPUT INPUT KARAOKE RANDOM REPEAT TIME MODE HOUR MIN DOLBY NR REC/PAUSE AUTO/MANUAL MEMORY DISPLAY TIMER TIME ADJ STANDBY/ON AUTO REVERSE CASSETTE DECK DOLBY B NR DIRECTION 1 DISPLAY...
... Changes. Singapore model uses a 24-hour display. Press and hold DISPLAY for about 5 minutes without any power supply. Note In the event of the display. English Setting the clock DISC 1 DISC 2 DISC 3 DISC CHANGE OPEN / CLOSE 3-DISC VCD CHANGER STANDBY TIMER PRESET/ TUNING/ BAND A/B/C/D/E VOLUME DOWN UP PHONES 1 MIC 2 BASS TREBLE MIC MIXING MIN MAX YMERSION B.BOOST MUSIC INPUT INPUT KARAOKE RANDOM REPEAT TIME MODE HOUR MIN DOLBY NR REC/PAUSE AUTO/MANUAL MEMORY DISPLAY TIMER TIME ADJ STANDBY/ON AUTO REVERSE CASSETTE DECK DOLBY B NR DIRECTION 1 DISPLAY...
Owner's Manual
Page 16
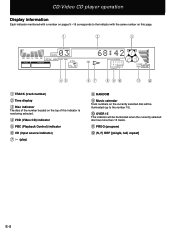
... TOTAL REM VCD PBC MUSIC PROGRAM CD RANDOM 123456 7 8 9 10 11 12 13 14 15 OVER 15 S F REP PROG VOLUME 45 67 8 90 AB 1 TRACK (track number) 2 Time display 3 Disc indicator The disc of the number located on the top of this indicator is now being selected. 4 VCD (Video CD) indicator 5 PBC (Playback Control) indicator 6 CD (input source indicator) 7 (play) 8 RANDOM 9 Music calendar Track numbers on the currently selected...
... TOTAL REM VCD PBC MUSIC PROGRAM CD RANDOM 123456 7 8 9 10 11 12 13 14 15 OVER 15 S F REP PROG VOLUME 45 67 8 90 AB 1 TRACK (track number) 2 Time display 3 Disc indicator The disc of the number located on the top of this indicator is now being selected. 4 VCD (Video CD) indicator 5 PBC (Playback Control) indicator 6 CD (input source indicator) 7 (play) 8 RANDOM 9 Music calendar Track numbers on the currently selected...
Owner's Manual
Page 17
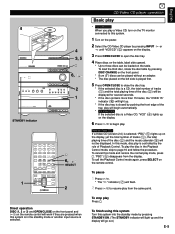
... input source is a Video CD, "VCD" (4) lights up on the display, yet the total number of tracks (1), the total playing time of the tray, play will flash. 2 Press / to resume play mode, press . To cancel this mode and restore the normal play from the display. To pause 1 Press / . * The " " indicator (7) will begin automatically. * For Video CDs If the selected disc is selected. To finish using this system Turn this system. 1 Turn on the power. 2 Select the CD/Video CD player...
... input source is a Video CD, "VCD" (4) lights up on the display, yet the total number of tracks (1), the total playing time of the tray, play will flash. 2 Press / to resume play mode, press . To cancel this mode and restore the normal play from the display. To pause 1 Press / . * The " " indicator (7) will begin automatically. * For Video CDs If the selected disc is selected. To finish using this system Turn this system. 1 Turn on the power. 2 Select the CD/Video CD player...
Owner's Manual
Page 20
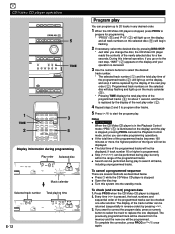
... play order (2). 4 Repeat steps 2 and 3 to program other tracks. 5 Press / to search all track numbers on the display) and the play . To complete the correction, press PROG or / once again. CD/Video CD player operation DISC 1 DISC 2 DISC 3 DISC CHANGE OPEN / CLOSE PRESET/ TUNING/ BAND A/B/C/D/E VOLUME DOWN UP 5 YMERSION B.BOOST MUSIC INPUT INPUT KARAOKE RANDOM REPEAT TIME MODE HOUR MIN DOLBY NR REC/PAUSE AUTO/MANUAL MEMORY DISPLAY TIMER TIME ADJ STANDBY/ON TIME DIRECTION 1 TIME 2 1 2 3 4 5 1 2 3 4 5 6 7 8 PRESET 6 7 8 9 0 A B C D E TIME...
... play order (2). 4 Repeat steps 2 and 3 to program other tracks. 5 Press / to search all track numbers on the display) and the play . To complete the correction, press PROG or / once again. CD/Video CD player operation DISC 1 DISC 2 DISC 3 DISC CHANGE OPEN / CLOSE PRESET/ TUNING/ BAND A/B/C/D/E VOLUME DOWN UP 5 YMERSION B.BOOST MUSIC INPUT INPUT KARAOKE RANDOM REPEAT TIME MODE HOUR MIN DOLBY NR REC/PAUSE AUTO/MANUAL MEMORY DISPLAY TIMER TIME ADJ STANDBY/ON TIME DIRECTION 1 TIME 2 1 2 3 4 5 1 2 3 4 5 6 7 8 PRESET 6 7 8 9 0 A B C D E TIME...
Owner's Manual
Page 24
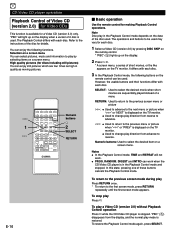
... to change play by pressing DISC SKIP on the remote control. * "PBC" (5) lights up on the TV monitor. To return to the previous screen mode during play direction from advance to select the desired item on the TV monitor. TIME EDIT +10 MODE REPEAT RANDOM TUNER TUNER VCD/CD DISC SKIP TIME INDEX RETURN SELECT KARAOKE INTRO DIGEST DIRECTION TAPE REC/PAUSE KEY/ECHO YMERSION BASS BOOST MUSIC LEVEL POWER SLEEP /I INPUT VOLUME Numeric buttons...
... to change play by pressing DISC SKIP on the remote control. * "PBC" (5) lights up on the TV monitor. To return to the previous screen mode during play direction from advance to select the desired item on the TV monitor. TIME EDIT +10 MODE REPEAT RANDOM TUNER TUNER VCD/CD DISC SKIP TIME INDEX RETURN SELECT KARAOKE INTRO DIGEST DIRECTION TAPE REC/PAUSE KEY/ECHO YMERSION BASS BOOST MUSIC LEVEL POWER SLEEP /I INPUT VOLUME Numeric buttons...

Owner's Manual
Page 32
..." (6) lights up on the tray with side A upward. 3 4 DIRECTION 4 Press DIRECTION or MODE to change the display to change the current setting 7 if necessary. You do not need to record. 1 3 Load a tape on the display. YMERSION B.BOOST MUSIC INPUT INPUT Basic recording KARAOKE RANDOM REPEAT TIME DISPLAY 1 Turn on page 21. Recording DISC 1 DISC 2 DISC 3 DISC CHANGE OPEN / CLOSE PRESET/ TUNING/ BAND A/B/C/D/E VOLUME DOWN UP 2 Notes ● Adjusting the VOLUME, BASS and TREBLE controls, B. Pressing DISPLAY again will restore the previous display mode...
..." (6) lights up on the tray with side A upward. 3 4 DIRECTION 4 Press DIRECTION or MODE to change the display to change the current setting 7 if necessary. You do not need to record. 1 3 Load a tape on the display. YMERSION B.BOOST MUSIC INPUT INPUT Basic recording KARAOKE RANDOM REPEAT TIME DISPLAY 1 Turn on page 21. Recording DISC 1 DISC 2 DISC 3 DISC CHANGE OPEN / CLOSE PRESET/ TUNING/ BAND A/B/C/D/E VOLUME DOWN UP 2 Notes ● Adjusting the VOLUME, BASS and TREBLE controls, B. Pressing DISPLAY again will restore the previous display mode...
Owner's Manual
Page 36
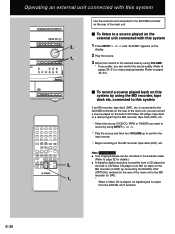
... the desired level by connecting the DIGITAL OUT (OPTICAL) terminal on the rear of the main unit to a source played on the external unit connected with this system DISC 1 DISC 2 DISC 3 DISC CHANGE OPEN / CLOSE PRESET/ TUNING/ BAND A/B/C/D/E VOLUME DOWN UP YMERSION B.BOOST MUSIC INPUT INPUT KARAOKE RANDOM REPEAT TIME MODE HOUR MIN DOLBY NR REC/PAUSE AUTO/MANUAL MEMORY DISPLAY TIMER TIME ADJ STANDBY/ON 3, 2 1, 1 Use the external unit connected to the AUX/MD terminals on the 3 Adjust the volume to pages 32...
... the desired level by connecting the DIGITAL OUT (OPTICAL) terminal on the rear of the main unit to a source played on the external unit connected with this system DISC 1 DISC 2 DISC 3 DISC CHANGE OPEN / CLOSE PRESET/ TUNING/ BAND A/B/C/D/E VOLUME DOWN UP YMERSION B.BOOST MUSIC INPUT INPUT KARAOKE RANDOM REPEAT TIME MODE HOUR MIN DOLBY NR REC/PAUSE AUTO/MANUAL MEMORY DISPLAY TIMER TIME ADJ STANDBY/ON 3, 2 1, 1 Use the external unit connected to the AUX/MD terminals on the 3 Adjust the volume to pages 32...
Owner's Manual
Page 38
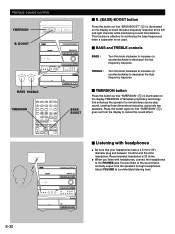
... stereo source play sound, creating three-dimensional acoustics using only two speakers. BOOST BASS TREBLE DISC 1 DISC 2 DISC 3 DISC CHANGE OPEN / CLOSE 3-DISC VCD CHANGER STANDBY TIMER PRESET/ TUNING/ BAND A/B/C/D/E VOLUME DOWN UP PHONES 1 MIC 2 BASS TREBLE MIC MIXING YMERSION B.BOOST MUSIC INPUT INPUT KARAOKE RANDOM REPEAT TIME MODE HOUR MIN DOLBY NR REC/PAUSE AUTO/MANUAL MEMORY DISPLAY TIMER TIME ADJ STANDBY/ON AUTO REVERSE CASSETTE DECK DOLBY B NR DIRECTION BASS TREBLE YMERSION 6 7 8 PRESET 6 7 8 9 0 A B C D E TIME PROG R. Adjust...
... stereo source play sound, creating three-dimensional acoustics using only two speakers. BOOST BASS TREBLE DISC 1 DISC 2 DISC 3 DISC CHANGE OPEN / CLOSE 3-DISC VCD CHANGER STANDBY TIMER PRESET/ TUNING/ BAND A/B/C/D/E VOLUME DOWN UP PHONES 1 MIC 2 BASS TREBLE MIC MIXING YMERSION B.BOOST MUSIC INPUT INPUT KARAOKE RANDOM REPEAT TIME MODE HOUR MIN DOLBY NR REC/PAUSE AUTO/MANUAL MEMORY DISPLAY TIMER TIME ADJ STANDBY/ON AUTO REVERSE CASSETTE DECK DOLBY B NR DIRECTION BASS TREBLE YMERSION 6 7 8 PRESET 6 7 8 9 0 A B C D E TIME PROG R. Adjust...
Owner's Manual
Page 39
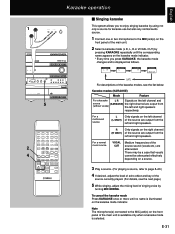
... use but also any normal audio source. 1 Connect one or two microphones to the MIC jack(s) on the front panel of the main unit is available only when a karaoke mode is displayed as follows. Karaoke operation English 1 PHONES 1 MIC 2 BASS DISC 1 DISC 2 DISC 3 DISC CHANGE OPEN / CLOSE 3-DISC VCD CHANGER STANDBY TIMER PRESET/ TUNING/ BAND A/B/C/D/E VOLUME DOWN UP PHONES 1 MIC 2 BASS TREBLE MIC MIXING MIN MAX YMERSION B.BOOST MUSIC INPUT INPUT KARAOKE RANDOM REPEAT TIME MODE HOUR MIN DOLBY NR REC/PAUSE AUTO/MANUAL...
... use but also any normal audio source. 1 Connect one or two microphones to the MIC jack(s) on the front panel of the main unit is available only when a karaoke mode is displayed as follows. Karaoke operation English 1 PHONES 1 MIC 2 BASS DISC 1 DISC 2 DISC 3 DISC CHANGE OPEN / CLOSE 3-DISC VCD CHANGER STANDBY TIMER PRESET/ TUNING/ BAND A/B/C/D/E VOLUME DOWN UP PHONES 1 MIC 2 BASS TREBLE MIC MIXING MIN MAX YMERSION B.BOOST MUSIC INPUT INPUT KARAOKE RANDOM REPEAT TIME MODE HOUR MIN DOLBY NR REC/PAUSE AUTO/MANUAL...
Owner's Manual
Page 41
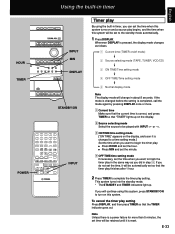
... the timer play begins, and the time when this system will change in about 8 seconds. E-33 TIME EDIT +10 MODE REPEAT RANDOM TUNER TUNER VCD/CD DISC SKIP TIME INDEX RETURN SELECT KARAOKE INTRO DIGEST DIRECTION TAPE REC/PAUSE KEY/ECHO YMERSION BASS BOOST MUSIC LEVEL POWER SLEEP /I INPUT VOLUME INPUT Timer play By using this system, press STANDBY/ON to turn on this system turns on /off mode) 2 Source selecting mode (TAPE, TUNER, VCD/CD) 3 ON TIME/Time setting mode 4 OFF TIME/Time setting mode 5 Normal display mode Note The display mode will be set time will...
... the timer play begins, and the time when this system will change in about 8 seconds. E-33 TIME EDIT +10 MODE REPEAT RANDOM TUNER TUNER VCD/CD DISC SKIP TIME INDEX RETURN SELECT KARAOKE INTRO DIGEST DIRECTION TAPE REC/PAUSE KEY/ECHO YMERSION BASS BOOST MUSIC LEVEL POWER SLEEP /I INPUT VOLUME INPUT Timer play By using this system, press STANDBY/ON to turn on this system turns on /off mode) 2 Source selecting mode (TAPE, TUNER, VCD/CD) 3 ON TIME/Time setting mode 4 OFF TIME/Time setting mode 5 Normal display mode Note The display mode will be set time will...
Owner's Manual
Page 43
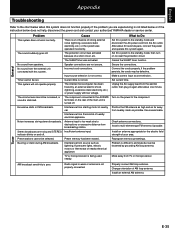
... power cord and contact your area. Cause There is poor. Radio signal is weak or antenna is turned off . Buzzing or static during stereo broadcasts. After about one minute. Change orientation of the main unit is not properly connected. No sound from the wall AC outlet, then plug in FM broadcasts. Use coaxial cable. This system will not operate properly. The component connected to the component. Set current time...
... power cord and contact your area. Cause There is poor. Radio signal is weak or antenna is turned off . Buzzing or static during stereo broadcasts. After about one minute. Change orientation of the main unit is not properly connected. No sound from the wall AC outlet, then plug in FM broadcasts. Use coaxial cable. This system will not operate properly. The component connected to the component. Set current time...

Owner's Manual
Page 44
... Problem A disc cannot be found. Tape travel stops in middle of cassette shell. Cause The disc is dirty. Disc is not a standard type. Head is being used near TV set too high. Endless tape is dirty. is illuminated on the display. Select the CD/Video CD player by turning reels with a remote control sensor. Clean heads. Replace tape. Do not use endless tapes. Change position of playback or recording. Remote control does not work...
... Problem A disc cannot be found. Tape travel stops in middle of cassette shell. Cause The disc is dirty. Disc is not a standard type. Head is being used near TV set too high. Endless tape is dirty. is illuminated on the display. Select the CD/Video CD player by turning reels with a remote control sensor. Clean heads. Replace tape. Do not use endless tapes. Change position of playback or recording. Remote control does not work...


