
Owners Manual
Page 3
... unit should be sure the service technician has used replacement parts specified by the manufacturer or have the same characteristics as indicated in the instructions contained in this manual, meets FCC requirements. Follow all installations. In the case of antenna discharge unit, connection to its subsidiaries. If the antenna lead-in is 300 ohm ribbon lead, change in harmful interference with FCC...
... unit should be sure the service technician has used replacement parts specified by the manufacturer or have the same characteristics as indicated in the instructions contained in this manual, meets FCC requirements. Follow all installations. In the case of antenna discharge unit, connection to its subsidiaries. If the antenna lead-in is 300 ohm ribbon lead, change in harmful interference with FCC...
Owners Manual
Page 5
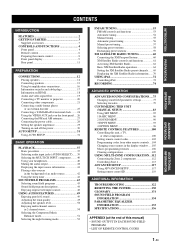
... on HDMI 18 Audio and video signal flow 19 Connecting a TV monitor or projector 20 Connecting other components 21 Connecting a multi-format player or an external decoder 25 Connecting a YAMAHA iPod universal dock ........ 26 Using the VIDEO AUX jacks on the front panel .... 26 Connecting the FM and AM antennas 27 Connecting the power cable 28 Setting the speaker impedance 29 Turning on and off the power 30 AUTO SETUP 31 Using AUTO SETUP 31 BASIC OPERATION PLAYBACK 37 Basic procedure 37 Selecting audio input jacks (AUDIO SELECT)...... 39 Selecting the MULTI CH INPUT component...
... on HDMI 18 Audio and video signal flow 19 Connecting a TV monitor or projector 20 Connecting other components 21 Connecting a multi-format player or an external decoder 25 Connecting a YAMAHA iPod universal dock ........ 26 Using the VIDEO AUX jacks on the front panel .... 26 Connecting the FM and AM antennas 27 Connecting the power cable 28 Setting the speaker impedance 29 Turning on and off the power 30 AUTO SETUP 31 Using AUTO SETUP 31 BASIC OPERATION PLAYBACK 37 Basic procedure 37 Selecting audio input jacks (AUDIO SELECT)...... 39 Selecting the MULTI CH INPUT component...
Owners Manual
Page 8
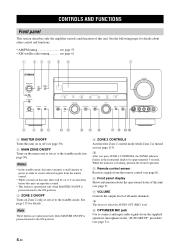
... SILENT CINEMA VOLUME PRESET/TUNING SEARCH MODE EDIT PURE DIRECT STRAIGHT FM/AM A/B/C/D/E CATEGORY PRESET/TUNING/CH PROGRAM TONE CONTROL AUDIO SELECT EFFECT MEMORY MAN'L/AUTO FM TUNINIG MODE DISPLAY INPUT ZONE 2 INPUT ZONE 2 VOLUME VIDEO AUX S VIDEO VIDEO L AUDIO R OPTICAL 8 9 0A BC DEF G H IJ 1 MASTER ON/OFF Turns this unit on or off (see page 30). 2 MAIN ZONE ON/OFF Turns on the main zone or sets it to connect and input audio signals from the remote control. • When you press ZONE 2 CONTROLS, the ZONE2 indicator flashes in the "AUTO SETUP" procedure...
... SILENT CINEMA VOLUME PRESET/TUNING SEARCH MODE EDIT PURE DIRECT STRAIGHT FM/AM A/B/C/D/E CATEGORY PRESET/TUNING/CH PROGRAM TONE CONTROL AUDIO SELECT EFFECT MEMORY MAN'L/AUTO FM TUNINIG MODE DISPLAY INPUT ZONE 2 INPUT ZONE 2 VOLUME VIDEO AUX S VIDEO VIDEO L AUDIO R OPTICAL 8 9 0A BC DEF G H IJ 1 MASTER ON/OFF Turns this unit on or off (see page 30). 2 MAIN ZONE ON/OFF Turns on the main zone or sets it to connect and input audio signals from the remote control. • When you press ZONE 2 CONTROLS, the ZONE2 indicator flashes in the "AUTO SETUP" procedure...
Owners Manual
Page 10
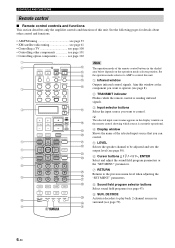
... decoders to play back 2-channel sources in the display window on the operation mode selector position. y The selected input source name appears in surround (see page 102 1 2 3 POWER TV POWER AV STANDBY POWER XM AUDIO SEL SLEEP PHONO TUNER CD MULTI CH IN V-AUX/DOCK CBL/SAT MD/TAPE CD-R B C D E F DTV VCR 1 DVR/VCR 2 DVD 4 5 6 7 8 9 0 A SELECT ++ TV VOL CH -- + VOLUME - AMP SOURCE TV TV MUTE LEVEL TITLE BAND TV INPUT MUTE PRESET/CH SET MENU MENU SRCH MODE PURE DIRECT ENTER AUDIO A-E/CAT. Aim...
... decoders to play back 2-channel sources in the display window on the operation mode selector position. y The selected input source name appears in surround (see page 102 1 2 3 POWER TV POWER AV STANDBY POWER XM AUDIO SEL SLEEP PHONO TUNER CD MULTI CH IN V-AUX/DOCK CBL/SAT MD/TAPE CD-R B C D E F DTV VCR 1 DVR/VCR 2 DVD 4 5 6 7 8 9 0 A SELECT ++ TV VOL CH -- + VOLUME - AMP SOURCE TV TV MUTE LEVEL TITLE BAND TV INPUT MUTE PRESET/CH SET MENU MENU SRCH MODE PURE DIRECT ENTER AUDIO A-E/CAT. Aim...

Owners Manual
Page 14
C YPAO indicator Lights up when you select a HiFi DSP sound field program (see page 44). F PCM indicator Lights up when this unit is reproducing PCM (Pulse Code Modulation) digital audio signals. AUTO indicator Lights up when this unit is in the automatic tuning mode (see page 53). O SLEEP indicator Lights up while the sleep timer is turned on (see page 113). HiFi DSP indicator Lights up when you run "AUTO SETUP" and when the speaker settings set in...
C YPAO indicator Lights up when you select a HiFi DSP sound field program (see page 44). F PCM indicator Lights up when this unit is reproducing PCM (Pulse Code Modulation) digital audio signals. AUTO indicator Lights up when this unit is in the automatic tuning mode (see page 53). O SLEEP indicator Lights up while the sleep timer is turned on (see page 113). HiFi DSP indicator Lights up when you run "AUTO SETUP" and when the speaker settings set in...
Owners Manual
Page 22
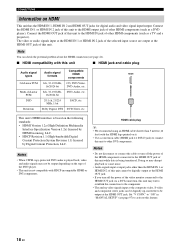
... components. This unit's HDMI interface is being transferred. HDMI cable plug y • We recommend using an HDMI cable shorter than the HDMI IN 1 or HDMI IN 2 of this unit cannot be digitally output at the HDMI OUT jack. • If you turn off the power of the video monitor connected to the HDMI OUT jack via a DVI connection, this feature. 18 En The video or audio signals input at the HDMI IN 1 or HDMI IN 2 jack of the selected input source are output...
... components. This unit's HDMI interface is being transferred. HDMI cable plug y • We recommend using an HDMI cable shorter than the HDMI IN 1 or HDMI IN 2 of this unit cannot be digitally output at the HDMI OUT jack. • If you turn off the power of the video monitor connected to the HDMI OUT jack via a DVI connection, this feature. 18 En The video or audio signals input at the HDMI IN 1 or HDMI IN 2 jack of the selected input source are output...

Owners Manual
Page 30
... the rear panel of this unit to the AC power supply until all connections between components are complete. Note The audio signals input at the VIDEO AUX jacks. CAUTION Be sure to turn off the volume of your iPod and control playback of this unit. MAIN ZONE ON/OFF ON OFF MASTER OPTIMIZER MIC ZONE 2 ZONE 2 CONTROLS ON/OFF PHONES ENHANCER NIGHT SILENT CINEMA VOLUME PRESET/TUNING SEARCH MODE EDIT PURE DIRECT STRAIGHT FM/AM A/B/C/D/E CATEGORY PRESET/TUNING/CH PROGRAM TONE CONTROL AUDIO SELECT...
... the rear panel of this unit to the AC power supply until all connections between components are complete. Note The audio signals input at the VIDEO AUX jacks. CAUTION Be sure to turn off the volume of your iPod and control playback of this unit. MAIN ZONE ON/OFF ON OFF MASTER OPTIMIZER MIC ZONE 2 ZONE 2 CONTROLS ON/OFF PHONES ENHANCER NIGHT SILENT CINEMA VOLUME PRESET/TUNING SEARCH MODE EDIT PURE DIRECT STRAIGHT FM/AM A/B/C/D/E CATEGORY PRESET/TUNING/CH PROGRAM TONE CONTROL AUDIO SELECT...
Owners Manual
Page 41
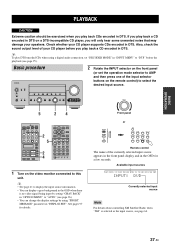
...If you play DTS-encoded CDs when using "SHORT MESSAGE" parameter in "DISPLAY SET". Basic procedure MAIN ZONE ON/OFF ON OFF MASTER OPTIMIZER MIC ZONE 2 ZONE 2 CONTROLS ON/OFF PHONES ENHANCER NIGHT SILENT CINEMA VOLUME PRESET/TUNING SEARCH MODE EDIT PURE DIRECT STRAIGHT FM/AM A/B/C/D/E CATEGORY PRESET/TUNING/CH PROGRAM TONE CONTROL AUDIO SELECT EFFECT MEMORY MAN'L/AUTO FM TUNINIG MODE DISPLAY INPUT ZONE 2 INPUT ZONE 2 VOLUME VIDEO AUX S VIDEO VIDEO L AUDIO R OPTICAL 2 Rotate the INPUT selector on the front panel (or set "DECODER MODE" in "INPUT MENU" to this...
...If you play DTS-encoded CDs when using "SHORT MESSAGE" parameter in "DISPLAY SET". Basic procedure MAIN ZONE ON/OFF ON OFF MASTER OPTIMIZER MIC ZONE 2 ZONE 2 CONTROLS ON/OFF PHONES ENHANCER NIGHT SILENT CINEMA VOLUME PRESET/TUNING SEARCH MODE EDIT PURE DIRECT STRAIGHT FM/AM A/B/C/D/E CATEGORY PRESET/TUNING/CH PROGRAM TONE CONTROL AUDIO SELECT EFFECT MEMORY MAN'L/AUTO FM TUNINIG MODE DISPLAY INPUT ZONE 2 INPUT ZONE 2 VOLUME VIDEO AUX S VIDEO VIDEO L AUDIO R OPTICAL 2 Rotate the INPUT selector on the front panel (or set "DECODER MODE" in "INPUT MENU" to this...

Owners Manual
Page 47
...ZONE ON/OFF ON OFF MASTER OPTIMIZER MIC ZONE 2 ZONE 2 CONTROLS ON/OFF PHONES ENHANCER NIGHT SILENT CINEMA VOLUME PRESET/TUNING SEARCH MODE EDIT PURE DIRECT STRAIGHT FM/AM A/B/C/D/E CATEGORY PRESET/TUNING/CH PROGRAM TONE CONTROL AUDIO SELECT EFFECT MEMORY MAN'L/AUTO FM TUNINIG MODE DISPLAY INPUT ZONE 2 INPUT ZONE 2 VOLUME VIDEO AUX S VIDEO VIDEO L AUDIO R OPTICAL PROGRAM selector ++ TV VOL CH -- + VOLUME - See page 75 for details. The name of the sound field program selector buttons on the front panel. Set the operation mode selector to enjoy multi-channel...
...ZONE ON/OFF ON OFF MASTER OPTIMIZER MIC ZONE 2 ZONE 2 CONTROLS ON/OFF PHONES ENHANCER NIGHT SILENT CINEMA VOLUME PRESET/TUNING SEARCH MODE EDIT PURE DIRECT STRAIGHT FM/AM A/B/C/D/E CATEGORY PRESET/TUNING/CH PROGRAM TONE CONTROL AUDIO SELECT EFFECT MEMORY MAN'L/AUTO FM TUNINIG MODE DISPLAY INPUT ZONE 2 INPUT ZONE 2 VOLUME VIDEO AUX S VIDEO VIDEO L AUDIO R OPTICAL PROGRAM selector ++ TV VOL CH -- + VOLUME - See page 75 for details. The name of the sound field program selector buttons on the front panel. Set the operation mode selector to enjoy multi-channel...
Owners Manual
Page 53
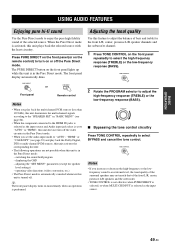
... turned off the video circuitry in the Pure Direct mode. • When you play back the Dolby Digital, DTS or multi-channel PCM sources, this unit activates the corresponding decoder. • The following operations are not possible when this unit downmixes the multi-channel signals according to the "SPEAKER SET" in the Pure Direct mode. PROGRAM ■ Bypassing the tone control circuitry Press TONE CONTROL repeatedly to adjust the high-frequency response (TREBLE) or the low-frequency response (BASS). displaying the OSD - Adjusting...
... turned off the video circuitry in the Pure Direct mode. • When you play back the Dolby Digital, DTS or multi-channel PCM sources, this unit activates the corresponding decoder. • The following operations are not possible when this unit downmixes the multi-channel signals according to the "SPEAKER SET" in the Pure Direct mode. PROGRAM ■ Bypassing the tone control circuitry Press TONE CONTROL repeatedly to adjust the high-frequency response (TREBLE) or the low-frequency response (BASS). displaying the OSD - Adjusting...
Owners Manual
Page 57
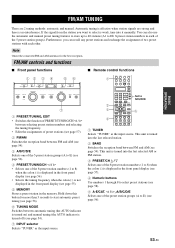
... panel functions 12 3 4 PRESET/TUNING SEARCH MODE EDIT PURE DIRECT STRAIGHT FM/AM A/B/C/D/E CATEGORY PRESET/TUNING/CH PROGRAM TONE CONTROL AUDIO SELECT EFFECT 56 MEMORY MAN'L/AUTO FM TUNINIG MODE DISPLAY INPUT ZONE 2 INPUT ZONE 2 VOLUME 7 1 PRESET/TUNING, EDIT • Switches the function of PRESET/TUNING/CH l / h between selecting preset station numbers and selecting the tuning frequency. • Edits the assignments of the preset station groups (A to SOURCE 5 1 TUNER Selects "TUNER" as the input source. ■ Remote control functions 1 PHONO TUNER CD MULTI CH...
... panel functions 12 3 4 PRESET/TUNING SEARCH MODE EDIT PURE DIRECT STRAIGHT FM/AM A/B/C/D/E CATEGORY PRESET/TUNING/CH PROGRAM TONE CONTROL AUDIO SELECT EFFECT 56 MEMORY MAN'L/AUTO FM TUNINIG MODE DISPLAY INPUT ZONE 2 INPUT ZONE 2 VOLUME 7 1 PRESET/TUNING, EDIT • Switches the function of PRESET/TUNING/CH l / h between selecting preset station numbers and selecting the tuning frequency. • Edits the assignments of the preset station groups (A to SOURCE 5 1 TUNER Selects "TUNER" as the input source. ■ Remote control functions 1 PHONO TUNER CD MULTI CH...
Owners Manual
Page 86
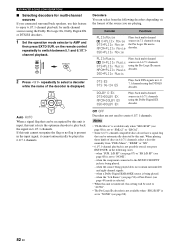
... 6.1/7.1 channels. when a Dolby Digital KARAOKE source is displayed. in 7.1 channels using the Pro Logic IIx movie decoder. L/R SP" (see page 87) or "SB L/R SP" (see page 88) is being played does not contain surround left and right channel signals. - when the component connected to the MULTI CH INPUT jacks is set to "NONE". - ADVANCED SOUND CONFIGURATIONS ■ Selecting decoders for multi-channel sources using the Dolby Pro Logic IIx, Dolby Digital EX or DTS-ES decoders. 1 Set the operation mode selector to AMP...
... 6.1/7.1 channels. when a Dolby Digital KARAOKE source is displayed. in 7.1 channels using the Pro Logic IIx movie decoder. L/R SP" (see page 87) or "SB L/R SP" (see page 88) is being played does not contain surround left and right channel signals. - when the component connected to the MULTI CH INPUT jacks is set to "NONE". - ADVANCED SOUND CONFIGURATIONS ■ Selecting decoders for multi-channel sources using the Dolby Pro Logic IIx, Dolby Digital EX or DTS-ES decoders. 1 Set the operation mode selector to AMP...
Owners Manual
Page 87
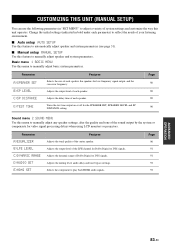
...Adjusts the output level of each speaker. Adjusts the muting level, audio delay and tone bypass settings. Basic menu 1 BASIC MENU Use this menu to manually adjust speaker and system parameters. Parameter A)SPEAKER SET B)SP LEVEL C)SP DISTANCE D)TEST TONE Features Selects the size of the sound output by the system or compensate for Dolby Digital or DTS signals. Page 86 89 89 90 Sound menu 2 SOUND MENU Use this menu to play back HDMI audio signals. Turns the test tone output on or off for low-frequency signal output, and the crossover frequency. Adjusts the delay time...
...Adjusts the output level of each speaker. Adjusts the muting level, audio delay and tone bypass settings. Basic menu 1 BASIC MENU Use this menu to manually adjust speaker and system parameters. Parameter A)SPEAKER SET B)SP LEVEL C)SP DISTANCE D)TEST TONE Features Selects the size of the sound output by the system or compensate for Dolby Digital or DTS signals. Page 86 89 89 90 Sound menu 2 SOUND MENU Use this menu to play back HDMI audio signals. Turns the test tone output on or off for low-frequency signal output, and the crossover frequency. Adjusts the delay time...
Owners Manual
Page 90
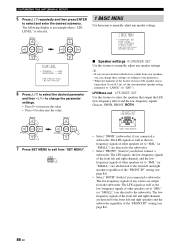
... selected. ENTER 1 BASIC MENU Use this feature to manually adjust any speaker settings. 2 BASIC MENU . PRESET/CH PRESET/CH ■ Speaker settings A)SPEAKER SET Use this menu to manually adjust any source are directed to "SML" (or "SMALL") are not satisfied with the bass sounds from your preference. • When the diameter of the woofer section of the front left and right channels are output from "SET MENU". ENTER A-E/CAT. The LFE signals as well as the low-frequency signals of other speakers set...
... selected. ENTER 1 BASIC MENU Use this feature to manually adjust any speaker settings. 2 BASIC MENU . PRESET/CH PRESET/CH ■ Speaker settings A)SPEAKER SET Use this menu to manually adjust any source are directed to "SML" (or "SMALL") are not satisfied with the bass sounds from your preference. • When the diameter of the woofer section of the front left and right channels are output from "SET MENU". ENTER A-E/CAT. The LFE signals as well as the low-frequency signals of other speakers set...
Owners Manual
Page 96
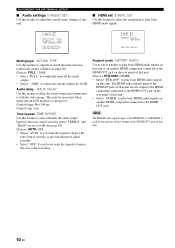
... "TREBLE" and "BASS" are not output to the HDMI component connected to the HDMI OUT jack on the rear panel of this unit or on another HDMI component connected to the HDMI OUT jack. MUTE TYPE;;;FULL A.DELAY;;;;;;0ms TONE BYPASS;AUTO LE>E [ ]/[ ]:Up/Down [p]/[[]:Adjust E)HDMI SET SUPPORT AUDIO: HTR-6090 [p]/[[]:Adjust Muting type MUTING TYPE Use this feature to play back HDMI audio signals on the rear panel of this unit. • Select "OTHER" to play back HDMI audio signals on this unit. p p D)AUDIO SET . Choices: HTR-6090, OTHER • Select "HTR-6090...
... "TREBLE" and "BASS" are not output to the HDMI component connected to the HDMI OUT jack on the rear panel of this unit or on another HDMI component connected to the HDMI OUT jack. MUTE TYPE;;;FULL A.DELAY;;;;;;0ms TONE BYPASS;AUTO LE>E [ ]/[ ]:Up/Down [p]/[[]:Adjust E)HDMI SET SUPPORT AUDIO: HTR-6090 [p]/[[]:Adjust Muting type MUTING TYPE Use this feature to play back HDMI audio signals on the rear panel of this unit. • Select "OTHER" to play back HDMI audio signals on this unit. p p D)AUDIO SET . Choices: HTR-6090, OTHER • Select "HTR-6090...

Owners Manual
Page 100
... front panel display brighter. A)DISPLAY SET . Control range: - 4 to 0 Control step: 1 • Press l to make the front panel display dimmer. • Press h to make the same type of video connections between each component. • When composite video or S-video signals from a game console) are only output at the VIDEO, S VIDEO and COMPONENT VIDEO jacks. Choices: AUTO, OFF • Select "AUTO" to display a gray background in "DISPLAY SET" (except "DIMMER", "SHORT MESSAGE", "ON SCREEN" and "FL SCROLL") to the factory presets...
... front panel display brighter. A)DISPLAY SET . Control range: - 4 to 0 Control step: 1 • Press l to make the front panel display dimmer. • Press h to make the same type of video connections between each component. • When composite video or S-video signals from a game console) are only output at the VIDEO, S VIDEO and COMPONENT VIDEO jacks. Choices: AUTO, OFF • Select "AUTO" to display a gray background in "DISPLAY SET" (except "DIMMER", "SHORT MESSAGE", "ON SCREEN" and "FL SCROLL") to the factory presets...
Owners Manual
Page 123
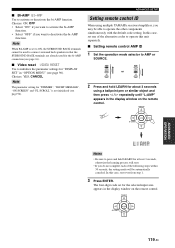
... selected input area appears in the display window on the remote control. PRESET/CH LEARN A-E/CAT. In this case, set to ON, the SURROUND BACK terminals cannot be automatically canceled. In this unit separately. ■ Setting remote control AMP ID 1 Set the operation mode selector to press and hold LEARN for the bi-AMP connection (see page 16). ■ Video reset VIDEO RESET Use to activate or deactivate the bi-AMP function. ENTER ADVANCED OPERATION...
... selected input area appears in the display window on the remote control. PRESET/CH LEARN A-E/CAT. In this case, set to ON, the SURROUND BACK terminals cannot be automatically canceled. In this unit separately. ■ Setting remote control AMP ID 1 Set the operation mode selector to press and hold LEARN for the bi-AMP connection (see page 16). ■ Video reset VIDEO RESET Use to activate or deactivate the bi-AMP function. ENTER ADVANCED OPERATION...
Owners Manual
Page 126
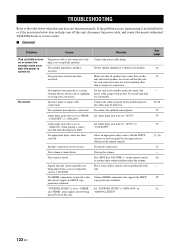
.... Audio input jack select is muted. The sound is set to "HDMI", Set Audio input jack select to "AUTO". Signals this unit cannot reproduce are secure and that support the HDCP copy protection standards. Play a source whose signals can be defective. The HDMI components connected to this unit to the standby mode, disconnect the power cable, plug it back in after the power is turned on. "SUPPORT AUDIO" is set to "ANALOG" while playing a source encoded in "MANUAL SETUP". The power cable is not connected or the plug is turned down. Audio input jack select is set...
.... Audio input jack select is muted. The sound is set to "HDMI", Set Audio input jack select to "AUTO". Signals this unit cannot reproduce are secure and that support the HDCP copy protection standards. Play a source whose signals can be defective. The HDMI components connected to this unit to the standby mode, disconnect the power cable, plug it back in after the power is turned on. "SUPPORT AUDIO" is set to "ANALOG" while playing a source encoded in "MANUAL SETUP". The power cable is not connected or the plug is turned down. Audio input jack select is set...
Owners Manual
Page 127
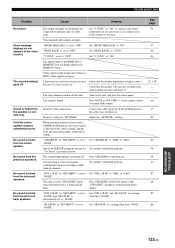
... front panel so that the speaker impedance setting is set to a setting other than "NONE". L/R SP" and "SB L/R SP" to "OFF". The protection circuitry has been activated because of video jacks. Adjust the "SP LEVEL" settings. Set "SHORT MESSAGE" to "SML" or "LRG". When playing a monaural source with a CINEMA DSP program, the source signal is directed to a setting other than "NONE". Set "SB L/R SP" to the center channel, and the front and surround speakers output effect sounds. Set "V CONV." Connect the cables...
... front panel so that the speaker impedance setting is set to a setting other than "NONE". L/R SP" and "SB L/R SP" to "OFF". The protection circuitry has been activated because of video jacks. Adjust the "SP LEVEL" settings. Set "SHORT MESSAGE" to "SML" or "LRG". When playing a monaural source with a CINEMA DSP program, the source signal is directed to a setting other than "NONE". Set "SB L/R SP" to the center channel, and the front and surround speakers output effect sounds. Set "V CONV." Connect the cables...
Owners Manual
Page 134
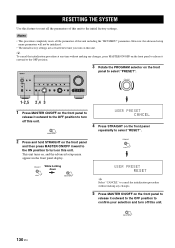
... MIC ZONE 2 ZONE 2 CONTROLS ON/OFF PHONES ENHANCER NIGHT SILENT CINEMA VOLUME PRESET/TUNING SEARCH MODE EDIT PURE DIRECT STRAIGHT FM/AM A/B/C/D/E CATEGORY PRESET/TUNING/CH PROGRAM TONE CONTROL AUDIO SELECT EFFECT MEMORY MAN'L/AUTO FM TUNINIG MODE DISPLAY INPUT ZONE 2 INPUT ZONE 2 VOLUME VIDEO AUX S VIDEO VIDEO L AUDIO R OPTICAL 3 Rotate the PROGRAM selector on the front panel to turn off this unit. MASTER 2 Press and hold STRAIGHT on this unit. MASTER 130 En STRAIGHT EFFECT STRAIGHT While holding down EFFECT MASTER USER PRESET RESET y Select...
... MIC ZONE 2 ZONE 2 CONTROLS ON/OFF PHONES ENHANCER NIGHT SILENT CINEMA VOLUME PRESET/TUNING SEARCH MODE EDIT PURE DIRECT STRAIGHT FM/AM A/B/C/D/E CATEGORY PRESET/TUNING/CH PROGRAM TONE CONTROL AUDIO SELECT EFFECT MEMORY MAN'L/AUTO FM TUNINIG MODE DISPLAY INPUT ZONE 2 INPUT ZONE 2 VOLUME VIDEO AUX S VIDEO VIDEO L AUDIO R OPTICAL 3 Rotate the PROGRAM selector on the front panel to turn off this unit. MASTER 2 Press and hold STRAIGHT on this unit. MASTER 130 En STRAIGHT EFFECT STRAIGHT While holding down EFFECT MASTER USER PRESET RESET y Select...


