

Owners Manual
Page 8
...other in billions of ways to each voice, they control all eight modules may be driven by pressing the selector button on a MIDI rack frame. MIDI instruments made by a single MIDI signal, or they may either drive, or be easily assembled. Each of these compact ... (VCOs, VCAs or VCFs). This aligns particularly well with the Yamaha QX1 Digital Sequence Recorder, which there are characteristic of any acoustic sound. As the name suggests, digital music instruments convert all . INTRODUCTION The Yamaha TX816 FM Tone Generator System basically consists of eight identical TF1 modules, ...
...other in billions of ways to each voice, they control all eight modules may be driven by pressing the selector button on a MIDI rack frame. MIDI instruments made by a single MIDI signal, or they may either drive, or be easily assembled. Each of these compact ... (VCOs, VCAs or VCFs). This aligns particularly well with the Yamaha QX1 Digital Sequence Recorder, which there are characteristic of any acoustic sound. As the name suggests, digital music instruments convert all . INTRODUCTION The Yamaha TX816 FM Tone Generator System basically consists of eight identical TF1 modules, ...

Owners Manual
Page 9
...produced. THE PLAY MODE In the Play Mode, which is the basic mode the TX816 enters when it is first turned on, the Tone Generator System is immediately ready to be played. In this playing mode). A Yamaha DX or KX keyboard is the ideal instrument for editing or playing. program 1...to an INDIVIDUAL MIDI IN socket on the front of the MODI rack frame, it will control all modules switched to "COMMON". iiMos MIDI instrument. When you for this information is transfeffed from erasure. This why the TX816 contains eight individual modules. The Edit Buffer makes the data available ...
...produced. THE PLAY MODE In the Play Mode, which is the basic mode the TX816 enters when it is first turned on, the Tone Generator System is immediately ready to be played. In this playing mode). A Yamaha DX or KX keyboard is the ideal instrument for editing or playing. program 1...to an INDIVIDUAL MIDI IN socket on the front of the MODI rack frame, it will control all modules switched to "COMMON". iiMos MIDI instrument. When you for this information is transfeffed from erasure. This why the TX816 contains eight individual modules. The Edit Buffer makes the data available ...

Owners Manual
Page 11
...prior to store a newly edited voice. You can be dumped (output) at before leaving the Yamaha factory. Sub-modes within the Utility mode have the following functions: (a) SELECT DESTINATION: Select the...: Reduce all the function data from one time through the MIDI OUT terminal on the MIDI rack frame. Each module is factory programmed with a different voice; A table in a QX1. ...be switched on your new voice and its accompanying function data, this information in the TX816. eight separate sections, each voice. THE STORE MODE This provides access to store only...
...prior to store a newly edited voice. You can be dumped (output) at before leaving the Yamaha factory. Sub-modes within the Utility mode have the following functions: (a) SELECT DESTINATION: Select the...: Reduce all the function data from one time through the MIDI OUT terminal on the MIDI rack frame. Each module is factory programmed with a different voice; A table in a QX1. ...be switched on your new voice and its accompanying function data, this information in the TX816. eight separate sections, each voice. THE STORE MODE This provides access to store only...

Owners Manual
Page 13
...deg.0 (for you intend to experiment with different MIDI connection configurations (this section throughly before setting up your TX816 may miss parts of overheating. You should also be rack mounted in a hot climate) it is best to use a cooling fan to carry our its sophisticated ... is not advisable to function best within a "normal" temperature range. The MIDI rack frame is designed to use any fluff. LOCATION Avoid placing the TX816 in close proximity. The TX816 performs as efficiently onstage as it is recommended that will also require easy access to operate....
...deg.0 (for you intend to experiment with different MIDI connection configurations (this section throughly before setting up your TX816 may miss parts of overheating. You should also be rack mounted in a hot climate) it is best to use a cooling fan to carry our its sophisticated ... is not advisable to function best within a "normal" temperature range. The MIDI rack frame is designed to use any fluff. LOCATION Avoid placing the TX816 in close proximity. The TX816 performs as efficiently onstage as it is recommended that will also require easy access to operate....

Owners Manual
Page 15
... relasing immediately, to change data continuously and rapidly until the key is the only MIDI OUT TERNINAL on the front panel of the MIDI rack frame are referred to as "COMMON" as they provide access to all modules. ("COMMON" is not always applied to the MIDI OUT...FRONT PANEL FEATURES section explains the functions of the panel). C SW3 0=7"' o '''""" TF1 -FRONT 2. LED's SW rx)rc) SW2 LED DISPLAY I•L-isU0. OO 0 YAMAHA MIDI RACK COMMON 0 MIDI RACK 14 CONVENTIONS The following simple conventions are used to indicate these two different actions. 3. The MIDI terminals on the...
... relasing immediately, to change data continuously and rapidly until the key is the only MIDI OUT TERNINAL on the front panel of the MIDI rack frame are referred to as "COMMON" as they provide access to all modules. ("COMMON" is not always applied to the MIDI OUT...FRONT PANEL FEATURES section explains the functions of the panel). C SW3 0=7"' o '''""" TF1 -FRONT 2. LED's SW rx)rc) SW2 LED DISPLAY I•L-isU0. OO 0 YAMAHA MIDI RACK COMMON 0 MIDI RACK 14 CONVENTIONS The following simple conventions are used to indicate these two different actions. 3. The MIDI terminals on the...
Owners Manual
Page 18
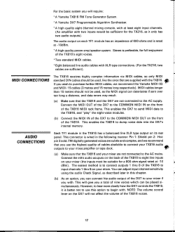
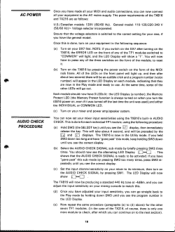
... to your mixer,amplifier or tape deck. (a) Make sure that the TX816 and your mixer are sufficient). AUDIO CONNECTIONS Each TF1 module in the TX816 has a balancaed line XLR type output on the front of the TX816 MIDI rack frame. The easiest method is wired in the following manner: Pin ...output of the DX7 to your mixer if you wish to purchase further MIDI cables, we recommend that you will require: *A Yamaha TX816 FM Tone Generator System. *A Yamaha DX7 Programmable Algorithm Synthesizer. *A high quality eight channel mixing console, with at least eight input channels. (An amplifier with ...
... to your mixer,amplifier or tape deck. (a) Make sure that the TX816 and your mixer are sufficient). AUDIO CONNECTIONS Each TF1 module in the TX816 has a balancaed line XLR type output on the front of the TX816 MIDI rack frame. The easiest method is wired in the following manner: Pin ...output of the DX7 to your mixer if you wish to purchase further MIDI cables, we recommend that you will require: *A Yamaha TX816 FM Tone Generator System. *A Yamaha DX7 Programmable Algorithm Synthesizer. *A high quality eight channel mixing console, with at least eight input channels. (An amplifier with ...
Owners Manual
Page 19
... until you have tha general model. You should now have "gone past " this sub-mode by pressing SW3 too many times, press SW3 re- The TX816 will be an audible click and a program number (voice number) will now show a "1". The poser requirements of the LEDs on the front panel will light.... peatedly until you see the correct display. (b) Select the AUDIO CHECK SIGNAL sub-mode by pressing the power switch on the fornt of the MIDI rack frame. Ensure that the AUDIO CHECK SIGNAL is always turned on when you see the alternating LED Display L H . At the same time, some of ...
... until you have tha general model. You should now have "gone past " this sub-mode by pressing SW3 too many times, press SW3 re- The TX816 will be an audible click and a program number (voice number) will now show a "1". The poser requirements of the LEDs on the front panel will light.... peatedly until you see the correct display. (b) Select the AUDIO CHECK SIGNAL sub-mode by pressing the power switch on the fornt of the MIDI rack frame. Ensure that the AUDIO CHECK SIGNAL is always turned on when you see the alternating LED Display L H . At the same time, some of ...
Owners Manual
Page 23
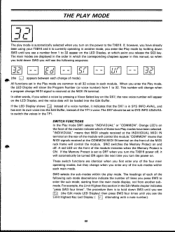
... I The play mode. The procedure then is in each of these two Play modes have already been using your TX816 and it is ON. All functions set to SYS INFO UNAVAIL to 32. Orange LED's on the front of... it indicates that MIDI signals received at the MIDI IN terminal. The headings of the MIDI rack frame will appear on the power to OFF when you enter the Play mode, the LED ... mode SW1 selects "INDIVIDUAL" or "COMMON". If the Memory Protect is set to the TX816. When you turn the TX816 power off . If the LED Display shows Cb' instead of the module indicate which point...
... I The play mode. The procedure then is in each of these two Play modes have already been using your TX816 and it is ON. All functions set to SYS INFO UNAVAIL to 32. Orange LED's on the front of... it indicates that MIDI signals received at the MIDI IN terminal. The headings of the MIDI rack frame will appear on the power to OFF when you enter the Play mode, the LED ... mode SW1 selects "INDIVIDUAL" or "COMMON". If the Memory Protect is set to the TX816. When you turn the TX816 power off . If the LED Display shows Cb' instead of the module indicate which point...

Owners Manual
Page 26
... detailed description of all the data to the Edit Buffer, where it were one of the MIDI rack frame. If you hold down SW3. NOTE- You can also select a voice number for modifying...., copies all parameters, consult the DX7 owner's manual. The LED Display example above . If the TX816 is in the Play mode, the next display shown on the fornt panel of its own internal voice...will select the next higher-or lower-numbered voice, respectively. You will send the data of the TX816 are as function data. the only plarameters which must be edited on the LED Display will be much...
... detailed description of all the data to the Edit Buffer, where it were one of the MIDI rack frame. If you hold down SW3. NOTE- You can also select a voice number for modifying...., copies all parameters, consult the DX7 owner's manual. The LED Display example above . If the TX816 is in the Play mode, the next display shown on the fornt panel of its own internal voice...will select the next higher-or lower-numbered voice, respectively. You will send the data of the TX816 are as function data. the only plarameters which must be edited on the LED Display will be much...
Owners Manual
Page 33
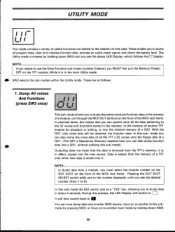
... the internal memory of a QX1. (The QX1's Operations Directory explains how you MUST first turn the Memory Protect OFF on the front of the MIDI rack frame. In practical terms, this means that the data is removed from 1 to 8). mode you see the above LED Display, which follows the ISI-Idisplay... the Utility mode. The Utility mode is entered by pressing SW3, or move on to another MIDI device, move on the front of the MIDI rack frame. NOTE• If you intend to use the Clear Function sub-mode (number 3 below) you can now dump data into another Utility submode by...
... the internal memory of a QX1. (The QX1's Operations Directory explains how you MUST first turn the Memory Protect OFF on the front of the MIDI rack frame. In practical terms, this means that the data is removed from 1 to 8). mode you see the above LED Display, which follows the ISI-Idisplay... the Utility mode. The Utility mode is entered by pressing SW3, or move on to another MIDI device, move on the front of the MIDI rack frame. NOTE• If you intend to use the Clear Function sub-mode (number 3 below) you can now dump data into another Utility submode by...

Owners Manual
Page 34
...-mode, as described at the beginning of module 2. (b) Switch module 2 to "INDIVIDUAL" and turn its Memory Protect OFF. If it easy to deal with the TX816 on the DX7 will light. After the 3 second dump process, the LCD display on its own--no other equipment r is detailed in the QX1 Operations... select the OUT SLOT corresponding to the module you are dumping from module 1 to module 2. (a) Connect the MIDI OUT on the front of the MIDI rack frame to the MIDI IN on module 2 will not affect the dumping procedure. (c) Set module 1 to the Dump All Voices And Functions sub-mode, ...
...-mode, as described at the beginning of module 2. (b) Switch module 2 to "INDIVIDUAL" and turn its Memory Protect OFF. If it easy to deal with the TX816 on the DX7 will light. After the 3 second dump process, the LCD display on its own--no other equipment r is detailed in the QX1 Operations... select the OUT SLOT corresponding to the module you are dumping from module 1 to module 2. (a) Connect the MIDI OUT on the front of the MIDI rack frame to the MIDI IN on module 2 will not affect the dumping procedure. (c) Set module 1 to the Dump All Voices And Functions sub-mode, ...
Owners Manual
Page 39
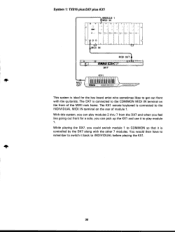
... feel like going out front for the key board artist who sometimes likes to the COMMON MIDI IN terminal on the rear of the MIDI rack frame. You would then have to remember to switch it back to COMMON so that it to the INDIVIDUAL MIDI IN terminal on the front... of module 1. While playing the DX7, you could switch module 1 to INDIVIDUAL before playing the KX1. 4ip 38 I y j , ,. System 1: TX816 plus DX7 plus KX1 0 61 -I MODULE MIDI IN a a LI LJ ,__J j -J KLI ,,j LJ E4fu Na _J t.N' I MIDI IN 4 MIDI OUT Y DX7 MIDI OUT...
... feel like going out front for the key board artist who sometimes likes to the COMMON MIDI IN terminal on the rear of the MIDI rack frame. You would then have to remember to switch it back to COMMON so that it to the INDIVIDUAL MIDI IN terminal on the front... of module 1. While playing the DX7, you could switch module 1 to INDIVIDUAL before playing the KX1. 4ip 38 I y j , ,. System 1: TX816 plus DX7 plus KX1 0 61 -I MODULE MIDI IN a a LI LJ ,__J j -J KLI ,,j LJ E4fu Na _J t.N' I MIDI IN 4 MIDI OUT Y DX7 MIDI OUT...

Owners Manual
Page 47
...) 22W 480 X 176 X 346 mm (18-7/8"X6-15/16"X13-5/8") 10kg (22 lbs.) MIDI cable [1.5m (5 ft.)x2] MIDI cable [5m(16.4 ft.)] Socket wrench TX816 MIDI RACK FRAME TF1 FM Tone Generator X 8 120 V (60 Hz) 100-- 120/22O"240 V (50/60Hz) 70W 480 X 176 X 346 mm (18-7 /8"X6-15/16"X13...-5/8") 12 kg (26 lbs. 6oz.) MIDI cable [1.5 m (5 ft.)x8] MIDI cable [5m(16.4 ft.)] Socket wrench MIDI RACK FRAME TERMINALS CONTROLS MASTER CLOCK RATES DIMENSIONS (W X H X D) WEIGHT MIDI IN, MIDI OUT, MIDI THRU (5-pin DIN) Power ON/OFF, MIDI Out Slot select 9.4265 MHz...
...) 22W 480 X 176 X 346 mm (18-7/8"X6-15/16"X13-5/8") 10kg (22 lbs.) MIDI cable [1.5m (5 ft.)x2] MIDI cable [5m(16.4 ft.)] Socket wrench TX816 MIDI RACK FRAME TF1 FM Tone Generator X 8 120 V (60 Hz) 100-- 120/22O"240 V (50/60Hz) 70W 480 X 176 X 346 mm (18-7 /8"X6-15/16"X13...-5/8") 12 kg (26 lbs. 6oz.) MIDI cable [1.5 m (5 ft.)x8] MIDI cable [5m(16.4 ft.)] Socket wrench MIDI RACK FRAME TERMINALS CONTROLS MASTER CLOCK RATES DIMENSIONS (W X H X D) WEIGHT MIDI IN, MIDI OUT, MIDI THRU (5-pin DIN) Power ON/OFF, MIDI Out Slot select 9.4265 MHz...

Owners Manual
Page 49
MEMORY velv PROTECT Or NO > OL Or SELECT (t) Latch ADDRESS / DATA / CONTROL BUS EGS OPS N,/ L.P.F. • • • LINE OUT I, (rear) -J AC 4) photo coupler I 4MHzei CPU Rx x BACK UP BATTERY 1 ROM RAM 1 (front) d It ) INDIVIDUAL COMMON 0, +1 or YES eiv,- INVII9V/C7 )13076 MRF MIDI RACK FRAME OUT SLOT 2 LED driver IINNCCJo OUT SLOT SELECTOR MIDI IN OUT THRU TFI r FM tone generator MIDI IN photo Coupler THRU r INDIVIDUAL (rear) L_icommoN I +5 SWITCHING POWER Do +15 SUPPLY AG -IS CLOCK 9.4 MHz GENERATOR •
MEMORY velv PROTECT Or NO > OL Or SELECT (t) Latch ADDRESS / DATA / CONTROL BUS EGS OPS N,/ L.P.F. • • • LINE OUT I, (rear) -J AC 4) photo coupler I 4MHzei CPU Rx x BACK UP BATTERY 1 ROM RAM 1 (front) d It ) INDIVIDUAL COMMON 0, +1 or YES eiv,- INVII9V/C7 )13076 MRF MIDI RACK FRAME OUT SLOT 2 LED driver IINNCCJo OUT SLOT SELECTOR MIDI IN OUT THRU TFI r FM tone generator MIDI IN photo Coupler THRU r INDIVIDUAL (rear) L_icommoN I +5 SWITCHING POWER Do +15 SUPPLY AG -IS CLOCK 9.4 MHz GENERATOR •

Owners Manual
Page 74
... to repeated removals and installations. ++ DO NOT place the TF1's circuit board close to your TX216 would then function in exactly the same way as a TX816. NOTE• For each TF1 that good contacts may be damaged by static electricity. + +DO NOT touch or in which case your TX216, the power.... 3. The card edge connectors cannot stand up to six more TF1 modules to discharge. 1. Switch the power OFF and unplug the TX216 from the MIDI rack frame, at the location you add to any kind of eight, in anby way stain the gold-plated card edge connectors on the TF1. ADDING...
... to repeated removals and installations. ++ DO NOT place the TF1's circuit board close to your TX216 would then function in exactly the same way as a TX816. NOTE• For each TF1 that good contacts may be damaged by static electricity. + +DO NOT touch or in which case your TX216, the power.... 3. The card edge connectors cannot stand up to six more TF1 modules to discharge. 1. Switch the power OFF and unplug the TX216 from the MIDI rack frame, at the location you add to any kind of eight, in anby way stain the gold-plated card edge connectors on the TF1. ADDING...
