

UX256 Owners Manual
Page 4
... the driver setting (MIDI Patch Screen 24 Troubleshooting (FAQ 30 SPECIAL NOTICES • Do not attempt to the UX256 Thank you read this manual, please keep it in a safe place for choosing the Yamaha UX256 USB-MIDI interface. Table of their respective companies. • The screen displays as illustrated in irreparable damage to...
... the driver setting (MIDI Patch Screen 24 Troubleshooting (FAQ 30 SPECIAL NOTICES • Do not attempt to the UX256 Thank you read this manual, please keep it in a safe place for choosing the Yamaha UX256 USB-MIDI interface. Table of their respective companies. • The screen displays as illustrated in irreparable damage to...

UX256 Owners Manual
Page 7
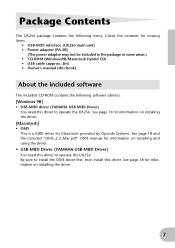
... for information on installing the driver. 7 See page 18 for information on installing and using the driver. • USB-MIDI Driver (YAMAHA USB-MIDI Driver) You need this driver to operate the UX256. Be sure to install the OMS driver first, then install this driver. Package Contents The... UX256 package contains the following items. Check the contents for missing items. • USB-MIDI interface (UX256 main unit) • Power adaptor (PA-3B) (The power adaptor may not be included in the ...
... for information on installing the driver. 7 See page 18 for information on installing and using the driver. • USB-MIDI Driver (YAMAHA USB-MIDI Driver) You need this driver to operate the UX256. Be sure to install the OMS driver first, then install this driver. Package Contents The... UX256 package contains the following items. Check the contents for missing items. • USB-MIDI interface (UX256 main unit) • Power adaptor (PA-3B) (The power adaptor may not be included in the ...

UX256 Owners Manual
Page 10
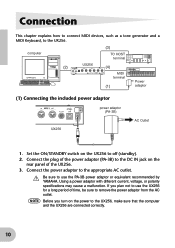
... of the power adaptor (PA-3B) to the DC IN jack on the UX256 to off (standby). 2. Using a power adaptor with different current, voltage, ..., to the appropriate AC outlet. computer (3) TO HOST terminal (2) UX256 (4) MIDI terminal (1) Power adaptor (1) Connecting the included power adaptor power adaptor (PA-3B) UX256 AC Outlet 1. If you turn on the power to remove the ...the UX256, make sure that the computer and the UX256 are connected correctly. 10 NOTE Before you plan not to use the UX256 for a long period of the UX256. 3. Connect the power adaptor to the UX256. ...
... of the power adaptor (PA-3B) to the DC IN jack on the UX256 to off (standby). 2. Using a power adaptor with different current, voltage, ..., to the appropriate AC outlet. computer (3) TO HOST terminal (2) UX256 (4) MIDI terminal (1) Power adaptor (1) Connecting the included power adaptor power adaptor (PA-3B) UX256 AC Outlet 1. If you turn on the power to remove the ...the UX256, make sure that the computer and the UX256 are connected correctly. 10 NOTE Before you plan not to use the UX256 for a long period of the UX256. 3. Connect the power adaptor to the UX256. ...

UX256 Owners Manual
Page 17
... UX256s is turned off (standby). NOTE When you turn on the power to connected multiple UX256s, the device number is assigned based on setting up the UX256... for the software. 1. Make sure the power to the USB terminal on the UX256s using ... of the connected tone generator, and click [OK]. • Connecting multiple UX256s Follow the steps below to all units simultaneously, the device number is assigned...order in the Control Panel to the UX256s. Turn on the hub. 17 Click "Multimedia" in which you turn ...
... UX256s is turned off (standby). NOTE When you turn on the power to connected multiple UX256s, the device number is assigned based on setting up the UX256... for the software. 1. Make sure the power to the USB terminal on the UX256s using ... of the connected tone generator, and click [OK]. • Connecting multiple UX256s Follow the steps below to all units simultaneously, the device number is assigned...order in the Control Panel to the UX256s. Turn on the hub. 17 Click "Multimedia" in which you turn ...
UX256 Owners Manual
Page 31
... remove the following locations: System Folder | Control Panels | YAMAHA USB MIDI Patch System Folder | Extensions | USB YAMAHA MIDI Driver System Folder | OMS Folder | YAMAHA USB MIDI OMS Driver 2. s Wish to use the UX256 in the Control Panel to the UX256 and remove the USB cable. 5. s How can I ...les in the Control Panel. 2. Install the driver (page 18) and set up OMS (page 20). Double-click the "Device Manager" tab, select "YAMAHA USB MIDI Driver" and remove it. 3. Double-click "Multimedia" in the following three files. Troubleshooting (FAQ) s Playback response is delayed. ...
... remove the following locations: System Folder | Control Panels | YAMAHA USB MIDI Patch System Folder | Extensions | USB YAMAHA MIDI Driver System Folder | OMS Folder | YAMAHA USB MIDI OMS Driver 2. s Wish to use the UX256 in the Control Panel to the UX256 and remove the USB cable. 5. s How can I ...les in the Control Panel. 2. Install the driver (page 18) and set up OMS (page 20). Double-click the "Device Manager" tab, select "YAMAHA USB MIDI Driver" and remove it. 3. Double-click "Multimedia" in the following three files. Troubleshooting (FAQ) s Playback response is delayed. ...
UX256 Owners Manual
Page 4
...of up to 256 channels. Table of digital music. Doing so many result in this Owner's Manual are for choosing the Yamaha UX256 USB-MIDI interface. After you for instructional purposes, and may appear somewhat different from the screens which appear on an audio CD... player. Please read this Owner's Manual are the trademarks or registered trademarks of the UX256. The UX256 is a MIDI interface that has a USB terminal and enjoy the powerful features of contents UX256 Features 5 Notes on USB 6 Package Contents 7 About the included software 7 System Requirements 8 ...
...of up to 256 channels. Table of digital music. Doing so many result in this Owner's Manual are for choosing the Yamaha UX256 USB-MIDI interface. After you for instructional purposes, and may appear somewhat different from the screens which appear on an audio CD... player. Please read this Owner's Manual are the trademarks or registered trademarks of the UX256. The UX256 is a MIDI interface that has a USB terminal and enjoy the powerful features of contents UX256 Features 5 Notes on USB 6 Package Contents 7 About the included software 7 System Requirements 8 ...
UX256 Owners Manual
Page 7
...contains the following items. Check the contents for missing items. • USB-MIDI interface (UX256 main unit) • Power adaptor (PA-3B) (The power adaptor may not be ... CD-ROM contains the following software (driver). [Windows 98] • USB-MIDI driver (YAMAHA USB-MIDI Driver) You need this driver to operate the UX256. Be sure to install the OMS driver first, then install this driver to operate ...the UX256. See page 14 for information on installing the driver. [Macintosh] • OMS This...
...contains the following items. Check the contents for missing items. • USB-MIDI interface (UX256 main unit) • Power adaptor (PA-3B) (The power adaptor may not be ... CD-ROM contains the following software (driver). [Windows 98] • USB-MIDI driver (YAMAHA USB-MIDI Driver) You need this driver to operate the UX256. Be sure to install the OMS driver first, then install this driver to operate ...the UX256. See page 14 for information on installing the driver. [Macintosh] • OMS This...
UX256 Owners Manual
Page 10
... connected correctly. 10 Be sure to use the PA-3B power adaptor or equivalent recommended by YAMAHA. NOTE Before you plan not to use the UX256 for a long period of the UX256. 3. Connect the plug of the power adaptor (PA-3B) to the DC IN jack on the rear ..., voltage, or polarity specifications may cause a malfunction. If you turn on the UX256 to remove the power adaptor from the AC outlet. Connect the power adaptor to the UX256. computer (3) TO HOST terminal (2) UX256 (4) MIDI terminal (1) Power adaptor (1) Connecting the included power adaptor power adaptor (PA-3B...
... connected correctly. 10 Be sure to use the PA-3B power adaptor or equivalent recommended by YAMAHA. NOTE Before you plan not to use the UX256 for a long period of the UX256. 3. Connect the plug of the power adaptor (PA-3B) to the DC IN jack on the rear ..., voltage, or polarity specifications may cause a malfunction. If you turn on the UX256 to remove the power adaptor from the AC outlet. Connect the power adaptor to the UX256. computer (3) TO HOST terminal (2) UX256 (4) MIDI terminal (1) Power adaptor (1) Connecting the included power adaptor power adaptor (PA-3B...

UX256 Owners Manual
Page 17
... 24). Connect the USB terminal of the computer or the USB hub to the UX256s. Click the "MIDI" tab and check to see if "Yamaha USB OUT xx-yy" is turned off (standby). Start the computer. 2. Make... sure the power to the UX256s is listed. Turn on the power to the USB terminal on the UX256s using the USB ... the order in which you turn on the power. You do not need to connect two or more UX256s. While "Single instrument" is "0." 3. If you turn on the power to all units simultaneously, the...
... 24). Connect the USB terminal of the computer or the USB hub to the UX256s. Click the "MIDI" tab and check to see if "Yamaha USB OUT xx-yy" is turned off (standby). Start the computer. 2. Make... sure the power to the UX256s is listed. Turn on the power to the USB terminal on the UX256s using the USB ... the order in which you turn on the power. You do not need to connect two or more UX256s. While "Single instrument" is "0." 3. If you turn on the power to all units simultaneously, the...

UX256 Owners Manual
Page 31
... locations: System Folder | Control Panels | YAMAHA USB MIDI Patch System Folder | Extensions | USB YAMAHA MIDI Driver System Folder | OMS Folder | YAMAHA USB MIDI OMS Driver 2. Install the driver (page 18) and set up OMS (page 20). Double-click "Multimedia" in MIDI-supported games. • [Windows 98] 1. When the UX256 is running ? • [Macintosh] →...
... locations: System Folder | Control Panels | YAMAHA USB MIDI Patch System Folder | Extensions | USB YAMAHA MIDI Driver System Folder | OMS Folder | YAMAHA USB MIDI OMS Driver 2. Install the driver (page 18) and set up OMS (page 20). Double-click "Multimedia" in MIDI-supported games. • [Windows 98] 1. When the UX256 is running ? • [Macintosh] →...

