
UX256 Owners Manual
Page 4
... of contents UX256 Features 5 Notes on USB 6 Package Contents 7 About the included software 7 System Requirements 8 Specifications 8 Parts and Functions 9 Connection 10 Installing the Driver 13 Installing the driver on a Windows 98 system 14 Installing the driver on a Macintosh system 18 Changing the driver setting (MIDI... from the screens which appear on an audio CD player. Doing so many result in a safe place for choosing the Yamaha UX256 USB-MIDI interface. Please read this Owner's Manual are the trademarks or registered trademarks of their respective companies. • The...
... of contents UX256 Features 5 Notes on USB 6 Package Contents 7 About the included software 7 System Requirements 8 Specifications 8 Parts and Functions 9 Connection 10 Installing the Driver 13 Installing the driver on a Windows 98 system 14 Installing the driver on a Macintosh system 18 Changing the driver setting (MIDI... from the screens which appear on an audio CD player. Doing so many result in a safe place for choosing the Yamaha UX256 USB-MIDI interface. Please read this Owner's Manual are the trademarks or registered trademarks of their respective companies. • The...

UX256 Owners Manual
Page 5
...Very quick response during multi-port simultaneous performance thanks to the USB connection. • Supports Windows 98 and Macintosh environments The Windows 98 driver and Macintosh driver are provided to support Windows 98 and Macintosh (USB-supported iMac, G3, G4, etc.) environments. • Connect up to the ...equivalent to serial ports on the operating environment. • Stable Operation The power is an abbreviation for Universal Serial Bus. UX256 Features • 256-channel Simultaneous Playback You can connect and disconnect the USB cable while the power to 256 ports for MIDI IN....
...Very quick response during multi-port simultaneous performance thanks to the USB connection. • Supports Windows 98 and Macintosh environments The Windows 98 driver and Macintosh driver are provided to support Windows 98 and Macintosh (USB-supported iMac, G3, G4, etc.) environments. • Connect up to the ...equivalent to serial ports on the operating environment. • Stable Operation The power is an abbreviation for Universal Serial Bus. UX256 Features • 256-channel Simultaneous Playback You can connect and disconnect the USB cable while the power to 256 ports for MIDI IN....
UX256 Owners Manual
Page 6
...mode during MIDI data transfer. • Do not connect or disconnect the USB cable while the UX256 is on. • Do not turn the power to the UX256 on or off , start the computer, or install the driver while a large quantity of data is being transferred. 6 Also, don't perform any of the...disabled: • The computer is checking the device or loading the driver. • The computer is starting or quitting the OS. • The computer is in Save Energy (Sleep) mode. • A MIDI application program is starting up or the UX256 functions may lock up . Notes on USB Don't turn the power...
...mode during MIDI data transfer. • Do not connect or disconnect the USB cable while the UX256 is on. • Do not turn the power to the UX256 on or off , start the computer, or install the driver while a large quantity of data is being transferred. 6 Also, don't perform any of the...disabled: • The computer is checking the device or loading the driver. • The computer is starting or quitting the OS. • The computer is in Save Energy (Sleep) mode. • A MIDI application program is starting up or the UX256 functions may lock up . Notes on USB Don't turn the power...
UX256 Owners Manual
Page 7
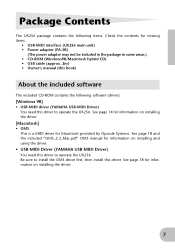
...information on installing and using the driver. • USB-MIDI Driver (YAMAHA USB-MIDI Driver) You need this driver to operate the UX256. Package Contents The UX256 package contains the following items. Check the contents for missing items. • USB-MIDI interface (UX256 main unit) • Power ...CD-ROM contains the following software (driver). [Windows 98] • USB-MIDI driver (YAMAHA USB-MIDI Driver) You need this driver to operate the UX256. See page 14 for information on installing the driver. [Macintosh] • OMS This is a MIDI driver for Macintosh provided by Opcode Systems...
...information on installing and using the driver. • USB-MIDI Driver (YAMAHA USB-MIDI Driver) You need this driver to operate the UX256. Package Contents The UX256 package contains the following items. Check the contents for missing items. • USB-MIDI interface (UX256 main unit) • Power ...CD-ROM contains the following software (driver). [Windows 98] • USB-MIDI driver (YAMAHA USB-MIDI Driver) You need this driver to operate the UX256. See page 14 for information on installing the driver. [Macintosh] • OMS This is a MIDI driver for Macintosh provided by Opcode Systems...

UX256 Owners Manual
Page 13
The installation procedure differs between sequence software and the UX256 via a USB cable. Proceed to install the driver on the computer correctly. Windows 98 computer sequence software driver USB cable UX256 Macintosh computer sequence software OMS driver USB cable UX256 13 Installing the Driver To operate the UX256, you also need to page 18 for installation instruction for a Macintosh...
The installation procedure differs between sequence software and the UX256 via a USB cable. Proceed to install the driver on the computer correctly. Windows 98 computer sequence software driver USB cable UX256 Macintosh computer sequence software OMS driver USB cable UX256 13 Installing the Driver To operate the UX256, you also need to page 18 for installation instruction for a Macintosh...

UX256 Owners Manual
Page 14
Connect the USB terminal of the UX256 using the included USB cable. 3. Turn on a Windows 98 system • Follow the steps below to install the driver. 1. The system displays a screen that the power to the UX256 is turned off (standby). Click [Next]. Start the computer. 2. The system displays the "Add New Hardware Wizard." 4. Installing the Driver Installing the driver on the power to the UX256. Make sure that enables you to the USB terminal of the computer or the USB hub to select search method. 14
Connect the USB terminal of the UX256 using the included USB cable. 3. Turn on a Windows 98 system • Follow the steps below to install the driver. 1. The system displays a screen that the power to the UX256 is turned off (standby). Click [Next]. Start the computer. 2. The system displays the "Add New Hardware Wizard." 4. Installing the Driver Installing the driver on the power to the UX256. Make sure that enables you to the USB terminal of the computer or the USB hub to select search method. 14
UX256 Owners Manual
Page 15
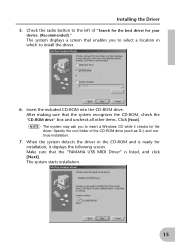
... The system may ask you to the left of the CD-ROM drive (such as D:\) and continue installation. 7. Make sure that the "YAMAHA USB MIDI Driver" is ready for installation, it checks for your device. (Recommended)." The system displays a screen that the system recognizes the CD-ROM, check the "CD-ROM ...drive" box and uncheck all other items. Click [Next]. When the system detects the driver in which to insert a Windows CD while it displays the following screen. After making sure that enables you to install the...
... The system may ask you to the left of the CD-ROM drive (such as D:\) and continue installation. 7. Make sure that the "YAMAHA USB MIDI Driver" is ready for installation, it checks for your device. (Recommended)." The system displays a screen that the system recognizes the CD-ROM, check the "CD-ROM ...drive" box and uncheck all other items. Click [Next]. When the system detects the driver in which to insert a Windows CD while it displays the following screen. After making sure that enables you to install the...

UX256 Owners Manual
Page 16
The driver has been installed. • Checking the installation Follow the steps below to open the System Properties window. 2. When installation is listed. 16 Click [Finish]. Double-click "System" in the Control Panel to make sure the driver has been installed correctly. 1. Click the "Device Manager" tab and check to show this screen after installation is complete. NOTE Some computers may take about ten seconds to see if "YAMAHA USB MIDI Driver" is complete, the following screen appears. Installing the Driver 8.
The driver has been installed. • Checking the installation Follow the steps below to open the System Properties window. 2. When installation is listed. 16 Click [Finish]. Double-click "System" in the Control Panel to make sure the driver has been installed correctly. 1. Click the "Device Manager" tab and check to show this screen after installation is complete. NOTE Some computers may take about ten seconds to see if "YAMAHA USB MIDI Driver" is complete, the following screen appears. Installing the Driver 8.

UX256 Owners Manual
Page 17
...). Connect the USB terminal of the computer or the USB hub to the USB terminal on the hub. 17 Make sure the power to the UX256s is selected, select a driver according to the port number of the USB hub. Click "Multimedia" in the Control Panel to install the... the power to all units simultaneously, the device number is assigned based on setting up the UX256 for the software. 1. Click the "MIDI" tab and check to see if "Yamaha USB OUT xx-yy" is "0." 3. Installing the Driver • Selecting the destination for the MIDI signal output This section explains how to set...
...). Connect the USB terminal of the computer or the USB hub to the USB terminal on the hub. 17 Make sure the power to the UX256s is selected, select a driver according to the port number of the USB hub. Click "Multimedia" in the Control Panel to install the... the power to all units simultaneously, the device number is assigned based on setting up the UX256 for the software. 1. Click the "MIDI" tab and check to see if "Yamaha USB OUT xx-yy" is "0." 3. Installing the Driver • Selecting the destination for the MIDI signal output This section explains how to set...
UX256 Owners Manual
Page 18
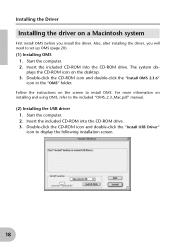
...ROM icon and double-click the "Install OMS 2.3.6" icon in the "OMS" folder. Double-click the CD-ROM icon and double-click the "Install USB Driver" icon to install OMS. For more information on the desktop. 3. The system dis- Start the computer. 2. plays the CD-ROM icon on installing ...and using OMS, refer to the included "OMS_2.3_Mac.pdf" manual. (2) Installing the USB driver 1. Insert the included CD-ROM into the CD-ROM drive. Installing the Driver Installing the driver on a Macintosh system First install OMS before you will need to set up OMS (page 20). (1) Installing...
...ROM icon and double-click the "Install OMS 2.3.6" icon in the "OMS" folder. Double-click the CD-ROM icon and double-click the "Install USB Driver" icon to install OMS. For more information on the desktop. 3. The system dis- Start the computer. 2. plays the CD-ROM icon on installing ...and using OMS, refer to the included "OMS_2.3_Mac.pdf" manual. (2) Installing the USB driver 1. Insert the included CD-ROM into the CD-ROM drive. Installing the Driver Installing the driver on a Macintosh system First install OMS before you will need to set up OMS (page 20). (1) Installing...
UX256 Owners Manual
Page 19
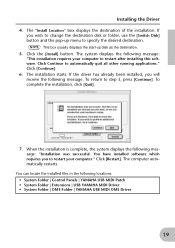
...-up menu to restart after installing this software. Click Continue to step 3, press [Continue]. Click [Continue]. 6. If the driver has already been installed, you to restart your computer to specify the desired destination. When the installation is complete, the system ...displays the following locations: • System Folder | Control Panels | YAMAHA USB MIDI Patch • System Folder | Extensions | USB YAMAHA MIDI Driver • System Folder | OMS Folder | YAMAHA USB MIDI OMS Driver 19 Click [Restart]. You can locate the installed files in the following message:...
...-up menu to restart after installing this software. Click Continue to step 3, press [Continue]. Click [Continue]. 6. If the driver has already been installed, you to restart your computer to specify the desired destination. When the installation is complete, the system ...displays the following locations: • System Folder | Control Panels | YAMAHA USB MIDI Patch • System Folder | Extensions | USB YAMAHA MIDI Driver • System Folder | OMS Folder | YAMAHA USB MIDI OMS Driver 19 Click [Restart]. You can locate the installed files in the following message:...
UX256 Owners Manual
Page 20
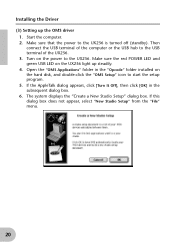
...OK] in the "Opcode" folder installed on the hard disk, and double-click the "OMS Setup" icon to the UX256 is turned off (standby). Turn on the UX256 light up the OMS driver 1. The system displays the "Create a New Studio Setup" dialog box. Make sure the red POWER LED and green ...to the USB terminal of the computer or the USB hub to the UX256. Make sure that the power to start the setup program. 5. Open the "OMS Applications" folder in the subsequent dialog box. 6. Start the computer. 2. Installing the Driver (3) Setting up steadily. 4. If this dialog box does not appear, ...
...OK] in the "Opcode" folder installed on the hard disk, and double-click the "OMS Setup" icon to the UX256 is turned off (standby). Turn on the UX256 light up the OMS driver 1. The system displays the "Create a New Studio Setup" dialog box. Make sure the red POWER LED and green ...to the USB terminal of the computer or the USB hub to the UX256. Make sure that the power to start the setup program. 5. Open the "OMS Applications" folder in the subsequent dialog box. 6. Start the computer. 2. Installing the Driver (3) Setting up steadily. 4. If this dialog box does not appear, ...

UX256 Owners Manual
Page 21
..." check boxes, and click [Search]. 8. See page 8 for more information. • The system displays one "USB-MIDI x" message for each connected UX256. 21 After the search operation is complete, make sure that "USB-MIDI 1" is not detected correctly, "USB-MIDI 1" does not appear. The system displays... the "OMS Driver Search" dialog box. Remove the check from the beginning. • If your iMac does not detect the UX256, "iMac Update 1.1" may not have been installed. NOTE • If the UX256 is listed in the "OMS Driver Setup" dialog, then click [OK]. Click...
..." check boxes, and click [Search]. 8. See page 8 for more information. • The system displays one "USB-MIDI x" message for each connected UX256. 21 After the search operation is complete, make sure that "USB-MIDI 1" is not detected correctly, "USB-MIDI 1" does not appear. The system displays... the "OMS Driver Search" dialog box. Remove the check from the beginning. • If your iMac does not detect the UX256, "iMac Update 1.1" may not have been installed. NOTE • If the UX256 is listed in the "OMS Driver Setup" dialog, then click [OK]. Click...

UX256 Owners Manual
Page 22
Check all Ports 1-16 check boxes. 10. Click [OK]. 11. The system displays a dialog box that "USB-MIDI 1" and multiple Port numbers are listed in the "OMS MIDI Device Setup" dialog. Installing the Driver 9. Make sure that enables you to save the setup file. Enter the file name and click [Save]. 22
Check all Ports 1-16 check boxes. 10. Click [OK]. 11. The system displays a dialog box that "USB-MIDI 1" and multiple Port numbers are listed in the "OMS MIDI Device Setup" dialog. Installing the Driver 9. Make sure that enables you to save the setup file. Enter the file name and click [Save]. 22
UX256 Owners Manual
Page 23
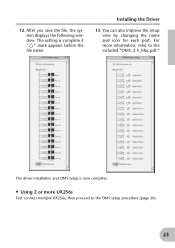
The driver installation and OMS setup is complete if " " mark appears before the file name. Installing the Driver 13. You can also improve the setup view by changing the name and icon for each port. For more UX256s First connect multiple UX256s, then proceed to the included "OMS_2.3_Mac.pdf." After you save the file, the system displays the following window. 12. The setting is now complete. • Using 2 or more information, refer to the OMS setup procedure (page 20). 23
The driver installation and OMS setup is complete if " " mark appears before the file name. Installing the Driver 13. You can also improve the setup view by changing the name and icon for each port. For more UX256s First connect multiple UX256s, then proceed to the included "OMS_2.3_Mac.pdf." After you save the file, the system displays the following window. 12. The setting is now complete. • Using 2 or more information, refer to the OMS setup procedure (page 20). 23
UX256 Owners Manual
Page 24
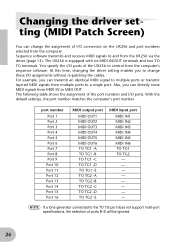
...change these I/O assignments without re-patching the cables. Sequence software transmits and receives MIDI signals to MIDI OUT. At this time, changing the driver setting enables you can directly route MIDI signals from MIDI IN to and from the computer. For example, you to a single port. port ...B-E will be ignored. 24 You specify the I/O ports of the port numbers and I /O connectors on the UX256 and port numbers selected from the UX256 via the driver (page 13). The UX256 is equipped with six MIDI IN/OUT terminals and two TO TG terminals. Also, you can transmit an identical ...
...change these I/O assignments without re-patching the cables. Sequence software transmits and receives MIDI signals to MIDI OUT. At this time, changing the driver setting enables you can directly route MIDI signals from MIDI IN to and from the computer. For example, you to a single port. port ...B-E will be ignored. 24 You specify the I/O ports of the port numbers and I /O connectors on the UX256 and port numbers selected from the UX256 via the driver (page 13). The UX256 is equipped with six MIDI IN/OUT terminals and two TO TG terminals. Also, you can transmit an identical ...

UX256 Owners Manual
Page 25
The following section explains how to display the screen. 25 Changing the driver setting (MIDI Patch Screen) • Starting the MIDI Patch screen The start-up method and the MIDI Patch screen differs slightly between the Windows 98 and Macintosh system. Double-click "MIDI-USB Driver" to display the screen. [Macintosh] Select "Control Panels" from the Apple menu, then select "YAMAHA USB MIDI Patch" to operate the MIDI Patch screen in the "My Computer" folder. 2. Double-click "Control Panel" in Windows 98. [Windows 98] 1. However, the basic operation of the screen is the same.
The following section explains how to display the screen. 25 Changing the driver setting (MIDI Patch Screen) • Starting the MIDI Patch screen The start-up method and the MIDI Patch screen differs slightly between the Windows 98 and Macintosh system. Double-click "MIDI-USB Driver" to display the screen. [Macintosh] Select "Control Panels" from the Apple menu, then select "YAMAHA USB MIDI Patch" to operate the MIDI Patch screen in the "My Computer" folder. 2. Double-click "Control Panel" in Windows 98. [Windows 98] 1. However, the basic operation of the screen is the same.

UX256 Owners Manual
Page 26
Changing the driver setting (MIDI Patch Screen) • Changing the device number If you are using multiple UX256s, you can try transmitting MIDI signals. • Note Off Message When you click [Send All Note OFF], a MIDI All Note Off message will be sent to all ports on the UX256. • Note On Message When...., as the Device Name. • Checking the signal path To see if the MIDI device is connected correctly, you wish to all ports on the UX256. 26 Click "Device Name." The System displays the drop-down list. Select the device for which you can change the setting.
Changing the driver setting (MIDI Patch Screen) • Changing the device number If you are using multiple UX256s, you can try transmitting MIDI signals. • Note Off Message When you click [Send All Note OFF], a MIDI All Note Off message will be sent to all ports on the UX256. • Note On Message When...., as the Device Name. • Checking the signal path To see if the MIDI device is connected correctly, you wish to all ports on the UX256. 26 Click "Device Name." The System displays the drop-down list. Select the device for which you can change the setting.
UX256 Owners Manual
Page 27
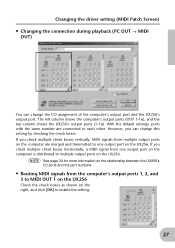
... from multiple output ports on the computer are connected to one output port on the computer is distributed to enable the setting. 27 Changing the driver setting (MIDI Patch Screen) • Changing the connection during playback (PC OUT → MIDI OUT) You can change the I /O ports and the port ...check boxes as shown on the right, and click [OK] to multiple output ports on the UX256. The left column shows the computer's output ports (OUT 1-16), and the top column shows the UX256's output ports (1-16). With the default settings, ports with the same number are merged and transmitted...
... from multiple output ports on the computer are connected to one output port on the computer is distributed to enable the setting. 27 Changing the driver setting (MIDI Patch Screen) • Changing the connection during playback (PC OUT → MIDI OUT) You can change the I /O ports and the port ...check boxes as shown on the right, and click [OK] to multiple output ports on the UX256. The left column shows the computer's output ports (OUT 1-16), and the top column shows the UX256's output ports (1-16). With the default settings, ports with the same number are merged and transmitted...

UX256 Owners Manual
Page 28
Changing the driver setting (MIDI Patch Screen) • Changing the connection during recording (MIDI IN → PC IN) You can change the I /O ports and the port numbers. • Routing MIDI signals from multiple input ports on the UX256 are connected to each other. The left column shows the computer's input ports ... by checking the check boxes. With the default settings, ports with the same number are merged and transmitted to one input port on the UX256 is distributed to the computer's input port 1 Check the check boxes as shown on the computer. NOTE See page 24 for more information...
Changing the driver setting (MIDI Patch Screen) • Changing the connection during recording (MIDI IN → PC IN) You can change the I /O ports and the port numbers. • Routing MIDI signals from multiple input ports on the UX256 are connected to each other. The left column shows the computer's input ports ... by checking the check boxes. With the default settings, ports with the same number are merged and transmitted to one input port on the UX256 is distributed to the computer's input port 1 Check the check boxes as shown on the computer. NOTE See page 24 for more information...


