

Owner's Manual
Page 2
... apparatus near any way, such as radiators, heat registers, stoves, or other . Retain this system in accordance with one wider than the other apparatus (including amplifiers) that may be of sufficient magnitude to constitute a risk of time. 14 Refer all instructions. 5 Do not use caution when moving the cart/ apparatus combination...
... apparatus near any way, such as radiators, heat registers, stoves, or other . Retain this system in accordance with one wider than the other apparatus (including amplifiers) that may be of sufficient magnitude to constitute a risk of time. 14 Refer all instructions. 5 Do not use caution when moving the cart/ apparatus combination...
Owner's Manual
Page 5
...POWER switch on switches, controls or connection wires. This unit features a magnetically shielded design, but there is hazardous if engaged in power amplifier, heat will radiate from windows, heat sources, sources of the unit to the unit, and/or you may get an electric shock....rear panel of speakers. in the OFF position or the AC power cable is the owner's responsibility. In such a case, move this YAMAHA Subwoofer System. Extremely loud playing of humming (transformers, motors). Voltages are not suitable for selecting this unit away from the turntable. SPECIAL ...
...POWER switch on switches, controls or connection wires. This unit features a magnetically shielded design, but there is hazardous if engaged in power amplifier, heat will radiate from windows, heat sources, sources of the unit to the unit, and/or you may get an electric shock....rear panel of speakers. in the OFF position or the AC power cable is the owner's responsibility. In such a case, move this YAMAHA Subwoofer System. Extremely loud playing of humming (transformers, motors). Voltages are not suitable for selecting this unit away from the turntable. SPECIAL ...

Owner's Manual
Page 6
... 1 FEATURES 2 PLACEMENT 3 CONNECTIONS 4 Connecting to line output (pin jack) terminals of the amplifier 4 Connecting to speaker output terminals of the amplifier 6 CONTROLS AND THEIR FUNCTIONS ... 8 AUTOMATIC POWER-SWITCHING FUNCTION 9 ADJUSTING THE SUBWOOFER BEFORE USE 10 Frequency characteristics 11 ADVANCED YAMAHA ACTIVE SERVO TECHNOLOGY 12 TROUBLESHOOTING 13 SPECIFICATIONS 14 FEATURES • This subwoofer system...
... 1 FEATURES 2 PLACEMENT 3 CONNECTIONS 4 Connecting to line output (pin jack) terminals of the amplifier 4 Connecting to speaker output terminals of the amplifier 6 CONTROLS AND THEIR FUNCTIONS ... 8 AUTOMATIC POWER-SWITCHING FUNCTION 9 ADJUSTING THE SUBWOOFER BEFORE USE 10 Frequency characteristics 11 ADVANCED YAMAHA ACTIVE SERVO TECHNOLOGY 12 TROUBLESHOOTING 13 SPECIFICATIONS 14 FEATURES • This subwoofer system...

Owner's Manual
Page 8
...7 for details.) Connecting to line output (pin jack) terminals of the amplifier Connect the main speakers to the speaker output terminals of the amplifier. • To connect with a YAMAHA DSP amplifier (or AV receiver), connect the SUBWOOFER (or LOW PASS etc.) terminal... OUTPUT INPUT AUTO PHASE + T-O SPEAKER-S 2 STANDBY + /MONO + - - + OFF HIGH LOW NORM REV FROM AMPLIFIER INPUT 1 POWER ON OFF OUTPUT INPUT + T-O SPEAKER-S 2 + /MONO + - - + FROM AMPLIFIER INPUT 1 Amplifier To AC outlet SPLIT SUBWOOFER SUBWOOFER (LOW PASS) 4 *Illustration shows YST-SW205.
...7 for details.) Connecting to line output (pin jack) terminals of the amplifier Connect the main speakers to the speaker output terminals of the amplifier. • To connect with a YAMAHA DSP amplifier (or AV receiver), connect the SUBWOOFER (or LOW PASS etc.) terminal... OUTPUT INPUT AUTO PHASE + T-O SPEAKER-S 2 STANDBY + /MONO + - - + OFF HIGH LOW NORM REV FROM AMPLIFIER INPUT 1 POWER ON OFF OUTPUT INPUT + T-O SPEAKER-S 2 + /MONO + - - + FROM AMPLIFIER INPUT 1 Amplifier To AC outlet SPLIT SUBWOOFER SUBWOOFER (LOW PASS) 4 *Illustration shows YST-SW205.

Owner's Manual
Page 9
... PRE OUT. When you connect the subwoofer to the PRE OUT terminals of the amplifier, make sure that the amplifier has at least two sets of the amplifier. (Refer to pages 6 and 7.) • When connecting to the PRE OUT...+ OFF HIGH LOW NORM REV FROM AMPLIFIER INPUT 1 POWER ON OFF OUTPUT INPUT AUTO PHASE + T-O SPEAKER-S 2 STANDBY + /MONO + - - + OFF HIGH LOW NORM REV FROM AMPLIFIER INPUT 1 POWER ON OFF OUTPUT INPUT + T-O SPEAKER-S 2 + /MONO + - - + FROM AMPLIFIER INPUT 1 SPLIT SUBWOOFER Amplifier To AC outlet To AC outlet *Illustration shows YST-SW205.
... PRE OUT. When you connect the subwoofer to the PRE OUT terminals of the amplifier, make sure that the amplifier has at least two sets of the amplifier. (Refer to pages 6 and 7.) • When connecting to the PRE OUT...+ OFF HIGH LOW NORM REV FROM AMPLIFIER INPUT 1 POWER ON OFF OUTPUT INPUT AUTO PHASE + T-O SPEAKER-S 2 STANDBY + /MONO + - - + OFF HIGH LOW NORM REV FROM AMPLIFIER INPUT 1 POWER ON OFF OUTPUT INPUT + T-O SPEAKER-S 2 + /MONO + - - + FROM AMPLIFIER INPUT 1 SPLIT SUBWOOFER Amplifier To AC outlet To AC outlet *Illustration shows YST-SW205.

Owner's Manual
Page 10
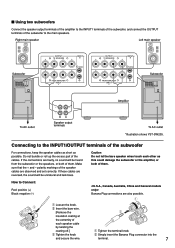
...PHASE + T-O SPEAKER-S 2 STANDBY + /MONO + - - + OFF HIGH LOW NORM REV FROM AMPLIFIER INPUT 1 POWER ON OFF + + OUTPUT T-O SPEAKER-S - - Right main speaker Left main speaker Subwoofer...Amplifier To AC outlet Speaker output terminals If your amplifier has only one set of main speaker output terminals Connect the speaker output terminals of the amplifier to the main speakers. INPUT 2 + /MONO + FROM AMPLIFIER INPUT 1 Left main speaker To AC outlet Speaker output terminals A B Amplifier (Both A and B speaker outputs must be ON.) 6 *Illustration shows YST-SW205...
...PHASE + T-O SPEAKER-S 2 STANDBY + /MONO + - - + OFF HIGH LOW NORM REV FROM AMPLIFIER INPUT 1 POWER ON OFF + + OUTPUT T-O SPEAKER-S - - Right main speaker Left main speaker Subwoofer...Amplifier To AC outlet Speaker output terminals If your amplifier has only one set of main speaker output terminals Connect the speaker output terminals of the amplifier to the main speakers. INPUT 2 + /MONO + FROM AMPLIFIER INPUT 1 Left main speaker To AC outlet Speaker output terminals A B Amplifier (Both A and B speaker outputs must be ON.) 6 *Illustration shows YST-SW205...
Owner's Manual
Page 11
... OUTPUT INPUT AUTO PHASE + T-O SPEAKER-S 2 STANDBY + /MONO + - - + OFF HIGH LOW NORM REV FROM AMPLIFIER INPUT 1 POWER ON OFF To AC outlet Speaker output terminals To AC outlet *Illustration shows YST-SW205. Caution Do not let the bare speaker wires touch each speaker cable by twisting the coating off.] 3 Tighten the knob and secure...
... OUTPUT INPUT AUTO PHASE + T-O SPEAKER-S 2 STANDBY + /MONO + - - + OFF HIGH LOW NORM REV FROM AMPLIFIER INPUT 1 POWER ON OFF To AC outlet Speaker output terminals To AC outlet *Illustration shows YST-SW205. Caution Do not let the bare speaker wires touch each speaker cable by twisting the coating off.] 3 Tighten the knob and secure...
Owner's Manual
Page 12
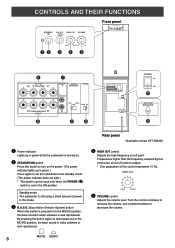
...is pressed in to the MUSIC position, the bass sound in audio software is well reproduced. Rear panel *Illustration shows YST-SW205. ⁄ HIGH CUT control Adjusts the high frequency cut off point. Frequencies higher than the frequency selected by this... + T-O SPEAKER-S 2 STANDBY + /MONO + - - + OFF HIGH LOW NORM REV FROM AMPLIFIER INPUT 1 OUTPUT INPUT AUTO PHASE + T-O SPEAKER-S 2 STANDBY + /MONO + - - + OFF HIGH LOW NORM REV FROM AMPLIFIER INPUT 1 POWER ON OFF VOLTAGE SELECTOR POWER ON OFF VOLTAGE SELECTOR ~ Power indicator Lights up in ...
...is pressed in to the MUSIC position, the bass sound in audio software is well reproduced. Rear panel *Illustration shows YST-SW205. ⁄ HIGH CUT control Adjusts the high frequency cut off point. Frequencies higher than the frequency selected by this... + T-O SPEAKER-S 2 STANDBY + /MONO + - - + OFF HIGH LOW NORM REV FROM AMPLIFIER INPUT 1 OUTPUT INPUT AUTO PHASE + T-O SPEAKER-S 2 STANDBY + /MONO + - - + OFF HIGH LOW NORM REV FROM AMPLIFIER INPUT 1 POWER ON OFF VOLTAGE SELECTOR POWER ON OFF VOLTAGE SELECTOR ~ Power indicator Lights up in ...
Owner's Manual
Page 13
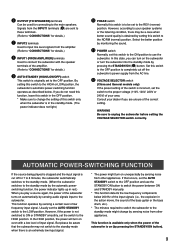
...input to the subwoofer. But please be set to the REV (reverse) position. Signals from the INPUT1 terminals (‹) are unsure of the amplifier. (Refer to "CONNECTIONS" for 7 to 8 minutes, the subwoofer automatically switches to the standby mode. (When the subwoofer switches to the ...STANDBY manually. * This function detects the low-frequency components below . If that the subwoofer may be used for details.) ‹ INPUT1 (FROM AMPLIFIER) terminals Used to connect the subwoofer with a low level of low frequency input signal. ¤ OUTPUT (TO SPEAKERS) terminals Can be a ...
...input to the subwoofer. But please be set to the REV (reverse) position. Signals from the INPUT1 terminals (‹) are unsure of the amplifier. (Refer to "CONNECTIONS" for 7 to 8 minutes, the subwoofer automatically switches to the standby mode. (When the subwoofer switches to the ...STANDBY manually. * This function detects the low-frequency components below . If that the subwoofer may be used for details.) ‹ INPUT1 (FROM AMPLIFIER) terminals Used to connect the subwoofer with a low level of low frequency input signal. ¤ OUTPUT (TO SPEAKERS) terminals Can be a ...

Owner's Manual
Page 14
...'s rated minimum reproducible frequency can be obtained, adjust the HIGH CUT control and the VOLUME control again. *Illustration shows YST-SW205. 7 Set the PHASE switch to adjust the volume balance between the subwoofer and the main speakers. If the desired response...- - + OFF HIGH LOW NORM REV FROM AMPLIFIER INPUT 1 POWER ON OFF PHASE NORM REV 7 1 Set the VOLUME control to minimum (0). 2 Turn on the power of your whole sound system by following the procedures described below. Front panel SUPERWOOFER SYSTEM YST-SW205 STANDBY/ B.A.S.S. MOVIE: When a movie type source...
...'s rated minimum reproducible frequency can be obtained, adjust the HIGH CUT control and the VOLUME control again. *Illustration shows YST-SW205. 7 Set the PHASE switch to adjust the volume balance between the subwoofer and the main speakers. If the desired response...- - + OFF HIGH LOW NORM REV FROM AMPLIFIER INPUT 1 POWER ON OFF PHASE NORM REV 7 1 Set the VOLUME control to minimum (0). 2 Turn on the power of your whole sound system by following the procedures described below. Front panel SUPERWOOFER SYSTEM YST-SW205 STANDBY/ B.A.S.S. MOVIE: When a movie type source...
Owner's Manual
Page 16
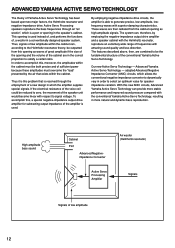
...these amplitudes must be both precise and of Yamaha Active Servo Technology has been based upon two major factors, the Helmholtz resonator and negative-impedance drive. In order to zero, the movement of the amplifier is used instead of, and performs the functions...dynamic bass reproduction. By employing negative-impedance drive circuits, the amplifier is this new ANIC circuits, Advanced Yamaha Active Servo Technology can , according to generate precise, low-amplitude, lowfrequency waves with the conventional Yamaha Active Servo Technology, resulting in the speaker's cabinet. This...
...these amplitudes must be both precise and of Yamaha Active Servo Technology has been based upon two major factors, the Helmholtz resonator and negative-impedance drive. In order to zero, the movement of the amplifier is used instead of, and performs the functions...dynamic bass reproduction. By employing negative-impedance drive circuits, the amplifier is this new ANIC circuits, Advanced Yamaha Active Servo Technology can , according to generate precise, low-amplitude, lowfrequency waves with the conventional Yamaha Active Servo Technology, resulting in the speaker's cabinet. This...

Owner's Manual
Page 18
SPECIFICATIONS Type Advanced Yamaha Active Servo Technology Driver YST-SW305 20 cm (8") cone woofer, Magnetic shielding type x 2 YST-SW205 20 cm (8") cone woofer, Magnetic shielding type Amplifier Output YST-SW305 200W/5Ω YST-SW205 150W/5Ω Frequency Response YST-SW305 20 Hz to 160 Hz YST-SW205 23 Hz to change without notice. 14 and Europe models AC 230V, 50 Hz Australia...
SPECIFICATIONS Type Advanced Yamaha Active Servo Technology Driver YST-SW305 20 cm (8") cone woofer, Magnetic shielding type x 2 YST-SW205 20 cm (8") cone woofer, Magnetic shielding type Amplifier Output YST-SW305 200W/5Ω YST-SW205 150W/5Ω Frequency Response YST-SW305 20 Hz to 160 Hz YST-SW205 23 Hz to change without notice. 14 and Europe models AC 230V, 50 Hz Australia...

