Operating Guide
Page 5
...11~14 Antenna Connection 11 VCR Setup 12 Cable TV Setup 12 External A/V Source Setup 12 DVD Setup 13 DTV Setup 13 Using Headphones 13 PC...-out-of-Picture: Channel Scan) . . .29 Troubleshooting Checklist 30 Maintenance 31 Product Specifications 31 Your Zenith Limited Warranty Back Cover After reading this manual, keep it handy for future reference. 5 Adjustment 27 Horizontal/Vertical Position Adjustments . . . . ....Options Auto Clock Setup 21 Manual Clock Setup 21 On/Off Timer Setup 22 Sleep Timer Setup 22 Special Menu Options Closed Captions 23 Captions 24 Caption/Text 24...
...11~14 Antenna Connection 11 VCR Setup 12 Cable TV Setup 12 External A/V Source Setup 12 DVD Setup 13 DTV Setup 13 Using Headphones 13 PC...-out-of-Picture: Channel Scan) . . .29 Troubleshooting Checklist 30 Maintenance 31 Product Specifications 31 Your Zenith Limited Warranty Back Cover After reading this manual, keep it handy for future reference. 5 Adjustment 27 Horizontal/Vertical Position Adjustments . . . . ....Options Auto Clock Setup 21 Manual Clock Setup 21 On/Off Timer Setup 22 Sleep Timer Setup 22 Special Menu Options Closed Captions 23 Captions 24 Caption/Text 24...
Operating Guide
Page 11
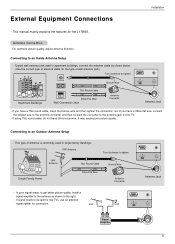
...Converter Antenna Jack - This type of wall antenna jack.) Turn clockwise to the antenna jack on the TV. - Connecting to tighten. If you have a 300Ω flat wire, connect the twisted wire to the antenna converter and then connect the converter to tighten. VHF Antenna... Turn clockwise to an Inside Antenna Setup - External Equipment Connections Installation - This manual mainly explains the features for connection. Antenna ...
...Converter Antenna Jack - This type of wall antenna jack.) Turn clockwise to the antenna jack on the TV. - Connecting to tighten. If you have a 300Ω flat wire, connect the twisted wire to the antenna converter and then connect the converter to tighten. VHF Antenna... Turn clockwise to an Inside Antenna Setup - External Equipment Connections Installation - This manual mainly explains the features for connection. Antenna ...
Operating Guide
Page 12
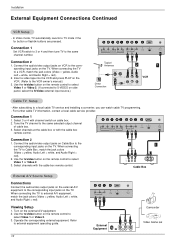
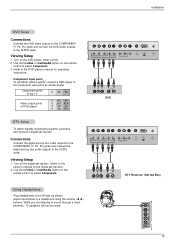
...If connected to external A/V equipment, match the jack colors (Video = yellow, Audio Left = white, and Audio Right = red). Use the tv/video button on side panel, select the S-Video external input source.) Y PB PR LR COMPONENT(480i/480p/720p/1080i) AUDIO DVD/DTV IN VIDEO (MONO) L AUDIO... IN ANT OUT S-VIDEO OUT CH3 IN CH4 (R) AUDIO(L) VIDEO VCR Cable TV Setup - Installation External Equipment Connections Continued VCR Setup - Connection 1 Set VCR switch to 3 or 4 and then tune TV to the VCR owner's manual.) 3. Connection 2 1. Y PB PR LR COMPONENT(480i/480p/720p/1080i) ...
...If connected to external A/V equipment, match the jack colors (Video = yellow, Audio Left = white, and Audio Right = red). Use the tv/video button on side panel, select the S-Video external input source.) Y PB PR LR COMPONENT(480i/480p/720p/1080i) AUDIO DVD/DTV IN VIDEO (MONO) L AUDIO... IN ANT OUT S-VIDEO OUT CH3 IN CH4 (R) AUDIO(L) VIDEO VCR Cable TV Setup - Installation External Equipment Connections Continued VCR Setup - Connection 1 Set VCR switch to 3 or 4 and then tune TV to the VCR owner's manual.) 3. Connection 2 1. Y PB PR LR COMPONENT(480i/480p/720p/1080i) ...
Operating Guide
Page 13
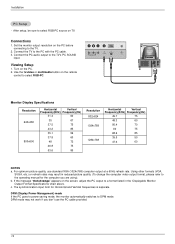
... digitally broadcast programs, purchase and connect a digital set -top box audio outputs to select Component. Use the tv/video or multimedia button on the remote control to the DVD player's manual for the digital set-top box.) 2. Adjust sound level to the AUDIO jacks. Refer to select Component. ... the DVD audio outputs to a headphone using the volume (F, G) buttons. While you are listening to the component input ports as shown. - Component ports of the TV Y PB PR Video output ports of DVD player Y Pb Pr Y B-Y R-Y Y Cb Cr Y PB PR DTV Setup - Turn on the DVD player, insert...
... digitally broadcast programs, purchase and connect a digital set -top box audio outputs to select Component. Use the tv/video or multimedia button on the remote control to the DVD player's manual for the digital set-top box.) 2. Adjust sound level to the AUDIO jacks. Refer to select Component. ... the DVD audio outputs to a headphone using the volume (F, G) buttons. While you are listening to the component input ports as shown. - Component ports of the TV Y PB PR Video output ports of DVD player Y Pb Pr Y B-Y R-Y Y Cb Cr Y PB PR DTV Setup - Turn on the DVD player, insert...
Operating Guide
Page 14
...Out of range" appears on the PC. 2. DPM mode may result in the 'Displayable Monitor Output Format Specifications' chart above. Connect the TV to the TV's PC SOUND input. Turn on the screen, adjust the PC output to a format listed in reduced picture quality. (To change the computer... 3. After setup, be sure to select RGB-PC source on the PC before connecting to the operating manual for Horizontal and Vertical frequencies is separate. Set the monitor output resolution on TV. For optimum picture quality, use the PC cable provided. 14 Viewing Setup 1. DPM (Display Power Management)...
...Out of range" appears on the PC. 2. DPM mode may result in the 'Displayable Monitor Output Format Specifications' chart above. Connect the TV to the TV's PC SOUND input. Turn on the screen, adjust the PC output to a format listed in reduced picture quality. (To change the computer... 3. After setup, be sure to select RGB-PC source on the PC before connecting to the operating manual for Horizontal and Vertical frequencies is separate. Set the monitor output resolution on TV. For optimum picture quality, use the PC cable provided. 14 Viewing Setup 1. DPM (Display Power Management)...
Operating Guide
Page 16
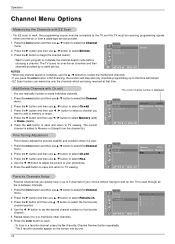
...use D / E button to select Favorite ch.. 3. Press the enter button to save and return to that time will remain. • EZ Scan function can manually include or erase individual channels. 1. Press the E button and then use D / E button to select Memory (add) or Erase (delete). 6. Press the ...select the first favorite channel position. 4. Use the F / G button to set the desired channel number for auto program to the TV and the TV must be connected to complete the channel search cycle before choosing a channel. Channel EZ Scan Ch.edit Favorite ch. Operation Channel Menu ...
...use D / E button to select Favorite ch.. 3. Press the enter button to save and return to that time will remain. • EZ Scan function can manually include or erase individual channels. 1. Press the E button and then use D / E button to select Memory (add) or Erase (delete). 6. Press the ...select the first favorite channel position. 4. Use the F / G button to set the desired channel number for auto program to the TV and the TV must be connected to complete the channel search cycle before choosing a channel. Channel EZ Scan Ch.edit Favorite ch. Operation Channel Menu ...
Operating Guide
Page 17
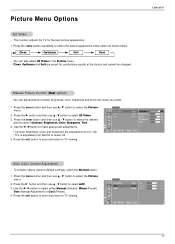
... and return to select the Picture menu. DE F G Â MENU EXIT 17 Press the G button and then use D / E button to TV viewing. Use the F / G button to the levels you prefer. 1. Picture EZ Video User Contrast 89 ACC User Brightness 50 DRP Clear Color 60..., color, sharpness and tint to make appropriate adjustments. • Contrast, Brightness, Color, and Sharpness are preset for the best picture appearance. 1. Operation Manual Picture Control (User option) - Press the exit button to save and return to select EZ Video 3. Press the menu button and then use D ...
... and return to select the Picture menu. DE F G Â MENU EXIT 17 Press the G button and then use D / E button to TV viewing. Use the F / G button to the levels you prefer. 1. Picture EZ Video User Contrast 89 ACC User Brightness 50 DRP Clear Color 60..., color, sharpness and tint to make appropriate adjustments. • Contrast, Brightness, Color, and Sharpness are preset for the best picture appearance. 1. Operation Manual Picture Control (User option) - Press the exit button to save and return to select EZ Video 3. Press the menu button and then use D ...

Operating Guide
Page 18
...User Red 50 2. Use the F / G button to select Red, Green or Blue. 4. Press the exit button to save and return to TV viewing. Press the enter button and then use D / E button to make appropriate adjustments. • The adjustment range of Red, Green, and... the G button and then use D / E button to select the Picture menu. 2. Use the F / G button to select ACC . Operation Picture Menu Options Continued Manual Color Temperature Control (User option) - Press the G button and then use D / E button to select Clear or Soft. 4. ARC Zoom 18 ACC User Green 50 ...
...User Red 50 2. Use the F / G button to select Red, Green or Blue. 4. Press the exit button to save and return to TV viewing. Press the enter button and then use D / E button to make appropriate adjustments. • The adjustment range of Red, Green, and... the G button and then use D / E button to select the Picture menu. 2. Use the F / G button to select ACC . Operation Picture Menu Options Continued Manual Color Temperature Control (User option) - Press the G button and then use D / E button to select Clear or Soft. 4. ARC Zoom 18 ACC User Green 50 ...
Operating Guide
Page 21
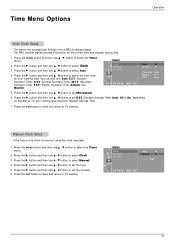
...Operation Auto Clock Setup - Timer Clock Off timer On timer DE F G Â MENU EXIT Auto G Manual G Time zone Auto PBS Ch. Press the G button and then use D / E button to TV viewing. Press the G button and then use D / E button to select the time zone for the ...broadcast signal. - The time is incorrect, reset the clock manually. 1. TV 1 D.S.T. Timer Clock Off timer On timer Auto G Manual G - - : - - Press the G button and then use D / E button to select Auto. 4. Press the G button and then use D / E button to TV viewing. Press the exit button to save and return to ...
...Operation Auto Clock Setup - Timer Clock Off timer On timer DE F G Â MENU EXIT Auto G Manual G Time zone Auto PBS Ch. Press the G button and then use D / E button to TV viewing. Press the G button and then use D / E button to select the time zone for the ...broadcast signal. - The time is incorrect, reset the clock manually. 1. TV 1 D.S.T. Timer Clock Off timer On timer Auto G Manual G - - : - - Press the G button and then use D / E button to select Auto. 4. Press the G button and then use D / E button to TV viewing. Press the exit button to save and return to ...

Operating Guide
Page 27
... the Clock / Phase. Be sure to be adjusted more after auto adjustment and especially if characters are still jittery, adjust the picture Phase manually. 1. RGB-PC Menu Options - Adjustment - If picture needs to select the RGB-PC source before operation. Press the menu button and ...then use D / E button to TV viewing. RGB-PC H-Position 50 V-Position 50 Clock 50 Phase 10 Auto configure DE F G Â MENU EXIT Phase / Clock Adjustments - Use the...
... the Clock / Phase. Be sure to be adjusted more after auto adjustment and especially if characters are still jittery, adjust the picture Phase manually. 1. RGB-PC Menu Options - Adjustment - If picture needs to select the RGB-PC source before operation. Press the menu button and ...then use D / E button to TV viewing. RGB-PC H-Position 50 V-Position 50 Clock 50 Phase 10 Auto configure DE F G Â MENU EXIT Phase / Clock Adjustments - Use the...


