
User Manual
Page 1
... function is off. Heath®/Zenith wireless lighting controls are UL/cUL and/or FCC/IC tested and approved. • Operational range of switches 1 through 3 set the code setting to 100 feet. There are 8 codes available by changing the settings of up to match...must have control which transmitter(s) you would like to have the same code and group setting to the following products: • Wireless Transmitters (Indoor / Outdoor) - 180° Motion Sensor - 240° Motion Sensor - Indicates Position of each system to work together. Transmitter(s)/ Receiver(s) Code ...
... function is off. Heath®/Zenith wireless lighting controls are UL/cUL and/or FCC/IC tested and approved. • Operational range of switches 1 through 3 set the code setting to 100 feet. There are 8 codes available by changing the settings of up to match...must have control which transmitter(s) you would like to have the same code and group setting to the following products: • Wireless Transmitters (Indoor / Outdoor) - 180° Motion Sensor - 240° Motion Sensor - Indicates Position of each system to work together. Transmitter(s)/ Receiver(s) Code ...

User Manual
Page 2
... Switch Receiver Note: The "X" has been placed on the switches to help clarify the code settings on the previous page. ON 1 2 3 4 Close-Up of Typical Code Switch (Factory Default Setting is Off) 2 598-1306-07 Code Switch Locations Code Switches DAY NIGHT NIGHT ONLY 1234 ...CODES DETECT 180° Motion Sensor Code Switches CODES DETECT 1 2 3 4 DAY NIGHT NIGHT ONLY 240° Motion Sensor CR2032 3 VOLTS ON 12 34 Code Switches Entry...
... Switch Receiver Note: The "X" has been placed on the switches to help clarify the code settings on the previous page. ON 1 2 3 4 Close-Up of Typical Code Switch (Factory Default Setting is Off) 2 598-1306-07 Code Switch Locations Code Switches DAY NIGHT NIGHT ONLY 1234 ...CODES DETECT 180° Motion Sensor Code Switches CODES DETECT 1 2 3 4 DAY NIGHT NIGHT ONLY 240° Motion Sensor CR2032 3 VOLTS ON 12 34 Code Switches Entry...
User Manual
Page 3
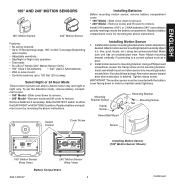
... to either the DAY/NIGHT or NIGHT ONLY position. To set the detection mode, remove battery compartment cover: • 180° Model - Install motion sensor mounting bracket where motion detection is desired. Attach motion sensor mounting bracket to mounting bracket. Tighten clamp screw. Make... upon model). • Adjustable sensitivity. • Day/Night or Night only operation. • Test mode. • DualBrite® Mode (240° Motion Sensor Only). • 180° Uses 2 AA batteries. • 240° Uses 2 AAA batteries. • Wall or eave mount. •...
... to either the DAY/NIGHT or NIGHT ONLY position. To set the detection mode, remove battery compartment cover: • 180° Model - Install motion sensor mounting bracket where motion detection is desired. Attach motion sensor mounting bracket to mounting bracket. Tighten clamp screw. Make... upon model). • Adjustable sensitivity. • Day/Night or Night only operation. • Test mode. • DualBrite® Mode (240° Motion Sensor Only). • 180° Uses 2 AA batteries. • 240° Uses 2 AAA batteries. • Wall or eave mount. •...

User Manual
Page 4
...3 Hours • 6 Hours • Dusk to Dawn IMPORTANT: Avoid Aiming Motion Sensor At: • Objects that change the coverage area. Adjust RANGE Control. Set the ON-TIME control to flash. DualBrite® Dimmer Control (240° Motion Sensor Only) Light comes on after dusk (Off, 3 or 6 hours, until it opens. ...TEST mode. Do not point other lights at motion sensor. Set the ON-TIME control to the TEST position. Set the DETECT control switch to stay on half power for location of LED light). 2. Locate the RANGE control and ON-TIME control on the motion sensor: • The RANGE ...
...3 Hours • 6 Hours • Dusk to Dawn IMPORTANT: Avoid Aiming Motion Sensor At: • Objects that change the coverage area. Adjust RANGE Control. Set the ON-TIME control to flash. DualBrite® Dimmer Control (240° Motion Sensor Only) Light comes on after dusk (Off, 3 or 6 hours, until it opens. ...TEST mode. Do not point other lights at motion sensor. Set the ON-TIME control to the TEST position. Set the DETECT control switch to stay on half power for location of LED light). 2. Locate the RANGE control and ON-TIME control on the motion sensor: • The RANGE ...

User Manual
Page 5
ENGLISH 8 ft. (2.4 m) 180° Motion Motion 70 ft. (21 m) Maximum Range Maximum Coverage Angle 180° Motion Sensor Coverage Area Sensor Least Sensitive Sensor Most Sensitive The detector is most sensitive to motion across its field of view. Motion Sensor Sensitivity 8 ft. (2.4 m) 240° 70 ft. (21 m) Maximum Range Maximum Coverage Angle 240° Motion Sensor Coverage Area Aim Sensor Down for Short Coverage Aim Sensor Higher for Long Coverage Adjusting Motion Sensor Coverage 598-1306-07 5
ENGLISH 8 ft. (2.4 m) 180° Motion Motion 70 ft. (21 m) Maximum Range Maximum Coverage Angle 180° Motion Sensor Coverage Area Sensor Least Sensitive Sensor Most Sensitive The detector is most sensitive to motion across its field of view. Motion Sensor Sensitivity 8 ft. (2.4 m) 240° 70 ft. (21 m) Maximum Range Maximum Coverage Angle 240° Motion Sensor Coverage Area Aim Sensor Down for Short Coverage Aim Sensor Higher for Long Coverage Adjusting Motion Sensor Coverage 598-1306-07 5

User Manual
Page 6
...and magnet in alignment (see Troubleshooting Guide. 4. Verify red LED on transmitter flashes momentarily and receiver turns light on transmitter flashes momentarily and receiver turns light off. Tape Mounting: Apply large piece of Magnet Mounted On Moving Surface 3. Possible Directions of Movement Transmitter... system includes a transmitter and magnet. Remove transmitter back cover from Battery Chamber. Stick transmitter back cover to automatically turn the light on type of each component must be mounted on door or window (moving surface). If magnet is 3/8" and the arrows ...
...and magnet in alignment (see Troubleshooting Guide. 4. Verify red LED on transmitter flashes momentarily and receiver turns light on transmitter flashes momentarily and receiver turns light off. Tape Mounting: Apply large piece of Magnet Mounted On Moving Surface 3. Possible Directions of Movement Transmitter... system includes a transmitter and magnet. Remove transmitter back cover from Battery Chamber. Stick transmitter back cover to automatically turn the light on type of each component must be mounted on door or window (moving surface). If magnet is 3/8" and the arrows ...

User Manual
Page 7
...period of overheating and possible damage to other equipment, do not install to control a receptacle, a motor-operated appliance, a fluorescent lighting fixture, or a transformer-supplied appliance. Carefully pry battery loose with the battery installed. ing upon switch purchased. With typical use,...Fits standard single gang junction box (wall switch only). • Not for use with 120 volt incandescent or halogen bulbs. Select light switch to the switch, consult an electrician about installation. Important: When ganging these units, they must be replaced by a qualified ...
...period of overheating and possible damage to other equipment, do not install to control a receptacle, a motor-operated appliance, a fluorescent lighting fixture, or a transformer-supplied appliance. Carefully pry battery loose with the battery installed. ing upon switch purchased. With typical use,...Fits standard single gang junction box (wall switch only). • Not for use with 120 volt incandescent or halogen bulbs. Select light switch to the switch, consult an electrician about installation. Important: When ganging these units, they must be replaced by a qualified ...

User Manual
Page 8
...sent by any transmitter will go off . 4. The light should turn the lights on at your circuit breaker or fuse box. Do this . Push the ON (top) button and release. When the receiver's OFF button is used . Note: The DIM setting defaults to 50% in the junction box with screws ...(short) provided. 11. Replace bulb(s). Set desired DIM level...
...sent by any transmitter will go off . 4. The light should turn the lights on at your circuit breaker or fuse box. Do this . Push the ON (top) button and release. When the receiver's OFF button is used . Note: The DIM setting defaults to 50% in the junction box with screws ...(short) provided. 11. Replace bulb(s). Set desired DIM level...

User Manual
Page 9
... to off twice before turning on then off when motion is no longer detected and after selected ON-TIME. • FLASH - Remove the existing light fixture. 2. Note: The plastic hanger can be used with mounting bolt. 7. Set the LAMP MODE switch to full brightness. Fixture should...ground wire to hold the fixture while wiring. Light instantly comes on effects) available when motion is repeated to return the light to toggle between AUTO and MANUAL MODE. Secure with local codes. Check operation. Note: Light will not trigger light while in the lamps, do not overtighten. ...
... to off twice before turning on then off when motion is no longer detected and after selected ON-TIME. • FLASH - Remove the existing light fixture. 2. Note: The plastic hanger can be used with mounting bolt. 7. Set the LAMP MODE switch to full brightness. Fixture should...ground wire to hold the fixture while wiring. Light instantly comes on effects) available when motion is repeated to return the light to toggle between AUTO and MANUAL MODE. Secure with local codes. Check operation. Note: Light will not trigger light while in the lamps, do not overtighten. ...

User Manual
Page 10
...Service Parts Available for all warranty requests. 10 598-1306-07 Dip switches on the same frequency. Check for 90 second initialization period (remote motion sensor). 5. You may also write* to 4:30 PM CST (M-F). Troubleshooting Guide POSSIBLE CAUSE 1. Short term power line failure. 2. Verify ...-858-8501 (English speaking only) for assistance at : www.hzsupport.com. Signals from transmitter will reset receiver to store. Verify code settings on . 2. Verify circuit breaker or fuse is turned on device is out of Purchase. SYMPTOM Device does not come on randomly. ...
...Service Parts Available for all warranty requests. 10 598-1306-07 Dip switches on the same frequency. Check for 90 second initialization period (remote motion sensor). 5. You may also write* to 4:30 PM CST (M-F). Troubleshooting Guide POSSIBLE CAUSE 1. Short term power line failure. 2. Verify ...-858-8501 (English speaking only) for assistance at : www.hzsupport.com. Signals from transmitter will reset receiver to store. Verify code settings on . 2. Verify circuit breaker or fuse is turned on device is out of Purchase. SYMPTOM Device does not come on randomly. ...

User Manual
Page 11
Repair service, adjustment and calibration due to misuse, abuse or negligence, light bulbs, batteries, and other expendable items are not covered by the party responsible for regulatory compliance could void the user's authority to operate the equipment. ...
Repair service, adjustment and calibration due to misuse, abuse or negligence, light bulbs, batteries, and other expendable items are not covered by the party responsible for regulatory compliance could void the user's authority to operate the equipment. ...