Ariens Platinum 30 Support Question
Ariens Platinum 30 Support Question
Find answers below for this question about Ariens Platinum 30.Need a Ariens Platinum 30 manual? We have 2 online manuals for this item!
Question posted by atvs0128 on February 17th, 2015
Stumped
ive replaced v belt on my model 921018 and still no forward motion can I adjust clutch cable as disc drive doesn't appear to be worn alot
Current Answers
Answer #1: Posted by BusterDoogen on February 17th, 2015 8:20 PM
BusterDoogen

Member since:
October 30th, 2011 Points: 28,565,397

Member since:
October 30th, 2011 Points: 28,565,397
Go to page 29 for the speed selector adjustment.
I hope this is helpful to you!
Please respond to my effort to provide you with the best possible solution by using the "Acceptable Solution" and/or the "Helpful" buttons when the answer has proven to be helpful. Please feel free to submit further info for your question, if a solution was not provided. I appreciate the opportunity to serve you!
Related Ariens Platinum 30 Manual Pages
Owners Manual - Page 1

Deluxe 24 Platinum
(SN 000101 +)
921029 -
Deluxe 30
(SN 000101 +)
921035 - Deluxe 30 Platinum
(SN 000101 +)
921030 -
921 Series Sno-Thro ®
Owner/Operator Manual Manuel Du Propriétaire/Utilisateur
Models
921023 - Deluxe 28 Track
(SN 095000 +)
921024 - Deluxe 24
(SN 000101 +)
921028 - ENGLISH FRANÇAIS
04585100B 7/13 Printed in USA Deluxe 28
(SN...
Owners Manual - Page 2

... position and facing the direction of forward travel. MODEL AND SERIAL NUMBERS
When ordering replacement parts or making service inquiries, know the Model and Serial numbers of your manuals....OF CONTENTS
SAFETY 4 ASSEMBLY 8 CONTROLS and FEATURES 15 OPERATION 17 MAINTENANCE 24 SERVICE AND ADJUSTMENTS . . . . . 27
STORAGE 35 SERVICE PARTS 35 ACCESSORIES 35 TROUBLESHOOTING 36 SPECIFICATIONS...
Owners Manual - Page 3
...instructions in this manual may not be optional. EN - 3 UNAUTHORIZED REPLACEMENT PARTS
Use only Ariens replacement parts. DISCLAIMER
Ariens reserves the right to discontinue, make changes to ...this manual were in the manuals.
3. WARNING: Improper assembly or adjustments can cause serious injury.
2.
The descriptions and specifications contained in this manual. NOTICE:...
Owners Manual - Page 4
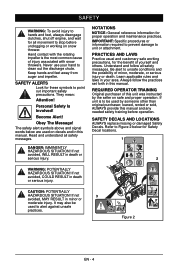
... and others. Learn applicable rules and laws in this manual. SAFETY DECALS AND LOCATIONS
ALWAYS replace missing or damaged Safety Decals.
The safety alert symbols above and signal words below for Safety... against unsafe
practices. SAFETY
WARNING: To avoid injury to hands and feet, always disengage clutches, shut off engine, and wait for all movement to stop before operation.
Keep hands...
Owners Manual - Page 5
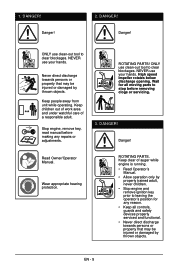
NEVER use your hands. Stop engine, remove key, read manual before removing clogs or servicing.
3. Wait for any repairs or adjustments. Danger! Read Owner/Operator Manual. DANGER! ONLY use clean-out tool to clear blockages. Keep people away from unit while operating.
ROTATING PARTS! NEVER use ...
Owners Manual - Page 6
...Before starting . Slow down and behind before beginning assembly or operating. Disengage attachment drive when traveling from engine exhaust can reduce vision and cause an accident. Failure ...its engine may include exhaust and evaporative emissions control system components required to maintain, adjust or service. Wear adequate safety gear, including safety glasses with emission controls and...
Owners Manual - Page 7
...clutches before servicing. ALWAYS remove key to prevent unauthorized use . Never carry passengers. All motion of slopes. DO NOT clear snow across the face of drive...worn out muffler can damage unit. NEVER store unit with an internal combustion type engine. If worn or damaged, replace... engine to stop . Check clutch and brake operation frequently. Adjust and service as hot water ...
Owners Manual - Page 8
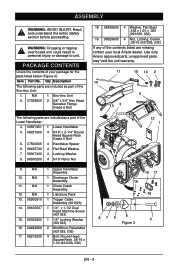
...WARNING: AVOID INJURY. N/A
13. 06900510
14. 06100007
15. 06305200 16. 02483859 17. 06212000
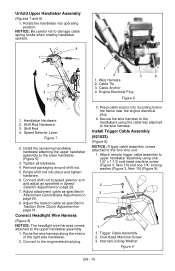
1 Upper Handlebar Assembly
1 Discharge Chute Assembly
1 Chute Crank Assembly
1 Literature Pack
1 Trigger Cable Assembly (921023)
1 1/4" x 1-1/2 Oval Head Machine Screw (921023)
1 1/4" Locking Washer (921023)
2 Skid Shoe, Reversible (921029, 032)
4 Bolt, Round Head Square Neck .38-16 x 1.00 (921029, 032...
Owners Manual - Page 9
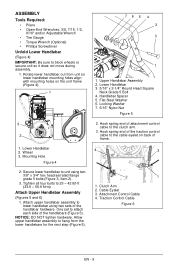
Upper Handlebar Assembly 2. Flat Steel Washer 6. Hook spring end of the handlebars (Figure 5).
Clutch Arm 2. Traction Control Cable
1.
ASSEMBLY
Tools Required:
• Pliers • Open-End Wrenches: 3/8, 7/16, 1/2,
9/16" and/or Adjustable Wrench • Tire Gauge • Torque Wrench (Optional) • Phillips Screwdriver
Unfold Lower Handlebar
(Figure 4)
IMPORTANT: Be sure ...
Owners Manual - Page 10
...place and tighten
hardware. 6. Route the wire harness along the interior of the right side handlebar.
2.
Shift Rod Hardware 3. Adjust the traction cable as specified in Traction Drive Clutch Adjustment on page 29. 7. Trigger Cable Assembly 2. Engine Electrical Plug
Figure 8
1. Install the remaining handlebar hardware attaching the upper handlebar assembly to the engine electrical...
Owners Manual - Page 12
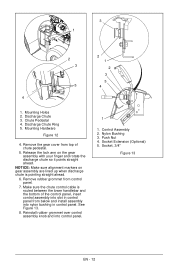
... chute is routed between the lower handlebar and the bottom of the control panel, insert control assembly into control panel.
1
1. Make sure the chute control cable is pointing straight ahead.
6. Nylon Bushing 3. Discharge Chute 3. Chute Pedestal 4. Mounting Hardware
Figure 12
4. Remove rubber grommet from control panel.
7. Push Nut 4. NOTICE: Make sure...
Owners Manual - Page 13
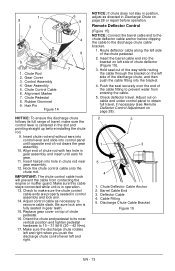
... ears hit gear.
11. Chute Control Cable 6. Align end of chute pedestal.
16. Adjust control cable as directed in Discharge Chute on the left side of travel, make sure the chute control cable ends are properly seated in gear teeth.
15. Replace gear cover on left side of the cable fitting to 15 - 31 lbf-ft...
Owners Manual - Page 14
... when they do not, contact your Dealer for about 15 minutes.
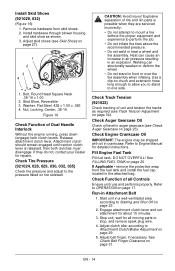
3. Check Auger Gearcase Oil
Check oil level in Attachment Belt
1. Run-in auger gearcase (see Skid Shoes on page 17. Adjust clutch idler according to perform the job.
• Do not inflate the tires above the recommended pressure.
• Do not weld...
Owners Manual - Page 15
Impeller 8. Chute Crank 9. Discharge Chute 7. Quick Turn Chute Control (921028, 029)
EN - 15 Skid Shoe 2. Clean-Out Tool 3. Belt Cover 5. Headlight 6. Remote Discharge Chute Deflector 4. CONTROLS AND FEATURES
921028, 029 9
8 3
6
2 5
8 4
3
6
2
5
7
4
1
7
1
Figure 17
1.
Owners Manual - Page 28
... does not stay in set position:
1. Push deflector remote all cable slack is removed and lock arm engages teeth (Figure 30).
Forward Adjustment Nut
2. To adjust the deflector lower:
Slide cable down. To adjust deflector higher:
Slide cable up. Cable Adjusting Nuts 2.
Nut
Figure 31
EN - 28 Cable Support Bracket 3. Control Lever Nut
Figure 29
If deflector does not...
Owners Manual - Page 30
...16" (1.6 mm)
1 2
1. Attachment Pulley
Figure 36
2. With clutch lever engaged, brake pad must contact attachment belts. Attachment Drive Belt 2. Brake Arm and Pad 3.
With the attachment clutch lever engaged, check the clearance between the frame and plastic roller on page 31. Position idler to the belt, tighten adjustment nut and recheck roller clearance. The attachment idler arm...
Owners Manual - Page 37

...Displacement - SPECIFICATIONS
Model Number
921032
921028
921029
Description
Deluxe 30
Deluxe 24 Platinum
Deluxe 30 Platinum
Engine
Engine
...30 (76.2)
24 (61)
30 (76.2)
Gearcase
Cast Iron
Auger Diameter - in . (cm)
32.4 (82.3)
26.4 (67.1)
32.4 (82.3)
Weight - ft/sec (m/sec)
1010 61.7 (18.8)
Drive
Blower Drive
Dual HA Belts
Drive
Disc-O-Matic ™
Speeds
6 Forward...
Owners Manual - Page 39

... String Trimmers, Edgers Professional Powered Brushes Tillers Vacuums, Blowers, Sweepers, Truck Loaders, Lawn Rakes, Sprayers, Aerators, etc. EN - 39
Sno-Chore 2013
An authorized Ariens... Generators Professional Sno-Thro® Compact, Deluxe, Platinum, AMP™ Sno-Thro®, Path-Pro® Sno-Tek® Utility Vehicles Service (Replacement) Parts
Warranty Period Consumer Use
3 Years 3 ...
Quick Start Guide - Page 1

... MANUAL THOROUGHLY AND FOLLOW THE IMPORTANT SAFE OPERATION PRACTICES BEFORE OPERATING. Quick Start Guide
Deluxe 30 Platinum (921029 s/n 000101 & up)
• Step 1: Assemble Handlebars • Step 2:... 6: Check Function of Dual Handle Interlock • Step 7: Check Tire Pressure • Step 8: Adjust Skid Shoes • Step 9: Check Auger Gearcase Oil • Step 10: Check Engine Crankcase Oil...
Quick Start Guide - Page 19

Step Ten: Check Engine Crankcase Oil
(Ariens AX)
IMPORTANT: The engine is shipped with 5W-30 oil in crankcase. Refer to engine manual for detailed instructions.
Similar Questions

On My Ariens Platinum 30' Model# 921029 Only The Left Wheel Engages.
(Posted by brepeter 1 year ago)

My Ariens Deluxe 30 Snow Blower Is Leaking Gas.
I think it may be the float, so I would like to get a flout, needle valve and casket for the out sid...
I think it may be the float, so I would like to get a flout, needle valve and casket for the out sid...
(Posted by ahanna7 2 years ago)

Deluxe 30 Axle Lock Not Working, Can Only Drive Right Wheel. Suggestion On Repai
[email protected]
[email protected]
(Posted by dbrooks7 5 years ago)

Where Would I Get A Copy Of A Service Manual For Ariens 30 Platinum Snowblower
(Posted by Murray31 10 years ago)