Audiovox VE927 Support Question
Audiovox VE927 Support Question
Find answers below for this question about Audiovox VE927 - VE - 927.Need a Audiovox VE927 manual? We have 1 online manual for this item!
Question posted by mruj99 on June 12th, 2012
Our Ve927 Unit Does Not Trun On.is There A Fuse Or Where Can We Find Wiring Diag
Our VE927 unit does not turn on?where can we find wring diagram? Is there a fuse insd the unit??
Current Answers
Related Audiovox VE927 Manual Pages
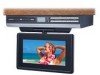
Owners Manual - Page 2

... uninsulated "dangerous voltage" within the equilateral triangle, is intended to alert the user to the presence of electric shock to dry before turning the power on back enclosure of the unit by placing it in a place with poor air flow, by covering it with an arrowhead symbol, within the product's enclosure that...
Owners Manual - Page 3
...to radio or television reception, which the receiver is encouraged to try to a qualified technician. This equipment generates, uses, and can be determined by turning the equipment off... is no guarantee that is prohibited.
-2- WARNING: Changes or modifications to this unit to provide reasonable protection against harmful interference in a particular installation. SAFETY PRECAUTIONS
FCC...
Owners Manual - Page 5

... Default ...23
Using the TV ...24 TV Setup ...25-27 Listening to the Radio ...28 Troubleshooting Guide ...29 Maintenance ...30 Specifications ...30
Monitor Operation ...13 Unit Operation ...14 Sound System ...14 Setting the Clock ...15 Setting the Cooking Timer ...15 Playing a Disc ...16-18
Playing a Disc ...16 Pausing Playback ...16 Stopping...
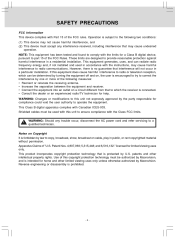
Owners Manual - Page 6
... DVD does not correspond to play back some DVDs on them, but the graphic images will not be able to the region number of this unit if they were purchased from outside your geographic area or made for subtitles Screen aspect ratio Multiple camera angles Region code indicator
Note: • When...
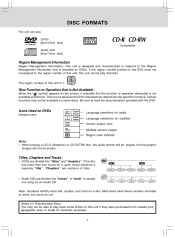
Owners Manual - Page 7
...the side of the refrigerator. • Point the remote control at the REMOTE SENSOR located on the unit. • When there is greatly reduced and you will need to replace them. Do not mix... damage caused by battery leakage. • Do not mix old and new batteries. Some refrigerators panels are not metallic. Notes: • Do not place the remote control near magnetic devices or magnetic...
Owners Manual - Page 9
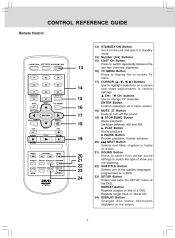
... or tracks on a disc. 21) SOUND Button Press to select from preset sound settings to certain settings. PLAY Button Starts playback. buttons CH+ / Use to turn off the sound. CONTROL REFERENCE GUIDE
Remote Control
PICTURE
13
1 4 7 2 5 8 0
EXIT TV MENU
3 6
14
9
LAST CH
15 16
13) STANDBY/ON Button...
Owners Manual - Page 10
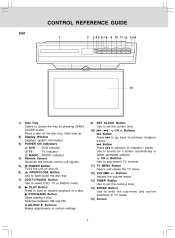
... DVD : DVD indicator TV : TV indicator RADIO : RADIO indicator Remote Sensor Receives the remote control unit signals. POWER Button Turns the unit on the disc tray, label side up. Switches between AM and FM. VOLUME +/- CONTROL REFERENCE GUIDE
Unit
1 2 3 45 678 9 10 11 12 13 14
15
1)
2) 3)
4) 5) 6) 7) 8)
Disc Tray Opens or closes the tray...
Owners Manual - Page 11
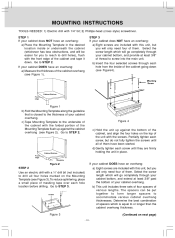
...with the screws. Figure 3 Go to STEP 2. c) Tape Mounting Template to screw into the main unit.
If your cabinet does NOT have an overhang: a) Eight screws are included with the front edge...3/8" past the bottom of your cabinet overhang. MOUNTING INSTRUCTIONS
TOOLS NEEDED: 1) Electric drill with this unit, but you will only need four of them . STEP 1 If your cabinet DOES have been ...
Owners Manual - Page 12
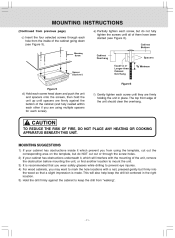
...If your cabinet has obstructions inside of the cabinet going down and push the unit and spacers onto the screws, then hold the unit up until all of them have been started (see Figure 5). f) Gently ...the bottom of the cabinet (and fully nested within each other if you are firmly holding the unit in the right location. 5) Hold the drill firmly against the cabinet to keep the drill from "...
Owners Manual - Page 13
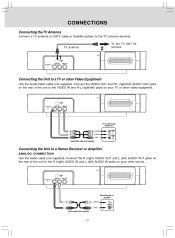
... video equipment. Connect the R (right) AUDIO OUT and L (left) AUDIO OUT jacks on the rear of the unit to the R (right) AUDIO IN and L (left ) jacks on your TV or other source.
CONNECTIONS
Connecting the...To the TV ANT IN terminal
TV antenna
2
1
FM ANTENNA
Connecting the Unit to a TV or other Video Equipment
(yellow) (white) (red)
VIDEO IN
L
AUDIO IN
R
Audio/Video ...
Owners Manual - Page 14
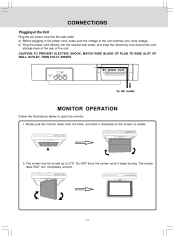
... 270o. b) Plug the power cord directly into the wall outlet a) Before plugging in the Unit
Plug the AC power cord into the nearest wall outlet, and wrap the remaining cord around .
- 13 - The screen can be turned up to open the monitor. 1. Do NOT force the screen once it clockwise so the...
Owners Manual - Page 15
... on the screen.
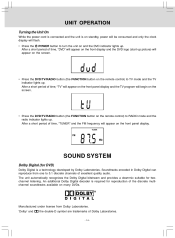
• Press the DVD/TV/RADIO button (the FUNCTION button on the front panel display.
After a short period of time, "TUNER" and the FM frequency will begin on the ...
• Press the DVD/TV/RADIO button (the FUNCTION button on the remote control) to turn the unit on many DVDs.
Manufactured under license from one to 5.1 discrete channels of time, "DVD" will...
Owners Manual - Page 16
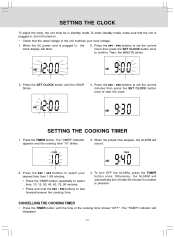
... hours then press the SET CLOCK button once to start the clock.
SETTING THE CLOCK
To adjust the clock, the unit must be in , but not turned on. • Check that the unit is plugged in, the clock display will blink.
2. The "TIMER" indicator appears and the cooking time "10" blinks. 3. Press the...
Owners Manual - Page 17
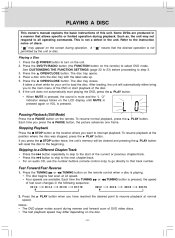
... press the STOP button twice, the unit's memory will be cleared and pressing the will automatically either bring you have reached the desired point to turn on the LCD display until MUTE is... the TUNING or TUNING button on the remote) to interrupt playback. A " permitted by the unit or disc. Pausing Playback (Still Mode)
Press the PAUSE button on the screen during playback. Stopping...
Owners Manual - Page 19
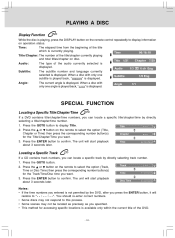
... on the remote to select the option (Title, Chapter or Time) then press the corresponding number button(s) for the Title/Chapter/Time you want . 3. The unit will restore to You should re-enter correct numbers. • Some discs may not be located as precisely as you specified. • This method for...
Owners Manual - Page 20
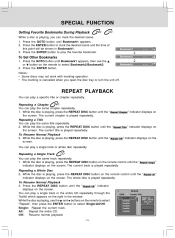
... button until the " the screen. Press the ENTER button to select Single/All/Off.
While the disc is playing, you open the disc tray or turn the unit off.
" indicator displays on
" indicator displays on
" indicator displays on the screen. While the disc is played repeatedly. The current chapter is playing, press...
Owners Manual - Page 21
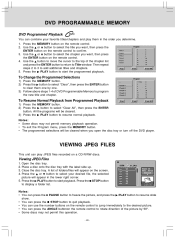
...then press the ENTER button to clear them in the lower right corner. 5. VIEWING JPEG FILES
This unit can play them one by 90o. • Some discs may not permit memory playback operation. •...
Viewing JPEG Files
1. All the programs will appear in the order you open the disc tray or turn off the DVD player. Place a disc onto the disc tray with the label side up. 3. ...
Owners Manual - Page 24
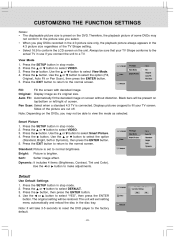
... the playback picture of screen. Use the or button to conform the LCD screen on the unit. Press the button. Use the or button to select VIDEO. Softer image effect. 1. ... to select the option Press the (Standard, Bright, Soft or Dynamic), then press the ENTER button. 5. The unit will take 3-5 seconds to reset the DVD player to select the option (Fill, Original, Auto Fit or Pan ...
Owners Manual - Page 25

...first received channel when auto search is displayed on the unit. 3. USING THE TV
Connect a TV antenna or CATV... or button to select ANTENNA. Press the ENTER button to turn on the top right corner of Auto Scan. 5. POWER button...
RF CH Found
13 0
PRESS MENU TO EXIT AUTO SCAN
Watching Television
Viewing a television station after a few seconds. • When MUTE is pressed,...
Owners Manual - Page 29
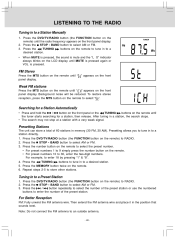
... on the remote until the tuner starts searching for a station, then release. Presetting Stations
The unit can store a total of 60 stations in a station, the search stops. • The...button to RADIO. 2. Press the MEMORY button twice on the front panel display. 2. For Better Reception
FM: Fully unwind the FM antenna wire.
Press the DVD/TV/RADIO button (the FUNCTION button on the ...
Similar Questions

Audiovox Ve 1510dv Tv Remote
The remote to our Audiovox VE 1510DV flat panel has been lost. The manual says universal remotes wil...
The remote to our Audiovox VE 1510DV flat panel has been lost. The manual says universal remotes wil...
(Posted by srshoemaker 7 years ago)

Unit Works, But When Power On For Tv Function...
picture is only on a couple seonds then off but can hear story with no picture! Have moved screen bo...
picture is only on a couple seonds then off but can hear story with no picture! Have moved screen bo...
(Posted by slredbv 11 years ago)

Audiovox Ve927 Channel Displays Sequence And Channel Sellection
I have an Audiovox VE927. The channels do not run in sequencel order. For example channel 2 through ...
I have an Audiovox VE927. The channels do not run in sequencel order. For example channel 2 through ...
(Posted by thebirdman161 12 years ago)
Is There A Channel 3/4 Selector Switch On Back Of Ve927?
I need to change from channel 4 to 3, at turn-on, to satisfy Comcast ADT hardware. Is there a select...
I need to change from channel 4 to 3, at turn-on, to satisfy Comcast ADT hardware. Is there a select...
(Posted by rbleete 12 years ago)

I Have A Black Screen And No Sign Of Power. Is My Tv Completely Dead! Help
(Posted by terashjem 13 years ago)