KitchenAid KDRU783VSS Support Question
KitchenAid KDRU783VSS Support Question
Find answers below for this question about KitchenAid KDRU783VSS.Need a KitchenAid KDRU783VSS manual? We have 3 online manuals for this item!
Question posted by darrenmackay on November 7th, 2011
Kdru783vss Side Panels
Are there insulated side panels available for the KDRU783VSS slide-in? Trying to get away from the 6" clearance requirement.
Current Answers
Related KitchenAid KDRU783VSS Manual Pages
Use & Care Guide - Page 2

...RANGE SAFETY 4 The Anti-Tip Bracket 5
PARTS AND FEATURES 7
COOKTOP USE 9 Cooktop Controls 9 Cooktop Surface 10 Sealed Surface Burners 10 Even-Heat™ Chrome Electric Griddle 11 Cookware 12 Home Canning 12
ELECTRONIC OVEN CONTROLS 13 Control Panel... Chart 34 Auto Steam Meats and Poultry Roasting Chart 35
RANGE CARE 37 Self-Cleaning Cycle 37 Water Filter Cartridge Replacement ...
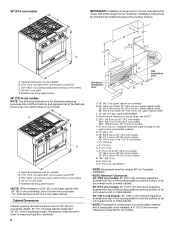
Use & Care Guide - Page 7

...style die cast metal control
knobs
M. Halogen lights B. The range you have some models)
B. Removable lower panel
J. CleanBake™ hidden element
F
E
7 Balanced hinged ...backguards Optional griddle cover Optional wok ring Optional broil pan and roasting rack Hefty slide-out racks with handle SatinGlide™ roll-out extension rack with handle Optional stainless...
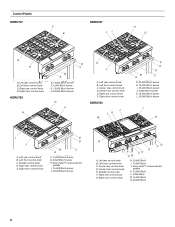
Use & Care Guide - Page 8
...
I H
I . 15,000 Btu/h burner J. 20,000 Btu/h burner
N
A. Griddle control knob D. Right front control knob
E CD AB
FG
H. 20,000 Btu/h I. 15,000 Btu/h J. Control Panels KDRU707
F E
KDRU767 JI
H G
G H
A. Center rear control knob D.Center front control knob E. Left rear control knob B.
Use & Care Guide - Page 13

... very sensitive, and require only a light touch to the sensitivity of the control panel, we have some or all of your commands. Control panel B. The control pads... items shown here may have provided special instructions for cleaning instructions.
30" (76.2 cm) and 36" (91.4 cm) Range Control Panel
A
B
C
D
E
I
H
F. NOTE: Due to activate. Clear I . Number keys
K
J
I
H
A. ...
Use & Care Guide - Page 19

... Control Lock. To Unlock Control: Repeat to the Main Menu from the chart. 2. On 48" (121.9 cm) ranges, both ovens, wait at least 1 minute from 16 to wait. If you wish to avoid unintended use of day.... using the Timer Off key. In the last hour, the time will count down the control panel keys to change the temperature on the first oven until "controls locked" and a lock icon ...
Use & Care Guide - Page 24
... .
■ Reduce recipe temperature 25°F (14°C). Cookware should sit in the rear panel of the oven.
10.
During the preheat and cooking cycle an Adjust Settings key
appears on the...immediately when the door is full, extra cooking time may need to select recipes that require similar temperatures. Failure to clear the message, stop reminder tones, and continue the current ...
Use & Care Guide - Page 30

...of the food when it is done. Keep probe as far away from heat source as required for different foods within a range of temperatures. Touch the number keys to clear the message, stop... reminder tones, and continue the current cooking cycle.
8. If the probe is available on a ...
Use & Care Guide - Page 38

... in the Self-Cleaning cycle. Cleaning Method: ■ Warm, soapy water:
Pull knobs straight away from the filter head. Touch OK to clear this message, stop reminder tones and return to the...as the cooktop, grates and caps are in the lower left to remove cartridge from control panel to stainless steel surfaces, do not use soapfilled scouring pads, abrasive cleaners, Cooktop Cleaner, ...
Use & Care Guide - Page 39

... to soft cloth or sponge, not directly on panel. ■ All-Purpose Appliance Cleaner Part Number 31682...range use oven cleaners. If this happens, a light coating of the new bulb, do so can result.
Remove bulb from oven.
3. Replace bulb cover by grasping the front edge and
pulling away... first. Remove racks or they will help them slide. ■ Steel-wool pad
GRIDDLE MODULE
Clean ...
Use & Care Guide - Page 42

... free at 1-800-442-9991 and follow the menu prompts. Go to KitchenAid Canada with Shelf for 48" (121.9 cm) Ranges and Cooktops Order Part Number W10225948
KitchenAid® Architect® II 30" (76.2 cm) Handle Kit Order Part Number W10188342
... eXperience Centre toll free: 1-800-807-6777. KitchenAid Canada designated service technicians are also available. Accessories
Accessories U.S.A.
Use & Care Guide - Page 43

... purchase date is required to obtain service ... and only in-home service is covered by an authorized KitchenAid servicer is not available.
9. SECOND THROUGH FIFTH YEAR LIMITED WARRANTY ON CERTAIN COMPONENT PARTS
In the second... to parts or systems resulting from warranty coverage.
3. KITCHENAID® DUAL FUEL RANGE WARRANTY
LIMITED WARRANTY
For one year from the date of purchase, when this major...
Dimension Guide - Page 1

... NUMBERS
KDRS407VSS KDRS462VSS KDRS463VSS
KDRS467VSS KDRS483VSS KDRU707VSS
GAS REQUIREMENTS
KDRU763VSS KDRU767VSS KDRU783VSS
Type of Gas
Natural Gas: This range is design-certified by a qualified service technician.
q When a 4-wire, single phase 250 volt, 60 Hz., AC only electrical supply is available, a 40-amp minimum circuit protection is required on 30" (76.2 cm) and 36" (91.4 cm...
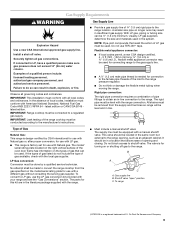
Installation Guide - Page 4
...
■ Masking tape
Parts supplied Check that all parts are available from your local hardware store. Longer screws are included. ■...clearance to a combustible backwall.
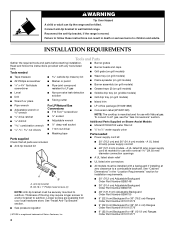
Reconnect the anti-tip bracket, if the range is a registered trademark of flooring may require longer screws to anchor bracket to subfloor. INSTALLATION REQUIREMENTS
Tools and Parts
Gather the required...
Installation Guide - Page 5

...insulated pad or ¼" (0.64 cm) plywood over carpet and under range if installing range over heated surface units, cabinet storage space located above the surface units should be mounted above the range.
■ Recessed installations must be available...Electrical Requirements" section.
■ Proper gas supply connection must be installed B. 27¾" (70.5 cm) depth with control panel, ...
Installation Guide - Page 6
....5 cm) depth with control panel, see NOTE* C. 35¾" (90.2 cm) cooktop height when setting on the wheels D. 36" (91.4 cm) width E. clearance from both sides of range to side wall or other ... a 6" (15.2 cm) minimum clearance is required for Canadian installation.
**NOTE: Minimum Clearances 30" (76.2 cm) models: 30" (76.2 cm) minimum clearance between the top of the cooking platform...
Installation Guide - Page 8

...upturned ends, terminating in a NEMA Type 14-50R plug on the supply end. Electrical Requirements - Only" section. and recreational vehicles, or an area where local codes prohibit grounding... supply is available, a 40-amp minimum circuit protection is required on 30" (76.2 cm) and 36" (91.4 cm) ranges and a 50-amp minimum circuit protections is required on 48" (121.9 cm) ranges, fused on...
Installation Guide - Page 9
... Rigid pipe connection:
The rigid pipe connection requires a combination of the inlet to the manufacturer's instructions. It should be connected to the range opening and closing. Do not block access ... C. The model/ serial rating plate located on the right vertical surface of gas available, check with your range and see the "Gas Conversions" section. No attempt shall be made to do ...
Installation Guide - Page 11
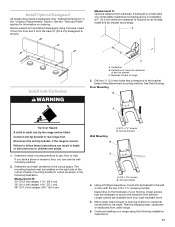
... right side of a combustible material and a backguard is not installed, a 6" (15.2 cm) minimum clearance is required for information on ordering. Measurement C: Optional distance from your range using 6 screws, insert 3 from the front and 3 from under range.
6.
Longer screws are available from backwall. Remove shipping base, cardboard or hardboard from the back (9" [22.9 cm...
Installation Guide - Page 12
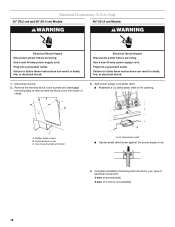
... C. Disconnect power.
2. Two mounting tabs at bottom
A
A. Failure to remove terminal block cover from back of electrical connection: 4-wire (recommended)
3-wire (if 4-wire is not available)
12 Electrical Connection - Remove the terminal block cover screws and disengage mounting tabs to follow these instructions can result in death, fire, or electrical shock...
Installation Guide - Page 26
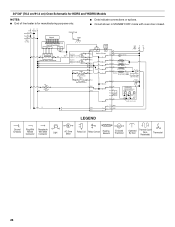
.... ■ Circuit shown in STANDBY/OFF mode with oven door closed. N L2 L1 W R BK R
W
BK Spare Cooktop
Keypad
P40
User Interface Board
P1
P2
Control Panel G GND
P8-1
Temp Sensor
W
V P2-1
W
BK
BK
BK
Spare 1080 at 21˚C (70˚F) Communication 1654 at 177˚C (350˚F)
W
V P2-2
BKControl Power...
KitchenAid Knowledge Base Results
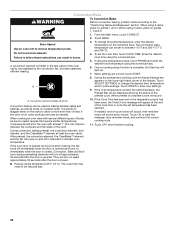
We have determined that the information below may contain an answer to this question. If you find an answer, please remember to return to this page and add it here using the "I KNOW THE ANSWER!" button above. It's that easy to earn points!-
Refrigerator unlevel - Side by side refrigerator
... the refrigerator level with the side cabinets or cabinet end panels. Side by side refrigerator How to level your model,...hex head socket or screwdriver to make sure the doors are not available on each side of the refrigerator behind the base grille of ... is approximately 31 3/8" deep, so it counterclockwise to come away from the refrigerator when in one-rotation increments. The ... -
General cleaning tips for my electric or gas range
... Fit the ends of vegetable oil applied to soft cloth or sponge, not directly onto panel. Slide the drawer closed. To clean the oven cavity: IMPORTANT: Food spills should be...or certain paper towels. Electric Ranges and Cooktops Cleaning and caring stainless steel surfaces Rainbow colors in the cavity. Pull knobs straight away from control panel to stainless steel surfaces, do not... -
When to change the water filter - Side by side refrigerator
... two styles. To purchase replacement filters and receive a 10% discount on the dispenser control panel, alerts that it is almost time to be replaced. Here See also: Changing/removing the... Reset the water filter indicator Changing/replacing the water filter - Side by side refrigerator Download available Owners Manuals/Use & The water filter should be one of clean, refreshing ice...
Similar Questions

Far Left Leveling Rod Has Broken While Trying To Raise And Level Range, Now What
(Posted by breedlove 8 years ago)

Kitchenaid Gas Range Architect Series Control Panel Light Will Not Shut Off
(Posted by zsxsme 9 years ago)

Odor From Panel Of Kers507xss
KitchenAid Electric Dual Oven: Odor of burned electrical insulation has been coming from control pan...
KitchenAid Electric Dual Oven: Odor of burned electrical insulation has been coming from control pan...
(Posted by jpbras44 10 years ago)

Kitchen Aid Gas Range Model Kgra806 I Need Control Panel
i need control panel for my gas range Kitchen Aid moder KGRA806
i need control panel for my gas range Kitchen Aid moder KGRA806
(Posted by black2stars 11 years ago)

Grate Design Flaw
We just moved into a new house and this is our new range. the grates are so high and far away from t...
We just moved into a new house and this is our new range. the grates are so high and far away from t...
(Posted by theinlows 12 years ago)