KitchenAid KHMS2040WSS Support Question
KitchenAid KHMS2040WSS Support Question
Find answers below for this question about KitchenAid KHMS2040WSS.Need a KitchenAid KHMS2040WSS manual? We have 3 online manuals for this item!
Question posted by scCam on August 16th, 2014
Why Discontinue Khms2040wss
The person who posted this question about this KitchenAid product did not include a detailed explanation. Please use the "Request More Information" button to the right if more details would help you to answer this question.
Current Answers
Related KitchenAid KHMS2040WSS Manual Pages
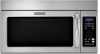
Dimension Guide - Page 1
... between the top of the microwave oven and the rectangular to round transition piece so that a separate circuit serving only this microwave oven be provided.
17 " (...) high
Because Whirlpool Corporation policy includes a continuous commitment to round transition piece
F. Microwave Hood Combination
PRODUCT MODEL NUMBERS KHMC1857W KHMC1857XS KHMS2040W
PRODUCT DIMENSIONS
Electrical: A 120-Volt,...
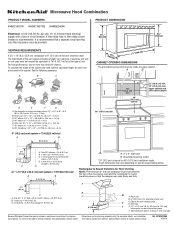
Installation Guide - Page 1
... how to Wall 8 Prepare Upper Cabinet 8 Install Damper Assembly 9 Install the Microwave Oven 9 Complete Installation 10 VENTING DESIGN SPECIFICATIONS 11 ASSISTANCE 12 Replacement Parts 12 Accessories 12
MICROWAVE HOOD COMBINATION SAFETY
Your safety and the safety of Contents
MICROWAVE HOOD COMBINATION SAFETY 1 INSTALLATION REQUIREMENTS 2
Tools and Parts 2 Remove Cardboard Template...
Installation Guide - Page 2

... upper cabinet.
Washers (2) D. See User Instructions.)
NOTE: Depending on model, charcoal filters may be free of 150 lbs (68 kg), which includes microwave oven and items placed inside the microwave oven and upper cabinet.
■ Grounded electrical outlet inside the perforation is for cooking. See "Venting Design Specifications" section.
See "Electrical Requirements" section...
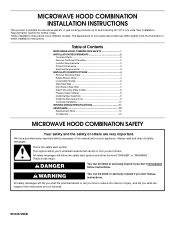
Installation Guide - Page 3
.... or 20-amp electrical supply
with a grounding plug. Recommended: ■ A time-delay fuse or time-delay circuit breaker.
■ A separate circuit serving only this microwave oven. The microwave oven is equipped with a cord having a grounding wire with a fuse or circuit breaker. Consult a qualified electrician or serviceman if the grounding instructions are not completely understood...
Installation Guide - Page 4
...
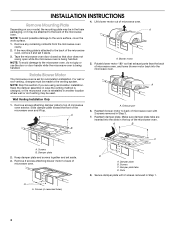
Depending on your model, the mounting plate may be in the foam packaging, or it aside.
3.
Remove any remaining contents from the microwave oven cavity.
2. Rotate Blower Motor
The microwave oven is reinstalled in another location
where wall or roof venting may be made to the venting system. Reattach damper plate.
Damper plate tabs...
Installation Guide - Page 5
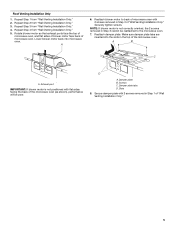
...and flat sides of blower motor face back of "Wall Venting Installation Only."
5
Repeat Step 3 from "Wall Venting Installation Only." 5. Reattach blower motor to the microwave oven.
7. A
B
C
A. Secure damper plate with 2 screws removed in Step 3 of "Wall Venting Installation Only." Damper plate tabs D. Roof Venting Installation Only
1. A
6. D
A. Damper plate B.
Lower blower...
Installation Guide - Page 6
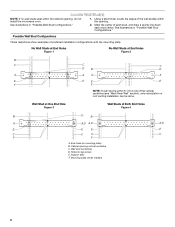
... stud centerlines D. Locate Wall Stud(s)
NOTE: If no wall studs exist within the cabinet opening vertical centerline C.
Support tabs F. Cabinet opening , do not install the microwave oven.
1. Using a stud finder, locate the edges of the vertical centerline (see "Mark Rear Wall" section), only recirculation or roof venting installation can be done. Mounting...
Installation Guide - Page 7

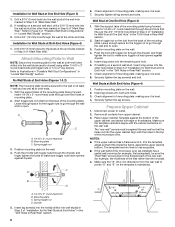
...;" (35.9 cm) from the mark made in Step 3 of the upper cabinet. Drill Holes in Step 2 of the upper cabinet.
9. Centerline
2. Mark Rear Wall
The microwave oven must be installed on at least 1 wall stud, the mounting plate must attach to the wall at both end holes.
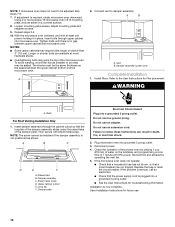
Installation Guide - Page 8
...3/16" (5 mm) holes into the wall stud at the end hole marked in Step 6 of the microwave oven. Refer to the wall on the wall. 4. Leave enough space for the toggle nut to go through the... cabinet. 3. The template has trim lines to use as guides. ■ If the wall behind the microwave oven (as at both end holes. 3. With the support tabs of the mounting plate facing forward,
insert 1/4-...
Installation Guide - Page 9
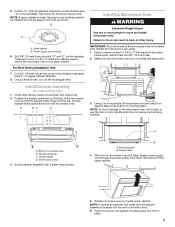
... out the rectangular area. Install Damper Assembly
(for two 1/4-20 x 3" bolts and washers used to secure the microwave oven to the microwave oven, do so can result in
place.
9
Failure to move and install microwave oven. Make sure the microwave oven door is being handled. NOTE: To avoid damage to the upper cabinet. A. Back of the upper cabinet...
Installation Guide - Page 10
... most hardware stores.
■ Overtightening bolts may be installed if the damper assembly is plugged into microwave oven. Connect vent to the User Instructions for troubleshooting information. WARNING
A. A
B
C
D
E
F... plate, and set aside on the turntable, and programming a cook time of microwave oven by operating the vent fan. 5. If the problem continues, call an electrician...
Installation Guide - Page 11

... vent
■ using the most direct route by minimizing the length of the vent and number of the microwave oven and the rectangular to round transition piece so that there is proper clearance within walls or ceilings, attics, ...NOTE: The minimum 3" (7.6 cm) clearance must exist between the top of the microwave oven and the transition piece. If venting through the wall, be sure to vent air ...
Installation Guide - Page 12
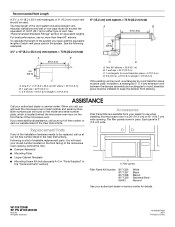
...piece must not exceed the equivalent of 140 ft (42.7 m) for either type of the microwave oven opening .
ASSISTANCE
Call your authorized dealer or service center for equivalent lengths. Accessories
Filler Panel ...in a 36" (91.4 cm) or 42" (106.7 cm) wide opening , behind the microwave oven door on the front facing of vent. W10247296B SP PN W10345003B
© 2010. See "Recommended ...
Use & Care Guide - Page 1
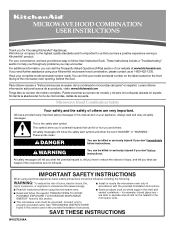
... Combination Safety
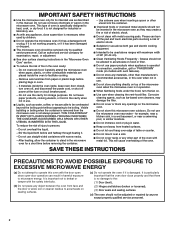
Your safety and the safety of injury, and tell you what the potential hazard is, tell you how to excessive microwave energy:
■ Install or locate the microwave oven only in accordance with the provided Installation Instructions.
■ Read all safety messages. Always read and obey all instructions before using the...
Use & Care Guide - Page 2
... boiling when the container is removed from paper or plastic bags before placing bags in the microwave oven for industrial or laboratory use above ranges with the safety interlocks.
(b) Do not place any...container.
■ Oversized foods or oversized metal utensils should be inserted in the "Microwave Oven Care" section.
■ To reduce the risk of electric shock.
■ Do not clean ...
Use & Care Guide - Page 3
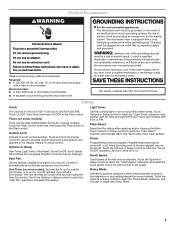
... is too short, have a qualified electrician or serviceman install an outlet near the microwave oven. Failure to follow these instructions can be turned off.
In the event of an ...9632; A time-delay fuse or time-delay circuit breaker. ■ A separate circuit serving only this microwave oven.
■ For all governing codes and ordinances. Options or Setup
Vent Timer, Light Timer, Filter ...
Use & Care Guide - Page 4

... models)
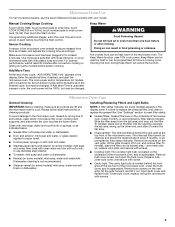
The convection element and fan are embedded in the microwave oven.
4 To avoid damage to the microwave oven due to the microwave oven, always remove rack after 2-level cooking. Convection Element and ...Place cookware directly on the rack. Pan (not provided) C. Program 1 minute of the microwave oven cavity, behind the metal screen. If dish becomes hot and the water stays cool, do...
Use & Care Guide - Page 5
...cooktop light bulb is replaceable.
Doing so can be changed . To avoid damage to the microwave oven caused by filter status indicator.
Clean with mild soap, water and a soft cloth or... cavity light bulb is cool.
To reinstall, place end of the microwave oven. Add More Time
At the end of the microwave oven, and is not recommended.
■ Steamer vessel (on some models...
Use & Care Guide - Page 6
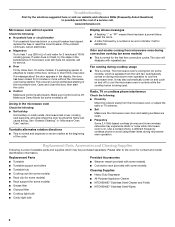
... interference Check the following: ■ Proximity
Move the receiver away from microwave oven during microwave oven operation to the cover for assistance. Please refer to cool the microwave oven. If microwave oven still does not operate, call an electrician.
■ Magnetron
Try to inside of the microwave oven. Make sure Control Lock is an error indicator.
Odor and smoke coming...
Use & Care Guide - Page 7
...
■ Solid state touch control system parts
SECOND THROUGH TENTH YEAR LIMITED WARRANTY
On microwave ovens only, in the second through due to defects in a remote area where service by...Service must be provided by a KitchenAid designated service company. KITCHENAID® BUILT-IN OVEN & MICROWAVE WARRANTY
LIMITED WARRANTY
For one year from the date of purchase, when this major appliance...
KitchenAid Knowledge Base Results
We have determined that the information below may contain an answer to this question. If you find an answer, please remember to return to this page and add it here using the "I KNOW THE ANSWER!" button above. It's that easy to earn points!-
My microwave oven will not run
...available Owners Manuals/Use & See "Assistance or service" section below . To Lock/Unlock control: The microwave oven and Timer must be off. Model Number | Help me locate my model number Please enter at 100% cooking..., is locked, only the Vent Fan and Light pads will not run Why won't my microwave oven run? Child Lock (on some models) The Child Lock shuts down the control panel pads to... -
Can I use aluminum foil in my microwave and if so, are there tips for using it?
... I use the turntable. Metals approved for use Do not use oven mitts or pot holders when removing dishes from the microwave oven. Always use aluminum foil in the oven. Metals not approved for use Racks and bakeware supplied with the microwave oven (on some metal can occur and cause damage to touch the inside... -
Microwavable immersion blender beaker
... Saturday 10am-5pm Eastern Time at least 6 characters of your model number. The beaker and the chopper bowl should not be used in the microwave oven. Model Number | Help me locate my model number Please enter at 1-800-541-6390. All times are Eastern Time. Download available...
Similar Questions


How To Change The Charcoal Filter In A Khms2040wss Kitchenaid Microwave
(Posted by annJoyP 10 years ago)

How To Change The Charcoal Filter In Kitchenaid Microwave Oven/hood
(Posted by mandart 10 years ago)
How To Change The Light Bulb In Kitchenaid Microwave Oven Model Kemc378kss?
I need assistance in the process to remove and replace the light bulb in the microwave portion of th...
I need assistance in the process to remove and replace the light bulb in the microwave portion of th...
(Posted by chipnchatter 11 years ago)

Change Light Bulb In Microwave Oven.
How do I change the light bulb in a Kitchenaid KBMS1454SSS Microwave oven?
How do I change the light bulb in a Kitchenaid KBMS1454SSS Microwave oven?
(Posted by danafeneck 13 years ago)