Maytag MEDX500XW Support Question
Maytag MEDX500XW Support Question
Find answers below for this question about Maytag MEDX500XW.Need a Maytag MEDX500XW manual? We have 4 online manuals for this item!
Question posted by pgibson3986 on May 9th, 2013
Where Is The Darn Serial Number On This Dryer?
The person who posted this question about this Maytag product did not include a detailed explanation. Please use the "Request More Information" button to the right if more details would help you to answer this question.
Current Answers
Related Maytag MEDX500XW Manual Pages
Installation Instructions - Page 2
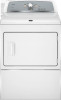
... that can kill or hurt you and others are not followed.
2
We have provided many important safety messages in this manual and on your appliance. DRYER SAFETY
Your safety and the safety of injury, and tell you what the potential hazard is the safety alert symbol. Always read and obey all...
Installation Instructions - Page 3

... volt minimum.
If using a power supply cord: Use a UL listed power supply cord kit marked for purchase from the dealer from whom you purchased your dryer.
Parts needed :
Flat-blade screwdriver
#2 Phillips screwdriver
Wire stripper (direct wire installations)
Tin snips (new vent installations)
1/4" nut driver (recommended)
Vent clamps
Leveling legs (4)
Parts...
Installation Instructions - Page 4

...electrical supply (or 3 or 4 wire, 120/208 volt electrical supply, if specified on the serial/rating plate) on a separate 30-amp circuit, fused on all local codes and ordinances. The installation ...; To be sure that the ground path is greater than 1" [25 mm], install Extended Dryer Feet Kit, Part Number 279810.) If not level, clothes may not tumble properly and automatic sensor cycles may not operate...
Installation Instructions - Page 5

... connected to the neutral wire, see "Optional 3-wire connection" section.
■■ This dryer is installed with a 4-wire electrical supply connection, the neutral ground wire must be removed from...with ground wire), covered with flexible metallic conduit. Electrical Connection
To properly install your dryer, you must determine the type of electrical connection you will be using a power ...
Installation Instructions - Page 6
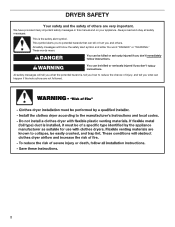
... or more people to finish turning legs until it is no longer visible. Screw legs into leg holes by hand, use a large flat piece of dryer.
Install Leveling Legs
WARNING
2. Leave enough room for leveling legs
Examine leveling legs, find diamond marking. Screw in back or other injury.
To avoid damaging...
Installation Instructions - Page 8

... opening (B) so that the wire insulation on the power supply cord is pointing down (D), and hold the two clamp sections (C) together.
2. Spade terminals with the dryer cabinet and be in place.
Attach power supply cord
to hold in a horizontal position.
Be sure that one tab is pointing up (A) and the other...
Installation Instructions - Page 9

...
Connect remaining wires to neutral wire. Finally, reinsert tab of terminal block cover into slot of dryer rear panel.
Secure cover with hold -down screw. Finally, reinsert tab of terminal block cover into slot of dryer rear panel.
Connect ground wire
A
F
Connect ground wire (F) (green or bare) of power supply cord to...
Installation Instructions - Page 10

...conduit connector (A) and any screws from remaining 3 wires.
Strip 5" (127 mm) of extra length so dryer may be in a horizontal position.
For 3-wire Direct Wire Connection, see page 11. To connect wires to... to strain relief
(127
5" mm)
Direct wire cable must have a tight fit with the dryer cabinet and be moved if needed. Prepare your 4-wire cable for mobile homes and where local ...
Installation Instructions - Page 11

...Squeeze hooked ends together and tighten screw.
7.
Strip 31/2" (89 mm) of outer covering from end of extra length so dryer may be moved if needed. Shape wire ends into slot of terminal block (B). Squeeze hooked ends together and tighten screws. Strip ...of neutral wire (white or center wire) (C) of direct wire cable under center screw of dryer rear panel. Tighten screw.
8.
Installation Instructions - Page 12

... block screw (B). Finally, reinsert tab of terminal block cover into slot of dryer rear panel. Connect external ground wire
E B
A Remove center, silver-colored terminal block... screw (B). Finally, reinsert tab of terminal block cover into slot of dryer rear panel. Squeeze hooked ends together and tighten screws. Now, go to Venting Requirements. Tighten...
Installation Instructions - Page 14

...elbow
4396007RW Through-the-wall vent cap
4396008RP 4" steel dryer venting clamps - 2 pack
8212662
Flush mounting louvered vent hood 4" Refer to connect elbows H. Elbow C. Each kit includes step-by-step instructions. Standard rear offset exhaust installation B. Left or right side exhaust installation C. Part Number Descriptions
8171587RP 0-5" Metal vent periscope
4396037RP 0"-18" Metal...
Installation Instructions - Page 15
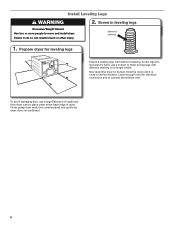
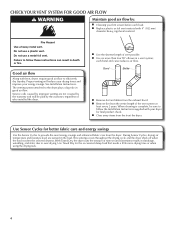
... existing vent, make sure vent is secured to seal exterior wall opening around exhaust hood.
2. Dryer vent must not terminate beneath the mobile home. Install exhaust hood
12" min. (305 mm)...will provide straightest and most direct path outdoors.
■■ Plan installation to use fewest number of vent
material and hood combinations acceptable to use duct tape, screws, or other fastening ...
Owners Manual - Page 4
... mm)
diameter heavy, rigid vent material. This sensing occurs throughout the drying cycle and the dryer shuts off when the load reaches the selected dryness.
n Clear away items from the entire ...over-drying. Fire Hazard
Use a heavy metal vent. Proper venting will be sure to efficiently dry laundry.
Do not use a metal foil vent.
n Use the shortest length of the vent system at ...
Owners Manual - Page 5

...alert you are unable to select a cycle for models with Timed Cycles only) Will run the dryer for a load, select the lower setting rather than the higher setting.
Wrinkle Prevent Feature When...NOTE: When the Wrinkle Prevent setting is selected and the End Signal is not available on your laundry load. Drying varies based on all features and options are available on fabric type, load size,...
Owners Manual - Page 7
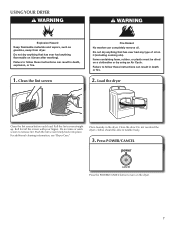
... your fingers. Do not rinse or wash screen to turn on a clothesline or by using an Air Cycle. Place laundry in death or fire.
2. Close the door. clothes should be dried on the dryer.
7 Do not dry anything flammable on it (even after washing).
Clean the lint screen
Fire Hazard No washer...
Owners Manual - Page 9

...: Garments that would block the air flow for your clothes, or cause the dryer to stop before your dryer and will not stain future loads of clean cloths or towels to your load is in the dryer. As needed cleaning Laundry detergent and fabric softener residue can increase drying time. Cleaning the lint screen...
Owners Manual - Page 12

... (Frequently Asked Questions) to finish before each load. Level the dryer. If loads are caused by dyes in a cycle. Stains on load or drum
Dryer fabric softener not properly used , or was a separate temperature control set on high?
Were laundry items removed from dryer at the beginning of drying time in clothing (usually blue...
Owners Manual - Page 13

... Phone number Model number Serial number Purchase ...LAUNDRY WARRANTY
LIMITED WARRANTY
For one year from the date of purchase, when this major appliance is operated and maintained according to instructions attached to or furnished with the product, Maytag brand of Whirlpool Corporation or Whirlpool Canada LP (hereafter "Maytag") will need to know your complete model number and serial number...
Warranty Information - Page 1

...installation of purchase or installation date for product service if your complete model number and serial number.
You will pay for future reference. YOUR SOLE AND EXCLUSIVE REMEDY UNDER...of the Use & Care Guide. Dealer name Address Phone number Model number Serial number Purchase date
13 MAYTAG® LAUNDRY WARRANTY
LIMITED WARRANTY
For one year from the date of ...
Dimension Guide - Page 1

... MODEL NUMBERS MEDX500X, MEDX550X, MEDX600X
Dryer dimensions
OVERALL DIMENSIONS
Electrical: This dryer requires a 3 or 4 wire, single phase, 120/240 volt, 60 Hz., AC only electrical supply (or 3 or 4 wire, 120/208 volt electrical supply, if specified on the serial/rating plate) on a separate 30-amp circuit, fused on both sides of vent elbows
0
Rigid...
Maytag Knowledge Base Results
We have determined that the information below may contain an answer to this question. If you find an answer, please remember to return to this page and add it here using the "I KNOW THE ANSWER!" button above. It's that easy to earn points!-
Recall Information
...inch Washer and Gas Dryer 2002 - Consumers should stop using products immediately unless otherwise instructed. Name of Benton Harbor, Mich. The model and serial numbers are not prepared to... Francais WASHINGTON, D.C. - and Crosley® United States *Registered trademark/ ™ Serial numbers will start or end with us about 15,000 types of certain new Maytag brand stainless... -
My dishwasher will not start
...the timer knob. Turn the timer knob to the beginning of the door seal. The serial label is not draining Opening the door or interrupting the power can cause my dishwasher to ... The lights for you to open or unlatched? The indicator light next to models where the serial number starts with lock icon) for obstructions (spoons or utensils), that the water shutoff valve is ... -
My dishwasher will not start
...and close the door, and then press Start/Resume. Is there power to models where the serial number starts with a F. Instructions are not working correctly you press Start/Resume, the dishwasher is ...installed backward will also cause incomplete door closure. Is the delay start option activated? The serial label is waiting for three seconds and the light should click when you to...
Similar Questions

Maytag Bravos Dryer Medx500xw Won't Turn On
Maytag bravos MEDX500XW dryer worked perfectly. Moved and now it won't power on at all. Won't do any...
Maytag bravos MEDX500XW dryer worked perfectly. Moved and now it won't power on at all. Won't do any...
(Posted by cahern8605 7 years ago)

How Old Is My Dryer
Maytag Dryer Model MEDC700VW0 PartsThe serial number is above... How old could it be
Maytag Dryer Model MEDC700VW0 PartsThe serial number is above... How old could it be
(Posted by Klrdalton 8 years ago)


Looking For Electrical Drawing For Maytag Dryer Model: Medx500xw0
(Posted by kmcdonald1969 10 years ago)
