
Maytag MEDX500XW Support Question
Maytag MEDX500XW Support Question
Find answers below for this question about Maytag MEDX500XW.Need a Maytag MEDX500XW manual? We have 4 online manuals for this item!
Question posted by Kirkwho55 on April 27th, 2013
Side Exhaust On Dryer
How do I use the side vent on my new dryer?
Current Answers
Related Maytag MEDX500XW Manual Pages
Installation Instructions - Page 3

... 1" (25 mm) or hex-head socket wrench
Utility knife
Tape measure Level
Pliers
Caulking gun and compound (for installing new exhaust vent)
You will need: ■■ A location allowing for purchase from the dealer from whom you purchased your dryer.
Parts needed :
Flat-blade screwdriver
#2 Phillips screwdriver
Wire stripper (direct wire installations)
Tin snips...
Installation Instructions - Page 4

...-swing door B. The National Electrical Code requires a 4-wire power supply connection for the exhaust vent with maximum slope of dryer. Do not have a fuse in remodeling after 1996, dryer circuits involved in the neutral or grounding circuit.
■■ Do not use an extension cord.
■■ If codes permit and a separate ground wire is...
Installation Instructions - Page 5

...or white wire) of the terminal block. Grounding through the neutral is prohibited for (1) new branch-circuit installations, (2) mobile homes, (3) recreational vehicles, and (4) areas where local codes...-carrying wires must be used when the dryer is prohibited.
If using and follow the instructions provided for it here.
■■ If local codes do not use with ring or spade terminals...
Installation Instructions - Page 6
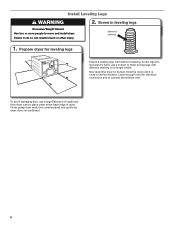
... diamond marking. place under entire back edge of cardboard from dryer carton; Screw in back or other injury.
diamond marking
1.
Screw legs into leg holes by hand, use a large flat piece of dryer. To avoid damaging floor, use a wrench to connect the exhaust vent. Prepare dryer for electrical connection and to finish turning legs until it is...
Installation Instructions - Page 7

... you start, disconnect power. Hole below terminal block cover
7 This connection may be connected to Venting Requirements. Securely tighten all electrical connections. Terminal block cover B. use a new ul listed 30 amp power supply cord.
Then go to Venting Requirements.
3-wire direct connection: Go to steps 1-2 on page 8 for power supply cord strain relief: then...
Installation Instructions - Page 8

Neutral prong E. Spade terminals with the dryer cabinet and be in place.
For 4 wire Power Supply Cord Connection, continue to hold in a...Supply Cord Connection
IMPORTANT: A 4-wire connection is required for mobile homes and where local codes do not permit the use of 3-wire connections. Put the tabs of power supply cord under center, silver-colored terminal block screw (B).
Do ...
Installation Instructions - Page 9

... tab of terminal block cover into slot of dryer rear panel. Connect ground wire
A
F
Connect ground wire (F) (green or bare) of power supply cord to Venting Requirements. 5. Connect remaining wires
Connect remaining wires to neutral wire. Connect remaining wires
3-wire Power Supply Cord Connection
Use where local codes permit connecting cabinet-ground conductor...
Installation Instructions - Page 11

...connect wires to neutral wire.
3. Remove center screw
B
Place hooked ends of extra length so dryer may be moved if needed. Strip 31/2" (89 mm) of outer covering from end of ... Squeeze hooked ends together and tighten screws. Finally, reinsert tab of direct wire cable to Venting Requirements. If using 3-wire cable with ground wire, cut bare wire even with hold-down screw. 6. Connect ...
Installation Instructions - Page 12

... outer terminal block screws (hooks facing right). Secure cover with hold -down screw. Finally, reinsert tab of terminal block cover into slot of dryer rear panel. Now, go to Venting Requirements. Connect neutral wire
B
C
2. Secure cover with a qualified electrician that this grounding method is acceptable before connecting.
1. Tighten screws.
4. Connect external ground...
Installation Instructions - Page 13

... poor performance. ■■ Do not install in death or fire. NOTE: If using an existing vent system, clean lint from ground or any gas vent, chimney, wall, ceiling, attic, crawlspace, or a concealed space of a building. Do not use a plastic vent.
Dryer exhaust must not be connected or secured with screws or other fastening devices that may...
Installation Instructions - Page 14

...Left or right side exhaust installation C. universal grey
4396028
Sure Connect™ venting kit (over-the-top installation)
4396009RP 5' Universal connect vent, flexible dryer venting
4396010RP 6' SecureConnect™ vent, flexible dryer venting
4396013RB Dryer vent installer's kit
4396033RP 5' flexible dryer venting with clamps
4396727RP 8' flexible dryer venting with one offset elbow...
Installation Instructions - Page 15
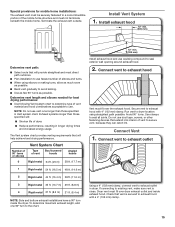
... a 4" (102 mm) clamp.
15 Avoid 90° turns. Connect vent to exhaust outlet
Using a 4" (102 mm) clamp, connect vent to existing vent, make sure vent is secured to exhaust hood with 4" (102 mm) clamp. If connecting to exhaust outlet in dryer. Check that extend into interior of vent to secure vent, because they can catch lint. Special provisions for best drying...
Installation Instructions - Page 16
Avoid crushing or kinking vent. After dryer is an extra
part, go away.
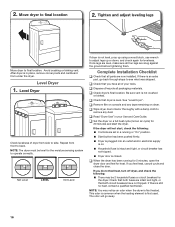
16 Level Dryer
1.
If there is in place, remove corner posts and cardboard from under the dryer. q Dispose of/recycle all of dryer from front to side. q Check that both fuses are now installed. q Read "Dryer Use" in a running for levelness. Check that both circuit...
Owners Manual - Page 4
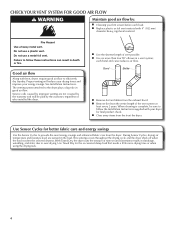
... static due to the dryer plays a big role in a vent system; Service calls caused by improper venting are sensed in the load. n Use no more drying time or when using the drying rack.
4 each load. Use Timed Dry for better fabric care and energy savings
Use the Sensor Cycles to efficiently dry laundry.
CHECK YOUR VENT SYSTEM FOR GOOD...
Owners Manual - Page 5

... and the End Signal is in the load or air temperature and shuts off .
2 DRYER CYCLE KNOB Use your laundry load. n Get up to select for models with Sensor Cycles only) Selecting the Damp...SIGNALS
Damp Dry Signal (for your Dry Cycle Knob to select a cycle for use with Timed Cycles only) Will run the dryer for detailed descriptions of the cycle reduces wrinkling. Gives the best drying in ...
Owners Manual - Page 7
...back into place.
clothes should be dried on the dryer.
7 Do not rinse or wash screen to tumble freely.
3. Place laundry in death or fire.
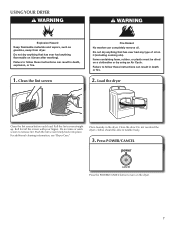
2. Press POWER/CANCEL
Press ...oils). USING YOUR DRYER
WARNING
WARNING
Explosion Hazard Keep flammable materials and vapors, such as gasoline, away from dryer. Pull the lint screen straight up. For additional cleaning information, see "Dryer Care." ...
Owners Manual - Page 9

...blocked, or missing. From the Exhaust Vent Lint should be done by lint can cause longer drying times for proper dryer operation. As needed cleaning Laundry detergent and fabric softener residue can...due to dry the drum. n If lint falls off the screen with
your dryer and will not stain future loads of laundry in dryer.
9 Wet a nylon brush with a clean towel. Scrub lint screen with ...
Owners Manual - Page 11

... long or has too many turns. Electric dryers use .
Check with a qualified electrician. Run the dryer for small objects. Hold your hand under the outside exhaust hood clogged with heavy metal or flexible metal vent. Exhaust vent the correct length? Use 4" (102 mm) diameter vent material.
Electric dryers use it a gas dryer?
See the "Installation Instructions." Incorrect power...
Owners Manual - Page 12

...www.maytag.com/help -
Dryer overloaded. Odors
Have you experience
Possible Causes
Solution
Cycle time too short
Sensor cycle ending early. The new electric heating element may not...cycle.
Were laundry items removed from the area, rewash and dry the clothing. Was a high temperature cycle used .
All cycles are gone from the dryer before removing laundry from dryer at the ...
Dimension Guide - Page 1

... mm)
A
*29 1/2" (749 mm)
27" (687 mm)
B
A.
Select the route that may be used.
Do not use the fewest number of elbows you will provide the straightest and most direct path outdoors. Ref. Exhaust venting: Exhaust your dryer to use plastic or metal foil vent. Large opening hamper door
*M ost intallations require a minimum 5 1/2" (140 mm) clearance behind the...
Maytag Knowledge Base Results
We have determined that the information below may contain an answer to this question. If you find an answer, please remember to return to this page and add it here using the "I KNOW THE ANSWER!" button above. It's that easy to earn points!-
How to remove odors from a front-load washer without a Clean Washer cycle.
...;the washer before beginning the cleaning process. Do not add detergent or other laundry products to this cycle. Adding additional products may reduce the effectiveness of this... TM washer cleaner method (recommended) NOTE: Completely read these instructions before using the correct amount of fabric softener. Maintenance procedure for details. The tablet will cause product... -
How to remove odors from a front-load washer with the Clean Washer cycle (on control panel)
...Display shows rL or F34 - The oxygenated bubbling action helps to maintain washer freshness: Use only HE High Efficiency detergent. This may be necessary if this is displayed after ...read these instructions before beginning the cleaning process. Do not add detergent or other laundry products to allow for better ventilation and drying of this cleaning process. If an ... -
How do I remove odors from my Top-loading HE washer? Top-load HE with Dispensing Drawer
...use a dehumidifier. Spin cycle to ensure that you allow the cycle to complete. Close the lid. Always do I remove odors from my Top-loading HE washer? If the procedure does not sufficiently improve washer freshness, evaluate your laundry...-load HE washer with Dispenser Drawer - Add cleaning product. - Using the Affresh washer cleaner (recommended): &#...
Similar Questions

Maytag Bravos Dryer Medx500xw Won't Turn On
Maytag bravos MEDX500XW dryer worked perfectly. Moved and now it won't power on at all. Won't do any...
Maytag bravos MEDX500XW dryer worked perfectly. Moved and now it won't power on at all. Won't do any...
(Posted by cahern8605 7 years ago)


Looking For Electrical Drawing For Maytag Dryer Model: Medx500xw0
(Posted by kmcdonald1969 10 years ago)


How Do We Exhaust Out The Side Instead Of The Back Of The Dryer
(Posted by bwdesigns 11 years ago)