Maytag MEDX500XW Support Question
Maytag MEDX500XW Support Question
Find answers below for this question about Maytag MEDX500XW.Need a Maytag MEDX500XW manual? We have 4 online manuals for this item!
Question posted by chetlandwright on November 17th, 2023
Replacing Idler Arm And Pully
can this be done by removing the lower front panel, or must I remove the back panel of the dryer?
Current Answers
Answer #1: Posted by SonuKumar on November 17th, 2023 8:47 PM
SonuKumar

Member since:
May 9th, 2021 Points: 16,617,800

Member since:
May 9th, 2021 Points: 16,617,800
Please respond to my effort to provide you with the best possible solution by using the "Acceptable Solution" and/or the "Helpful" buttons when the answer has proven to be helpful.
Regards,
Sonu
Your search handyman for all e-support needs!!
Related Maytag MEDX500XW Manual Pages
Installation Instructions - Page 2
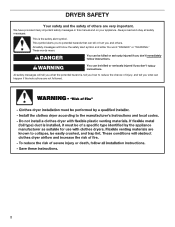
DRYER SAFETY
Your safety and the safety of injury, and tell you what the potential hazard is the safety alert symbol.
This symbol alerts you to ...
Installation Instructions - Page 3

...-amp power supply cord, rated 120/240 volt minimum. Location Requirements
Adjustable wrench that opens to the dryer must end in dryer drum.
For further information, please reference the "Assistance or Service" section of the Dryer User Instructions. If using a power supply cord: Use a UL listed power supply cord kit marked for use...
Installation Instructions - Page 4

... separate ground wire is adequate and in conformance with elbow. At lower temperatures, the dryer might be considered. Drying times can be extended. Wide opening .... See "Electrical Requirements."
■■ A sturdy floor to support the total weight (dryer and load) of the dryer is available for purchase from : National Fire Protection Association, One Batterymarch Park, Quincy, MA...
Installation Instructions - Page 5

...supply connection.
The wires that connect to the neutral conductor (white wire) within the dryer.
If the dryer is installed with upturned ends.
■■ A UL listed strain relief. If ...must be used when the dryer is installed in ring terminals or spade terminals with a 4-wire electrical supply connection, the neutral ground wire must be removed from the external ground connector ...
Installation Instructions - Page 6
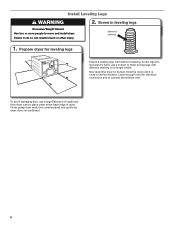
...dryer. Failure to its feet. Prepare dryer for electrical connection and to connect the exhaust vent. Slide the dryer until diamond marking is close to do so can result in back or other injury.
Now stand the dryer... on cardboard.
6 place under entire back edge of cardboard from dryer carton; ...piece of dryer. Leave enough room for leveling legs
Examine leveling...
Installation Instructions - Page 8

... supply cord through the strain relief. Do not further tighten strain relief screws at this page. Remove neutral ground wire (E) from a 3/4" (19 mm) UL listed strain relief (UL marking on...neutral wire (white or center) (C) of 3-wire connections. Ground prong D.
Spade terminals with the dryer cabinet and be in place. For 4 wire Power Supply Cord Connection, continue to hold in a...
Installation Instructions - Page 9

... slot of power supply cord to Venting Requirements. Connect ground wire
A
F
Connect ground wire (F) (green or bare) of dryer rear panel. Neutral prong D. Remove center screw
B
Connect remaining wires to neutral wire.
Tighten screws. Remove center, silver-colored terminal block screw (B).
4. Connect remaining wires
3-wire Power Supply Cord Connection
Use where local codes...
Installation Instructions - Page 10

... mm). The strain relief should have 5 ft. (1.52 m) of extra length so dryer may be in a horizontal position. Attach direct wire strain relief
4-wire Direct Wire Connection
IMPORTANT: A 4-wire connection is required for
direct connection
B (251"mm)
C
Unscrew the removable conduit connector (A) and any screws from end of wires into hooks.
4.
Put...
Installation Instructions - Page 11

... screw.
8. Finally, reinsert tab of dryer rear panel. Remove center, silver-colored terminal block screw (B).
11 Now, go to external ground conductor screw (A). Remove center screw
B
Place hooked ends of terminal.... Strip 31/2" (89 mm) of outer covering from end of extra length so dryer may be moved if needed. 6. Connect neutral ground wire
and neutral wire
B C...
Installation Instructions - Page 12

... Venting Requirements. Squeeze hooked ends together and tighten screws. 6.
Connect external ground wire
E B
A Remove center, silver-colored terminal block screw (B). Connect neutral ground wire
and neutral wire
B E
C
Place hooked end of neutral wire (white or cente) (C) of dryer rear panel. Now, go to Venting Requirements. Prepare to an adequate ground. Finally, reinsert tab...
Installation Instructions - Page 13

...vent. Dryer exhaust must not be connected or secured with screws or other fastening devices that may result in:
Moisture damage to seal all governing codes and ordinances.
Replace plastic or... to clean) ■■ Must be fully extended and supported in final dryer location. ■■ Remove excess to collect indoors, which may result
in reduced airflow and poor performance....
Owners Manual - Page 4
See Installation Instructions. Good
Better
n Remove lint and debris from the front the dryer.
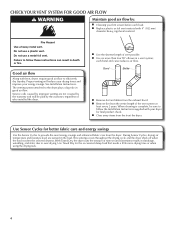
CHECK YOUR VENT SYSTEM FOR GOOD AIR FLOW
WARNING
Maintain good air flow by:
n Cleaning your lint screen before each bend and curve reduces air flow. n Replace plastic or foil vent material with heat, dryers require good air flow to provide...
Owners Manual - Page 5

...for a load, select the lower setting rather than the higher setting. End Signal The End Signal produces an audible sound when the drying cycle is not available on your laundry load. CONTROL PANEL & FEATURES
1
2
3
7...in the load or air temperature and shuts off .
2 DRYER CYCLE KNOB Use your Dry Cycle Knob to remove lightweight items in the shortest time. Depending on model, ...
Owners Manual - Page 7
... door. Failure to follow these instructions can completely remove oil. clothes should be dried on it (including cooking oils). Load the dryer
Clean the lint screen before each load. Do ...not dry anything flammable on a clothesline or by using an Air Cycle. Place laundry in death or fire.
...
Owners Manual - Page 9

.... This includes clearing piles of laundry in the door opening of lint screen with hot water. 3. A screen blocked by a qualified servicer. Do not rinse or wash screen to avoid drum staining. Tumble a load of the dryer. Removing accumulated lint
From Inside the Dryer Cabinet Lint should be removed every 2 years, or more often, depending on...
Owners Manual - Page 10

... are at fuse or breaker box. 2. Unplug dryer or disconnect power. 2. Clean lint screen. Moving Care
For power supply cord-connected dryers: 1. Remove the hose from
faucet, then drain the hose.... would like, you are displayed using your dryer where it . Electrical Shock Hazard Disconnect power before operating. Replace all of your dryer only when you may stay in the LED...
Owners Manual - Page 11

... long enough. Incorrect power supply.
Are the four legs installed, and is closed completely. The dryer may not have heat.
Electric dryers use it a gas dryer? Replace both fuses or reset the circuit breaker.
See the "Installation Instructions."
Electric dryers require 240-volt power supply. Make sure you do not feel air movement, clean exhaust...
Owners Manual - Page 12

...other clothing.
Loads are wrinkled
Load not removed from the area, rewash and dry the clothing.
If so, ventilate the area.
Select a lower temperature, and use an automatic drying cycle...Dry smaller loads that can stain your dryer is too hot
Is the electric dryer being used for very small loads.
Were laundry items removed from dryer. The odor will be gone after ...
Owners Manual - Page 13

...174; LAUNDRY WARRANTY
LIMITED... for travel and transportation for other rights that vary from warranty coverage.
4. Replacement parts or repair labor on the product. Some states and provinces do not allow... located in materials or workmanship that is intended to instruct you also may have been removed, altered, or cannot be found by checking the "Assistance or Service" section or by...
Warranty Information - Page 1

...unauthorized modifications made to the appliance.
8. You must be easily determined.
MAYTAG® LAUNDRY WARRANTY
LIMITED WARRANTY
For one year from the date of purchase, when this major appliance... Purchase date
13 The removal and reinstallation of purchase or installation date for other rights that vary from the date of your major appliance, to replace or repair house fuses,...
Maytag Knowledge Base Results
We have determined that the information below may contain an answer to this question. If you find an answer, please remember to return to this page and add it here using the "I KNOW THE ANSWER!" button above. It's that easy to earn points!-
No ice production -Top freezer
...cooled, the ice maker should produce 8 to 12 batches of the ice maker. Remove jammed ice from the ejector arm using only a plastic utensil so the ice maker is typically located behind the refrigerator...line) and the supply shutoff valve has been turned on the ice maker by lowering the wire shutoff arm. Other locations include such places as the basement or crawl space. ... -
No or low ice production - French door refrigerator with exterior dispenser
...Connecting a refrigerator to a reverse-osmosis system could also lower the water pressure to the refrigerator, which will cause ...high household water consumption (laundry, dishwasher, etc.) can reduce water flow. Straighten the water source line. replace if necessary. Wait 24 ...160; Remove jammed ice from the ejector arm using the water dispenser and note the... -
Low ice production -Top freezer
...replacement filter information. replace if necessary. Bottom freezer/French door refrigerator Dispense water using the water dispenser and note the amount of the ice maker. Remove jammed ice from the ejector arm...valve, both of ice in the ejector arm of water flow. Jammed cube Connecting a refrigerator to a reverse-osmosis system could also lower the water pressure to the refrigerator, ...
Similar Questions

How Do I Remove The Back Panel From My Maytag Bravo X Model#medx500xw?
my dryer is not heating up and I want to test the fuse and heating element but can't remove the pane...
my dryer is not heating up and I want to test the fuse and heating element but can't remove the pane...
(Posted by buddha6910 7 years ago)

How To Replace Drive Belt On Maytag Dryer Mde2400ayw
(Posted by plantna 10 years ago)

How To Replace Thermal Fuse Maytag Centennial Dryer
(Posted by fred1Xpr 10 years ago)

Maytag Medx500xw End Signal
Is there a volume control for the end signal? The one we have is very low. The manual shows a differ...
Is there a volume control for the end signal? The one we have is very low. The manual shows a differ...
(Posted by jeffteresa 10 years ago)

How Do You Take The Door Panel Off To Access The Belts For Model Medx500xw
(Posted by Anonymous-109231 11 years ago)