Nady 4W-1KU Support Question
Nady 4W-1KU Support Question
Find answers below for this question about Nady 4W-1KU.Need a Nady 4W-1KU manual? We have 2 online manuals for this item!
Question posted by Redman3097033 on February 26th, 2022
Interference
Why do I get interference when auto selecting a channel and then turning off the microphone
Current Answers
Answer #1: Posted by SonuKumar on February 26th, 2022 9:47 AM
SonuKumar

Member since:
May 9th, 2021 Points: 16,617,800

Member since:
May 9th, 2021 Points: 16,617,800
Please respond to my effort to provide you with the best possible solution by using the "Acceptable Solution" and/or the "Helpful" buttons when the answer has proven to be helpful.
Regards,
Sonu
Your search handyman for all e-support needs!!
Related Nady 4W-1KU Manual Pages
Manual - Page 1
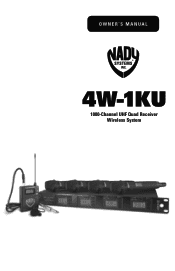
Owner's Manual
4W-1KU
1000-Channel UHF Quad Receiver Wireless System
Manual - Page 2
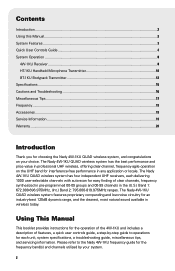
... Service Information...19 Warranty...20
Introduction
Thank you for choosing the Nady 4W-1KU QUAD wireless system, and congratulations on the UHF band for interference-free performance in any application or locale. Please refer to operations for each delivering 1000 user-selectable channels with auto-scan for easy finding of features, a quick user controls guide, a step...
Manual - Page 3

...channels and ASC™ (Auto-Sync Channel) IR download feature which sends selected Group/Channel information to transmitter via IR Sync download of selected channel for clear, powerful audio, maximum feedback rejection, and minimal handling noise
• BT-1KU bodypack transmitter (choice of three versions: LT, LT/HM, or GT) features road worthy all -metal housing; System Features
4W-1KU...
Manual - Page 4
... maximum audio allowable
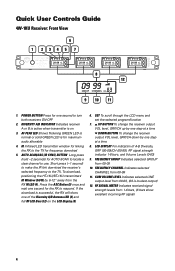
4. AUTO-SCAN/ASC (IR SYNC) BUTTON Long press (hold ~2 seconds) for frequency download
5. Press the ASC Button (5) once and wait one second to use. FREQUENCY CHANNEL Indicates selected CHANNEL from the RX IR LED (4). IR Infrared LED transmitter window for linking the RX to the TX for AUTO-SCAN to locate a clear channel to turn...
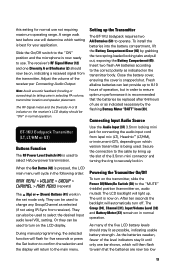
Manual - Page 5
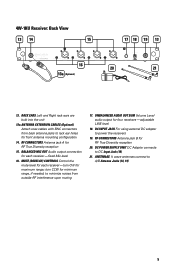
...interference upon muting
17. BALANCED MIC OUT Audio output connection for front antenna mounting configuration
14. DC INPUT JACK For using external DC adapter to DC Input Jack (18)
21. RF CONNECTORS Antenna jack B for RF True Diversity reception
15. DC POWER SUPPLY UNIT DC Adaptor connects to power the receivers
19. 4W-1KU... LINE
ANT-A
21
13. turn CW for minimum range, if...
Manual - Page 6

... CH (00-99), AUDIO INPUT LEVEL (0dB to -30dB 33. SET To scroll through the LCD menu and set the selected program/function
27. FREQUENCY GROUP Indicates selected GROUP
from 00dB to -...
24. FREQUENCY CHANNEL Indicates selected
CHANNEL from RX 35. Two AA ALKALINE BATTERIES
6 INTERNAL ANTENNA Built-in HT-1KU transmitter diagram above for IR frequency download from 00-99 or to turn ON-OFF
29...
Manual - Page 7
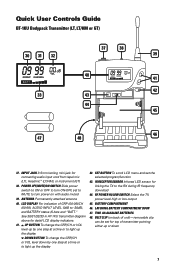
... up or down by one step at a time or to turn ON-OFF, set the selected program/function
43. RF POWER HI/LOW SWITCH Select the TX power level high or low output
45. BATTERY COMPARTMENT...and BATTERY status (5 bars and "BATT." BELT CLIP (on with audio muted
39. See 30/31/32/33 in HT-1KU transmitter diagram above for connecting audio input cord from lapel mic (LT), Headmic™ (LT/HM...
Manual - Page 8

... seconds to turn ON or OFF all four receivers at power-on the receiver's LCD display will then light up, indicating that
Selecting the 4W-1KU QUAD Receiver Volume Level / Group / Channel
This section... selection and the display will light up your system(s). Clockwise running segments on the same channel as the receiver. The AUTO-SCAN / ASC (IR Sync) Button (2) has two functions:
channel ...
Manual - Page 9

... the Up/Down button continuously for faster channel selection.
Select 1 of 10 groups available from the Channel menu or press the Set button twice to skip Volume Level setting and exit to Channel Setup Mode and the Channel icon will turn off . Select 1 of each other.
Rack-mounting the Receiver
The Nady 4W-1KU QUAD receiver wireless system has built...
Manual - Page 10
... to the transmitter is normal. Connecting the Audio Outputs
The 4W-1KU QUAD receiver has one audio signal at clockwise (CW) for each instrument then the Balanced Mic Out sockets must be used with each receiver.
10
Be careful not to adjust too high CCW setting as selected by the up to the maximum operating...
Manual - Page 11

... Group (30), Channel (31), Input Volume Level (32), and Battery Meter (33) indicator icons stay on the transmitter body. As the batteries weaken, fewer of use or as selected (if not using the IR Sync function or manually on the LCD display. To turn on the transmitter itself. Programming the HT-1KU to conserve...
Manual - Page 12
...1KU, which is set up , indicating that can be successful in a light-shielded or darker environment.
This is displayed, the IR Infrared LED (4) will then light up the first transmitter and leave it ON and keep it 3 ft.
To start AUTO...for most applications. When the Group/Channel selection is finished, slide the battery cover back then turn the Mic Ball (23) counterclockwise to...
Manual - Page 13
...turn on the receiver's LCD display should stay lit as indicated necessary by lining up the Transmitter
The BT-1KU bodypack requires two AA Batteries (50) to select the desired Input audio level VOL setting.
The Group (30), Channel... the "ON" position and the microphone is best for your application. As many of the receiver per Connecting Audio Output.
The RF Signal meter and...
Manual - Page 14

.... Programming the BT-1KU to the Selected Channel
The transmitter can be programmed to success-fully program the transmitter with the pre-programmed group and channel info from the receiver.
The factory default setting for Volume 0dB is finished, press the Set button again for all transmitters. To preserve battery life, turn the transmitter off...
Manual - Page 15
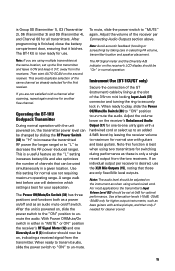
... selection of the 3.5mm mini locking Input Jack (37) connector and turning the...audio.
Note: If you are not satisfied with a channel after scanning, repeat again anytime for another free channel. Then start AUTO-SCAN on /off switch.
With Power Off/Mute/On switch in either in .
Operating the BT-1KU Bodypack Transmitter
During normal operation with a hardwired cord or select...
Manual - Page 16

Synthesized PLL System Frequency Stability Frequency Response Dynamic Range Harmonic Distortion Modulation Operating Range
(U.S.) Band 1: 672.000-696.975MHz, (Int.) Band 2: 795.000-819.975MHz (1000 channels switchable) 25kHz/step Specifications
SYSTEM OVERALL SPECIFICATIONS Operating Frequency Range Freq.
Manual - Page 17
... of the microphone selected. Please note that location. Note: More bars in the Received Signal (12) icon indicate good signal strength in the band. See: Selecting the 4W-1KU QUAD Receiver Volume Level / Group / Channel
Programming the HT-1KU/BT-1KU to a different channel.
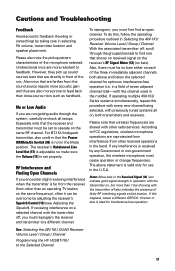
No or Low Audio
If you must be set properly. RF Interference and Finding Open Channels
If you...
Manual - Page 18

... the microphone transmitter ... it may overdrive the input of the attached audio mixer, causing distortion. The transmitter should also ...turned off when it and the transmitter. When batteries are not being used.
• When using the BT-1KU bodypack for optimum results but permits the mixer level control to the same frequency group and channel number.
• After making a receiver channel...
Manual - Page 19

...warranty, please enclose a cashier's check or money order (or pay by credit card) per step (1000 Channels) U.S.
Ship your country through the dealer/store from which you are experiencing. Do not attempt to &#...system require service, please contact the Nady Service Department at www.nady.com for BT-1KU/GT transmitter, 3.5mm locking mini plug to service this product. For service of the...
Manual - Page 20
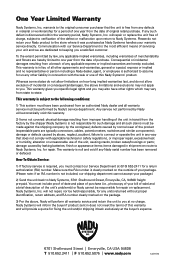
... defects caused by the consignee); items damaged in does not meet the terms of merchantability and fitness are typically connectors, cables, potentiometers, switches and similar components);
defects caused by law, any defects in transit from a breach of purchase. To the extent permitted by normal wear of the product (expendable parts are...
Similar Questions
