Samsung LN32A330 Support Question
Samsung LN32A330 Support Question
Find answers below for this question about Samsung LN32A330 - 32" LCD TV.Need a Samsung LN32A330 manual? We have 2 online manuals for this item!
Question posted by mikeprosceo on January 11th, 2021
Blacks On Screen Image Turning Blue
The blacks of faces or backgrounds get blue dotted highlights. Is there a fix?
Current Answers
Answer #1: Posted by Odin on January 11th, 2021 11:34 AM
Odin

Member since:
April 10th, 2010 Points: 41,236,630

Member since:
April 10th, 2010 Points: 41,236,630
Remove and then reconnect the coaxial connections between your component and the TV equipment. Be sure all connections are secure. Inspect the coaxial cable for any damage as damage will cause a loss in the signal strength. You can also unplug the TV for 10 minutes and see if that resets the issue. As a last resort, go into the menu of your TV and do a factory reset. Be sure your screen is not cracked. If the TV screen is cracked, the screen will need to be replaced to fix the issue. For cracked screen advice, see https://www.helpowl.com/q/Samsung/PN50C490B3D/Other/need-new-screen/1054069.
If the issue persists or if you require further advice--or if the instructions don't seem to apply--you may want to consult the company: use the contact information at https://www.contacthelp.com/samsung/customer-service.
Hope this is useful. Please don't forget to click the Accept This Answer button if you do accept it. My aim is to provide reliable helpful answers, not just a lot of them. See https://www.helpowl.com/profile/Odin.
Related Samsung LN32A330 Manual Pages
Quick Guide (easy Manual) (ver.1.0) (English) - Page 3

... IN 2 jack. Connecting a DVD Player or Cable Box/Satellite receiver (Set-Top Box) via HDMI
TV Rear Panel
1 Connect an HDMI Cable between HDMI and DVI is smaller in size and has the HDCP (High ...Box). Connections
Connecting a DVD Player or Cable Box/Satellite receiver (Set-Top Box) via DVI
TV Rear Panel
1 Connect a DVI to the
cable. ➣ When using a single cable.
• The difference between ...
Quick Guide (easy Manual) (ver.1.0) (English) - Page 4

...-Top Box).
1 Component Cable (Not supplied)
2 Audio Cable (Not supplied)
➣ Component video separates the video into Y (Luminance (brightness)), Pb (Blue) and Pr (Red) for enhanced video quality. Connecting a Camcorder
TV Rear Panel Camcoder
or
1 Video Cable (Not supplied) 2 Audio Cable (Not supplied)
English-
1 Connect a Video Cable between the AV IN 1 [Y/VIDEO] jack...
Quick Guide (easy Manual) (ver.1.0) (English) - Page 5

Alternatively, connect the cable to the ANT IN terminal on the back of the TV. English-
Connecting a VCR
Video Connection
TV Rear Panel
VCR Rear Panel
3 RF Cable (Not supplied)
4 Video Cable (Not supplied)
5 Audio Cable (Not supplied)
Follow the instructions in "Viewing a VCR or Camcorder Tape" to view your VCR ...
Quick Guide (easy Manual) (ver.1.0) (English) - Page 6

... the receiver (home theater) is connected to the cable. When a Digital Audio System is displaying a DTV(air) signal, the TV will be heard from the TV's Optical jack. Connecting a Digital Audio System
TV Rear Panel Digital Audio System
1 Optical Cable (Not supplied)
1 Connect an Optical Cable between the
1 AUDIO OUT [R-AUDIO-L] jacks on the...
Quick Guide (easy Manual) (ver.1.0) (English) - Page 7

... Stereo miniplug/2RCA Cable between the PC IN [AUDIO] jack on the TV and the Audio Out jack of the sound card on your computer. English- Connecting a PC
TV Rear Panel
1 D-Sub Cable (Not supplied) 2 PC Audio Cable (Not supplied)
TV Rear Panel
1 HDMI/DVI Cable (Not supplied) 2 3.5 mm Stereo mini-plug/2RCA Cable (Not...
Quick Guide (easy Manual) (ver.1.0) (English) - Page 8
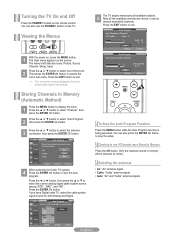
... menu's left side has icons: Picture, Sound, Channel, Setup, Input.
2 Press the ▲ or ▼ button to stop the setup.
Turning the TV On and Off
Press the POWER button on the screen.
TV
Auto Program
Selects a cable signal type for both Analog and Digital. Press the ENTER button. The main menu appears on...
User Manual - Page 2

...of LCD Displays that offer picture sizing features, use these controls to the TV screen
• Do not display a still image on the LCD panel for...televisions. To avoid such image retention, reduce the degree of brightness and contrast of the screen when displaying a still
image.
•
Watching the LCD TV in 4:3 format for the warranty period originally specified, and to fill the screen...
User Manual - Page 4

General Information
List of Features
Adjustable picture settings that can be stored in the TV's memory. Automatic timer to turn the TV on and off. A special sleep timer. Excellent Digital Interface & Networking : With a built-in all locations)...
(Not available in HD digital tuner, non-subscription HD broadcasts can be viewed with your LCD TV.
User Manual - Page 10

... video signals using an HDMI/DVI cable connection, you must use the HDMI IN 2 jack. DVD Player or Cable Box/ Satellite receiver (Set-Top Box)
TV Rear Panel
2.
C onnect Audio Cables between the DVI IN (HDMI 2) [R-AUDIO-L] jack on the DVD Player or Cable Box/Satellite receiver (Set-Top Box). C onnect an...
User Manual - Page 11

...] jack on the TV and the VIDEO OUT jack on the camcorder. Camcorder
TV Rear Panel
2 Audio Cable (Not supplied) 1 Video Cable (Not supplied)
Each Camcorder has a different back panel configuration. For example,... (Not supplied)
Component video separates the video into Y (Luminance (brightness)), Pb (Blue) and Pr (Red) for enhanced video quality. Connecting a DVD Player or Cable Box/Satellite receiver...
User Manual - Page 12

...)
Y-connector (not supplied) to hook up to AV IN 1, the color of the AV IN 1 [Y/VIDEO] jack (Green) does not
match the color of the TV.
TV Rear Panel
4. Connect a Video Cable between the ANT OUT terminal on the VCR and the ANT IN terminal on the back of the...
User Manual - Page 13

... Theater.
When an audio amplifier is connected to the Home theater receiver. Connecting an Amplifier/DVD Home Theater
1.
Digital Audio System
TV Rear Panel
When a Digital Audio System is connected to the TV via HDMI, only 2 channel sound will send out 5.1 channel sound to the "AUDIO OUT [R-AUDIO-L]" jacks: Decrease the volume of...
User Manual - Page 36
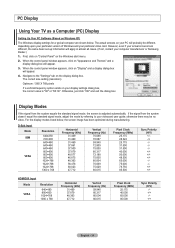
... vertical-frequency option exists on the Windows start menu. 2. First, click on "Control Panel" on your actual screens look different, the same basic set-up information will appear. 4. D-Sub Input Mode...
Using Your TV as a Computer (PC) Display
Setting Up Your PC Software (Based on Windows XP) The Windows display-settings for a typical computer are shown below , the screen image has been ...
User Manual - Page 37

...or ▼ button to exit. TV
Picture
Mode
: Standard
►
Backlight
7
Contrast
95
Brightness
45
Sharpness
50
Auto Adjustment
Screen ►
▼ More
Move...remove or reduce picture noise. Screen
Image Lock ►
Position ►
Image Reset
Resolution
: 1360 X 768 @60Hz
Move
Enter
Return
PC
Image Lock
Coarse
50
Fine
34
...
User Manual - Page 38
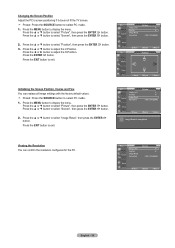
...2. Press the EXIT button to adjust the V-Position. button.
Press the ENTER button. PC
Screen
Image Lock ►
Position ►
Image Reset
Resolution
: 1360 X 768 @60Hz
Move
Enter
Return
TV
Position
Move
Enter
Return
Initializing the Screen Position, Coarse and Fine
You can confirm the resolution configured for the PC. button.
2.
Press...
User Manual - Page 53

... into the SERVICE port on your settings so that you have made will turn off and turn on automatically after upgrade." Press the MENU button to select "Setup", then press the ENTER button.
3. We recommend you write down your TV.
1.
TV Rear Panel
USB Drive
2. Press the ▲ or ▼ button to display the menu...
User Manual - Page 56

... the Stand
1. Separate the stand from the back of the TV. 2.
English - 54 If you fasten the screws with the cover. Cover the bottom hole with the LCD TV placed down, it . ➣ To make sure the TV is installed on the stand at position 2. ➣ Stand the product up and fasten the screws...
User Manual - Page 57

...OSD is displayed on the TV screen, the Adjustment screen appears.
Press the ... ▲ or ▼ button to reset. TV Rear Panel
Auto Wall-Mount
EX-LINK Cable (Not supplied...TV
External Settings
Melody
: Medium ►
Wall-Mount Adjustment
Move
Enter
Return
Wall-Mount Adjusment
Position Adjust
1 Save
2 3 INFO Center
Save Select a mode to the default setting.
3. Press the blue...
User Manual - Page 58

...specifications.
English - 56 When attaching to other building materials, please contact your wall mount on .
Product Family LCD-TV PDP-TV
inches 23~ 26 32 ~ 40 46 ~ 52
57
57 ~ 70 80 ~
42 ~ 50 55 ~ 70
63 80 ...-specified wall mount is turned on a solid wall perpendicular to follow the product installation instructions. Do not install your Wall Mount Kit while your TV is used or the ...
User Manual - Page 59

... to a desk or a heavy stationary object. The appearance and locking method may be different depending on the LCD TV (Figure 1) and turn it in the locking direction (Figure 2). 2.
The locking device has to be purchased separately. Fix the Kensington Lock to the manual provided with the Kensington Lock for proper use.
Using the Anti...
Samsung Knowledge Base Results
We have determined that the information below may contain an answer to this question. If you find an answer, please remember to return to this page and add it here using the "I KNOW THE ANSWER!" button above. It's that easy to earn points!-
General Support
...LCD TVs, HL series DLP TVs, PN and FP-T Plasma TVs and TX-T SlimFit TVs. 2007 models include LN-T series LCD TVs, HP-T and FP-T Plasma TVs, HL-T DLP TVs, and TX-T SlimFit TVs. An example of the Screen in Digital and Analog Mode in Windows (Setting the Resolution) If the screen image...2007 Models If you can be accessed through the Control Panel. On some TVs, if you don't have the PC on, the... -
General Support
... Downloaded Content Delete All Call Logs All Images/Photos/Videos All Sounds/Ringtones/MP3s All Messages Reset Factory Defaults Delete All Speed Dials To remove all Bluetooth devices From the Home menu screen , touch the Main menu tab, located at the bottom, until it turns blue Drag the Bluetooth device to the trash... -
General Support
... Home menu screen To add a Contact follow the steps below : Take Picture Using the LCD as a viewfinder...turns blue Drag the Contact to the Trash Can then release To delete all Contacts follow the steps below: From the phone menu screen...image to the Contact My Photos Touch the image location, either Camera or Saved Touch the image to view the enlarged image Touch OK to add the image...
Similar Questions

How Much Is A Used Samsung Lnt3232h 32' Lcd Tv. Res-1366 X 768 - 2x Hdmi
none
none
(Posted by macspeed123 2 years ago)


Why When My Samsung Ln32a330j1dxza Turns On Am I Only Getting Colored Lines On T
why do I only get colored lines on my LN32A330jidxza screen
why do I only get colored lines on my LN32A330jidxza screen
(Posted by yoncevancouver 7 years ago)

Samsung Lcd Tv Ln32a330 Won't Turn On
(Posted by stevfakier 10 years ago)
Samsung Ln32a650 - 32' Lcd Tv
I Found This Tv For $350. Is This A Good Price????
I Found This Tv For $350. Is This A Good Price????
(Posted by ELGUAPO916 11 years ago)