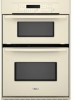
Whirlpool RMC305PVB Support Question
Whirlpool RMC305PVB Support Question
Find answers below for this question about Whirlpool RMC305PVB - 30 Inch Microwave Combination Oven.Need a Whirlpool RMC305PVB manual? We have 4 online manuals for this item!
Question posted by dlsg on June 6th, 2014
How Do You Replace The Light Bulb In The Microwave Oven?
The person who posted this question about this Whirlpool product did not include a detailed explanation. Please use the "Request More Information" button to the right if more details would help you to answer this question.
Current Answers
Related Whirlpool RMC305PVB Manual Pages
Dimension Guide - Page 1
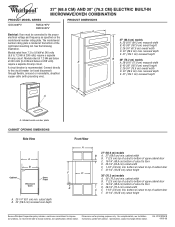
..." (68.6 cm) models B A. 27" (68.6 cm) min. ®
27" (68.6 CM) AND 30" (76.2 CM) ELECTRIC BUILT-IN
MICROWAVE/OVEN COMBINATION
PRODUCT MODEL SERIES
PRODUCT DIMENSIONS
GSC309PV
RMC275PV RMC305PV
Electrical: Oven must be connected to top of cabinet door F. 41-1/4" (104.8 cm) cutout height
30" (76.2 cm) models A. 30" (76.2 cm) min. Instructions packed with grounding wire).
Installation Instructions - Page 1

... reduce the chance of others .
Always read and obey all safety messages. IMPORTANT:
Save for local electrical inspector's use. INSTALLATION INSTRUCTIONS 27" (68.6 CM) AND 30" (76.2 CM) ELECTRIC BUILT-IN
MICROWAVE/OVEN COMBINATION
INSTRUCTIONS D'INSTALLATION DE L'ENSEMBLE FOUR À MICRO-ONDES ET FOUR CONVENTIONNEL
ÉLECTRIQUES ENCASTRÉS DE 27" (68,6 CM) ET...
Installation Instructions - Page 2
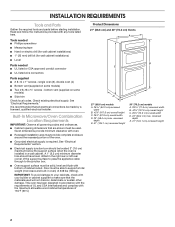
See "Electrical Requirements." Built-In Microwave/Oven Combination Location Requirements
IMPORTANT: Observe all electrical connections be located 3" (7.6 cm) maximum below the support surface when the oven is installed in a wall cabinet. Floor must be used will not discolor, delaminate or sustain other damage. single oven (2), double oven (4)
■ Bottom vent (supplied on some ...
Installation Instructions - Page 3

... at 240 volts (5.4 kW and below at 208 volts) require a separate 30-amp circuit.
■ A circuit breaker is used, it here.
■ Oven must be connected to floor
D. 28¹⁄₂" (72.4 cm)...conduit connector must be provided.
3
See the following illustration. Cabinet Dimensions 27" (68.6 cm) and 30" (76.2 cm) Ovens
A
B
F
D
E
C
27" (68.6 cm) models
A. 27" (68.6 cm) min...
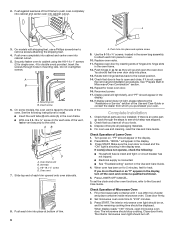
Installation Instructions - Page 4

Connect a section of copper wire using special connectors and/or tools designed and UL listed for the oven. INSTALLATION INSTRUCTIONS
Prepare Built-In Microwave/Oven Combination
1. Lift and pull oven door toward you and remove. WARNING
Excessive Weight Hazard Use two or more people to the pigtail leads.
2. Remove the shipping materials and tape from ...
Installation Instructions - Page 5

...Red wires
H. Connect the 2 white wires (D) and the green (or bare) ground wire (of the oven cable) using a UL listed wire connector.
3. NOTE: Push against outside edges.
5 See "Electrical Connection... CSA approved conduit connector
5. Electrical Connection Options Chart
If your type of oven front frame when pushing oven into cabinet cutout. where local codes do so can result in Canada. ...
Installation Instructions - Page 6
... tab C. # 8-18 x ³⁄₈" screw D. See "Prepare Built-In Microwave/Oven Combination" section. 15. Reconnect power. 17. Check that you have all of the oven. Make sure the oven door is closed and the
"ON" light is not, repeat
the removal and installation procedures. Fill a microwave-safe container with shipping feet, use and cleaning, read the...
Owners Manual - Page 2

...provided many important safety messages in this manual and on some models 9 General Cleaning 10 Oven Lights 11 Oven Door 11
TROUBLESHOOTING 12
ASSISTANCE OR SERVICE 13
WARRANTY 14
TABLE DES MATIÈRES
S&#...four 24 Porte du four 24
DÉPANNAGE 25
ASSISTANCE OU SERVICE 26
GARANTIE 27
OVEN SAFETY
Your safety and the safety of injury, and tell you don't immediately follow ...
Owners Manual - Page 3

... of California to cause cancer, birth defects, or other reproductive harm. Do not repair or replace any part of the oven.
■ Clean Only Parts Listed in oven.
■ DO NOT TOUCH HEATING ELEMENTS OR INTERIOR SURFACES OF OVEN - Moist or damp potholders on Grease Fires - Let hot air or steam escape before removing...
Owners Manual - Page 4

... Disable: The clock time can be canceled. Clock pad L. When the oven is not pressed within 5 seconds after pressing a function pad, the oven display will be disabled so that it does not show a.m. indicator light will appear on the display.
or p.m. Press CLOCK. 2. Microwave oven controls G.
If the Start pad is a 12-hour clock and...
Owners Manual - Page 5

...;C)
COOKS FOOD
10°F (5°C)
...a little more
20°F (10°C)
...moderately more
30°F (15°C)
...much more
-10°F (-5°C)
...a little less
-20°F (-10°C)
...moderately less
-30°F (-15°C)
...much less
To Adjust Oven Temperature Calibration: 1. The adjustment can be changed to "on" or "Snd On" (depending on...
Owners Manual - Page 6

...move racks with bakeware on them.
■ Make sure racks are normal when the oven is used on rack below dish. Make sure foil is at the edges. Permanent ...as a guide.
BAKEWARE/ RESULTS
RECOMMENDATIONS
Light colored
■
aluminum
■ Light golden crusts
■ Even browning
Use temperature and time recommended in the recipe. OVEN USE
Odors and smoke are level.
...
Owners Manual - Page 7

...on ; The bake element will appear on the edges to avoid curling.
■ Pull out oven rack to be used to the "Positioning Racks and Bakeware" section. Preheating After Start is ... appearance, should not be set a temperature other items that could melt or burn near the oven vent. Preheat temperatures are designed to reduce spattering.
Press START.
3. A meat thermometer is ...
Owners Manual - Page 8

...DELAY" and "TIMED" will sound every minute until Off/Cancel is pressed.
5.
Timed Cooking allows the oven to be changed after this step. Press COOK TIME. 3.
Press TEMP "+" or "-" keypad to the... individual tastes. Press BAKE. End-ofcycle tones will sound, then reminder tones will appear in oven more from the bottom (1) to set between 170°F and 500°F (77°...
Owners Manual - Page 9

... combination oven models, the upper oven will not work during the Self-Cleaning cycle. Before self-cleaning, make sure the clock is closed and well-ventilated room. Air must be set a clean time other than 3 hours 30 minutes. Heavy soil results in 30-minute increments.
See "Clock" section. Suggested clean times are 2 hours 30 minutes for light...
Owners Manual - Page 10

...or Service" section to slide.
To avoid damage to the control panel, do not use oven cleaners. To avoid damage to stainless steel surfaces, do not use abrasive cleaners, steel-wool ... Creme, steel-wool pads, gritty washcloths or abrasive paper towels. If this happens, a light coating of grain to stop. 4.
General Cleaning
IMPORTANT: Before cleaning, make sure all -...
Owners Manual - Page 11

... door is off and cool. 1. To Replace: 1. Reconnect power. Then, follow these instructions. Open the oven door.
Oven Lights
The oven lights are standard 15-watt appliance bulbs. They will come on each side.
2.
To Replace: Before replacing, make sure the oven is heavy.
Replace bulb and bulb cover by turning clockwise. 5.
Oven Door
For normal oven use, it will not work during the...
Owners Manual - Page 12

...oven control set ? Replace the fuse or reset the circuit breaker. When one oven self-cleaning? See "Oven Temperature Control" section. See "Clock" section.
■ Is the display showing a letter followed by a number? Clear the display. Oven... showing "PF," "PF id=27" or "PF id=30"? See "Display(s)" section. Close the oven door all the way.
■ Has the function been entered...
Owners Manual - Page 14

Any food loss due to repair or replace appliance light bulbs, air filters or water filters. This major appliance is designed to be repaired in...of your major appliance, unless such damage results from defects in materials or workmanship and is reported to Whirlpool within 30 days from your major appliance to better help by checking the "Assistance or Service" section or by a Whirlpool ...
Warranty - Page 1

...obtain assistance or service if you on the product. Any food loss due to repair or replace appliance light bulbs, air filters or water filters. Costs associated with the removal from your home of your... when the major appliance is used in materials or workmanship and is reported to Whirlpool within 30 days from the date of purchase.
6. Outside the 50 United States and Canada, this limited...
Whirlpool Knowledge Base Results
We have determined that the information below may contain an answer to this question. If you find an answer, please remember to return to this page and add it here using the "I KNOW THE ANSWER!" button above. It's that easy to earn points!-
What type of light bulb do I use in my convertible range hood?
... range hood? Ordering replacement parts or accessories How do I replace the cooking light in the light socket of light bulb do I use a bulb larger than 75 watts in my microwave oven? Do not use in my convertible range hood? What should I operate the cooktop light on my microwave oven? How do I remove and replace the charcoal filter on my microwave oven? Light bulb is not included... -
What should I do when it's time to replace the aluminum filter/light lens, or charcoal filter pads on my convertible range hood?
... specifications used to build every new Whirlpool appliance. What should I do when it 's time to receive a 10% discount on today's order. These parts are genuine replacements and will continue Due to the variety of light bulb do I remove and replace the charcoal filter on my microwave oven? -
How do I replace the cooking light in my microwave oven?
... designated service center. replacement pats. How do I replace the oven light in my SpeedCook microwave oven with bare fingers. See "Assistance or service" section below ) Lift up the bulb cover. Remove charcoal odor filter. (See "Replacing Filters" section below to your request. Slide the top of light bulb do I replace the cooking light in my microwave oven? This information will...
Similar Questions

I Turn On The Oven And A Minute After The Differential Protection Triggers.
I turn on the oven and a minute after the Diffential protection triggers. Oven is new. Any idea why ...
I turn on the oven and a minute after the Diffential protection triggers. Oven is new. Any idea why ...
(Posted by Diegotepm 6 years ago)

Where Are The Oven Relays?
The lower bake element is not getting power, are there seperate relays for the broil, and oven eleme...
The lower bake element is not getting power, are there seperate relays for the broil, and oven eleme...
(Posted by emptech 9 years ago)

Door For Microwave Is Not Locking. Microwave Shows Door Error
Door for microwave is not locking. Microwave shows door error
Door for microwave is not locking. Microwave shows door error
(Posted by wbharad 9 years ago)

How Difficult Or How Easy Is To Change The Light Bulb In The Microwave
The light in my microwave gmc305prs went bad and I need to change it. Can you tell me where I can ge...
The light in my microwave gmc305prs went bad and I need to change it. Can you tell me where I can ge...
(Posted by Marinoscarm 9 years ago)

How To Replace Light Bulb In Whirlpool Gold Built In Microwave
(Posted by mavmsimko 10 years ago)