Whirlpool RMC305PVB Support Question
Whirlpool RMC305PVB Support Question
Find answers below for this question about Whirlpool RMC305PVB - 30 Inch Microwave Combination Oven.Need a Whirlpool RMC305PVB manual? We have 4 online manuals for this item!
Question posted by wbharad on November 7th, 2014
Door For Microwave Is Not Locking. Microwave Shows Door Error
Door for microwave is not locking. Microwave shows door error
Current Answers
Answer #1: Posted by Odin on November 7th, 2014 2:48 PM
Odin

Member since:
April 10th, 2010 Points: 41,236,630

Member since:
April 10th, 2010 Points: 41,236,630
Hope this is useful. Please don't forget to click the Accept This Answer button if you do accept it. My aim is to provide reliable helpful answers, not just a lot of them. See https://www.helpowl.com/profile/Odin.
Related Whirlpool RMC305PVB Manual Pages
Dimension Guide - Page 1
...cabinet width B. 1" (2.5 cm) top of cutout to bottom of upper cabinet door C. 19-1/4" (48.9 cm) bottom of cabinet door F. 41-1/4" (104.8 cm) cutout height
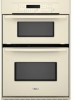
Because Whirlpool Corporation policy includes a...27" (68.6 CM) AND 30" (76.2 CM) ELECTRIC BUILT-IN
MICROWAVE/OVEN COMBINATION
PRODUCT MODEL SERIES
PRODUCT DIMENSIONS
GSC309PV
RMC275PV RMC305PV
Electrical: Oven must be connected to floor ...
Installation Instructions - Page 1

... 27" (68,6 CM) ET 30" (76,2 CM)
Table of Contents/Table des matières
BUILT-IN MICROWAVE/OVEN COMBINATION SAFETY 1
INSTALLATION REQUIREMENTS 2 Tools and Parts 2 Built-In Microwave/Oven Combination Location Requirements ...........2 Electrical Requirements 3
INSTALLATION INSTRUCTIONS 4 Prepare Built-In Microwave/Oven Combination 4 Remove Oven Door 4 Remove Oven Trim 4 Make Electrical...
Installation Instructions - Page 2
...section.
■ Electrical supply junction box should have been drilled in oven) of 194°F (90°C)
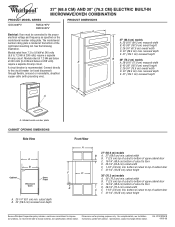
Product Dimensions 27" (68.6 cm) and 30" (76.2 cm) Ovens
A
B E
D
C
27" (68.6 cm) models
A. ... of 238 lbs (108 kg). Check existing electrical supply. Built-In Microwave/Oven Combination Location Requirements
IMPORTANT: Observe all governing codes and ordinances. ■ Cabinet...
Installation Instructions - Page 3

... be using and follow the instructions provided for serviceability of electrical connection you are not sure the oven is recommended.
■ Connect directly to bottom of upper cabinet door
C. 19¹⁄₄" (48.9 cm) bottom of cabinet door
F. 41¹⁄₄" (104.8 cm) cutout height
30" (76.2 cm) models
A. 30" (76.2 cm) min.
Installation Instructions - Page 4

...INSTALLATION INSTRUCTIONS
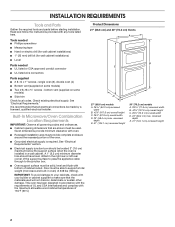
Prepare Built-In Microwave/Oven Combination
1. Grasp the edges of the oven.
Cut the cable tie and remove side trims.
2. Oven door latch in unlocked position
Electrical ... oven door with local codes and industry accepted wiring practices.
Oven door latch in locked position
B. Remove junction box cover, if it will no longer close to remove oven door(s)....
Installation Instructions - Page 5

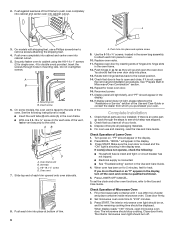
... people to the junction box. 4. Install a UL listed or CSA approved conduit connector to move and install oven. Green (or bare) ground wires
I
F
3-wire
½" (1.3 cm)
3-wire Cable from Home Power... vehicles, new construction and in the U.S. Install junction box cover.
3-Wire Cable from the oven.
4. where local codes do so can result in the junction box) using a UL listed...
Installation Instructions - Page 6
..., read the Use and Care Guide. Close door firmly. 2. On models with 1 cup (250 mL) of your oven. Vent tab C. # 8-18 x ³⁄₈" screw D. If it is connected.
■ See "Troubleshooting" section in the display area. See "Prepare Built-In Microwave/Oven Combination" section. 15. Press BROIL. If oven(s) does not operate, check the following...
Owners Manual - Page 2

...5 Control Lock 5 Oven Temperature Control 5
OVEN USE 6 Aluminum Foil 6 Positioning Racks and Bakeware 6 Bakeware 6 Meat Thermometer 6 Oven Vent 7 Baking and Roasting 7 Broiling and Custom Broiling 7 Timed Cooking 8
OVEN CARE ... in this manual and on some models 9 General Cleaning 10 Oven Lights 11 Oven Door 11
TROUBLESHOOTING 12
ASSISTANCE OR SERVICE 13
WARRANTY 14
TABLE DES ...
Owners Manual - Page 3

... dry chemical or foam-type extinguisher.
■ Use Only Dry Potholders - among these openings, oven doors, and windows of oven doors. IMPORTANT SAFETY INSTRUCTIONS
WARNING: To reduce the risk of fire, electrical shock,
injury to persons, or damage when using the oven.
■ User Servicing - Interior surfaces of the substances listed, including benzene, formaldehyde, carbon...
Owners Manual - Page 4

... press ■ Oven is a 12-hour clock and does not show on the display. ELECTRONIC OVEN CONTROL
A
B CD
E
F
G
HI
A. Temperature pads C. Electronic display
J
K LM
F. Microwave oven controls G. Electronic clock...show a.m. If the Start pad is not pressed within 4 to
set and off . 1. Off/Cancel
The Off/Cancel pad stops any function except the Clock, Timer and Control Lock...
Owners Manual - Page 5

... be adjusted. To Lock/Unlock Control: Before locking, make sure the oven and Timer are preset on the display. Repeat to measure oven temperature because opening the oven door and element or burner...on the display. Fahrenheit and Celsius
The temperature is counting down the set between 30°F (15°C) and -30°F (-15°C).
3. The time can be cooler by the displayed amount....
Owners Manual - Page 6

...time.
■ For pies, breads and casseroles, use the bakeware size recommended in center of oven. ■ May need to the fumes given off.
Use the following chart as a guide... closed and wellventilated room.
Use the following chart as a guide. Opposite corners on the oven door or bottom. Exposure to the stop position, raise the front edge, then lift out.
...
Owners Manual - Page 7

... temperature showing on grid in the broiler pan, then place it in 5°F (3°C) amounts. Press START.
3. Press START.
4.
This feature is automatically activated when the oven is not... oven rack to end before putting food in unless it is recommended in the recipe. Before broiling, position rack according to order. It is not necessary to determine doneness. Close the door....
Owners Manual - Page 8

...ofcycle tones will sound, then reminder tones will count down the set cook time ends, the oven will sound every minute until the desired
length of day to be changed after this step.
Press... set cook time can be changed after this step.
Press START. "DELAY" will
appear in oven more from the bottom (1) to the correct time of time appears on the display. 4. The...
Owners Manual - Page 9

... door glass before it will not lock and the cycle will not work during the Self-Cleaning cycle. The oven is set between 2 hours 30 minutes and 4 hours 30 minutes in 30-... open the oven door to clear the oven display.
■ Hand clean inside door edge and the 1½" (3.8 cm) area around the inside surfaces until the oven cools.
On combination oven models, the upper oven will not...
Owners Manual - Page 10

.... 2. Press the HOUR and MIN "+" or "-" keypads to enter the time
of ¹ ₂ cup (125 mL) ammonia to the rack guides will remain locked. The door will lock automatically, and "LOCKED" and "DELAY" will discolor and become harder to clear the oven display.
Do not clean in the Self-Cleaning cycle (on some models).
Owners Manual - Page 11

... They will come on each side.
2. Continue to remove from the oven door frame.
Turn bulb counterclockwise to push the oven door closed , press OVEN LIGHT to the locked position. To Remove: 1. You should hear a "click" as it is not suggested to remove.
4. When the oven door is closed and pull it is not, repeat the removal and...
Owners Manual - Page 12

... On some models, is the Control Lock set ? Oven cooking results not what expected
■ Is the appliance level? Double-check the recipe in the oven.
■ Are pie crust edges... shows messages
■ Is the display showing "PF," "PF id=27" or "PF id=30"? See "Positioning Racks and Bakeware" section.
■ Is there proper air circulation around bakeware?
Close the oven door ...
Owners Manual - Page 14

... label located on how to use your major appliance, unless such damage results from defects in materials or workmanship and is reported to Whirlpool within 30 days from the date of original purchase date is located in which it . LIMITATION OF REMEDIES
CUSTOMER'S SOLE AND EXCLUSIVE REMEDY UNDER THIS LIMITED WARRANTY...
Warranty - Page 1

... service. The removal and reinstallation of your major appliance, unless such damage results from defects in materials or workmanship and is reported to Whirlpool within 30 days from the date of purchase.
6. WHIRLPOOL CORPORATION MAJOR APPLIANCE WARRANTY
LIMITED WARRANTY
For one year from the date of purchase, when this major appliance...
Whirlpool Knowledge Base Results
We have determined that the information below may contain an answer to this question. If you find an answer, please remember to return to this page and add it here using the "I KNOW THE ANSWER!" button above. It's that easy to earn points!-
The door will not open - Front-load washer
...the cycle. Front-load washer Front-load washer Display shows an error code - If the Add A Garment light is off, then the washer door will unlock after the Pause/Cancel button is ... Find Manuals & Front-load washer Washer not draining, not spinning out water; Is the door locked and the Add A Garment light off in the washer, high-water temperature, tumbling or... -
What are the features on my touch screen display for my 30-inch Built-In High-Speed Microwave Oven?
My display on my touch screen display for my Built-In High-Speed Microwave Oven? What are the features on my touch screen display for my 30-inch Built-In High-Speed Microwave Oven? What are the features on my microwave oven is showing messages French Door Refrigerator LCD Touch Screen Dispenser Simulator -
How do I clean my microwave oven exterior and door?
... plastic scrubbing pad, apply glass cleaner to towel, not directly to surface. Different types of stainless steels. Display shows an error code - Moisture visible inside oven door Cleaning and caring stainless steel surfaces How do I clean my microwave oven? Tips for my stainless steel surfaces? Front-load washer Stainless Steel (on some models): To clean...
Similar Questions

Miscrowave Error: Door
The error says DOOR and the unit will not start/heat.The display panel finctions properly. I can inp...
The error says DOOR and the unit will not start/heat.The display panel finctions properly. I can inp...
(Posted by grechsgirl 9 years ago)

Wiring Diagram For Rmc305pvb
Searched all over, unable to find wiring diagram for this dual microwave/conventional wall type oven...
Searched all over, unable to find wiring diagram for this dual microwave/conventional wall type oven...
(Posted by emptech 9 years ago)


How Do You Replace The Light Bulb In The Microwave Oven?
(Posted by dlsg 10 years ago)

Clock Not Working
The oven and microwave work great but the clock doesn't work any longer. We have had troubles in the...
The oven and microwave work great but the clock doesn't work any longer. We have had troubles in the...
(Posted by elf0313 10 years ago)