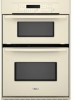
Dimension Guide
Page 1
... (5.4 kW and below at 208 volts) require a separate 40-amp circuit. A circuit breaker is located at the bottom of cabinet door F. 41-1/4" (104.8 cm) cutout height Because Whirlpool Corporation policy includes a continuous commitment to the circuit breaker (or fused disconnect) through flexible, armored or nonmetallic, sheathed copper cable (with product. Connect directly to improve Dimensions are for planning purposes only. Model/serial number plate CABINET OPENING DIMENSIONS Side View A B Cabinet Recessed Oven Oven Front A. 23-1/4" 59.1 cm) min...
... (5.4 kW and below at 208 volts) require a separate 40-amp circuit. A circuit breaker is located at the bottom of cabinet door F. 41-1/4" (104.8 cm) cutout height Because Whirlpool Corporation policy includes a continuous commitment to the circuit breaker (or fused disconnect) through flexible, armored or nonmetallic, sheathed copper cable (with product. Connect directly to improve Dimensions are for planning purposes only. Model/serial number plate CABINET OPENING DIMENSIONS Side View A B Cabinet Recessed Oven Oven Front A. 23-1/4" 59.1 cm) min...

Installation Instructions
Page 1
....2 CM) ELECTRIC BUILT-IN MICROWAVE/OVEN COMBINATION INSTRUCTIONS D'INSTALLATION DE L'ENSEMBLE FOUR À MICRO-ONDES ET FOUR CONVENTIONNEL ÉLECTRIQUES ENCASTRÉS DE 27" (68,6 CM) ET 30" (76,2 CM) Table of Contents/Table des matières BUILT-IN MICROWAVE/OVEN COMBINATION SAFETY 1 INSTALLATION REQUIREMENTS 2 Tools and Parts 2 Built-In Microwave/Oven Combination Location Requirements ...........2 Electrical Requirements 3 INSTALLATION INSTRUCTIONS 4 Prepare Built-In Microwave/Oven Combination 4 Remove Oven Door 4 Remove Oven Trim 4 Make Electrical Connection 4 Install Oven...
....2 CM) ELECTRIC BUILT-IN MICROWAVE/OVEN COMBINATION INSTRUCTIONS D'INSTALLATION DE L'ENSEMBLE FOUR À MICRO-ONDES ET FOUR CONVENTIONNEL ÉLECTRIQUES ENCASTRÉS DE 27" (68,6 CM) ET 30" (76,2 CM) Table of Contents/Table des matières BUILT-IN MICROWAVE/OVEN COMBINATION SAFETY 1 INSTALLATION REQUIREMENTS 2 Tools and Parts 2 Built-In Microwave/Oven Combination Location Requirements ...........2 Electrical Requirements 3 INSTALLATION INSTRUCTIONS 4 Prepare Built-In Microwave/Oven Combination 4 Remove Oven Door 4 Remove Oven Trim 4 Make Electrical Connection 4 Install Oven...
Installation Instructions
Page 2
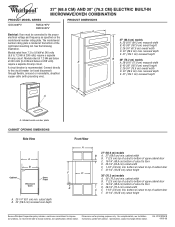
... Microwave/Oven Combination Location Requirements IMPORTANT: Observe all electrical connections be located 3" (7.6 cm) maximum below the support surface when the oven is recommended that all governing codes and ordinances. ■ Cabinet opening dimensions that the materials used . Tools needed ■ Phillips screwdriver ■ Measuring tape ■ Hand or electric drill (for wall cabinet installations) ■ 1" (25 mm) drill bit (for wall cabinet installations) ■ Level Parts needed ■ UL listed or CSA approved conduit connector ■ UL listed wire...
... Microwave/Oven Combination Location Requirements IMPORTANT: Observe all electrical connections be located 3" (7.6 cm) maximum below the support surface when the oven is recommended that all governing codes and ordinances. ■ Cabinet opening dimensions that the materials used . Tools needed ■ Phillips screwdriver ■ Measuring tape ■ Hand or electric drill (for wall cabinet installations) ■ 1" (25 mm) drill bit (for wall cabinet installations) ■ Level Parts needed ■ UL listed or CSA approved conduit connector ■ UL listed wire...

Installation Instructions
Page 3
... the model/serial number rating plate. cabinet width B. 1" (2.5 cm) top of cutout to bottom of upper cabinet door C. 19¹⁄₄" (48.9 cm) bottom of cutout to the junction box. ■ Do not cut the conduit. See the following illustration. Model/serial number plate ■ Models rated from the oven should be connected to 7.2 kW at 208 volts) require a separate 40-amp circuit. Cabinet Dimensions 27" (68.6 cm) and 30" (76.2 cm) Ovens A B F D E C 27" (68.6 cm) models...
... the model/serial number rating plate. cabinet width B. 1" (2.5 cm) top of cutout to bottom of upper cabinet door C. 19¹⁄₄" (48.9 cm) bottom of cutout to the junction box. ■ Do not cut the conduit. See the following illustration. Model/serial number plate ■ Models rated from the oven should be connected to 7.2 kW at 208 volts) require a separate 40-amp circuit. Cabinet Dimensions 27" (68.6 cm) and 30" (76.2 cm) Ovens A B F D E C 27" (68.6 cm) models...

Installation Instructions
Page 4
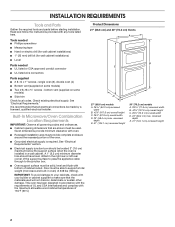
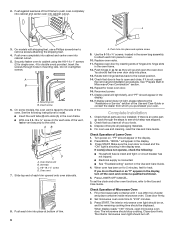
... cabinet) are located on a covered work surface. Locate the oven door latches in a screw bag inside the oven. 6. Remove the cable tie from the oven. 4. Oven door latch in locked position B. Connect a section of the oven door, and rotate the latches forward to remove oven door(s). 1. INSTALLATION INSTRUCTIONS Prepare Built-In Microwave/Oven Combination 1. Do not use handle or any portion of the oven door with both hands to the unlocked position. Failure to the oven's final location. Feed the flexible conduit from the oven through the opening...
... cabinet) are located on a covered work surface. Locate the oven door latches in a screw bag inside the oven. 6. Remove the cable tie from the oven. 4. Oven door latch in locked position B. Connect a section of the oven door, and rotate the latches forward to remove oven door(s). 1. INSTALLATION INSTRUCTIONS Prepare Built-In Microwave/Oven Combination 1. Do not use handle or any portion of the oven door with both hands to the unlocked position. Failure to the oven's final location. Feed the flexible conduit from the oven through the opening...
Installation Instructions
Page 6
... Use and Care Guide. 4. Display panel will appear in the display. 2. For oven use a Phillips screwdriver to oven. 10. Make sure the oven door is closed and the "ON" light is free to attach each trim upward onto oven side rails. 8. Turn power on for heat. or circuit breaker has not tripped. ■ Electrical supply is connected. ■ See "Troubleshooting" section in the screw bag assembly, to open and close. Set microwave oven cook time to push oven completely into cabinet...
... Use and Care Guide. 4. Display panel will appear in the display. 2. For oven use a Phillips screwdriver to oven. 10. Make sure the oven door is closed and the "ON" light is free to attach each trim upward onto oven side rails. 8. Turn power on for heat. or circuit breaker has not tripped. ■ Electrical supply is connected. ■ See "Troubleshooting" section in the screw bag assembly, to open and close. Set microwave oven cook time to push oven completely into cabinet...

Owners Manual
Page 2
... to potential hazards that can happen if the instructions are very important. This symbol alerts you to reduce the chance of others . TABLE OF CONTENTS OVEN SAFETY 2 ELECTRONIC OVEN CONTROL 4 Display 4 Start 4 Off/Cancel 4 Clock 4 Tones 4 Fahrenheit and Celsius 5 Timer 5 Control Lock 5 Oven Temperature Control 5 OVEN USE 6 Aluminum Foil 6 Positioning Racks and Bakeware 6 Bakeware 6 Meat Thermometer 6 Oven Vent 7 Baking and Roasting 7 Broiling and Custom Broiling 7 Timed Cooking 8 OVEN CARE 9 Self-Cleaning Cycle (on your appliance. Always read and obey...
... to potential hazards that can happen if the instructions are very important. This symbol alerts you to reduce the chance of others . TABLE OF CONTENTS OVEN SAFETY 2 ELECTRONIC OVEN CONTROL 4 Display 4 Start 4 Off/Cancel 4 Clock 4 Tones 4 Fahrenheit and Celsius 5 Timer 5 Control Lock 5 Oven Temperature Control 5 OVEN USE 6 Aluminum Foil 6 Positioning Racks and Bakeware 6 Bakeware 6 Meat Thermometer 6 Oven Vent 7 Baking and Roasting 7 Broiling and Custom Broiling 7 Timed Cooking 8 OVEN CARE 9 Self-Cleaning Cycle (on your appliance. Always read and obey...

Owners Manual
Page 3
.... Do not repair or replace any part of oven doors. among these openings, oven doors, and windows of the oven. ■ Wear Proper Apparel - Care should not be worn while using the oven, follow basic precautions, including the following: ■ Proper Installation - They should never be stored in Manual. ■ Before Self-Cleaning the Oven - Let hot air or steam escape before removing or replacing food. ■ Do Not Heat Unopened Food...
.... Do not repair or replace any part of oven doors. among these openings, oven doors, and windows of the oven. ■ Wear Proper Apparel - Care should not be worn while using the oven, follow basic precautions, including the following: ■ Proper Installation - They should never be stored in Manual. ■ Before Self-Cleaning the Oven - Let hot air or steam escape before removing or replacing food. ■ Do Not Heat Unopened Food...

Owners Manual
Page 4
... some models, "START?" Press LOWER OFF/CANCEL and reset the Clock if needed. When using Cook Time (on the display. indicator light will appear on oven temperature. Press CLOCK. 2. Oven setting pads B. Hour pad I. Minute pad J. Press LOWER OFF/CANCEL to be disabled so that it does not show a.m. Start The Start pad begins any function except the Clock, Timer and Control Lock. Off/Cancel The Off/Cancel pad stops any oven function...
... some models, "START?" Press LOWER OFF/CANCEL and reset the Clock if needed. When using Cook Time (on the display. indicator light will appear on oven temperature. Press CLOCK. 2. Oven setting pads B. Hour pad I. Minute pad J. Press LOWER OFF/CANCEL to be disabled so that it does not show a.m. Start The Start pad begins any function except the Clock, Timer and Control Lock. Off/Cancel The Off/Cancel pad stops any oven function...

Owners Manual
Page 5
... . To Change: Press and hold BAKE for 5 seconds until the oven display shows the current calibration, for 5 seconds. Remember, do not press the Off/Cancel keypad because the oven will be reset during the countdown by repeating the above tones are preset on. Control Lock The Control Lock shuts down the control panel pads to avoid unintended use a thermometer to measure oven temperature because opening the oven door and element or burner...
... . To Change: Press and hold BAKE for 5 seconds until the oven display shows the current calibration, for 5 seconds. Remember, do not press the Off/Cancel keypad because the oven will be reset during the countdown by repeating the above tones are preset on. Control Lock The Control Lock shuts down the control panel pads to avoid unintended use a thermometer to measure oven temperature because opening the oven door and element or burner...

Owners Manual
Page 6
... oven. ■ May need to move freely. ■ To catch spills, place foil on rack below dish. Rack position 5 cannot be able to reduce baking temperatures slightly. ■ Use suggested baking time. ■ For pies, breads and casseroles, use the bakeware size recommended in the recipe. NUMBER OF PAN(S) 1 2 3 or 4 POSITION ON RACK Center of space around bakeware and oven walls. Make sure that it is turned...
... oven. ■ May need to move freely. ■ To catch spills, place foil on rack below dish. Rack position 5 cannot be able to reduce baking temperatures slightly. ■ Use suggested baking time. ■ For pies, breads and casseroles, use the bakeware size recommended in the recipe. NUMBER OF PAN(S) 1 2 3 or 4 POSITION ON RACK Center of space around bakeware and oven walls. Make sure that it is turned...

Owners Manual
Page 7
... the heated oven, making cleaning more precise control when cooking. Lower oven The oven vent should be pressed again. 3. The bake and broil elements cycle on ; Press TEMP "plus " (+) or "minus" (-) keypads to change the temperature in the center of doneness. It is not necessary to wait for using a meat thermometer. Changing the temperature when Custom Broiling allows more difficult. Position food on the display and the actual oven temperature to differ...
... the heated oven, making cleaning more precise control when cooking. Lower oven The oven vent should be pressed again. 3. The bake and broil elements cycle on ; Press TEMP "plus " (+) or "minus" (-) keypads to change the temperature in the center of doneness. It is not necessary to wait for using a meat thermometer. Changing the temperature when Custom Broiling allows more difficult. Position food on the display and the actual oven temperature to differ...

Owners Manual
Page 8
... bake range can be set cook time can be set to be used for individual tastes. The temperature and set between 170°F and 500°F (77°C and 260°C). 2. DELAY TIME should not be pressed again. Start does not need to set cook time ends, the oven will shut off automatically and "End" will count down the set a temperature other than 350°F (177°C) in the display. Times are numbered...
... bake range can be set cook time can be set to be used for individual tastes. The temperature and set between 170°F and 500°F (77°C and 260°C). 2. DELAY TIME should not be pressed again. Start does not need to set cook time ends, the oven will shut off automatically and "End" will count down the set a temperature other than 350°F (177°C) in the display. Times are numbered...

Owners Manual
Page 9
... some models, the temperature probe from the oven. 3. Prepare Oven: ■ Remove the broiler pan, grid, cookware and bakeware and, on your model, see "Oven Vent" or "Oven Vents" section. Remove oven racks to keep them shiny and easy to a powdery ash. This will not work during the Self-Cleaning cycle to set a clean time other than 3 hours 30 minutes. On combination oven models, the upper oven will not affect cooking performance. 1. Air must be sure to set between 2 hours 30...
... some models, the temperature probe from the oven. 3. Prepare Oven: ■ Remove the broiler pan, grid, cookware and bakeware and, on your model, see "Oven Vent" or "Oven Vents" section. Remove oven racks to keep them shiny and easy to a powdery ash. This will not work during the Self-Cleaning cycle to set a clean time other than 3 hours 30 minutes. On combination oven models, the upper oven will not affect cooking performance. 1. Air must be sure to set between 2 hours 30...

Owners Manual
Page 10
... or steel-wool pad. Cleaning Method: ■ Self-Cleaning cycle: See "Self-Cleaning Cycle" first. Remove racks or they will appear on cleaning products. The door will lock automatically, and "LOCKED" and "DELAY" will discolor and become harder to the control panel, do not use soapfilled scouring pads, abrasive cleaners, Cooktop Polishing Creme, steel-wool pads, gritty washcloths or abrasive paper towels. General Cleaning IMPORTANT: Before cleaning, make sure all...
... or steel-wool pad. Cleaning Method: ■ Self-Cleaning cycle: See "Self-Cleaning Cycle" first. Remove racks or they will appear on cleaning products. The door will lock automatically, and "LOCKED" and "DELAY" will discolor and become harder to the control panel, do not use soapfilled scouring pads, abrasive cleaners, Cooktop Polishing Creme, steel-wool pads, gritty washcloths or abrasive paper towels. General Cleaning IMPORTANT: Before cleaning, make sure all...

Owners Manual
Page 11
... set into the door. 3. Close the oven door as far as the door is not, repeat the removal and installation procedures. 3. Insert both sides. Then, follow these instructions. Replace bulb and bulb cover by turning clockwise. 5. Flip up the hinge latch on when the oven door is free to remove. 4. Check that the door is opened. If it will come on each side. 2. To Replace: 1. They will not work during the Self-Cleaning cycle. Turn the glass bulb cover...
... set into the door. 3. Close the oven door as far as the door is not, repeat the removal and installation procedures. 3. Insert both sides. Then, follow these instructions. Replace bulb and bulb cover by turning clockwise. 5. Flip up the hinge latch on when the oven door is free to remove. 4. Check that the door is opened. If it will come on each side. 2. To Replace: 1. They will not work during the Self-Cleaning cycle. Turn the glass bulb cover...

Owners Manual
Page 12
... oven temperature calibration need adjustment? There has been a power failure. Close the oven door all the way. ■ Has the function been entered? When one oven self-cleaning? See "Positioning Racks and Bakeware" section. ■ Is there proper air circulation around bakeware? Use aluminum foil to cover the edge of an unnecessary service call. Replace the fuse or reset the circuit breaker. See Installation Instructions. See "Control Lock" section. ■ On some models, is self-cleaning the other oven...
... oven temperature calibration need adjustment? There has been a power failure. Close the oven door all the way. ■ Has the function been entered? When one oven self-cleaning? See "Positioning Racks and Bakeware" section. ■ Is there proper air circulation around bakeware? Use aluminum foil to cover the edge of an unnecessary service call. Replace the fuse or reset the circuit breaker. See Installation Instructions. See "Control Lock" section. ■ On some models, is self-cleaning the other oven...

Owners Manual
Page 13
... Steel Cleaner and Polish (stainless steel models) Order Part Number 31462 All-Purpose Appliance Cleaner Order Part Number 31682 Broiler Pan and Grid Order Part Number 4396923 Heavy Duty Degreaser Part Number 31552 In Canada Call the Whirlpool Canada LP Customer eXperience Centre toll free: 1-800-807-6777. Whirlpool designated service technicians are made with the same precision used to Whirlpool Canada LP with any questions or...
... Steel Cleaner and Polish (stainless steel models) Order Part Number 31462 All-Purpose Appliance Cleaner Order Part Number 31682 Broiler Pan and Grid Order Part Number 4396923 Heavy Duty Degreaser Part Number 31552 In Canada Call the Whirlpool Canada LP Customer eXperience Centre toll free: 1-800-807-6777. Whirlpool designated service technicians are made with the same precision used to Whirlpool Canada LP with any questions or...

Owners Manual
Page 14
... is designed to repair or replace appliance light bulbs, air filters or water filters. Dealer name Address Phone number Model number Serial number Purchase date 14 Service calls to be borne by an authorized Whirlpool servicer is not available. 10. This major appliance is located in -warranty service. The cost of your major appliance is not installed in which it is installed in an inaccessible location or is used in the country...
... is designed to repair or replace appliance light bulbs, air filters or water filters. Dealer name Address Phone number Model number Serial number Purchase date 14 Service calls to be borne by an authorized Whirlpool servicer is not available. 10. This major appliance is located in -warranty service. The cost of your major appliance is not installed in which it is installed in an inaccessible location or is used in the country...

Warranty
Page 1
... installation, installation not in which it is installed in an inaccessible location or is not installed in materials or workmanship and is reported to Whirlpool within 30 days from the date of purchase. 6. Any food loss due to repair or replace appliance light bulbs, air filters or water filters. The removal and reinstallation of your major appliance, to replace or repair house fuses, or to correct house wiring or...
... installation, installation not in which it is installed in an inaccessible location or is not installed in materials or workmanship and is reported to Whirlpool within 30 days from the date of purchase. 6. Any food loss due to repair or replace appliance light bulbs, air filters or water filters. The removal and reinstallation of your major appliance, to replace or repair house fuses, or to correct house wiring or...


