Get support for Zanussi ZOHCX3X2

Zanussi ZOHCX3X2 Support Question

Zanussi ZOHCX3X2 Support Question

Find answers below for this question about Zanussi ZOHCX3X2.
Need a Zanussi ZOHCX3X2 manual? We have 4 online manuals for this item!
Question posted by harrischdave43 on June 8th, 2023

Oven Door, Removed. Cant Get It Back.

We removed our oven door to clean it, and we cannot get it back on correctly,what are we doing wrong.

Current Answers

Answer #1: Posted by Suhana on July 27th, 2023 11:47 PM
Suhana

Member since:
July 19th, 2023

Points: 4,890
100
points
May be this will help you

I understand that you're facing an issue with your Zanussi ZOHCX3X2 oven door and are having trouble reattaching it. Attaching an oven door can sometimes be tricky, but I'll provide you with general steps that might help you in this process. Please note that specific instructions may vary, so if possible, refer to your oven's user manual for more detailed guidance.

Check the hinges: Make sure the hinges are in the correct position and not bent or damaged. The hinges are usually located on the sides of the oven door.

Open the hinges: If your oven door has removable hinges, you may need to open them to reattach the door. Look for a small lever or catch on each hinge and move it to the open position.

Position the door: Hold the oven door at an angle and align the hinges with the slots or brackets on the oven's main body.

Slide the door in: Carefully slide the door onto the hinges until it sits securely in place. Make sure the hinges fit properly into the slots or brackets.

Lock the hinges: If your hinges have a locking mechanism, ensure that you close or lock them back into position to secure the door.

Test the door: After attaching the door, gently open and close it a few times to check if it operates smoothly and closes securely.

Refer to the user manual: If the above steps do not work or if you're unsure about any specific details, it's always a good idea to refer to the user manual that came with your oven. The manual should have detailed instructions on how to remove and reattach the oven door correctly.

If you still find it difficult to reattach the oven door, or if there seems to be an issue with the hinges or any other part of the oven, it's best to reach out to Zanussi's customer support or a professional technician for further assistance. They will be able to provide specific guidance for your model and address any potential technical problems.

Related Zanussi ZOHCX3X2 Manual Pages

User Manual - Page 3

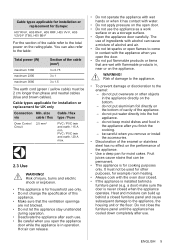
... WARNING: The appliance and its Authorised Service Centre or similarly qualified persons to clean the glass door since they can scratch the surface, which may result in shattering of the glass...safety device, it should be taken to avoid touching heating elements. • Always use oven gloves to remove or put in accessories or ovenware. • Before carrying out any maintenance, disconnect the...
User Manual - Page 4

... other appliances and units. • Before mounting the appliance, check if the oven door opens without a main plug and a main cable. 4 ENGLISH Always pull the mains plug. • Use only correct isolation devices: line protecting cut-outs, fuses (screw type fuses removed from the mains at the end of the mains power supply. •...
User Manual - Page 5

...• Do not apply pressure on the open the appliance door while the appliance is in the appliance after you remove or install the accessories. • Discoloration of the enamel ... food in operation. Fruit juices cause stains that the ventilation openings are wet with the oven door closed when the appliance operates. WARNING! do not put ovenware or other purposes, for example...
User Manual - Page 6

.... 2.7 Disposal WARNING! Do not use abrasive products, abrasive cleaning pads, solvents or metal objects. • If you remove the door from the mains socket. • Make sure the appliance ...are damaged. Contact the Authorised Service Centre. • Be careful when you use an oven spray, follow the safety instructions on its packaging. 2.5 Internal lighting WARNING! There is cold...
User Manual - Page 8

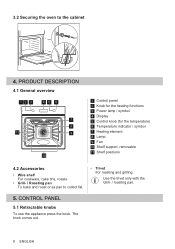
... panel 2 Knob for the heating functions 3 Power lamp / symbol 4 Display 5 Control knob (for the temperature) 6 Temperature indicator / symbol 7 Heating element 8 Lamp 9 Fan 10 Shelf support, removable 11 Shelf positions 4.2 Accessories • Wire shelf For cookware, cake tins, roasts. • Grill- / Roasting pan To bake and roast or as pan to the...
User Manual - Page 9

... 9 BEFORE FIRST USE WARNING! Set the maximum temperature movable shelf supports from the oven. 2. Place the accessories and the removable shelf supports in the oven. 7. press to set the mi‐ nutes. DAILY USE WARNING! To set the time. 5.3 Display A B A. Clean the oven and the acces‐ sories with a soft cloth, warm for the function...
User Manual - Page 10

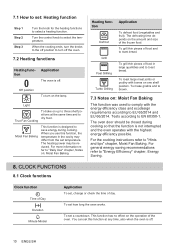
... in the cavity may be closed during cooking so that the function is designed to save energy during cooking. To grill thin pieces of the oven. The oven door should be re‐ duced. For the cooking instructions refer to select the tem‐ perature. This function has no effect on up to...
User Manual - Page 11

...chapters. 9.1 Inserting accessories A small indentation at the top increases safety. The signal sounds and the oven turns off position. Step 4 Press any button to stop the signal. press repeatedly. - The ... 9. Refer to change : Time of the shelf. ENGLISH 11 flashes when you connect the oven to set . press to the electrical supply, when there was a power cut or when...
User Manual - Page 13

...appliance. 11.2 Baking and roasting Use the function: True Fan Cooking. The oven turns on the type of the oven floor. The oven has a special system which interrupts the power supply. To prevent too much...Make sure the supports of the set cooking time is up. Baking cakes Do not open the oven door before . To prevent the smoke condensation, add water each time after it dries up . Make...
User Manual - Page 14

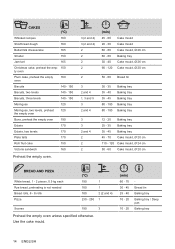
...165 Strudel 150 Jam tart 165 Christmas cake, preheat the emp‐ 150 ty oven Plum cake, preheat the empty 160 oven Biscuits 140 - 150 Biscuits, two levels 140 - 150 Biscuits, three levels 140... Eclairs 170 Eclairs, two levels 170 Plate tarts 170 Rich fruit cake 150 Victoria sandwich 160 Preheat the empty oven. 3 (2 and 4) 3 (2 and 4) 2 2 2 2 (min) 45 - 60 20 - 30 60 - ...
User Manual - Page 17

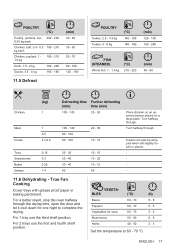
...trays use the third shelf position. ENGLISH 17 Turn halfway through the drying time, open the door and let it cool down for soup 60 - 70 5 - 6 Mushrooms 50 - 60...when still slightly fro‐ zen in places. - - - - 11.6 Dehydrating - For a better result, stop the oven halfway through . Turn halfway through. POULTRY (°C) Poultry, portions, 0.2 - 200 - 220 0.25 kg each Chicken,...
User Manual - Page 20

... cavity after each use and let them dry. Do not store the food in the oven or on the door glass panels. Use a soft cloth with a mild detergent. Accessories 12.2 How to remove: Shelf supports Remove the shelf supports to clean metal surfaces. Fat accumulation or other residue may cause fire. max. (min) 2 - 3 minutes first...
User Manual - Page 21

... away from its seat. Install the shelf supports in the oppo‐ site sequence. 1 2 12.3 How to clean it. You can remove the oven door and the internal glass panel to remove and install: Door The oven door has two glass panels. Step 3 Step 4 Close the oven door halfway to the first opening position. Then lift and pull forward and...
User Manual - Page 22

...cleaning, install the glass panel and the oven door. When installed correctly the door trim clicks. A Always hold the halogen lamp with water and soap. Step 1 Turn off the oven. Before you replace the lamp: Step 2 Step 3 Disconnect the oven... the door glass panel by its top edge and carefully pull it . Do not clean the glass panels in the seats correctly. 12.4 How to remove it out...
User Manual - Page 23

... dealer or an Authorised Service Centre. Do not remove the rating plate from the oven cavity. Contact an Authorised Service Centre. Set the time of cavities Zanussi ZOHCX3K2 949496299 ZOHCX3W2 949496298 ZOHCX3X2 949496297 95.3 A 0.81 kWh/cycle 1 ENGLISH 23 The lamp does not work. The door gasket is on the rating plate. Check if...
User Manual - Page 24

... Recycle materials with fan to save energy during everyday cooking. Do not dispose of oven Mass Electricity 72 l Built-In Oven ZOHCX3K2 ZOHCX3W2 ZOHCX3X2 26.9 kg 26.7 kg 27.0 kg * For European Union according to save energy. EN 60350-1 - Make sure that the oven door is not applicable for measuring performance. 14.2 Energy saving The...
Product information sheet - Page 1

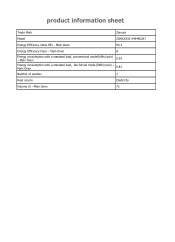
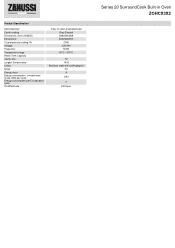
...0.93 Energy consumption with a standard load, conventional mode(kWh/cycle) - Main Oven A Energy consumption with a standard load, Main Oven fan-forced mode (kWh/cycle) - 0.81 Number of cavities 1 Heat source Electricity Volume (l) - product information sheet Trade Mark Zanussi Model ZOHCX3X2 949496297 Energy Efficiency index EEI - Main Oven 95.3 Energy Efficiency Class - Main...
Product information sheet - Page 2

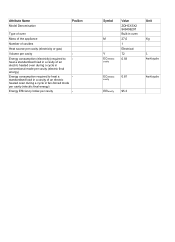
...required to heat a standardised load in a cavity of an electric heated oven during a cycle in fan-forced mode per cavity (electric final energy)... Model Denomination Position Type of oven Mass of the appliance Number of an electric heated oven during a cycle in conventional mode per cavity - Symbol M V ECelectric cavity Value ZOHCX3X2 949496297 Built-in oven 27,0 1 Electrical 72 0.93...
Specification Sheet - Page 1

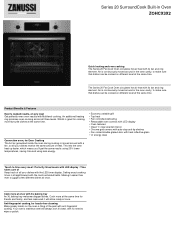
... • Retractable oven controls with LED display • Oven features: • Clean 'n' clear enamel interior • Chrome grid runners with auto-stop anti-tip shelves • Fan cooled double glazed door with heat reflective glass... SurroundCook Built-in Oven ZOHCX3X2 Quick heating and even cooking The Series 20 FanCook Oven circulates hot air heat with its fan and ring element.
Specification Sheet - Page 2

... Cavity size Largest Surface area Colour Noise Energy class Energy consumption, conventional mode, kWh per cycle Energy consumption per EU standard cycle ProdPartCode Easy to clean enamel/pinned Grey Enamel 589x594x568 600x560x550 2790 220-240 50/60 50°C - 275°C 72 1424 Stainless steel with antifingerprint 53 A 0.93 0 ER Open...

Similar Questions

Oven Door Won't Open
I have a Zanussi ZOP37902XK and the oven door will not open . We have 2 ovens the same and only one ...
(Posted by tinakhowell 1 year ago)
The Top Bracket On The Oven Door Has Broken And The Door Keeps Falling Off.
How do I remove it and obtain a new one? Thank you
(Posted by Geoffkelleher14 5 years ago)
Oven Door.
Hi Team,I have an Zanussi Zob 550 xl. (Right hand door handle..) The inner door glass is no longer s...
(Posted by mswaby 7 years ago)
Cannot Move The Locking System On The Oven Door
I have removed the door and cannot see how the locking system can move - in any direction - to remov...
(Posted by entropycity 8 years ago)
Ask a New Question
Use the box below to post a new question about this Zanussi product .
Points & Prizes
  • You can earn points for nearly everything you do on HelpOwl.com
  • You can trade in those points for gift cards at leading retailers such as Amazon.com and Walmart
  • It's that simple!
See How it Works
Create a Free Account

Zanussi Manuals

Find free Zanussi ZOHCX3X2 manuals and user guides available at ManualOwl.com. Try out our unique manual viewer allowing you to interact with manuals from directly within your browser!

Zanussi Reviews

View thousands of Zanussi user reviews and customer ratings available at ReviewOwl.com.

Contact Information

Complete Zanussi customer service contact information including steps to reach representatives, hours of operation, customer support links and more from ContactHelp.com.

Scoreboard Ratings

See detailed Zanussi customer service rankings, employee comments and much more from our sister site.