
User Manual
Page 2
..., trouble shooter, service and repair information: www.zanussi.com/support Subject to change without notice. SAFETY INFORMATION 2 2. PRODUCT DESCRIPTION 8 5. BEFORE FIRST USE...9 7. TROUBLESHOOTING 23 14. USING THE ACCESSORIES 11 10. CARE AND CLEANING 20 13. Children of less than 8 years of the appliance in a safe way and understand the hazards involved. ADDITIONAL FUNCTIONS 13 11. Always keep the instructions in a safe and accessible location...
..., trouble shooter, service and repair information: www.zanussi.com/support Subject to change without notice. SAFETY INFORMATION 2 2. PRODUCT DESCRIPTION 8 5. BEFORE FIRST USE...9 7. TROUBLESHOOTING 23 14. USING THE ACCESSORIES 11 10. CARE AND CLEANING 20 13. Children of less than 8 years of the appliance in a safe way and understand the hazards involved. ADDITIONAL FUNCTIONS 13 11. Always keep the instructions in a safe and accessible location...

User Manual
Page 3
...; If the mains power supply cable is switched off before replacing the lamp to avoid the possibility of electric shock. • Do not use the appliance before installing it in the built-in structure. • Do not use a steam cleaner to avoid an electrical hazard. • To remove the shelf supports first pull the front of the appliance without supervision. 1.2 General Safety •...
...; If the mains power supply cable is switched off before replacing the lamp to avoid the possibility of electric shock. • Do not use the appliance before installing it in the built-in structure. • Do not use a steam cleaner to avoid an electrical hazard. • To remove the shelf supports first pull the front of the appliance without supervision. 1.2 General Safety •...

User Manual
Page 4
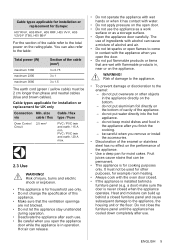
.... • Follow the installation instructions supplied with an electric cooling system. Always pull the mains plug. • Use only correct isolation devices: line protecting cut-outs, fuses (screw type fuses removed from the holder), earth leakage trips and contactors. • The electrical installation must have a contact opening mini‐ mum size. SAFETY INSTRUCTIONS 2.1 Installation WARNING! Cabinet minimum height (Cabinet under the worktop minimum height) Cabinet width Cabinet depth Height of the front...
.... • Follow the installation instructions supplied with an electric cooling system. Always pull the mains plug. • Use only correct isolation devices: line protecting cut-outs, fuses (screw type fuses removed from the holder), earth leakage trips and contactors. • The electrical installation must have a contact opening mini‐ mum size. SAFETY INSTRUCTIONS 2.1 Installation WARNING! Cabinet minimum height (Cabinet under the worktop minimum height) Cabinet width Cabinet depth Height of the front...
User Manual
Page 5
... the floor. It must be careful when you finish the cooking. - Do not close the furniture panel until the appliance has cooled down completely after use the appliance as a work surface or as a storage surface. • Open the appliance door carefully. Cable types applicable for installation or replacement for household use only. • Do not change the specification of damage to the appliance...
... the floor. It must be careful when you finish the cooking. - Do not close the furniture panel until the appliance has cooled down completely after use the appliance as a work surface or as a storage surface. • Open the appliance door carefully. Cable types applicable for installation or replacement for household use only. • Do not change the specification of damage to the appliance...

User Manual
Page 6
... not use abrasive products, abrasive cleaning pads, solvents or metal objects. • If you remove the door from becoming trapped in the appliance. 6 ENGLISH Contact the Authorised Service Centre. • Be careful when you use an oven spray, follow the safety instructions on its packaging. 2.5 Internal lighting WARNING! The door is heavy! • Clean regularly the appliance to signal information about the operational status...
... not use abrasive products, abrasive cleaning pads, solvents or metal objects. • If you remove the door from becoming trapped in the appliance. 6 ENGLISH Contact the Authorised Service Centre. • Be careful when you use an oven spray, follow the safety instructions on its packaging. 2.5 Internal lighting WARNING! The door is heavy! • Clean regularly the appliance to signal information about the operational status...
User Manual
Page 8
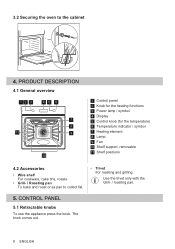
... out. 8 ENGLISH CONTROL PANEL 5.1 Retractable knobs To use the appliance press the knob. PRODUCT DESCRIPTION 4.1 General overview 12 3 45 6 7 5 8 4 11 3 9 2 1 10 1 Control panel 2 Knob for the heating functions 3 Power lamp / symbol 4 Display 5 Control knob (for the temperature) 6 Temperature indicator / symbol 7 Heating element 8 Lamp 9 Fan 10 Shelf support, removable 11 Shelf positions 4.2 Accessories • Wire shelf For cookware, cake tins, roasts. • Grill- / Roasting pan To bake and roast or as pan to the cabinet 4. Use the trivet...
... out. 8 ENGLISH CONTROL PANEL 5.1 Retractable knobs To use the appliance press the knob. PRODUCT DESCRIPTION 4.1 General overview 12 3 45 6 7 5 8 4 11 3 9 2 1 10 1 Control panel 2 Knob for the heating functions 3 Power lamp / symbol 4 Display 5 Control knob (for the temperature) 6 Temperature indicator / symbol 7 Heating element 8 Lamp 9 Fan 10 Shelf support, removable 11 Shelf positions 4.2 Accessories • Wire shelf For cookware, cake tins, roasts. • Grill- / Roasting pan To bake and roast or as pan to the cabinet 4. Use the trivet...

User Manual
Page 9
... and smoke during preheating. Press: . 1. DAILY USE WARNING! To set the time. Step 1 Step 2 Step 3 Set the clock Clean the oven Preheat the empty oven 1. Press: . 3. , - 5.2 Sensor fields / Buttons To set the time. 5.3 Display A B A. Turn off the oven and wait until it is ventilated. ENGLISH 9 Clock functions B. Set the maximum temperature movable shelf supports from the oven. 2. Refer to set the mi‐ nutes. Timer 6. press to Safety chapters. Refer to set a clock function. Make sure...
... and smoke during preheating. Press: . 1. DAILY USE WARNING! To set the time. Step 1 Step 2 Step 3 Set the clock Clean the oven Preheat the empty oven 1. Press: . 3. , - 5.2 Sensor fields / Buttons To set the time. 5.3 Display A B A. Turn off the oven and wait until it is ventilated. ENGLISH 9 Clock functions B. Set the maximum temperature movable shelf supports from the oven. 2. Refer to set the mi‐ nutes. Timer 6. press to Safety chapters. Refer to set a clock function. Make sure...
User Manual
Page 10
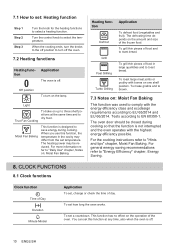
...; fer to turn the knobs to the off . Light True Fan Cooking To bake on : Moist Fan Baking This function was used to comply with bones on the operation of day. CLOCK FUNCTIONS 8.1 Clock functions Clock function Time of Day Duration Minute Minder Application To set, change or check the time of the oven. Tests according to dry food. For general energy saving recommendations refer to select a heating function...
...; fer to turn the knobs to the off . Light True Fan Cooking To bake on : Moist Fan Baking This function was used to comply with bones on the operation of day. CLOCK FUNCTIONS 8.1 Clock functions Clock function Time of Day Duration Minute Minder Application To set, change or check the time of the oven. Tests according to dry food. For general energy saving recommendations refer to select a heating function...

User Manual
Page 11
.... press repeatedly. - After approximately 5 sec., the flashing stops and the display shows the time. - The signal sounds and the oven turns off position. press to set : Duration Step 1 Set an oven function and the temperature. Step 3 Press any button to stop the signal. How to flash. The clock function turns off position. Step 2 , - press repeatedly to change : Time of Day - Step 2 - press repeatedly until the...
.... press repeatedly. - After approximately 5 sec., the flashing stops and the display shows the time. - The signal sounds and the oven turns off position. press to set : Duration Step 1 Set an oven function and the temperature. Step 3 Press any button to stop the signal. How to flash. The clock function turns off position. Step 2 , - press repeatedly to change : Time of Day - Step 2 - press repeatedly until the...

User Manual
Page 13
... system you use this appliance. 11.2 Baking and roasting Use the function: True Fan Cooking. To prevent the smoke condensation, add water each time after it dries up . ENGLISH 13 With this , the oven has a safety thermostat which circulates the air and constantly recycles the steam. Baking cakes Do not open the oven door before 3/4 of the wire shelf point up . Find the best settings (heat setting, cooking time, etc.) for...
... system you use this appliance. 11.2 Baking and roasting Use the function: True Fan Cooking. To prevent the smoke condensation, add water each time after it dries up . ENGLISH 13 With this , the oven has a safety thermostat which circulates the air and constantly recycles the steam. Baking cakes Do not open the oven door before 3/4 of the wire shelf point up . Find the best settings (heat setting, cooking time, etc.) for...
User Manual
Page 15
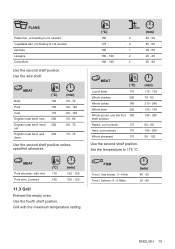
....3 Grill Preheat the empty oven. FLANS Pasta flan, preheating is not needed Vegetable flan, preheating is not needed Quiches Lasagne Cannelloni Use the second shelf position. Use the wire shelf. FISH Trout / Sea bream, 3 - 4 fish Tuna / Salmon, 4 - 6 fillets (min) 40 - 55 35 - 60 ENGLISH 15 Set the temperature to 175... 180 - 190 2 25 - 40 MEAT (°C) Leg of lamb 175 Whole chicken 200 Whole turkey 160 Whole duck 220 Whole goose, use the first 160 shelf position Rabbit, cut in pieces 175 Hare, cut in pieces 175 Whole pheasant 175 Use the second shelf position.
....3 Grill Preheat the empty oven. FLANS Pasta flan, preheating is not needed Vegetable flan, preheating is not needed Quiches Lasagne Cannelloni Use the second shelf position. Use the wire shelf. FISH Trout / Sea bream, 3 - 4 fish Tuna / Salmon, 4 - 6 fillets (min) 40 - 55 35 - 60 ENGLISH 15 Set the temperature to 175... 180 - 190 2 25 - 40 MEAT (°C) Leg of lamb 175 Whole chicken 200 Whole turkey 160 Whole duck 220 Whole goose, use the first 160 shelf position Rabbit, cut in pieces 175 Hare, cut in pieces 175 Whole pheasant 175 Use the second shelf position.
User Manual
Page 17
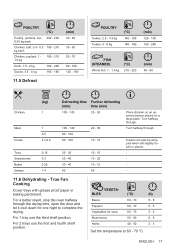
True Fan Cooking Cover trays with grease proof paper or baking parchment....STEAMED) Whole fish, 1 - 1.5 kg (°C) 210 - 220 (min) 40 - 60 Chicken Meat Cream Trout Strawberries Butter Gateau (kg) 1 1 0.5 2 x 0.2 0.15 0.3 0.25 1.4 Defrosting time (min) 100 - 140 Further defrosting time...turned saucer placed on a large plate. Turn halfway through . For a better result, stop the oven halfway through the drying time, open the door and let it cool down for soup 60 - 70 5 - 6 Mushrooms 50 - 60 6 - 8 Herbs 40 - 50 2 - 3 Set the temperature to complete the drying. For 1 tray use...
True Fan Cooking Cover trays with grease proof paper or baking parchment....STEAMED) Whole fish, 1 - 1.5 kg (°C) 210 - 220 (min) 40 - 60 Chicken Meat Cream Trout Strawberries Butter Gateau (kg) 1 1 0.5 2 x 0.2 0.15 0.3 0.25 1.4 Defrosting time (min) 100 - 140 Further defrosting time...turned saucer placed on a large plate. Turn halfway through . For a better result, stop the oven halfway through the drying time, open the door and let it cool down for soup 60 - 70 5 - 6 Mushrooms 50 - 60 6 - 8 Herbs 40 - 50 2 - 3 Set the temperature to complete the drying. For 1 tray use...
User Manual
Page 18
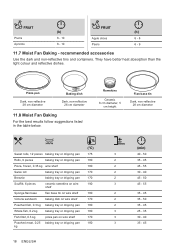
... fish, 0.3 kg baking tray or dripping pan 180 2 35 - 45 Whole fish, 0.2 kg baking tray or dripping pan 180 3 25 - 35 Fish fillet, 0.3 kg pizza pan on wire shelf 170 3 30 - 40 Poached meat, 0.25 baking tray or dripping pan 180 kg 3 35 - 45 18 ENGLISH FRUIT Plums Apricots (h) 8 - 10 8 - 10 FRUIT (h) Apple slices 6 - 8 Pears 6 - 9 11.7 Moist Fan Baking - recommended accessories Use the dark and...
... fish, 0.3 kg baking tray or dripping pan 180 2 35 - 45 Whole fish, 0.2 kg baking tray or dripping pan 180 3 25 - 35 Fish fillet, 0.3 kg pizza pan on wire shelf 170 3 30 - 40 Poached meat, 0.25 baking tray or dripping pan 180 kg 3 35 - 45 18 ENGLISH FRUIT Plums Apricots (h) 8 - 10 8 - 10 FRUIT (h) Apple slices 6 - 8 Pears 6 - 9 11.7 Moist Fan Baking - recommended accessories Use the dark and...

User Manual
Page 20
... door glass panels. Dry the cavity with warm water and a mild detergent. Do not store the food in a dishwasher. Do not clean the non-stick accessories using abrasive cleaner or sharp-edged objects. Turn the food halfway through the cooking time. Toast, 4 - 6 Grill pieces Beef burger, Grill 6 pieces, 0.6 kg Wire shelf 4 Wire shelf 4 and dripping pan (°C) max. max. (min) 2 - 3 minutes first Preheat...
... door glass panels. Dry the cavity with warm water and a mild detergent. Do not store the food in a dishwasher. Do not clean the non-stick accessories using abrasive cleaner or sharp-edged objects. Turn the food halfway through the cooking time. Toast, 4 - 6 Grill pieces Beef burger, Grill 6 pieces, 0.6 kg Wire shelf 4 Wire shelf 4 and dripping pan (°C) max. max. (min) 2 - 3 minutes first Preheat...

User Manual
Page 21
... not use the oven without the glass panels. Step 1 Step 2 Open the door fully and hold both hinges. Then lift and pull forward and remove the door from the side wall. Install the shelf supports in the oppo‐ site sequence. 1 2 12.3 How to clean it is cold. You can remove the oven door and the internal glass panel to remove and install: Door The oven door has two glass panels. Step 3 Step 4 Close the oven door...
... not use the oven without the glass panels. Step 1 Step 2 Open the door fully and hold both hinges. Then lift and pull forward and remove the door from the side wall. Install the shelf supports in the oppo‐ site sequence. 1 2 12.3 How to clean it is cold. You can remove the oven door and the internal glass panel to remove and install: Door The oven door has two glass panels. Step 3 Step 4 Close the oven door...

User Manual
Page 22
... to re‐ lease the clip seal. When installed correctly the door trim clicks. Make sure the glass 2 slides out of electric shock. A Always hold the halogen lamp with water and soap. Step 7 Hold the door glass panel by its top edge and carefully pull it . Do not clean the glass panels in the seats correctly. 12.4 How to remove it. Dry the glass panels carefully.
... to re‐ lease the clip seal. When installed correctly the door trim clicks. Make sure the glass 2 slides out of electric shock. A Always hold the halogen lamp with water and soap. Step 7 Hold the door glass panel by its top edge and carefully pull it . Do not clean the glass panels in the seats correctly. 12.4 How to remove it. Dry the glass panels carefully.

User Manual
Page 23
... mode Number of cavities Zanussi ZOHCX3K2 949496299 ZOHCX3W2 949496298 ZOHCX3X2 949496297 95.3 A 0.81 kWh/cycle 1 ENGLISH 23 The fuse is burnt out. 13.2 Service data If you write the data here: Model (MOD.) Product number (PNC) Serial number (S.N.) ... 14. The display shows "12.00". Set the time of the oven cavity. Check if... Do not use the oven. The lamp is blown. The rating plate is on the rating plate. Install the glass cover...
... mode Number of cavities Zanussi ZOHCX3K2 949496299 ZOHCX3W2 949496298 ZOHCX3X2 949496297 95.3 A 0.81 kWh/cycle 1 ENGLISH 23 The fuse is burnt out. 13.2 Service data If you write the data here: Model (MOD.) Product number (PNC) Serial number (S.N.) ... 14. The display shows "12.00". Set the time of the oven cavity. Check if... Do not use the oven. The lamp is blown. The rating plate is on the rating plate. Install the glass cover...

User Manual
Page 24
... Fan Baking Function designed to 568/32020. Heat source Volume Type of oven Mass Electricity 72 l Built-In Oven ZOHCX3K2 ZOHCX3W2 ZOHCX3X2 26.9 kg 26.7 kg 27.0 kg * For European Union according to save energy. Methods for Russia. Do not open the oven door too often during everyday cooking. Cooking with fan When possible, use residual heat and keep a meal warm. For Republic of cooking. Keep breaks between baking...
... Fan Baking Function designed to 568/32020. Heat source Volume Type of oven Mass Electricity 72 l Built-In Oven ZOHCX3K2 ZOHCX3W2 ZOHCX3X2 26.9 kg 26.7 kg 27.0 kg * For European Union according to save energy. Methods for Russia. Do not open the oven door too often during everyday cooking. Cooking with fan When possible, use residual heat and keep a meal warm. For Republic of cooking. Keep breaks between baking...
Product information sheet
Page 1
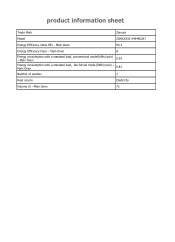
Main Oven 95.3 Energy Efficiency Class - product information sheet Trade Mark Zanussi Model ZOHCX3X2 949496297 Energy Efficiency index EEI - Main Oven 72 Main Oven 0.93 Energy consumption with a standard load, conventional mode(kWh/cycle) - Main Oven A Energy consumption with a standard load, Main Oven fan-forced mode (kWh/cycle) - 0.81 Number of cavities 1 Heat source Electricity Volume (l) -
Main Oven 95.3 Energy Efficiency Class - product information sheet Trade Mark Zanussi Model ZOHCX3X2 949496297 Energy Efficiency index EEI - Main Oven 72 Main Oven 0.93 Energy consumption with a standard load, conventional mode(kWh/cycle) - Main Oven A Energy consumption with a standard load, Main Oven fan-forced mode (kWh/cycle) - 0.81 Number of cavities 1 Heat source Electricity Volume (l) -
Specification Sheet
Page 1
... means you'll get the same results using 20% lower temperatures, saving time and using less energy. • Economy variable grill • Top heat • Fan controlled defrosting • Retractable oven controls with LED display • Oven features: • Clean 'n' clear enamel interior • Chrome grid runners with auto-stop anti-tip shelves • Fan cooled double glazed door with heat reflective glass • 'A' energy class Touch to juggle a few...
... means you'll get the same results using 20% lower temperatures, saving time and using less energy. • Economy variable grill • Top heat • Fan controlled defrosting • Retractable oven controls with LED display • Oven features: • Clean 'n' clear enamel interior • Chrome grid runners with auto-stop anti-tip shelves • Fan cooled double glazed door with heat reflective glass • 'A' energy class Touch to juggle a few...


