

User Manual
Page 7
... 3 Access to the Network Camera 13 3.1 Accessing by Web Browsers 13 3.2 Accessing by Client Software 14 Chapter 4 Wi-Fi Settings 16 4.1 Configuring Wi-Fi Connection in Manage and Ad-hoc Modes 16 4.2 Easy Wi-Fi Connection with WPS function 21 4.3 IP Property Settings for Wireless Network Connection 23 Chapter 5 Live View 25 5.1 Live View Page 25 5.2 Starting Live View 26 5.3 Recording and Capturing Pictures Manually 27 5.4 Operating PTZ Control 27 5.4.1 PTZ Control Panel...27 5.4.2 Setting/Calling a Preset 28 5.4.3 Setting/Calling a Patrol 29 Chapter 6 Network Camera Configuration...
... 3 Access to the Network Camera 13 3.1 Accessing by Web Browsers 13 3.2 Accessing by Client Software 14 Chapter 4 Wi-Fi Settings 16 4.1 Configuring Wi-Fi Connection in Manage and Ad-hoc Modes 16 4.2 Easy Wi-Fi Connection with WPS function 21 4.3 IP Property Settings for Wireless Network Connection 23 Chapter 5 Live View 25 5.1 Live View Page 25 5.2 Starting Live View 26 5.3 Recording and Capturing Pictures Manually 27 5.4 Operating PTZ Control 27 5.4.1 PTZ Control Panel...27 5.4.2 Setting/Calling a Preset 28 5.4.3 Setting/Calling a Patrol 29 Chapter 6 Network Camera Configuration...
User Manual
Page 15
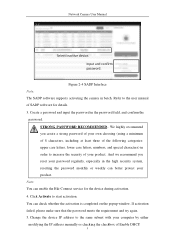
... window. Change the device IP address to the user manual of Enable DHCP. 5 STRONG PASSWORD RECOMMENDED- Click Activate to increase the security of your computer by either modifying the IP address manually or checking the checkbox of SADP software for the device during activation. 4. We highly recommend you reset your product. Network Camera User Manual Select inactive device. Figure 2-4 SADP Interface Note: The SADP software supports activating the camera...
... window. Change the device IP address to the user manual of Enable DHCP. 5 STRONG PASSWORD RECOMMENDED- Click Activate to increase the security of your computer by either modifying the IP address manually or checking the checkbox of SADP software for the device during activation. 4. We highly recommend you reset your product. Network Camera User Manual Select inactive device. Figure 2-4 SADP Interface Note: The SADP software supports activating the camera...
User Manual
Page 24
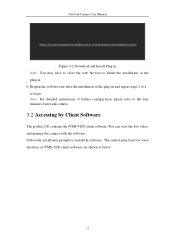
... live video and manage the camera with the software. Reopen the web browser after the installation of the plug-in and repeat steps 2 to 4 to install the software. Follow the installation prompts to login. Note: For detailed instructions of further configuration, please refer to finish the installation of the plug-in. 6. Network Camera User Manual Figure 3-2 Download and Install Plug-in Note: You may have to close the web browser to the user manual of network camera. 3.2 Accessing by Client Software...
... live video and manage the camera with the software. Reopen the web browser after the installation of the plug-in and repeat steps 2 to 4 to install the software. Follow the installation prompts to login. Note: For detailed instructions of further configuration, please refer to finish the installation of the plug-in. 6. Network Camera User Manual Figure 3-2 Download and Install Plug-in Note: You may have to close the web browser to the user manual of network camera. 3.2 Accessing by Client Software...

User Manual
Page 31
... PIN mode. Note: If you enable the WPS function, you do not need to configure the parameters such as the encryption type and you can enable the WPS function. WPS (Wi-Fi Protected Setup) refers to know the key of the wireless connection. Network Camera User Manual strongly recommend the use of strong passwords for all passwords and other security settings is the responsibility of the installer and...
... PIN mode. Note: If you enable the WPS function, you do not need to configure the parameters such as the encryption type and you can enable the WPS function. WPS (Wi-Fi Protected Setup) refers to know the key of the wireless connection. Network Camera User Manual strongly recommend the use of strong passwords for all passwords and other security settings is the responsibility of the installer and...
User Manual
Page 37
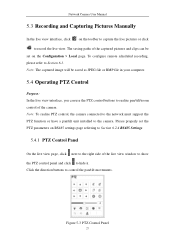
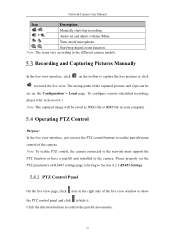
... PTZ control, the camera connected to the network must support the PTZ function or have a pan/tilt unit installed to Section 6.1. Figure 5-3 PTZ Control Panel 27 To configure remote scheduled recording, please refer to the camera. Click the direction buttons to record the live view. Note: The captured image will be saved as JPEG file or BMP file in your computer. 5.4 Operating PTZ Control Purpose: In the live view interface, you can be set the PTZ parameters on the Configuration...
... PTZ control, the camera connected to the network must support the PTZ function or have a pan/tilt unit installed to Section 6.1. Figure 5-3 PTZ Control Panel 27 To configure remote scheduled recording, please refer to the camera. Click the direction buttons to record the live view. Note: The captured image will be saved as JPEG file or BMP file in your computer. 5.4 Operating PTZ Control Purpose: In the live view interface, you can be set the PTZ parameters on the Configuration...
User Manual
Page 53
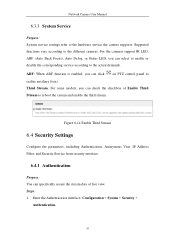
... function is enabled, you can click on PTZ control panel to reboot the system and enable the third stream. Enter the Authentication interface: Configuration > System > Security > Authentication. 43 For the cameras support IR LED, ABF (Auto Back Focus), Auto Defog, or Status LED, you can specifically secure the stream data of Enable Third Stream to realize auxiliary focus. Supported functions vary according to the hardware service the camera supports. Network Camera User Manual 6.3.3 System Service Purpose: System service settings refer to...
... function is enabled, you can click on PTZ control panel to reboot the system and enable the third stream. Enter the Authentication interface: Configuration > System > Security > Authentication. 43 For the cameras support IR LED, ABF (Auto Back Focus), Auto Defog, or Status LED, you can specifically secure the stream data of Enable Third Stream to realize auxiliary focus. Supported functions vary according to the hardware service the camera supports. Network Camera User Manual 6.3.3 System Service Purpose: System service settings refer to...

User Manual
Page 67
... need to use of the SNMP software. By setting the Trap Address, the camera can set the SNMP function to get camera status, parameters and alarm related information, and manage the camera remotely when it is the responsibility of the installer and/or end-user. SNMP v1 provides no security and SNMP v2 requires password for all passwords and other security settings is connected to receive the camera information via SNMP port...
... need to use of the SNMP software. By setting the Trap Address, the camera can set the SNMP function to get camera status, parameters and alarm related information, and manage the camera remotely when it is the responsibility of the installer and/or end-user. SNMP v1 provides no security and SNMP v2 requires password for all passwords and other security settings is connected to receive the camera information via SNMP port...

User Manual
Page 74
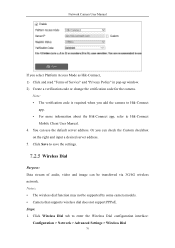
... settings. 7.2.5 Wireless Dial Purpose: Data stream of Service" and "Privacy Policy" in pop-up window. 2) Create a verification code or change the verification code for the camera. Click Wireless Dial tab to Hik-Connect Mobile Client User Manual. 4. Notes: • The wireless dial function may not be transferred via 3G/4G wireless network. Network Camera User Manual If you select Platform Access Mode as Hik-Connect, 1) Click and read "Terms of audio, video and image can be supported...
... settings. 7.2.5 Wireless Dial Purpose: Data stream of Service" and "Privacy Policy" in pop-up window. 2) Create a verification code or change the verification code for the camera. Click Wireless Dial tab to Hik-Connect Mobile Client User Manual. 4. Notes: • The wireless dial function may not be transferred via 3G/4G wireless network. Network Camera User Manual If you select Platform Access Mode as Hik-Connect, 1) Click and read "Terms of audio, video and image can be supported...
User Manual
Page 75
... to send a message to set the arming schedule if Auto is selected, you can set the offline time and manual dialing parameters. 2) Set the access number, user name, password, APN, MTU and verification protocol. iv.(Optional) You can also manually connect / disconnect the wireless network. 5. 5.Set the white list. If Manual is selected as the dial mode. 5) Input the UIM Number (Mobile Phone Number). 6) Click the Edit button to 65 Note: To reboot...
... to send a message to set the arming schedule if Auto is selected, you can set the offline time and manual dialing parameters. 2) Set the access number, user name, password, APN, MTU and verification protocol. iv.(Optional) You can also manually connect / disconnect the wireless network. 5. 5.Set the white list. If Manual is selected as the dial mode. 5) Input the UIM Number (Mobile Phone Number). 6) Click the Edit button to 65 Note: To reboot...

User Manual
Page 157
... add the network disk. 2. Network Camera User Manual responsibility of the installer and/or end-user. (4) Click Save to start initializing the disk. Initialize the added network disk. (1) Enter the HDD Settings interface, Configuration > Storage > Storage Management > HDD Management, in which you can view the capacity, free space, status, type and property of disk will become Normal. Figure 11-8 View Disk Status 3. Define the quota for record...
... add the network disk. 2. Network Camera User Manual responsibility of the installer and/or end-user. (4) Click Save to start initializing the disk. Initialize the added network disk. (1) Enter the HDD Settings interface, Configuration > Storage > Storage Management > HDD Management, in which you can view the capacity, free space, status, type and property of disk will become Normal. Figure 11-8 View Disk Status 3. Define the quota for record...

Quick Start Guide
Page 5
... the camera and the mount. The IR light from the device, immediately turn off the power, unplug the power cable, and contact the service center. Do not expose the device to the time settings interface. Visit the camera via Web browser/client software and go to high electromagnetic radiation or dusty environments. Make sure that the wall is 12 VDC, please make sure your camera. QSG DS-2CDx1xxG0...
... the camera and the mount. The IR light from the device, immediately turn off the power, unplug the power cable, and contact the service center. Do not expose the device to the time settings interface. Visit the camera via Web browser/client software and go to high electromagnetic radiation or dusty environments. Make sure that the wall is 12 VDC, please make sure your camera. QSG DS-2CDx1xxG0...

User Manual
Page 20
... connect the network camera via a router Steps: 1. Static IP Connection Before you can go to User Management interface to reset the admin password when admin user forgets the password. Please call the router manufacturer for detailed information about port mapping. 19 Network Camera User Manual (Optional) Setting Security Question Security question is used to set up window to the WAN directly. Connecting the network camera via a router or connect it to complete security question settings during camera activation. Connect the network camera to the router. 2. Set port...
... connect the network camera via a router Steps: 1. Static IP Connection Before you can go to User Management interface to reset the admin password when admin user forgets the password. Please call the router manufacturer for detailed information about port mapping. 19 Network Camera User Manual (Optional) Setting Security Question Security question is used to set up window to the WAN directly. Connecting the network camera via a router or connect it to complete security question settings during camera activation. Connect the network camera to the router. 2. Set port...
User Manual
Page 38
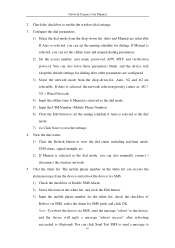
... PTZ control, the camera connected to the network must support the PTZ function or have a pan/tilt unit installed to control the pan/tilt movements. 37 Click the direction buttons to the camera. Recording and Capturing Pictures Manually In the live view interface, click on the Configuration > Local page. Please properly set on the toolbar to capture the live view. Network Camera User Manual Icon Description / Manually start/stop recording. / Audio on and adjust volume /Mute. / Turn on RS485 settings page referring to record the live...
... PTZ control, the camera connected to the network must support the PTZ function or have a pan/tilt unit installed to control the pan/tilt movements. 37 Click the direction buttons to the camera. Recording and Capturing Pictures Manually In the live view interface, click on the Configuration > Local page. Please properly set on the toolbar to capture the live view. Network Camera User Manual Icon Description / Manually start/stop recording. / Audio on and adjust volume /Mute. / Turn on RS485 settings page referring to record the live...
User Manual
Page 44
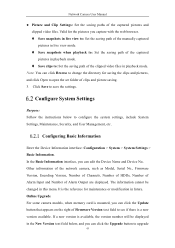
... in live view mode. Save snapshots when playback to: Set the saving path of the captured pictures in future. Online Upgrade For some camera models, when memory card is available, the version number will be changed in the New Version text field below to upgrade 43 In the Basic Information interface, you can click the Update button that appears on the right of Alarm Output are displayed...
... in live view mode. Save snapshots when playback to: Set the saving path of the captured pictures in future. Online Upgrade For some camera models, when memory card is available, the version number will be changed in the New Version text field below to upgrade 43 In the Basic Information interface, you can click the Update button that appears on the right of Alarm Output are displayed...

User Manual
Page 52
... default settings, the IP address is also restored to the default IP address, please be careful for this action. • For camera that applies to default, export/import the configuration files, and upgrade the device. The 51 For the exported file, you to process the operations, including reboot, partly restore, restore to the IP camera can be supported by some camera models. This operation requires admin password to create an encryption password. Network Camera User Manual...
... default settings, the IP address is also restored to the default IP address, please be careful for this action. • For camera that applies to default, export/import the configuration files, and upgrade the device. The 51 For the exported file, you to process the operations, including reboot, partly restore, restore to the IP camera can be supported by some camera models. This operation requires admin password to create an encryption password. Network Camera User Manual...

User Manual
Page 69
... router manually. 5. Note: If you select Auto, you start: Before setting the SNMP, please download the SNMP software and manage to use the third version, HTTPS protocol must be the same as that of the external port and complete port mapping settings on the router. Configure Advanced Settings Purpose: You can use the default name. 4. SNMP v1 provides no security and SNMP v2 requires password for the camera, or you use...
... router manually. 5. Note: If you select Auto, you start: Before setting the SNMP, please download the SNMP software and manage to use the third version, HTTPS protocol must be the same as that of the external port and complete port mapping settings on the router. Configure Advanced Settings Purpose: You can use the default name. 4. SNMP v1 provides no security and SNMP v2 requires password for the camera, or you use...
User Manual
Page 77
... can be supported by some camera models. • Camera that supports wireless dial does not support PPPoE. Network Camera User Manual If you can check the Custom checkbox on the right and input a desired server address. 5. Or you select Platform Access Mode as Hik-Connect, 1) Click and read "Terms of audio, video and image can use the default server address. Note: • The verification code is required when you add the camera to Hik-Connect app. • For...
... can be supported by some camera models. • Camera that supports wireless dial does not support PPPoE. Network Camera User Manual If you can check the Custom checkbox on the right and input a desired server address. 5. Or you select Platform Access Mode as Hik-Connect, 1) Click and read "Terms of audio, video and image can use the default server address. Note: • The verification code is required when you add the camera to Hik-Connect app. • For...

User Manual
Page 165
... end-user. (4) Click Save to activate the settings. 164 When the initialization completed, the status of the disk. View Disk Status 3. Define the quota for record and pictures. (1) Input the quota percentage for picture and for record. (2) Click Save and refresh the browser page to add the network disk. 2. Initialize the added network disk. (1) Enter the HDD Settings interface, Configuration > Storage > Storage Management...
... end-user. (4) Click Save to activate the settings. 164 When the initialization completed, the status of the disk. View Disk Status 3. Define the quota for record and pictures. (1) Input the quota percentage for picture and for record. (2) Click Save and refresh the browser page to add the network disk. 2. Initialize the added network disk. (1) Enter the HDD Settings interface, Configuration > Storage > Storage Management...
Quick Start Guide
Page 46
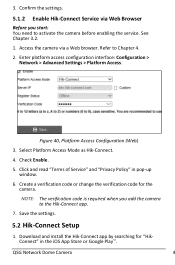
... Access Configuration (Web) 3. Check Enable. 5. Click and read "Terms of Service" and "Privacy Policy" in the iOS App Store or Google Play. NOTE: The verification code is required when you start: You need to activate the camera before enabling the service. Refer to the Hik-Connect app. 7. Select Platform Access Mode as Hik-Connect. 4. 3. QSG Network Dome Camera 4 Access the camera via Web Browser Before you add the camera to Chapter 4. 2. Confirm the settings. 5.1.2 Enable Hik-Connect Service...
... Access Configuration (Web) 3. Check Enable. 5. Click and read "Terms of Service" and "Privacy Policy" in the iOS App Store or Google Play. NOTE: The verification code is required when you start: You need to activate the camera before enabling the service. Refer to the Hik-Connect app. 7. Select Platform Access Mode as Hik-Connect. 4. 3. QSG Network Dome Camera 4 Access the camera via Web Browser Before you add the camera to Chapter 4. 2. Confirm the settings. 5.1.2 Enable Hik-Connect Service...

Data Sheet
Page 2
... DNR Image Setting Rotate mode, saturation, brightness, contrast, sharpness adjustable by client software or Web browser Target Cropping No Day/Night Switch Day/night/auto/schedule Network Network Storage Supports microSD/SDHC/SDXC card (128 GB), local storage, NAS (NFS,SMB/CIFS), and ANR Alarm Trigger Motion detection, video tampering, network disconnected, IP address conflict, illegal login, HDD full, HDD error Protocols TCP/IP, ICMP, HTTP, HTTPS, FTP, DHCP, DNS, DDNS, RTP, RTSP, RTCP, PPPoE, NTP, UPnP™, SMTP, SNMP...
... DNR Image Setting Rotate mode, saturation, brightness, contrast, sharpness adjustable by client software or Web browser Target Cropping No Day/Night Switch Day/night/auto/schedule Network Network Storage Supports microSD/SDHC/SDXC card (128 GB), local storage, NAS (NFS,SMB/CIFS), and ANR Alarm Trigger Motion detection, video tampering, network disconnected, IP address conflict, illegal login, HDD full, HDD error Protocols TCP/IP, ICMP, HTTP, HTTPS, FTP, DHCP, DNS, DDNS, RTP, RTSP, RTCP, PPPoE, NTP, UPnP™, SMTP, SNMP...
