
Quick Start Guide
Page 19
... to an IT power Set up device time manually for problems caused by users who have assume any responsibility for the first time access if distribution system. DO NOT aim the lens at operating light source. A few device applied to the location and about the reasons for password and that components (e.g., electrolytic capacitor) require shall be Cleaning securely attached to the instructions in original...
... to an IT power Set up device time manually for problems caused by users who have assume any responsibility for the first time access if distribution system. DO NOT aim the lens at operating light source. A few device applied to the location and about the reasons for password and that components (e.g., electrolytic capacitor) require shall be Cleaning securely attached to the instructions in original...

User Manual
Page 8
... is intended for installation in a restricted access location, access can be hot and should not be securely attached to the floor/wall in accordance with , or generates direct current. vii Installation ● Install the equipment according to the instructions in an unstable location. Hot Surface Prevention ● CAUTION: Hot parts! Burned fingers when handling the parts. Network Camera User Manual ● Improper replacement of the...
... is intended for installation in a restricted access location, access can be hot and should not be securely attached to the floor/wall in accordance with , or generates direct current. vii Installation ● Install the equipment according to the instructions in an unstable location. Hot Surface Prevention ● CAUTION: Hot parts! Burned fingers when handling the parts. Network Camera User Manual ● Improper replacement of the...

User Manual
Page 9
.... Maintenance ● If the product does not work properly, please contact your dealer for password and security configuration. The average lifespan varies, so periodic checking is not exposed to the laser beam, or it . Network Camera User Manual White Light Illuminator (If supported) ● Possibly hazardous optical radiation emitted from the device, immediately turn on the white light when you assemble, install or maintain the...
.... Maintenance ● If the product does not work properly, please contact your dealer for password and security configuration. The average lifespan varies, so periodic checking is not exposed to the laser beam, or it . Network Camera User Manual White Light Illuminator (If supported) ● Possibly hazardous optical radiation emitted from the device, immediately turn on the white light when you assemble, install or maintain the...

User Manual
Page 11
Network Camera User Manual Contents Chapter 1 System Requirement 1 Chapter 2 Device Activation and Accessing 2 2.1 Activate the Device via SADP 2 2.2 Activate the Device via Browser 2 2.3 Login ...3 2.3.1 Plug-in Installation ...3 2.3.2 Admin Password Recovery 4 2.3.3 Illegal Login Lock ...5 Chapter 3 Live View ...6 3.1 Live View Parameters ...6 3.1.1 Start and Stop Live View 6 3.1.2 Aspect Ratio ...6 3.1.3 Live View Stream Type 6 3.1.4 Select the Third-Party Plug-in 6 3.1.5 Light ...7 3.1.6 Count Pixel ...7 3.1.7 Start Digital Zoom ...7 3.1.8 Auxiliary Focus ...7 3.1.9 Lens ...
Network Camera User Manual Contents Chapter 1 System Requirement 1 Chapter 2 Device Activation and Accessing 2 2.1 Activate the Device via SADP 2 2.2 Activate the Device via Browser 2 2.3 Login ...3 2.3.1 Plug-in Installation ...3 2.3.2 Admin Password Recovery 4 2.3.3 Illegal Login Lock ...5 Chapter 3 Live View ...6 3.1 Live View Parameters ...6 3.1.1 Start and Stop Live View 6 3.1.2 Aspect Ratio ...6 3.1.3 Live View Stream Type 6 3.1.4 Select the Third-Party Plug-in 6 3.1.5 Light ...7 3.1.6 Count Pixel ...7 3.1.7 Start Digital Zoom ...7 3.1.8 Auxiliary Focus ...7 3.1.9 Lens ...

User Manual
Page 13
... Configuration ...34 5.3.1 Capture Automatically 34 5.3.2 Capture Manually ...34 5.3.3 View and Download Picture 35 Chapter 6 Event and Alarm ...36 6.1 Set Motion Detection ...36 6.1.1 Expert Mode ...36 6.1.2 Normal Mode ...37 6.2 Set Video Tampering Alarm 38 6.3 Set Alarm Input ...39 6.4 Set Exception Alarm ...39 6.5 Set Audio Exception Detection 40 Chapter 7 Arming Schedule and Alarm Linkage 41 7.1 Set Arming Schedule ...41 7.2 Linkage Method Settings ...41 7.2.1 Trigger Alarm Output 42 7.2.2 FTP/NAS/Memory Card Uploading 43 7.2.3 Send Email ...43 7.2.4 Notify Surveillance Center...
... Configuration ...34 5.3.1 Capture Automatically 34 5.3.2 Capture Manually ...34 5.3.3 View and Download Picture 35 Chapter 6 Event and Alarm ...36 6.1 Set Motion Detection ...36 6.1.1 Expert Mode ...36 6.1.2 Normal Mode ...37 6.2 Set Video Tampering Alarm 38 6.3 Set Alarm Input ...39 6.4 Set Exception Alarm ...39 6.5 Set Audio Exception Detection 40 Chapter 7 Arming Schedule and Alarm Linkage 41 7.1 Set Arming Schedule ...41 7.2 Linkage Method Settings ...41 7.2.1 Trigger Alarm Output 42 7.2.2 FTP/NAS/Memory Card Uploading 43 7.2.3 Send Email ...43 7.2.4 Notify Surveillance Center...

User Manual
Page 15
Network Camera User Manual 9.1 System Settings ...60 9.1.1 View Device Information 60 9.1.2 Time and Date ...60 9.1.3 Set RS-232 ...61 9.1.4 Set RS-485 ...62 9.1.5 Set Live View Connection 62 9.1.6 Location Settings ...62 9.1.7 View Open Source Software License 63 9.2 User and Account ...63 9.2.1 Set User Account and Permission 63 9.2.2 Simultaneous Login ...64 9.2.3 Online Users ...64 9.3 Maintenance ...64 9.3.1 Restart ...64 9.3.2 Upgrade ...64 9.3.3 Restore and Default ...65 9.3.4 Import and Export Configuration File 65 9.3.5 Search and Manage Log 65 9.3.6 Search Security Audit...
Network Camera User Manual 9.1 System Settings ...60 9.1.1 View Device Information 60 9.1.2 Time and Date ...60 9.1.3 Set RS-232 ...61 9.1.4 Set RS-485 ...62 9.1.5 Set Live View Connection 62 9.1.6 Location Settings ...62 9.1.7 View Open Source Software License 63 9.2 User and Account ...63 9.2.1 Set User Account and Permission 63 9.2.2 Simultaneous Login ...64 9.2.3 Online Users ...64 9.3 Maintenance ...64 9.3.1 Restart ...64 9.3.2 Upgrade ...64 9.3.3 Restore and Default ...65 9.3.4 Import and Export Configuration File 65 9.3.5 Search and Manage Log 65 9.3.6 Search Security Audit...

User Manual
Page 19
... password regularly, especially in Installation Certain operation systems and web browser may restrict the display and operation of the camera function. Click OK. 6. Input the activation password to log in or complete certain settings to 192.168.1.253 (except 192.168.1.64). You should install plug-in to ● Google Chrome 57 and complete plug-in installation is 192.168.1.64. Operating System Windows Mac OS Web Browser Operation ● Internet Explorer...
... password regularly, especially in Installation Certain operation systems and web browser may restrict the display and operation of the camera function. Click OK. 6. Input the activation password to log in or complete certain settings to 192.168.1.253 (except 192.168.1.64). You should install plug-in to ● Google Chrome 57 and complete plug-in installation is 192.168.1.64. Operating System Windows Mac OS Web Browser Operation ● Internet Explorer...

User Manual
Page 20
... to Configuration → System → User Management , click Account Security Settings, select the security question and input your email address to reset the password, make sure that the device and the PC are on the login page after completing the account security settings. Network Camera User Manual Operating System Web Browser Operation Go to Configuration → Network → Network Service → WebSocket(s) to Configuration → System → User Management , click Account Security Settings, input your answer. Display and operation of...
... to Configuration → System → User Management , click Account Security Settings, select the security question and input your email address to reset the password, make sure that the device and the PC are on the login page after completing the account security settings. Network Camera User Manual Operating System Web Browser Operation Go to Configuration → Network → Network Service → WebSocket(s) to Configuration → System → User Management , click Account Security Settings, input your answer. Display and operation of...

User Manual
Page 43
.... Select the memory card. Click Status Detection to unlock the memory card first. Verify the encryption password. 1) Click Parity. 2) Enter the encryption password. 3) Click OK. Network Camera User Manual 6. Steps 1. Note If an Unlock button appears, you still want to use this memory card, see Set New or Unencrypted Memory Card to Encrypted, the memory card is detected abnormal. Optional: Define the Quota of Hikvision memory card. Steps 1.
.... Select the memory card. Click Status Detection to unlock the memory card first. Verify the encryption password. 1) Click Parity. 2) Enter the encryption password. 3) Click OK. Network Camera User Manual 6. Steps 1. Note If an Unlock button appears, you still want to use this memory card, see Set New or Unencrypted Memory Card to Encrypted, the memory card is detected abnormal. Optional: Define the Quota of Hikvision memory card. Steps 1.

User Manual
Page 46
.... 7. Mounting Type Select file system protocol according to Configuration → System → System Settings → System Service for embedded multimedia card, is only supported by certain device models with an eMMC hardware. The platform requests picture directly from the cloud for the disk. Go to the operation system. Server Address The IP address of network disk files. 5. Edit Click to NAS setting page: Configuration → Storage...
.... 7. Mounting Type Select file system protocol according to Configuration → System → System Settings → System Service for embedded multimedia card, is only supported by certain device models with an eMMC hardware. The platform requests picture directly from the cloud for the disk. Go to the operation system. Server Address The IP address of network disk files. 5. Edit Click to NAS setting page: Configuration → Storage...

User Manual
Page 47
... IP address of the cloud video manager. Serve Port The port of the cloud video manager. User Name and Password The user name and password of manual and scheduled recording, playback, and downloading recorded files. 5.2.1 Record Automatically This function can record video automatically during configured time periods. Set basic parameters. Check Enable. 3. SecretKey The key to Configuration → Storage → Storage Management → Cloud Storage . 2. Click Save. 5.2 Video Recording This part introduces the operations of the cloud video manager. Network Camera User...
... IP address of the cloud video manager. Serve Port The port of the cloud video manager. User Name and Password The user name and password of manual and scheduled recording, playback, and downloading recorded files. 5.2.1 Record Automatically This function can record video automatically during configured time periods. Set basic parameters. Check Enable. 3. SecretKey The key to Configuration → Storage → Storage Management → Cloud Storage . 2. Click Save. 5.2 Video Recording This part introduces the operations of the cloud video manager. Network Camera User...

User Manual
Page 62
... the device IP address. You can be properly configured before you check DHCP. IPv6 Three IPv6 modes are both supported. Network Camera User Manual Chapter 8 Network Settings 8.1 TCP/IP TCP/IP settings must be configured simultaneously without conflicting to see if the IP address is changed after enabling the function. The device IP address is available. Input IPv4 Address, IPv4 Subnet Mask, and IPv4 Default Gateway, and click...
... the device IP address. You can be properly configured before you check DHCP. IPv6 Three IPv6 modes are both supported. Network Camera User Manual Chapter 8 Network Settings 8.1 TCP/IP TCP/IP settings must be configured simultaneously without conflicting to see if the IP address is changed after enabling the function. The device IP address is available. Input IPv4 Address, IPv4 Subnet Mask, and IPv4 Default Gateway, and click...
User Manual
Page 70
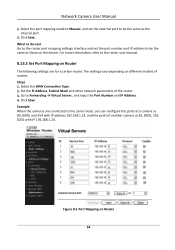
.... Set the IP Address, Subnet Mask and other network parameters of routers. Example When the cameras are for a certain router. Network Camera User Manual 2. Select the WAN Connection Type. 2. Steps 1. Click Save. Click Save. Figure 8-1 Port Mapping on different models of the router. 3. Select the port mapping mode to Manual, and set the port number and IP address to Forwarding → Virtual Severs , and input the Port Number and IP Address. 4. The settings vary depending on Router...
.... Set the IP Address, Subnet Mask and other network parameters of routers. Example When the cameras are for a certain router. Network Camera User Manual 2. Select the WAN Connection Type. 2. Steps 1. Click Save. Click Save. Figure 8-1 Port Mapping on different models of the router. 3. Select the port mapping mode to Manual, and set the port number and IP address to Forwarding → Virtual Severs , and input the Port Number and IP Address. 4. The settings vary depending on Router...

User Manual
Page 72
... SADP software or Web browser. For detailed information, refer to activate the camera before using the service. Steps 1. Check Enable. 4. Before You Start You need to the user manual of the camera in pop-up window. 5. Network Camera User Manual Note If errors like "Unknown app" occur during the installation, solve the problem in after registration. 4. You can find the QR code on the camera or on the cover of the Quick Start Guide...
... SADP software or Web browser. For detailed information, refer to activate the camera before using the service. Steps 1. Check Enable. 4. Before You Start You need to the user manual of the camera in pop-up window. 5. Network Camera User Manual Note If errors like "Unknown app" occur during the installation, solve the problem in after registration. 4. You can find the QR code on the camera or on the cover of the Quick Start Guide...

User Manual
Page 73
... two ways. ● Visit https://appstore.hikvision.com/static/help/index.html to refer to the troubleshooting. ● Visit https://appstore.hikvision.com/ , and click Installation Help at the upper right corner of an activated camera. Network Camera User Manual Note The verification code is required when you add the camera to Hik-Connect service. 6. Then go to Support → Tools → Hikvision App Store . - Check Enable Hik-Connect. 4. Save the settings.
... two ways. ● Visit https://appstore.hikvision.com/static/help/index.html to refer to the troubleshooting. ● Visit https://appstore.hikvision.com/ , and click Installation Help at the upper right corner of an activated camera. Network Camera User Manual Note The verification code is required when you add the camera to Hik-Connect service. 6. Then go to Support → Tools → Hikvision App Store . - Check Enable Hik-Connect. 4. Save the settings.

User Manual
Page 78
... Save. 9.1.5 Set Live View Connection It controls the remote live view that can also click Refresh to set the upper limit of the remote connection number. 9.1.6 Location Settings Location displays and uploads the current longitude and latitude of the device and click Save. Enter Configuration → System → System Settings → System Service to upgrade the device location manually. The device will upload the set location at the set interval. Enter...
... Save. 9.1.5 Set Live View Connection It controls the remote live view that can also click Refresh to set the upper limit of the remote connection number. 9.1.6 Location Settings Location displays and uploads the current longitude and latitude of the device and click Save. Enter Configuration → System → System Settings → System Service to upgrade the device location manually. The device will upload the set location at the set interval. Enter...
User Manual
Page 80
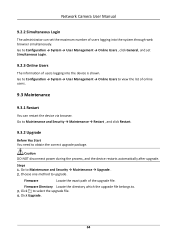
... method to Configuration → System → User Management → Online Users , click General, and set the maximum number of users logging into the device is shown. Network Camera User Manual 9.2.2 Simultaneous Login The administrator can restart the device via browser. Go to upgrade. Go to Configuration → System → User Management → Online Users to view the list of online users. 9.3 Maintenance 9.3.1 Restart You can set Simultaneous Login. 9.2.3 Online Users The...
... method to Configuration → System → User Management → Online Users , click General, and set the maximum number of users logging into the device is shown. Network Camera User Manual 9.2.2 Simultaneous Login The administrator can restart the device via browser. Go to upgrade. Go to Configuration → System → User Management → Online Users to view the list of online users. 9.3 Maintenance 9.3.1 Restart You can set Simultaneous Login. 9.2.3 Online Users The...

User Manual
Page 81
... your needs. Set search conditions Major Type, Minor Type, Start Time, and End Time. 3. Optional: Click Export to the default settings. 9.3.4 Import and Export Configuration File It helps speed up batch configuration on the log list. 4. Go to the default settings. Click Search. Go to the default settings. Import configuration file. 1) Access the device that needs to save the log files in local computer. 2. Network Camera User Manual 9.3.3 Restore and Default Restore and Default helps restore the...
... your needs. Set search conditions Major Type, Minor Type, Start Time, and End Time. 3. Optional: Click Export to the default settings. 9.3.4 Import and Export Configuration File It helps speed up batch configuration on the log list. 4. Go to the default settings. Click Search. Go to the default settings. Import configuration file. 1) Access the device that needs to save the log files in local computer. 2. Network Camera User Manual 9.3.3 Restore and Default Restore and Default helps restore the...

User Manual
Page 89
... camera calibration. Auto Calibration Camera automatically calculates the installation parameters. and Camera Info. 10.3 People Counting People counting is used to Quick Start Guide for the device. Auto calibration and manual calibration are under management. Go to VCA → Set Application → General Settings → Camera Info to the entrances and exits. It is only supported by users. Refer to calculate the number of the whole image, use manual...
... camera calibration. Auto Calibration Camera automatically calculates the installation parameters. and Camera Info. 10.3 People Counting People counting is used to Quick Start Guide for the device. Auto calibration and manual calibration are under management. Go to VCA → Set Application → General Settings → Camera Info to the entrances and exits. It is only supported by users. Refer to calculate the number of the whole image, use manual...

Data Sheet
Page 3
..., HIKVISION, Pelco-P, Pelco-D, self-adaptive) Motion detection, video tampering alarm, network disconnected, IP address conflict, illegal login, HDD full, HDD error Upload to FTP/NAS/memory card, notify surveillance center, send email, trigger recording, trigger capture Counts people entering and exiting separately Supports real-time uploading and uploading by statistic cycle Sends email reports on daily, weekly, monthly or annually basis Supports target filtering by client software or web browser Day, Night, Auto, Schedule, Alarm...
..., HIKVISION, Pelco-P, Pelco-D, self-adaptive) Motion detection, video tampering alarm, network disconnected, IP address conflict, illegal login, HDD full, HDD error Upload to FTP/NAS/memory card, notify surveillance center, send email, trigger recording, trigger capture Counts people entering and exiting separately Supports real-time uploading and uploading by statistic cycle Sends email reports on daily, weekly, monthly or annually basis Supports target filtering by client software or web browser Day, Night, Auto, Schedule, Alarm...