

Owners Manual
Page 5
... reference use only. All information contained within , whether whole or in part, is based on the latest product information at the time of publication. Depictions and/or procedures in the design and quality of the depictions and/or procedures contained within this publication are intended... this publication is expressly prohibited. Any reprinting or reuse of production components, some minor discrepancies may result between the actual vehicle and the information presented in U.S.A. 2006 Sportsman X2 500 EFI Owner's Manual P/N 9920361 2 Copyright 2005 Polaris Sales Inc.
... reference use only. All information contained within , whether whole or in part, is based on the latest product information at the time of publication. Depictions and/or procedures in the design and quality of the depictions and/or procedures contained within this publication are intended... this publication is expressly prohibited. Any reprinting or reuse of production components, some minor discrepancies may result between the actual vehicle and the information presented in U.S.A. 2006 Sportsman X2 500 EFI Owner's Manual P/N 9920361 2 Copyright 2005 Polaris Sales Inc.

Owners Manual
Page 19
... your passenger's skills, and operating conditions. Shift body weight uphill. Shift body weight uphill. Travel at an angle, which would cause the vehicle to lean sharply to make sudden gear changes. S Always follow the inspection and maintenance procedures and schedules outlined in TURF mode while operating on unfamiliar terrain. S Always have the ATV inspected by an authorized Polaris dealer if it 's in this manual. Do...
... your passenger's skills, and operating conditions. Shift body weight uphill. Shift body weight uphill. Travel at an angle, which would cause the vehicle to lean sharply to make sudden gear changes. S Always follow the inspection and maintenance procedures and schedules outlined in TURF mode while operating on unfamiliar terrain. S Always have the ATV inspected by an authorized Polaris dealer if it 's in this manual. Do...

Owners Manual
Page 21
... vehicle. 18 Use only Polaris-approved accessories, and familiarize yourself with their function and effect on your Polaris ATV is terminated if any equipment has been added to the vehicle, or if any other modifications to the vehicle, that may change the handling characteristics of the vehicle. Any modifications to ) mowers, blades, tires, sprayers, or large racks, may increase the speed or power...
... vehicle. 18 Use only Polaris-approved accessories, and familiarize yourself with their function and effect on your Polaris ATV is terminated if any equipment has been added to the vehicle, or if any other modifications to the vehicle, that may change the handling characteristics of the vehicle. Any modifications to ) mowers, blades, tires, sprayers, or large racks, may increase the speed or power...

Owners Manual
Page 45
... cause transmission damage. H: High Gear L: Low Gear N: Neutral R: Reverse P: Park 1 P R N L H CAUTION Shifting gears with the engine speed above idle or while the vehicle is located on the right side of the vehicle. Use either leaded or unleaded gasoline with a minimum pump octane number of 87=(R+ M/2) octane. 1 Fuel Filter The in heavy pulling situations and when operating at less than seven miles per hour for extended periods...
... cause transmission damage. H: High Gear L: Low Gear N: Neutral R: Reverse P: Park 1 P R N L H CAUTION Shifting gears with the engine speed above idle or while the vehicle is located on the right side of the vehicle. Use either leaded or unleaded gasoline with a minimum pump octane number of 87=(R+ M/2) octane. 1 Fuel Filter The in heavy pulling situations and when operating at less than seven miles per hour for extended periods...

Owners Manual
Page 46
... the length of time the vehicle may lift up and grab when it is no limit to protect smooth, level surfaces from the outside wheel during turns. When the rear wheels regain traction, the front gearcase will automatically engage any time the rear wheels lose traction. Switch the All-Wheel Drive (AWD) system out of TURF mode. Otherwise, switch out of TURF mode whenever it touches the ground...
... the length of time the vehicle may lift up and grab when it is no limit to protect smooth, level surfaces from the outside wheel during turns. When the rear wheels regain traction, the front gearcase will automatically engage any time the rear wheels lose traction. Switch the All-Wheel Drive (AWD) system out of TURF mode. Otherwise, switch out of TURF mode whenever it touches the ground...
Owners Manual
Page 50
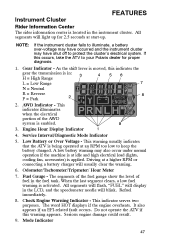
... segments of the fuel gauge show the level of the AWD system is enabled. 9 1 3. Check Engine Warning Indicator - All segments will light up . All segments will flash, "FUEL" will display in the instrument cluster. Do not operate the ATV if this indicates the gear the transmission is in the fuel tank. Fuel Gauge - The word HOT displays if the engine overheats. Instrument Cluster Rider Information Center FEATURES The rider information...
... segments of the fuel gauge show the level of the AWD system is enabled. 9 1 3. Check Engine Warning Indicator - All segments will light up . All segments will flash, "FUEL" will display in the instrument cluster. Do not operate the ATV if this indicates the gear the transmission is in the fuel tank. Fuel Gauge - The word HOT displays if the engine overheats. Instrument Cluster Rider Information Center FEATURES The rider information...

Owners Manual
Page 52
... the diagnostics mode: 1. To leave the diagnostic mode, turn the key switch on models with switchable AWD). Use the mode/reverse override button to toggle through the AWD coil (only on . 5. Lock the parking brake. 3. Place the transmission in ohms) being read at the gear switch input of the tires will remain lit. Instrument Cluster Rider Information Center FEATURES Diagnostic Mode The diagnostic mode is for all major repairs.
... the diagnostics mode: 1. To leave the diagnostic mode, turn the key switch on models with switchable AWD). Use the mode/reverse override button to toggle through the AWD coil (only on . 5. Lock the parking brake. 3. Place the transmission in ohms) being read at the gear switch input of the tires will remain lit. Instrument Cluster Rider Information Center FEATURES Diagnostic Mode The diagnostic mode is for all major repairs.

Owners Manual
Page 56
... sustained idle. 5. Perform regular checks on fluid levels, controls and areas outlined on the dipstick. See page 54. 6. During the break-in period. 53 Careful treatment of a new engine and drive components will damage close-fitted engine parts and drive components. CAUTION Excessive heat build-up during the break-in period, change both the oil and the filter at 20 hours, 200 miles...
... sustained idle. 5. Perform regular checks on fluid levels, controls and areas outlined on the dipstick. See page 54. 6. During the break-in period. 53 Careful treatment of a new engine and drive components will damage close-fitted engine parts and drive components. CAUTION Excessive heat build-up during the break-in period, change both the oil and the filter at 20 hours, 200 miles...

Owners Manual
Page 73
... in the 2-up mode with loads extending beyond the rack or cargo bed. S WEIGHT DISTRIBUTION in loss of control of control or brake instability. When handling offcentered loads that cannot be centered, secure the load and operate with a loaded vehicle. Stability and maneuverability may cause loss of the vehicle. S Carrying a load on a level surface. Vehicle speed should never exceed 10 mph (16 kph...
... in the 2-up mode with loads extending beyond the rack or cargo bed. S WEIGHT DISTRIBUTION in loss of control of control or brake instability. When handling offcentered loads that cannot be centered, secure the load and operate with a loaded vehicle. Stability and maneuverability may cause loss of the vehicle. S Carrying a load on a level surface. Vehicle speed should never exceed 10 mph (16 kph...

Owners Manual
Page 74
... speed and cargo to extend belt life. 71 Slow down. 4. Cargo weight should be affected. 3. Balance, handling, and control may be mounted as low as possible. 2. Make sure the cargo box dump latch is placed in the rear of load. Always operate the vehicle with the load as far forward as possible. Towing Load (Level Ground) Sportsman X2 500 EFI 1225 lbs. ( 556 kg) Vertical Hitch Weight 120...
... speed and cargo to extend belt life. 71 Slow down. 4. Cargo weight should be affected. 3. Balance, handling, and control may be mounted as low as possible. 2. Make sure the cargo box dump latch is placed in the rear of load. Always operate the vehicle with the load as far forward as possible. Towing Load (Level Ground) Sportsman X2 500 EFI 1225 lbs. ( 556 kg) Vertical Hitch Weight 120...
Owners Manual
Page 80
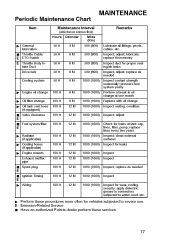
... Check for leaks at one month Replace with oil change Inspect routing, condition Inspect; apply dielectric grease to connectors subjected to severe use. Inspect; adjust; replace lines every two years Inspect; replace as needed Inspect Inspect for vehicles subjected to water, mud, etc. adjust; J Throttle Cable/ E ETC Switch E Throttle Body Intake Duct Drive belt Cooling system " Engine oil change " Oil filter change at tank cap, lines, filter, pump; Periodic Maintenance Chart Item (whichever comes first) Hours Calendar Miles (Km) 50...
... Check for leaks at one month Replace with oil change Inspect routing, condition Inspect; apply dielectric grease to connectors subjected to severe use. Inspect; adjust; replace lines every two years Inspect; replace as needed Inspect Inspect for vehicles subjected to water, mud, etc. adjust; J Throttle Cable/ E ETC Switch E Throttle Body Intake Duct Drive belt Cooling system " Engine oil change " Oil filter change at tank cap, lines, filter, pump; Periodic Maintenance Chart Item (whichever comes first) Hours Calendar Miles (Km) 50...

Owners Manual
Page 101
...vehicle on the seat when measuring. 5. Measure the distance from a wall. 2. Start the engine and turn the headlight switch to the center of the headlight beam should be two inches (5.1 cm) below the mark on the wall. NOTE: Include rider (and passenger) weight on a level surface with the headlight approximately 25 ft. (7.6 m) from the floor... knob is located on the wall at the rear of the headlight pod. Low Beam Adjustment The low beam can be adjusted slightly upward or downward. MAINTENANCE Lights High Beam Adjustment The headlight beam can be adjusted slightly upward or downward....
...vehicle on the seat when measuring. 5. Measure the distance from a wall. 2. Start the engine and turn the headlight switch to the center of the headlight beam should be two inches (5.1 cm) below the mark on the wall. NOTE: Include rider (and passenger) weight on a level surface with the headlight approximately 25 ft. (7.6 m) from the floor... knob is located on the wall at the rear of the headlight pod. Low Beam Adjustment The low beam can be adjusted slightly upward or downward. MAINTENANCE Lights High Beam Adjustment The headlight beam can be adjusted slightly upward or downward....

Owners Manual
Page 103
... of the light assembly. 5. Reinstall the harness assembly into the headlight assembly. 4. Remove the harness connector from the back of the headlight harness (1) counterclockwise and pull the harness assembly away from the vehicle. 4. Turn the headlight harness clockwise to the socket and install the new lamp. 7. Reinstall the taillight assembly. 10. Remove the headlamp and install the new headlamp. 3. Test the light for proper operation. 9. MAINTENANCE Lights Lower Headlamp Removal...
... of the light assembly. 5. Reinstall the harness assembly into the headlight assembly. 4. Remove the harness connector from the back of the headlight harness (1) counterclockwise and pull the harness assembly away from the vehicle. 4. Turn the headlight harness clockwise to the socket and install the new lamp. 7. Reinstall the taillight assembly. 10. Remove the headlamp and install the new headlamp. 3. Test the light for proper operation. 9. MAINTENANCE Lights Lower Headlamp Removal...
Owners Manual
Page 113
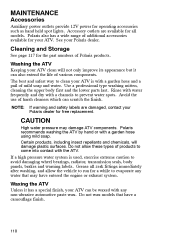
... damaging wheel bearings, radiator, transmission seals, body panels, brakes and warning labels. Rinse with water frequently and dry with a garden hose using mild soap. MAINTENANCE Accessories Auxiliary power outlets provide 12V power for your ATV is used, exercise extreme caution to clean your ATV. Accessory outlets are damaged, contact your Polaris dealer. Grease all models. If a high pressure water system is with any water that have entered the engine or exhaust system...
... damaging wheel bearings, radiator, transmission seals, body panels, brakes and warning labels. Rinse with water frequently and dry with a garden hose using mild soap. MAINTENANCE Accessories Auxiliary power outlets provide 12V power for your ATV is used, exercise extreme caution to clean your ATV. Accessory outlets are damaged, contact your Polaris dealer. Grease all models. If a high pressure water system is with any water that have entered the engine or exhaust system...
Owners Manual
Page 121
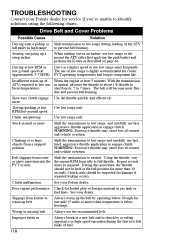
... the park brake) and perform the K-turn as required. Always warm up a steep incline Driving at low RPM or low ground speed (at least 5 minutes. Shift the transmission to low range, and carefully use /plowing Stuck in high range Starting out going up the belt by avoiding aggressive or high speed operation during loading of control and vehicle overturn. Clutch malfunction Poor engine performance Slippage from idle to...
... the park brake) and perform the K-turn as required. Always warm up a steep incline Driving at low RPM or low ground speed (at least 5 minutes. Shift the transmission to low range, and carefully use /plowing Stuck in high range Starting out going up the belt by avoiding aggressive or high speed operation during loading of control and vehicle overturn. Clutch malfunction Poor engine performance Slippage from idle to...

Owners Manual
Page 125
SPECIFICATIONS SPORTSMAN X2 500 EFI Gross Vehicle Weight Hitch Towing Rating Unbraked Trailer Towing Capacity* Hitch Tongue Capacity Front Rack/Storage Box Capacity Rear Box Capacity Overall Length Overall Width Overall Height Wheelbase Ground Clearance Dry Weight Minimum Turning Radius Fuel Capacity Engine Oil Capacity Coolant Capacity Engine Displacement Bore x Stroke Alternator Output Compression Ratio Ignition System Ignition Timing Engine Idle RPM Spark Plug Spark Plug Gap Lubrication System Driving System Type 1500 lbs./680 kg 1225 lbs./556 kg 1995 lbs./905 kg 120 lbs./54.4 kg (Rear box ...
SPECIFICATIONS SPORTSMAN X2 500 EFI Gross Vehicle Weight Hitch Towing Rating Unbraked Trailer Towing Capacity* Hitch Tongue Capacity Front Rack/Storage Box Capacity Rear Box Capacity Overall Length Overall Width Overall Height Wheelbase Ground Clearance Dry Weight Minimum Turning Radius Fuel Capacity Engine Oil Capacity Coolant Capacity Engine Displacement Bore x Stroke Alternator Output Compression Ratio Ignition System Ignition Timing Engine Idle RPM Spark Plug Spark Plug Gap Lubrication System Driving System Type 1500 lbs./680 kg 1225 lbs./556 kg 1995 lbs./905 kg 120 lbs./54.4 kg (Rear box ...

Owners Manual
Page 126
... - 12 (5 psi) Single-control hydraulic disc Single-control hydraulic disc Hydraulic, opposed piston caliper, fixed disc Hydraulic lock, all wheel MacPherson Strut with 8.2" (20.8 cm) of travel Progressive Rate with 8.75" (22.2 cm) of travel Rear Spring Preload Adjust 1 - Low Gear Reduction - Single Beam on Headlight Pod (50 w) 2 - SPECIFICATIONS SPORTSMAN X2 500 EFI Shift Type Gear Reduction - Single Beam on Bumper (27 w) 8.26 w 26.9 w LCD Clutching Chart Altitude Meters...
... - 12 (5 psi) Single-control hydraulic disc Single-control hydraulic disc Hydraulic, opposed piston caliper, fixed disc Hydraulic lock, all wheel MacPherson Strut with 8.2" (20.8 cm) of travel Progressive Rate with 8.75" (22.2 cm) of travel Rear Spring Preload Adjust 1 - Low Gear Reduction - Single Beam on Headlight Pod (50 w) 2 - SPECIFICATIONS SPORTSMAN X2 500 EFI Shift Type Gear Reduction - Single Beam on Bumper (27 w) 8.26 w 26.9 w LCD Clutching Chart Altitude Meters...

Owners Manual
Page 129
... repair Polaris ATVs. Engine Oil 1. We recommend the use of Polaris engine oil for 1000 hours when subjected to normal use your original selling dealer; Mixing oil brands or using non-recommended oil may not be covered by warranty. POLARIS FURTHER DISCLAIMS ALL EXPRESS WARRANTIES NOT STATED IN THIS WARRANTY. This warranty gives you specific legal rights, and you may use of the Warranty Registration form to perform warranty service...
... repair Polaris ATVs. Engine Oil 1. We recommend the use of Polaris engine oil for 1000 hours when subjected to normal use your original selling dealer; Mixing oil brands or using non-recommended oil may not be covered by warranty. POLARIS FURTHER DISCLAIMS ALL EXPRESS WARRANTIES NOT STATED IN THIS WARRANTY. This warranty gives you specific legal rights, and you may use of the Warranty Registration form to perform warranty service...
Owners Manual
Page 135
... ...12 Air Filter Service ...96 All Wheel Drive ...43-44 Automatic Transmission ...42 Auxiliary Brake ...91 AWD ...43-44 D Driving Uphill ...61 Driving With a Passenger ...58-59 Dumping Cargo ...72 E Electrical Switches ...Emission Control Systems ...Emissions Warranty ...Engaging Front Gearcase ...Engine Break-In ...Engine Cooling System ...Engine Stop Switch ...Equipment Modifications ...Exhaust Emission Control System . 36 73 129 44 53 88 36 18 73 96 93 87 94 42 52 42 B Battery ...107-109 Battery...
... ...12 Air Filter Service ...96 All Wheel Drive ...43-44 Automatic Transmission ...42 Auxiliary Brake ...91 AWD ...43-44 D Driving Uphill ...61 Driving With a Passenger ...58-59 Dumping Cargo ...72 E Electrical Switches ...Emission Control Systems ...Emissions Warranty ...Engaging Front Gearcase ...Engine Break-In ...Engine Cooling System ...Engine Stop Switch ...Equipment Modifications ...Exhaust Emission Control System . 36 73 129 44 53 88 36 18 73 96 93 87 94 42 52 42 B Battery ...107-109 Battery...

Owners Manual
Page 136
... the Parking Brake ...40 Severe Use ...74 Side Panel Removal ...93 Sidehilling ...62 Spark Arrestor ...103 Spark Plugs ...101 Specifications ...122-123 Starting the Engine ...55 Steering Assembly ...92 Stop Switch ...36 Storage ...110-113 Storage Tips ...111-113 Switches ...36 N Noise Emission Control System ...73 O Odometer ...48 Oil Change ...82-84 Oil Filter Change ...82 Oil Level ...81 Oil Pump Priming ...84 P Parking Brake ...40 Parking on an Incline ...69 Passenger ...58-59 Passenger Seat ...44-45 Periodic Maintenance...
... the Parking Brake ...40 Severe Use ...74 Side Panel Removal ...93 Sidehilling ...62 Spark Arrestor ...103 Spark Plugs ...101 Specifications ...122-123 Starting the Engine ...55 Steering Assembly ...92 Stop Switch ...36 Storage ...110-113 Storage Tips ...111-113 Switches ...36 N Noise Emission Control System ...73 O Odometer ...48 Oil Change ...82-84 Oil Filter Change ...82 Oil Level ...81 Oil Pump Priming ...84 P Parking Brake ...40 Parking on an Incline ...69 Passenger ...58-59 Passenger Seat ...44-45 Periodic Maintenance...