
Owners Manual
Page 26
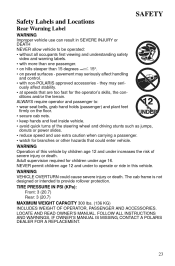
.... WARNING VEHICLE OVERTURN could enter vehicle. The cab frame is not designed or intended to be operated: • without all occupants first viewing and understanding safety video and warning labels. • with non-POLARIS approved accessories - IF OWNER'S MANUAL IS MISSING, CONTACT A POLARIS DEALER FOR A REPLACEMENT. 23 TIRE PRESSURE IN PSI (KPa): Front: 3 (20.7) Rear: 3 (20.7) MAXIMUM WEIGHT CAPACITY 300 lbs. (136 KG) INCLUDES WEIGHT OF OPERATOR, PASSENGER AND ACCESSORIES. LOCATE...
.... WARNING VEHICLE OVERTURN could enter vehicle. The cab frame is not designed or intended to be operated: • without all occupants first viewing and understanding safety video and warning labels. • with non-POLARIS approved accessories - IF OWNER'S MANUAL IS MISSING, CONTACT A POLARIS DEALER FOR A REPLACEMENT. 23 TIRE PRESSURE IN PSI (KPa): Front: 3 (20.7) Rear: 3 (20.7) MAXIMUM WEIGHT CAPACITY 300 lbs. (136 KG) INCLUDES WEIGHT OF OPERATOR, PASSENGER AND ACCESSORIES. LOCATE...
Owners Manual
Page 35
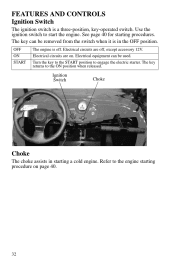
FEATURES AND CONTROLS Ignition Switch The ignition switch is in starting a cold engine. The key returns to engage the electric starter. Refer to start the engine. OFF ON START The engine is off , except accessory 12V. Electrical circuits are off . See page 40 for starting procedure on . The key can be removed from the switch when it is a three-position, key-operated switch. Electrical equipment can be used. Ignition Switch Choke Choke The choke assists in the...
FEATURES AND CONTROLS Ignition Switch The ignition switch is in starting a cold engine. The key returns to engage the electric starter. Refer to start the engine. OFF ON START The engine is off , except accessory 12V. Electrical circuits are off . See page 40 for starting procedure on . The key can be removed from the switch when it is a three-position, key-operated switch. Electrical equipment can be used. Ignition Switch Choke Choke The choke assists in the...

Owners Manual
Page 40
.... 8. Always exercise extreme caution whenever handling gasoline. See page 59. Change the engine oil at sustained idle. 6. CVT Break-in (Clutches/Belt) A proper break-in period as needed to handle gasoline. 2. Add the recommended oil as recommended. Avoid aggressive use of the clutches and drive belt will ensure a longer life and better performance. Avoid aggressive acceleration and high speed operation during the break-in...
.... 8. Always exercise extreme caution whenever handling gasoline. See page 59. Change the engine oil at sustained idle. 6. CVT Break-in (Clutches/Belt) A proper break-in period as needed to handle gasoline. 2. Add the recommended oil as recommended. Avoid aggressive use of the clutches and drive belt will ensure a longer life and better performance. Avoid aggressive acceleration and high speed operation during the break-in...
Owners Manual
Page 42
... do power slides, "donuts", jumps or other driving stunts. Never operate the vehicle on pavement or on the steering wheel at all times. 8. DO NOT attempt to handle gasoline. 5. Always maintain proper tire pressure. 10. Your vehicle doesn't have a qualified service dealer inspect the entire machine for your vehicle. Drive in these conditions. 3. Always use on this vehicle. 6. Do not ride at excessive speeds. Never install accessories...
... do power slides, "donuts", jumps or other driving stunts. Never operate the vehicle on pavement or on the steering wheel at all times. 8. DO NOT attempt to handle gasoline. 5. Always maintain proper tire pressure. 10. Your vehicle doesn't have a qualified service dealer inspect the entire machine for your vehicle. Drive in these conditions. 3. Always use on this vehicle. 6. Do not ride at excessive speeds. Never install accessories...
Owners Manual
Page 43
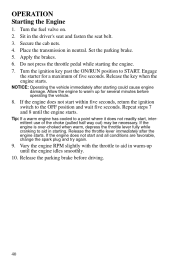
... transmission in the driver's seat and fasten the seat belt. Apply the brakes. Turn the ignition key past the ON/RUN position to aid in warm-up for a maximum of the choke (pulled half way out) may be necessary. NOTICE: Operating the vehicle immediately after the engine starts. Repeat steps 7 and 8 until the engine idles smoothly. 10. Secure the cab nets. Release the parking brake before operating the vehicle. 8. Turn the fuel valve...
... transmission in the driver's seat and fasten the seat belt. Apply the brakes. Turn the ignition key past the ON/RUN position to aid in warm-up for a maximum of the choke (pulled half way out) may be necessary. NOTICE: Operating the vehicle immediately after the engine starts. Repeat steps 7 and 8 until the engine idles smoothly. 10. Secure the cab nets. Release the parking brake before operating the vehicle. 8. Turn the fuel valve...

Owners Manual
Page 45
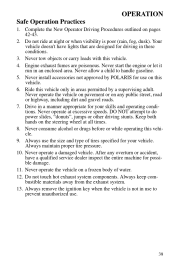
... in this owner's manual about starting the engine, stopping the engine, braking and parking (pages 40-41). 4. Watch the instructional video with the supervising adult. 3. Wear appropriate riding gear, including an approved helmet and eye protection (goggles or face shield). 6. Select a level open area to drive in the driver's seat and fasten the seat belt. 8. Sit in this vehicle. 2. OPERATION New Operator Driving Procedures 1. Review the section...
... in this owner's manual about starting the engine, stopping the engine, braking and parking (pages 40-41). 4. Watch the instructional video with the supervising adult. 3. Wear appropriate riding gear, including an approved helmet and eye protection (goggles or face shield). 6. Select a level open area to drive in the driver's seat and fasten the seat belt. 8. Sit in this vehicle. 2. OPERATION New Operator Driving Procedures 1. Review the section...

Owners Manual
Page 46
... on the steering wheel, slowly release the brakes and press the throttle with this vehicle. Place the transmission in reverse. Apply the brakes and shift into gear. 15. Practice starting, stopping, turning, using the throttle and brakes and driving in neutral. 13. Learn how the vehicle handles when making turns and begin driving. 18. Make sure the area is clear of driving experience with your right foot to do power slides, "donuts...
... on the steering wheel, slowly release the brakes and press the throttle with this vehicle. Place the transmission in reverse. Apply the brakes and shift into gear. 15. Practice starting, stopping, turning, using the throttle and brakes and driving in neutral. 13. Learn how the vehicle handles when making turns and begin driving. 18. Make sure the area is clear of driving experience with your right foot to do power slides, "donuts...

Owners Manual
Page 58
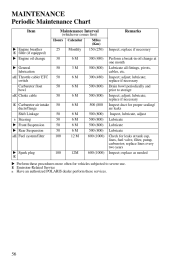
... often if driving in wet conditions Inspect periodically Check; See the Pre-Ride Checklist on page 38. 10 10 10 10 10 25 25 X Front suspension X Rear suspension Tires X Brake fluid level X Brake pedal travel Brake system Wheels/fasteners Frame fasteners X Engine oil level X Air filter E Daytime running lights/taillight Drive chain CVT housing (if equipped) X Brake pad wear n Idle speed n Choke E X Engine oil change (break-in) Drive chain (break-in oil change yearly Check each day before driving the vehicle. clean...
... often if driving in wet conditions Inspect periodically Check; See the Pre-Ride Checklist on page 38. 10 10 10 10 10 25 25 X Front suspension X Rear suspension Tires X Brake fluid level X Brake pedal travel Brake system Wheels/fasteners Frame fasteners X Engine oil level X Air filter E Daytime running lights/taillight Drive chain CVT housing (if equipped) X Brake pad wear n Idle speed n Choke E X Engine oil change (break-in) Drive chain (break-in oil change yearly Check each day before driving the vehicle. clean...
Owners Manual
Page 59
... Choke cable E Carburetor air intake ducts/flange Shift Linkage n Steering X Front Suspension X Rear Suspension nE Fuel system/filter X Spark plug E 100 12M 600 (1000) X Perform these services. 56 E Emission-Related Service n Have an authorized POLARIS dealer perform these procedures more often for leaks at one month Lubricate all fittings, pivots, cables, etc. adjust; adjust; replace if necessary Perform a break-in oil change X General lubrication nE Throttle cable/ ETC Remarks Miles (Km) 150 (250...
... Choke cable E Carburetor air intake ducts/flange Shift Linkage n Steering X Front Suspension X Rear Suspension nE Fuel system/filter X Spark plug E 100 12M 600 (1000) X Perform these services. 56 E Emission-Related Service n Have an authorized POLARIS dealer perform these procedures more often for leaks at one month Lubricate all fittings, pivots, cables, etc. adjust; adjust; replace if necessary Perform a break-in oil change X General lubrication nE Throttle cable/ ETC Remarks Miles (Km) 150 (250...

Owners Manual
Page 69
... drain plug. 2. Shift the transmission to drain. Start the engine. If your vehicle is accidently ingested into the CVT system. The CVT system has been precision balanced. CVT Drying There may occur at high speeds, creating large amounts of force on components. Set the parking brake. 3. Test for 10-15 seconds to expel the moisture and air-dry the belt and clutches...
... drain plug. 2. Shift the transmission to drain. Start the engine. If your vehicle is accidently ingested into the CVT system. The CVT system has been precision balanced. CVT Drying There may occur at high speeds, creating large amounts of force on components. Set the parking brake. 3. Test for 10-15 seconds to expel the moisture and air-dry the belt and clutches...

Owners Manual
Page 74
... to allow it to warm up for conditions in (clockwise) to raise RPM. Place the transmission in elevation. Set the parking brake. 3. Start the engine and allow more information about jetting the vehicle for approximately five minutes. 4. MAINTENANCE Carburetor Your POLARIS vehicle is not satisfactory, and all other conditions are required for optimal performance at the factory for operation above 6,000 feet and...
... to allow it to warm up for conditions in (clockwise) to raise RPM. Place the transmission in elevation. Set the parking brake. 3. Start the engine and allow more information about jetting the vehicle for approximately five minutes. 4. MAINTENANCE Carburetor Your POLARIS vehicle is not satisfactory, and all other conditions are required for optimal performance at the factory for operation above 6,000 feet and...

Owners Manual
Page 77
... vehicle, which could result in the Periodic Maintenance Chart beginning on level ground. 2. Always apply the same adjustment setting to make adjustments. Always adjust both the left and right. 3. Lightly turn the steering wheel left and right spring preloads equally or have the steering system inspected by an authorized POLARIS dealer. WARNING! If there is excessive freeplay or strange noises, or the steering...
... vehicle, which could result in the Periodic Maintenance Chart beginning on level ground. 2. Always apply the same adjustment setting to make adjustments. Always adjust both the left and right. 3. Lightly turn the steering wheel left and right spring preloads equally or have the steering system inspected by an authorized POLARIS dealer. WARNING! If there is excessive freeplay or strange noises, or the steering...

Owners Manual
Page 80
... the ground. 6. MAINTENANCE Tires Wheel Installation 1. Improperly installed wheels can adversely affect tire wear and vehicle handling, which can result in neutral. 2. lbs. (37 Nm) 77 Torque the wheel nuts to specification. Wheel Nut Torque Specifications Check the wheel nut torques occasionally and when they've been loosened for service. Location Front Wheel Rear Wheel Nut Torque 27 ft. Set the parking brake. 3. Place the wheel on the wheel hub with the valve...
... the ground. 6. MAINTENANCE Tires Wheel Installation 1. Improperly installed wheels can adversely affect tire wear and vehicle handling, which can result in neutral. 2. lbs. (37 Nm) 77 Torque the wheel nuts to specification. Wheel Nut Torque Specifications Check the wheel nut torques occasionally and when they've been loosened for service. Location Front Wheel Rear Wheel Nut Torque 27 ft. Set the parking brake. 3. Place the wheel on the wheel hub with the valve...

Owners Manual
Page 81
... positioning tab, then carefully pull the lamp out. 4. Tail Light Lamp Replacement If the brakelight doesn't work, the lamp may need to remove it with a new recommended lamp. 3. Install the new lamp. Test the light for service. 7. Disconnect the lights from the harness. 2. Remove the lens cover. 2. MAINTENANCE Lights Daytime Running Lights Lamp Replacement If the daytime running lights do not operate, see your authorized POLARIS dealer. 1.
... positioning tab, then carefully pull the lamp out. 4. Tail Light Lamp Replacement If the brakelight doesn't work, the lamp may need to remove it with a new recommended lamp. 3. Install the new lamp. Test the light for service. 7. Disconnect the lights from the harness. 2. Remove the lens cover. 2. MAINTENANCE Lights Daytime Running Lights Lamp Replacement If the daytime running lights do not operate, see your authorized POLARIS dealer. 1.

Owners Manual
Page 92
... the Exterior Make any time the fluid looks dark or contaminated) Engine Oil Change the oil. Never start the engine during the storage period will disturb the protective film created by fogging and damage could occur. Air Filter / Air Box Inspect and clean or replace the air filter. Drain the sediment tube. Fluid Levels Inspect the fluid levels. See page 86. Add POLARIS Carbon Clean Fuel Treatment or POLARIS Fuel Stabilizer. Turn the fuel valve...
... the Exterior Make any time the fluid looks dark or contaminated) Engine Oil Change the oil. Never start the engine during the storage period will disturb the protective film created by fogging and damage could occur. Air Filter / Air Box Inspect and clean or replace the air filter. Drain the sediment tube. Fluid Levels Inspect the fluid levels. See page 86. Add POLARIS Carbon Clean Fuel Treatment or POLARIS Fuel Stabilizer. Turn the fuel valve...

Owners Manual
Page 95
SPECIFICATIONS RANGER RZR 170 Maximum Rider Weight Maximum Weight Capacity Gross Vehicle Weight Dry Weight Fuel Capacity Engine Oil Capacity Transmission Oil Capacity Overall Length Overall Width Overall Height Wheelbase Ground Clearance Engine Type Displacement Cooling Bore x Stroke Alternator Output Compression Ratio Carburetor Pilot Jet Main Jet Air Screw Jet Needle Starting System Ignition System Spark Plug / Gap Front Suspension Rear Suspension 150 lbs. (68 kg) (each rider) 300 lbs. (81.7 kg) 840 lbs. (381 kg) 500 lbs. (227 kg) 2.5 gal. (9.5 ltr...
SPECIFICATIONS RANGER RZR 170 Maximum Rider Weight Maximum Weight Capacity Gross Vehicle Weight Dry Weight Fuel Capacity Engine Oil Capacity Transmission Oil Capacity Overall Length Overall Width Overall Height Wheelbase Ground Clearance Engine Type Displacement Cooling Bore x Stroke Alternator Output Compression Ratio Carburetor Pilot Jet Main Jet Air Screw Jet Needle Starting System Ignition System Spark Plug / Gap Front Suspension Rear Suspension 150 lbs. (68 kg) (each rider) 300 lbs. (81.7 kg) 840 lbs. (381 kg) 500 lbs. (227 kg) 2.5 gal. (9.5 ltr...

Owners Manual
Page 106
... the country where your vehicle was purchased, you should warranty register your vehicle at a local POLARIS dealer in your new country immediately after you move to POLARIS Industries in order to continue your warranty coverage. You may be authorized to perform the warranty repair. If Purchased From A Private Party: If you move. Upon residence verification, the servicing dealer will be...
... the country where your vehicle was purchased, you should warranty register your vehicle at a local POLARIS dealer in your new country immediately after you move to POLARIS Industries in order to continue your warranty coverage. You may be authorized to perform the warranty repair. If Purchased From A Private Party: If you move. Upon residence verification, the servicing dealer will be...

Owners Manual
Page 107
...-certified vehicle starts on the date the vehicle is the responsibility of the vehicle owner. This emissions limited warranty covers components whose failure increases the vehicle's regulated emissions, and it conforms with applicable U.S. Environmental Protection Agency emission regulations. For exhaust emissions, emission-related components include any engine parts related to the following systems: • Air-induction system • Fuel system • Ignition system • Exhaust gas recirculation...
...-certified vehicle starts on the date the vehicle is the responsibility of the vehicle owner. This emissions limited warranty covers components whose failure increases the vehicle's regulated emissions, and it conforms with applicable U.S. Environmental Protection Agency emission regulations. For exhaust emissions, emission-related components include any engine parts related to the following systems: • Air-induction system • Fuel system • Ignition system • Exhaust gas recirculation...

Owners Manual
Page 111
... Use Definition ...53 Shifting Gears ...33 Shock Spring Adjustment ...74 Side Guards ...30 Signal Words ...6 Spark Arrestor Cleaning ...68 Spark Arrestor Warning...68 Spark Plug Condition...65 Spark Plug Gap ...65 Spark Plug Removal ...65 Spark Plug Torque ...65 Spark Plugs ...65 Spark Plugs, Fouled...65 Specifications...92-93 Speed Control System ...35 Stabilizing the Fuel ...89 Steering Wheel Adjustment...27 Steering Wheel Inspection...74 Stopping the Engine...41 R Removal, Battery ...81 Removal, Seat ...26 Removal, Wheels...76 Removing the Vehicle from Storage 90 Reverse...
... Use Definition ...53 Shifting Gears ...33 Shock Spring Adjustment ...74 Side Guards ...30 Signal Words ...6 Spark Arrestor Cleaning ...68 Spark Arrestor Warning...68 Spark Plug Condition...65 Spark Plug Gap ...65 Spark Plug Removal ...65 Spark Plug Torque ...65 Spark Plugs ...65 Spark Plugs, Fouled...65 Specifications...92-93 Speed Control System ...35 Stabilizing the Fuel ...89 Steering Wheel Adjustment...27 Steering Wheel Inspection...74 Stopping the Engine...41 R Removal, Battery ...81 Removal, Seat ...26 Removal, Wheels...76 Removing the Vehicle from Storage 90 Reverse...

Owners Manual
Page 112
... Battery ...Filter Care During Storage ...Filter Cleaning, Air ...Filter Systems ...Filter, Air ...Fluid, Main Gearcase ...Fluid, Transmission ...Fluid Levels During Storage...Fluid, Battery ...Fluid, Brake ...Fogging the Engine ...Fouled Plugs ...Freeplay Adjustment, Throttle ...Freeplay, Steering Wheel ...Fuel Cap ...Fuel Safety ...Fuel Stabilizer ...Fuel Tank Filler Cap ...Fuel Valve...83 89 67 67 67 61 61 89 83 73 90 65 70 74 31 21 89 31 31 65 21 33 61 61 33 11 J Jetting ...93 K Key, Periodic Maintenance Chart...54 L Lamp Replacement Tail Light ...Daytime Running Lights...Lights...
... Battery ...Filter Care During Storage ...Filter Cleaning, Air ...Filter Systems ...Filter, Air ...Fluid, Main Gearcase ...Fluid, Transmission ...Fluid Levels During Storage...Fluid, Battery ...Fluid, Brake ...Fogging the Engine ...Fouled Plugs ...Freeplay Adjustment, Throttle ...Freeplay, Steering Wheel ...Fuel Cap ...Fuel Safety ...Fuel Stabilizer ...Fuel Tank Filler Cap ...Fuel Valve...83 89 67 67 67 61 61 89 83 73 90 65 70 74 31 21 89 31 31 65 21 33 61 61 33 11 J Jetting ...93 K Key, Periodic Maintenance Chart...54 L Lamp Replacement Tail Light ...Daytime Running Lights...Lights...