User Guide
Page 3
... Password and Voice Mail for the First Time 13 The NBX NetSet Utility 15 Starting the NBX NetSet Utility 16 Navigation and Shortcut Icons in the NBX NetSet Utility 16 Quick Reference Guides 17 2 3COM 3106C AND 3107C CORDLESS TELEPHONES Telephone Buttons and Controls 20 3Com 3106C 20 3Com 3107C 23 Programmable Access Buttons 25 Status Lights for System Appearance...
... Password and Voice Mail for the First Time 13 The NBX NetSet Utility 15 Starting the NBX NetSet Utility 16 Navigation and Shortcut Icons in the NBX NetSet Utility 16 Quick Reference Guides 17 2 3COM 3106C AND 3107C CORDLESS TELEPHONES Telephone Buttons and Controls 20 3Com 3106C 20 3Com 3107C 23 Programmable Access Buttons 25 Status Lights for System Appearance...

User Guide
Page 7
... Unit on the Wall 115 Attaching the Beltclip to the Handset 118 Installing the Handset Battery Pack 119 3Com 3106C 119 3Com 3107C 120 Charging the Handset Battery Pack 121 Charging an Optional Spare Battery Pack (3Com 3107C) 122 Low Battery Indicator 122 Cleaning the Battery and Charging Unit Contacts 123 Moving Your Telephone 123 Swapping...
... Unit on the Wall 115 Attaching the Beltclip to the Handset 118 Installing the Handset Battery Pack 119 3Com 3106C 119 3Com 3107C 120 Charging the Handset Battery Pack 121 Charging an Optional Spare Battery Pack (3Com 3107C) 122 Low Battery Indicator 122 Cleaning the Battery and Charging Unit Contacts 123 Moving Your Telephone 123 Swapping...

User Guide
Page 9
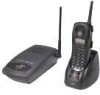
... How to Use This Guide This guide is intended for anyone using: ■ 3Com® 3106C Cordless Telephones ■ 3Com® 3107C Cordless Telephones It includes information about How to get started with your new telephone The 3Com 3106C and 3107C Cordless Telephones NBX Voice Messaging features Using standard telephone features Personalizing your telephone Enhanced system features Feature...
... How to Use This Guide This guide is intended for anyone using: ■ 3Com® 3106C Cordless Telephones ■ 3Com® 3107C Cordless Telephones It includes information about How to get started with your new telephone The 3Com 3106C and 3107C Cordless Telephones NBX Voice Messaging features Using standard telephone features Personalizing your telephone Enhanced system features Feature...
User Guide
Page 19
The chapter covers these topics: ■ Telephone Buttons and Controls ■ Programmable Access Buttons ■ Status Lights for System Appearance Buttons ■ Base Unit Controls and Functions ■ Using the Handset ■ Using the Optional Headset The 3Com 3106C and 3107C Cordless Telephones (3C10406C and 3C10407C) do not support speaker phone operation. 2 3COM 3106C AND 3107C CORDLESS TELEPHONES This chapter describes the buttons, controls, and features on the 3Com 3106C and 3107C Cordless Telephones.
The chapter covers these topics: ■ Telephone Buttons and Controls ■ Programmable Access Buttons ■ Status Lights for System Appearance Buttons ■ Base Unit Controls and Functions ■ Using the Handset ■ Using the Optional Headset The 3Com 3106C and 3107C Cordless Telephones (3C10406C and 3C10407C) do not support speaker phone operation. 2 3COM 3106C AND 3107C CORDLESS TELEPHONES This chapter describes the buttons, controls, and features on the 3Com 3106C and 3107C Cordless Telephones.

User Guide
Page 20
Displays telephone status messages, Caller ID information (if enabled), and the number of messages that you press a button. For many operations, the 3Com 3106C makes a sound when you have in this chapter. 2 Display panel - 20 CHAPTER 2: 3COM 3106C AND 3107C CORDLESS TELEPHONES Telephone Buttons and Controls 3Com 3106C Figure 1 shows the buttons and controls on the 3Com 3106C Cordless Telephone. See Using the Optional Headset later in your voice mail mailbox. Figure 1 3Com 3106C Cordless Telephone 1 15 2 16 9 3 10 4 11 12 5 6 13 7 14 8 1 Headset jack -
Displays telephone status messages, Caller ID information (if enabled), and the number of messages that you press a button. For many operations, the 3Com 3106C makes a sound when you have in this chapter. 2 Display panel - 20 CHAPTER 2: 3COM 3106C AND 3107C CORDLESS TELEPHONES Telephone Buttons and Controls 3Com 3106C Figure 1 shows the buttons and controls on the 3Com 3106C Cordless Telephone. See Using the Optional Headset later in your voice mail mailbox. Figure 1 3Com 3106C Cordless Telephone 1 15 2 16 9 3 10 4 11 12 5 6 13 7 14 8 1 Headset jack -
User Guide
Page 22
...the caller. When the ringer is enabled. Press the button to turn off the Mute feature. Controls the audio volume through the NBX Messaging system. Controls the ringer alert volume when you are not on the display panel. Turns the handset ringer on and off....Handset Ringer Tone and Volume later in this chapter. 16 Ringer ON/OFF and MUTE switch - 22 CHAPTER 2: 3COM 3106C AND 3107C CORDLESS TELEPHONES 13 Personal Speed Dial button - Accesses your NBX administrator for more information, and see Chapter 6 for information about Bridged Extensions. 14 Message (MSG) button - ...
...the caller. When the ringer is enabled. Press the button to turn off the Mute feature. Controls the audio volume through the NBX Messaging system. Controls the ringer alert volume when you are not on the display panel. Turns the handset ringer on and off....Handset Ringer Tone and Volume later in this chapter. 16 Ringer ON/OFF and MUTE switch - 22 CHAPTER 2: 3COM 3106C AND 3107C CORDLESS TELEPHONES 13 Personal Speed Dial button - Accesses your NBX administrator for more information, and see Chapter 6 for information about Bridged Extensions. 14 Message (MSG) button - ...
User Guide
Page 24
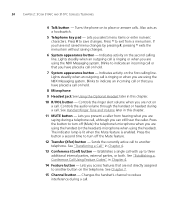
...phone on hold . 7 System appearance button - Blinks to another telephone. Lets you can still hear the caller. Sends the currently active call to another button on a call on to exit from hearing what you are using the NBX Messaging system. Lets you access features that you have placed a call . 24 CHAPTER 2: 3COM 3106C AND 3107C... CORDLESS TELEPHONES 4 Talk button - Also acts as a hookswitch. 5 Telephone key pad - If you have placed a call is enabled. Controls the ringer alert volume when you are using the NBX Messaging system....
...phone on hold . 7 System appearance button - Blinks to another telephone. Lets you can still hear the caller. Sends the currently active call to another button on a call on to exit from hearing what you are using the NBX Messaging system. Lets you access features that you have placed a call . 24 CHAPTER 2: 3COM 3106C AND 3107C... CORDLESS TELEPHONES 4 Talk button - Also acts as a hookswitch. 5 Telephone key pad - If you have placed a call is enabled. Controls the ringer alert volume when you are using the NBX Messaging system....
User Guide
Page 26
...be assigned other functions, such as Bridged Extensions. See Chapter 5. Accesses your NBX Administrator for more information, and see Chapter 6 for information about Bridged Extensions. Ask your NBX Administrator for more information, and see Chapter 6 for the label area below ...these Access buttons. See Chapter 3. Each System Appearance button lights as follows to define and print a new label for information about Bridged Extensions. 4 Message (MSG) button - 26 CHAPTER 2: 3COM 3106C AND 3107C...
...be assigned other functions, such as Bridged Extensions. See Chapter 5. Accesses your NBX Administrator for more information, and see Chapter 6 for information about Bridged Extensions. Ask your NBX Administrator for more information, and see Chapter 6 for the label area below ...these Access buttons. See Chapter 3. Each System Appearance button lights as follows to define and print a new label for information about Bridged Extensions. 4 Message (MSG) button - 26 CHAPTER 2: 3COM 3106C AND 3107C...
User Guide
Page 28
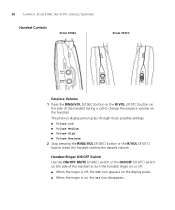
... on the handset. The phone's display panel cycles through these possible settings: ■ Volume Low ■ Volume Medium ■ Volume High ■ Volume Maximum 2 Stop pressing the RING/VOL (3106C) button or the R/VOL (3107C) button when the handset reaches the desired volume. 28 CHAPTER 2: 3COM 3106C AND 3107C CORDLESS TELEPHONES Handset Controls 3Com 3106C 3Com 3107C RING /VOL ON...
... on the handset. The phone's display panel cycles through these possible settings: ■ Volume Low ■ Volume Medium ■ Volume High ■ Volume Maximum 2 Stop pressing the RING/VOL (3106C) button or the R/VOL (3107C) button when the handset reaches the desired volume. 28 CHAPTER 2: 3COM 3106C AND 3107C CORDLESS TELEPHONES Handset Controls 3Com 3106C 3Com 3107C RING /VOL ON...

User Guide
Page 29
...AutoStandby mode) to change the ringer tone and volume. Using the Handset 29 Handset Ringer Tone and Volume 1 Press the RING/VOL (3106C) button or the R/VOL (3107C) button on the charger, the handset vibrates when there is an incoming call. ■ If you set the ringer off and the ...phone's display panel cycles through these possible settings: ■ Ring Type A High ■ Ring Type A Low ■ Ring Type B High ■ Ring Type B Low ■ Ring Type C High ■ Ring Type C Low ■ Ring Off Ring off is the handset Vibrate Mode. ■ If you set the ringer off using the NBX...
...AutoStandby mode) to change the ringer tone and volume. Using the Handset 29 Handset Ringer Tone and Volume 1 Press the RING/VOL (3106C) button or the R/VOL (3107C) button on the charger, the handset vibrates when there is an incoming call. ■ If you set the ringer off and the ...phone's display panel cycles through these possible settings: ■ Ring Type A High ■ Ring Type A Low ■ Ring Type B High ■ Ring Type B Low ■ Ring Type C High ■ Ring Type C Low ■ Ring Off Ring off is the handset Vibrate Mode. ■ If you set the ringer off using the NBX...
User Guide
Page 30
...enter a number that you receive a call, the handset rings and the display shows the calling phone's ID (if Caller ID is enabled). Example: 18085551840. 30 CHAPTER 2: 3COM 3106C AND 3107C CORDLESS TELEPHONES Or, depending on the condition, you may see one of Charging Unit Remove the handset... from the charging Press the Talk button. or Press the Talk button to hang up the phone. Making a Call 1 Press the Talk...
...enter a number that you receive a call, the handset rings and the display shows the calling phone's ID (if Caller ID is enabled). Example: 18085551840. 30 CHAPTER 2: 3COM 3106C AND 3107C CORDLESS TELEPHONES Or, depending on the condition, you may see one of Charging Unit Remove the handset... from the charging Press the Talk button. or Press the Talk button to hang up the phone. Making a Call 1 Press the Talk...

User Guide
Page 32
32 CHAPTER 2: 3COM 3106C AND 3107C CORDLESS TELEPHONES
32 CHAPTER 2: 3COM 3106C AND 3107C CORDLESS TELEPHONES
User Guide
Page 37
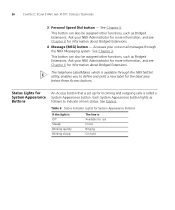
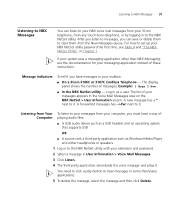
You need to click a play button to hear messages in as Windows Media Player, and either headphones or speakers 1 Log in to the NBX NetSet utility with your extension and password. 2 Select a message in User Information > Voice Mail Messages. 3 Click Listen. 4 The third-party ...it . A forwarded messages has -->Fw: next to it . Message Indicators To tell if you must have messages in your mailbox: ■ On a 3Com 3106C or 3107C Cordless Telephone - Log in some third-party applications. 5 To delete the message, select the message and then click Delete. After you listen to messages, you...
You need to click a play button to hear messages in as Windows Media Player, and either headphones or speakers 1 Log in to the NBX NetSet utility with your extension and password. 2 Select a message in User Information > Voice Mail Messages. 3 Click Listen. 4 The third-party ...it . A forwarded messages has -->Fw: next to it . Message Indicators To tell if you must have messages in your mailbox: ■ On a 3Com 3106C or 3107C Cordless Telephone - Log in some third-party applications. 5 To delete the message, select the message and then click Delete. After you listen to messages, you...

User Guide
Page 108
...System-Wide F + system-wide speed dial number List Transfer F + 420 + telephone number + hang up the handset. Speak (except 2101, 3101, 3106C, and 3107C) and listen without picking up Version F + 827 Volume Up or Down F + 102 to raise the sound or F + 103 to scroll through and...Dials" in Chapter 5 "Transferring a Call" in Chapter 4 Displays the NBX software version. Personal List F + personal speed dial number Speed Dial - On/Off F + 104 Speed Dial - 108 CHAPTER 7: FEATURE CODES Table 11 NBX Feature Codes (Alphabetical by Feature or Task) Feature Redial Release Show Lists ...
...System-Wide F + system-wide speed dial number List Transfer F + 420 + telephone number + hang up the handset. Speak (except 2101, 3101, 3106C, and 3107C) and listen without picking up Version F + 827 Volume Up or Down F + 102 to raise the sound or F + 103 to scroll through and...Dials" in Chapter 5 "Transferring a Call" in Chapter 4 Displays the NBX software version. Personal List F + personal speed dial number Speed Dial - On/Off F + 104 Speed Dial - 108 CHAPTER 7: FEATURE CODES Table 11 NBX Feature Codes (Alphabetical by Feature or Task) Feature Redial Release Show Lists ...

User Guide
Page 110
... office, each unit. ■ If you encounter interference or noise, press the CH button (3Com 3106C) or the Channel button (3Com 3107C), to windows, when coverage areas extend outdoors. ■ If you use 3Com 3106C units. ■ For optimum performance, place base units at least 15 feet apart. ■... desk or tabletop near a standard 120V AC outlet and an RJ45 connection to the LAN. Press the CH button (3Com 3106C) or the Channel button (3Com 3107C) to select a channel that avoids excessive heat or humidity. The base unit of electrical noise (motors, fluorescent lighting, computers).
... office, each unit. ■ If you encounter interference or noise, press the CH button (3Com 3106C) or the Channel button (3Com 3107C), to windows, when coverage areas extend outdoors. ■ If you use 3Com 3106C units. ■ For optimum performance, place base units at least 15 feet apart. ■... desk or tabletop near a standard 120V AC outlet and an RJ45 connection to the LAN. Press the CH button (3Com 3106C) or the Channel button (3Com 3107C) to select a channel that avoids excessive heat or humidity. The base unit of electrical noise (motors, fluorescent lighting, computers).

User Guide
Page 112
112 APPENDIX A: TELEPHONE INSTALLATION AND MAINTENANCE Applying Power to the Base and Charging Units 1 2 1 AC adapter 2 RJ45 connection to the LAN Use only the supplied AC adapter. CAUTION: Place the power cord so that it does not create a trip hazard, or where it could become chafed and create a fire or other electrical hazards. You can place the handset in the charging unit with or without the beltclip attached. Figure 9 3Com 3106C Charging Unit 1 1 AC adapter If you cannot plug the AC adapter into the outlet, contact someone about replacing the outlet.
112 APPENDIX A: TELEPHONE INSTALLATION AND MAINTENANCE Applying Power to the Base and Charging Units 1 2 1 AC adapter 2 RJ45 connection to the LAN Use only the supplied AC adapter. CAUTION: Place the power cord so that it does not create a trip hazard, or where it could become chafed and create a fire or other electrical hazards. You can place the handset in the charging unit with or without the beltclip attached. Figure 9 3Com 3106C Charging Unit 1 1 AC adapter If you cannot plug the AC adapter into the outlet, contact someone about replacing the outlet.

User Guide
Page 115
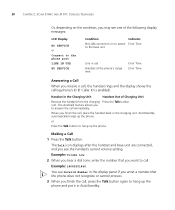
... the wall material. 1 Insert two mounting screws into the wall, with about 3/16 of an inch between the wall and screw heads for mounting the phone. 3Com 3106C 3Com 3107C 3/16 in. 1-1/5 in. 3/16 in. 1-9/10 in. Insert the screws 1-1/5 inches apart.
... the wall material. 1 Insert two mounting screws into the wall, with about 3/16 of an inch between the wall and screw heads for mounting the phone. 3Com 3106C 3Com 3107C 3/16 in. 1-1/5 in. 3/16 in. 1-9/10 in. Insert the screws 1-1/5 inches apart.

User Guide
Page 116
116 APPENDIX A: TELEPHONE INSTALLATION AND MAINTENANCE 2 Connect the charging unit to the wall mount stand: 3Com 3106C 3Com 3107C 1 1 Pass the one end through the hole of the Slide the wall mount stand into the notches on the bottom of the wall mount stand and plug it into the charging unit. Wrap the AC adapter cord Wrap the AC adapter cord around the strain relief (1).
116 APPENDIX A: TELEPHONE INSTALLATION AND MAINTENANCE 2 Connect the charging unit to the wall mount stand: 3Com 3106C 3Com 3107C 1 1 Pass the one end through the hole of the Slide the wall mount stand into the notches on the bottom of the wall mount stand and plug it into the charging unit. Wrap the AC adapter cord Wrap the AC adapter cord around the strain relief (1).

User Guide
Page 117
Installing on the Wall 117 3 Place the charging unit on the posts of the wall screws and push down until it is firmly seated. (1) indicates the strain relief on the 3Com 3107C. 3Com 3106C 3Com 3107C 1 3/16 in. 1-1/5 in. 3/16 in. 1-9/10 in. 4 Plug the AC adapter into a standard 120V AC wall outlet.
Installing on the Wall 117 3 Place the charging unit on the posts of the wall screws and push down until it is firmly seated. (1) indicates the strain relief on the 3Com 3107C. 3Com 3106C 3Com 3107C 1 3/16 in. 1-1/5 in. 3/16 in. 1-9/10 in. 4 Plug the AC adapter into a standard 120V AC wall outlet.

User Guide
Page 118
The beltclip is designed to your belt or pocket. 1 3Com 3106C only: Snap the cover tab out of the beltclip notch at the top of the handset. 2 Both telephones: Slide the beltclip into place. 4 Both telephones: ...To remove the beltclip, simultaneously press the retaining clip in toward the beltclip blade and slide the clip up. 3Com 3106C only: After the beltclip is removed, reinstall the cover tab. 118 APPENDIX A: TELEPHONE INSTALLATION AND MAINTENANCE Attaching the Beltclip to the Handset You can use...
The beltclip is designed to your belt or pocket. 1 3Com 3106C only: Snap the cover tab out of the beltclip notch at the top of the handset. 2 Both telephones: Slide the beltclip into place. 4 Both telephones: ...To remove the beltclip, simultaneously press the retaining clip in toward the beltclip blade and slide the clip up. 3Com 3106C only: After the beltclip is removed, reinstall the cover tab. 118 APPENDIX A: TELEPHONE INSTALLATION AND MAINTENANCE Attaching the Beltclip to the Handset You can use...