Getting Started Guide
Page 4
...27 Inserting a GBIC Transceiver 27 3 SETTING UP FOR MANAGEMENT Setting Up Overview 32 IP Configuration 33 Preparing for Management 34 Manually Configuring IP Information 35 Connecting to a Front Panel Port 35 Connecting to the Console Port 38 Viewing Automatically Configured IP Information 42 ...Using 3Com Network Supervisor 42 Connecting to the Console Port 42 Methods of Managing a Switch 45 Command Line Interface Management 45 Web Interface Management 46 SNMP Management 46 Setting Up Command Line...
...27 Inserting a GBIC Transceiver 27 3 SETTING UP FOR MANAGEMENT Setting Up Overview 32 IP Configuration 33 Preparing for Management 34 Manually Configuring IP Information 35 Connecting to a Front Panel Port 35 Connecting to the Console Port 38 Viewing Automatically Configured IP Information 42 ...Using 3Com Network Supervisor 42 Connecting to the Console Port 42 Methods of Managing a Switch 45 Command Line Interface Management 45 Web Interface Management 46 SNMP Management 46 Setting Up Command Line...
Getting Started Guide
Page 14
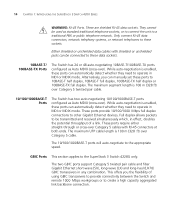
...need to create a high capacity aggregated link backbone connection. These ports provide 10/100/1000 Mbps full duplex connections to the SuperStack 3 Switch 4228G only. These are shielded RJ-45 data sockets. Alternatively, you the flexibility of a link. Full duplex allows packets to...Category 5 cable. While auto-negotiation is enabled, these ports can manually set these sockets. The 10/100/1000BASE-T ports will auto-negotiate to a traditional PBX or public telephone network. 14 CHAPTER 1: INTRODUCING THE SUPERSTACK 3 SWITCH 4200 SERIES WARNING: RJ-45 Ports. The maximum UTP cable ...
...need to create a high capacity aggregated link backbone connection. These ports provide 10/100/1000 Mbps full duplex connections to the SuperStack 3 Switch 4228G only. These are shielded RJ-45 data sockets. Alternatively, you the flexibility of a link. Full duplex allows packets to...Category 5 cable. While auto-negotiation is enabled, these ports can manually set these sockets. The 10/100/1000BASE-T ports will auto-negotiate to a traditional PBX or public telephone network. 14 CHAPTER 1: INTRODUCING THE SUPERSTACK 3 SWITCH 4200 SERIES WARNING: RJ-45 Ports. The maximum UTP cable ...

Getting Started Guide
Page 15
... flashing Packets are being transmitted/received on the port. Alternatively, auto-negotiation can be disabled and the flow control setting can be manually configured. 1000BaseT GBIC's These ports will auto-negotiate to color. Port Status LEDs GBIC ports Green A 1000 Mbps link is present...-T ports Green A 1000 Mbps link is present and the port is disabled. alternating Off No link is not possible to the "SuperStack 3 Switch Management Interface Reference Guide" on the CD-ROM that is auto-negotiation enabled, where speed, duplex and flow control modes are being...
... flashing Packets are being transmitted/received on the port. Alternatively, auto-negotiation can be disabled and the flow control setting can be manually configured. 1000BaseT GBIC's These ports will auto-negotiate to color. Port Status LEDs GBIC ports Green A 1000 Mbps link is present...-T ports Green A 1000 Mbps link is present and the port is disabled. alternating Off No link is not possible to the "SuperStack 3 Switch Management Interface Reference Guide" on the CD-ROM that is auto-negotiation enabled, where speed, duplex and flow control modes are being...
Getting Started Guide
Page 31
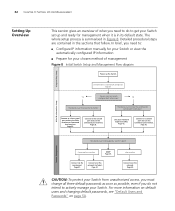
...■ Setting Up Overview ■ Manually Configuring IP Information ■ Viewing Automatically Configured IP Information ■ Methods of accessing the management software to change and monitor the way it will work straight away (plug-and-play). Managing the Switch can install it and it works, ...can help you have to make full use of your network. This chapter explains the initial set up of the Switch and the different methods of Managing a Switch ■ Setting Up Command Line Interface Management ■ Setting Up Web Interface Management ■ Setting Up SNMP ...
...■ Setting Up Overview ■ Manually Configuring IP Information ■ Viewing Automatically Configured IP Information ■ Methods of accessing the management software to change and monitor the way it will work straight away (plug-and-play). Managing the Switch can install it and it works, ...can help you have to make full use of your network. This chapter explains the initial set up of the Switch and the different methods of Managing a Switch ■ Setting Up Command Line Interface Management ■ Setting Up Web Interface Management ■ Setting Up SNMP ...
Getting Started Guide
Page 32
...Line Interface. Connect to the console port and use the Command Line Interface. Use 3Com Network Supervisor (3NS). Page 42. Connect via Telnet. Connect over the network. CAUTION: To protect your Switch from unauthorized access, you must change all three default passwords as soon as possible..., even if you want to manually No configure the IP information? 32 CHAPTER 3: SETTING UP FOR MANAGEMENT Setting Up...
...Line Interface. Connect to the console port and use the Command Line Interface. Use 3Com Network Supervisor (3NS). Page 42. Connect via Telnet. Connect over the network. CAUTION: To protect your Switch from unauthorized access, you must change all three default passwords as soon as possible..., even if you want to manually No configure the IP information? 32 CHAPTER 3: SETTING UP FOR MANAGEMENT Setting Up...
Getting Started Guide
Page 33
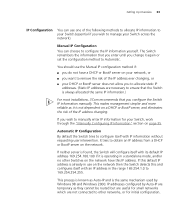
...in use on page 35. You should use one of the IP address ever changing, or ■ your Switch across the network). Manual IP Configuration You can use the Manual IP configuration method if: ■ you to allocate static IP addresses. (Static IP addresses are temporary as ...it is always allocated the same IP information.) For most installations, 3Com recommends that the Switch is not dependent on the network. Setting Up ...
...in use on page 35. You should use one of the IP address ever changing, or ■ your Switch across the network). Manual IP Configuration You can use the Manual IP configuration method if: ■ you to allocate static IP addresses. (Static IP addresses are temporary as ...it is always allocated the same IP information.) For most installations, 3Com recommends that the Switch is not dependent on the network. Setting Up ...

Getting Started Guide
Page 34
... management method as a DHCP or BootP server is detected, the Switch will configure itself with the Switch or on page 42. For a detailed description of Managing a Switch" on the 3Com Web site. If the Switch is re-deployed onto a different subnet, it will automatically reconfigure ...using automatic IP configuration it will be allocated to manually reconfigure the Switch. Refer to manage. If you know what IP address will be configured so that accompanies your network uses DHCP or BootP to the "SuperStack 3 Switch Management Interface Reference Guide" on the CD-ROM ...
... management method as a DHCP or BootP server is detected, the Switch will configure itself with the Switch or on page 42. For a detailed description of Managing a Switch" on the 3Com Web site. If the Switch is re-deployed onto a different subnet, it will automatically reconfigure ...using automatic IP configuration it will be allocated to manually reconfigure the Switch. Refer to manage. If you know what IP address will be configured so that accompanies your network uses DHCP or BootP to the "SuperStack 3 Switch Management Interface Reference Guide" on the CD-ROM ...
Getting Started Guide
Page 35
... IP information using the command line interface (CLI). You must do this section assumes the unit has been powered up your Switch manually you connect the Switch to a network. refer to "Choosing a Browser"on page 48. ■ You need to have the following ways: ■ Connecting to a front panel port - The procedure ...
... IP information using the command line interface (CLI). You must do this section assumes the unit has been powered up your Switch manually you connect the Switch to a network. refer to "Choosing a Browser"on page 48. ■ You need to have the following ways: ■ Connecting to a front panel port - The procedure ...
Getting Started Guide
Page 36
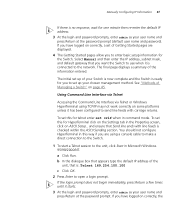
... to one minute. 2 Open a suitable Web browser and enter 169.254.100.100 in the Location Address field. Make a note of the Ethernet cable to manually set up the Switch. Change the workstation to the following settings: ■ IP address - 169.254.100.99 ■ Subnet mask - 255.255.0.0 Setting Up the...one end of the existing settings so you have connected to change the IP address and subnet mask of the front panel ports on the Switch. This takes approximately one of the workstation that is the default IP address that you can do this using an Ethernet cable as shown in...
... to one minute. 2 Open a suitable Web browser and enter 169.254.100.100 in the Location Address field. Make a note of the Ethernet cable to manually set up the Switch. Change the workstation to the following settings: ■ IP address - 169.254.100.99 ■ Subnet mask - 255.255.0.0 Setting Up the...one end of the existing settings so you have connected to change the IP address and subnet mask of the front panel ports on the Switch. This takes approximately one of the workstation that is the default IP address that you can do this using an Ethernet cable as shown in...
Getting Started Guide
Page 37
...does not begin immediately, press Return a few times until it starts. 3 At the login and password prompts, enter admin as your Switch is now complete and the Switch is ready for you to set of Getting Started pages are using TCP/IP may not work correctly on correctly, a set up ...Command Line Interface via Telnet or Windows HyperTerminal using a console cable to make a direct connection to the Switch. 1 To start a Telnet session to the unit, click Start in this for the Switch. Select Manual and then enter the IP address, subnet mask, and default gateway that is: Telnet 169.254.100....
...does not begin immediately, press Return a few times until it starts. 3 At the login and password prompts, enter admin as your Switch is now complete and the Switch is ready for you to set of Getting Started pages are using TCP/IP may not work correctly on correctly, a set up ...Command Line Interface via Telnet or Windows HyperTerminal using a console cable to make a direct connection to the Switch. 1 To start a Telnet session to the unit, click Start in this for the Switch. Select Manual and then enter the IP address, subnet mask, and default gateway that is: Telnet 169.254.100....
Getting Started Guide
Page 38
...manual...Switch is now complete and the Switch is ready for the Switch.... You can do this example describes a local connection to the console port, rather than a remote one via a modem). Basic device configuration logout - Administer physical interfaces protocol - Administer protocols security - At the Enter configuration method prompt enter manual...Switch manually you can alternatively make a connection to the console port (this whilst the Switch is offline, that is, before you connect the Switch to a network, or whilst the Switch... a Switch" on...
...manual...Switch is now complete and the Switch is ready for the Switch.... You can do this example describes a local connection to the console port, rather than a remote one via a modem). Basic device configuration logout - Administer physical interfaces protocol - Administer protocols security - At the Enter configuration method prompt enter manual...Switch manually you can alternatively make a connection to the console port (this whilst the Switch is offline, that is, before you connect the Switch to a network, or whilst the Switch... a Switch" on...
Getting Started Guide
Page 39
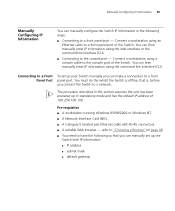
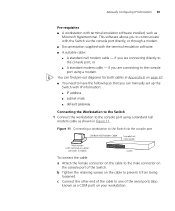
You can manually set up the Switch with IP information: ■ IP address ■ subnet mask ■ default gateway Connecting the Workstation to the Switch 1 Connect the workstation to the console port using a modem. if you can find pin-out diagrams for... 11 Connecting a workstation to the Switch via the console port directly, or through a modem. ■ Documentation supplied with the terminal emulation software. ■ A suitable cable: ■ A standard null modem cable - Manually Configuring IP Information 39 Pre-requisites ■ A workstation with terminal emulation software ...
You can manually set up the Switch with IP information: ■ IP address ■ subnet mask ■ default gateway Connecting the Workstation to the Switch 1 Connect the workstation to the console port using a modem. if you can find pin-out diagrams for... 11 Connecting a workstation to the Switch via the console port directly, or through a modem. ■ Documentation supplied with the terminal emulation software. ■ A suitable cable: ■ A standard null modem cable - Manually Configuring IP Information 39 Pre-requisites ■ A workstation with terminal emulation software ...
Getting Started Guide
Page 40
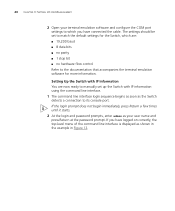
... menu of the command line interface is displayed as your terminal emulation software and configure the COM port settings to which are now ready to manually set to its console port. 40 CHAPTER 3: SETTING UP FOR MANAGEMENT 2 Open your user name and press Return at the password prompt. The... settings should be set up the Switch with IP Information You are : ■ 19,200 baud ■ 8 data bits ■ no parity ■ 1 stop bit ■ no hardware flow ...
... menu of the command line interface is displayed as your terminal emulation software and configure the COM port settings to which are now ready to manually set to its console port. 40 CHAPTER 3: SETTING UP FOR MANAGEMENT 2 Open your user name and press Return at the password prompt. The... settings should be set up the Switch with IP Information You are : ■ 19,200 baud ■ 8 data bits ■ no parity ■ 1 stop bit ■ no hardware flow ...
Getting Started Guide
Page 41
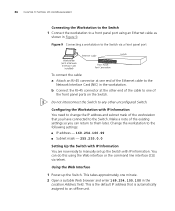
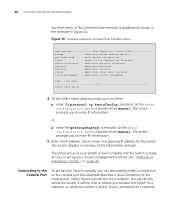
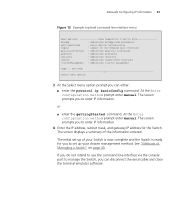
...Figure 12 Example top-level command line interface menu Menu options 3Com Superstack 3 Switch 4200 bridge - Basic device configuration logout - Administer protocols security - Administer security system - At the Enter configuration method prompt enter manual. The screen prompts you to enter IP information. See "... Administer traffic management Type ? At the Enter configuration method prompt enter manual. If you do not intend to use the command line interface via the console port to manage the Switch, you to enter IP information. 4 Enter the IP address, subnet ...
...Figure 12 Example top-level command line interface menu Menu options 3Com Superstack 3 Switch 4200 bridge - Basic device configuration logout - Administer protocols security - Administer security system - At the Enter configuration method prompt enter manual. The screen prompts you to enter IP information. See "... Administer traffic management Type ? At the Enter configuration method prompt enter manual. If you do not intend to use the command line interface via the console port to manage the Switch, you to enter IP information. 4 Enter the IP address, subnet ...
Getting Started Guide
Page 81
INDEX Numbers 10/100/1000BASE-T ports 14 3C number 22 3Com Knowledgebase Web Services 76 3Com URL 75 A access levels of default users 50 automatic setup 42 3Com Network Supervisor 42 console port 42 B browsers choosing 48 C cable choosing the correct 25 fiber 26 maximum length 14 pin-outs 67 CD...addressing registered 56 IP configuration 33 L LEDs 15 logging in as a default user 50 M MAC address of the Switch 22 management methods 45 preparing for 34 setting up 31, 32 manual setup console port 38 front panel port 35 MDI configuration 25 MDIX configuration 25 N network supplier support 76 O online...
INDEX Numbers 10/100/1000BASE-T ports 14 3C number 22 3Com Knowledgebase Web Services 76 3Com URL 75 A access levels of default users 50 automatic setup 42 3Com Network Supervisor 42 console port 42 B browsers choosing 48 C cable choosing the correct 25 fiber 26 maximum length 14 pin-outs 67 CD...addressing registered 56 IP configuration 33 L LEDs 15 logging in as a default user 50 M MAC address of the Switch 22 management methods 45 preparing for 34 setting up 31, 32 manual setup console port 38 front panel port 35 MDI configuration 25 MDIX configuration 25 N network supplier support 76 O online...


