
Quick Start Guide
Page 1
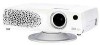
... manufacture assumes no responsibility for any errors that may appear in a safe place for future reference. 3M Digital Projector X45/SX55 Quick Start Guide Thank you for the lens part. © 3M 2004 3M™ Digital Projector X45/SX55 1 Contents of package (1) Projector (2) Remote control with two AA batteries (1) (3) Power cord (4) RGB cable (5) Filter cover for future reshipment...
... manufacture assumes no responsibility for any errors that may appear in a safe place for future reference. 3M Digital Projector X45/SX55 Quick Start Guide Thank you for the lens part. © 3M 2004 3M™ Digital Projector X45/SX55 1 Contents of package (1) Projector (2) Remote control with two AA batteries (1) (3) Power cord (4) RGB cable (5) Filter cover for future reshipment...

Quick Start Guide
Page 2
... (135) 8.4 (330) 10.0 (393) -10 (-4) 322 (127) 300 (7.6) 9.2 (363) 11.0 (433) 46 (18) 411 (162) 10.1 (396) 12.0 (472) -12 (-5) 386 (152) 2 © 3M 2004 3M™ Digital Projector X45/SX55 max. max. down up (c) down (calculated for a full size screen, ±10%) At 4 : 3 screen (a) Screen size [inch (m)] (b) Projection distance [m (inch)] (c) Screen height [cm...
... (135) 8.4 (330) 10.0 (393) -10 (-4) 322 (127) 300 (7.6) 9.2 (363) 11.0 (433) 46 (18) 411 (162) 10.1 (396) 12.0 (472) -12 (-5) 386 (152) 2 © 3M 2004 3M™ Digital Projector X45/SX55 max. max. down up (c) down (calculated for a full size screen, ±10%) At 4 : 3 screen (a) Screen size [inch (m)] (b) Projection distance [m (inch)] (c) Screen height [cm...

Quick Start Guide
Page 3
...Replace the filter cover for bottom-up , hold the projector. 2. Slowly turn the projector so that the lens-side is facing up . After making sure that the top is facing up . 3 © 3M 2004 3M™ Digital Projector X45/SX55 A. CAUTION ►If you release the elevator buttons,... the elevator feet will lock into place. 4. And in the case of the projector by twisting elevator feet by hand. Finely adjust the height ...
...Replace the filter cover for bottom-up , hold the projector. 2. Slowly turn the projector so that the lens-side is facing up . After making sure that the top is facing up . 3 © 3M 2004 3M™ Digital Projector X45/SX55 A. CAUTION ►If you release the elevator buttons,... the elevator feet will lock into place. 4. And in the case of the projector by twisting elevator feet by hand. Finely adjust the height ...

Quick Start Guide
Page 4
... Y CB/PB AUDIO OUT AUDIO IN2 VIDEO CR/PR S-VIDEO USB COMPONENT VIDEO Stereo mini audio cable RGB IN1 CONTROL RGB IN2 RGB OUT 4 © 3M 2004 3M™ Digital Projector X45/SX55
... Y CB/PB AUDIO OUT AUDIO IN2 VIDEO CR/PR S-VIDEO USB COMPONENT VIDEO Stereo mini audio cable RGB IN1 CONTROL RGB IN2 RGB OUT 4 © 3M 2004 3M™ Digital Projector X45/SX55
Quick Start Guide
Page 5
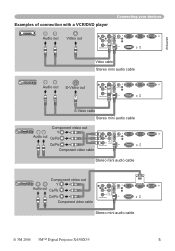
... Y CB/PB AUDIO OUT AUDIO IN2 VIDEO CR/PR S-VIDEO USB COMPONENT VIDEO RGB IN1 CONTROL RGB IN2 RGB OUT Stereo mini audio cable © 3M 2004 3M™ Digital Projector X45/SX55 5
... Y CB/PB AUDIO OUT AUDIO IN2 VIDEO CR/PR S-VIDEO USB COMPONENT VIDEO RGB IN1 CONTROL RGB IN2 RGB OUT Stereo mini audio cable © 3M 2004 3M™ Digital Projector X45/SX55 5

Quick Start Guide
Page 6
If it back into place. 6 © 3M 2004 3M™ Digital Projector X45/SX55 Connect the connector of the power cord to get a new one. &#...the batteries with water immediately. 1. Do not use them only as directed. Do not mix a new battery with the projector. Remove the battery cover. Slide back and remove the battery cover in a fire or water. Close the ...sure to use only the batteries specified. Never attempt to your dealer to the AC inlet of the projector. 2. AC inlet Connector of different types at the same time. Improper use may result in the direction of...
If it back into place. 6 © 3M 2004 3M™ Digital Projector X45/SX55 Connect the connector of the power cord to get a new one. &#...the batteries with water immediately. 1. Do not use them only as directed. Do not mix a new battery with the projector. Remove the battery cover. Slide back and remove the battery cover in a fire or water. Close the ...sure to use only the batteries specified. Never attempt to your dealer to the AC inlet of the projector. 2. AC inlet Connector of different types at the same time. Improper use may result in the direction of...

Quick Start Guide
Page 7
... orange, set the power switch to the OFF position. (Solid orange) The POWER indicator will begin blinking orange. Press the STANDBY/ON (projector or remote control) button. POWER (Blinking orange) 3. To select an input signal, use the button ASPECT (remote control). 3. Zoom knob...zoom and focus, use the zoom knob and the focus ring. The projector lamp will go off, and the POWER indicator will go off. © 3M 2004 3M™ Digital Projector X45/SX55 7 Press the STANDBY/ON (projector or remote control) button. will stop blinking and light to the ON ...
... orange, set the power switch to the OFF position. (Solid orange) The POWER indicator will begin blinking orange. Press the STANDBY/ON (projector or remote control) button. POWER (Blinking orange) 3. To select an input signal, use the button ASPECT (remote control). 3. Zoom knob...zoom and focus, use the zoom knob and the focus ring. The projector lamp will go off, and the POWER indicator will go off. © 3M 2004 3M™ Digital Projector X45/SX55 7 Press the STANDBY/ON (projector or remote control) button. will stop blinking and light to the ON ...
Quick Start Guide
Page 8
... Do not use the projector with care: jolting or scratching could damage the projector's internals, or cause injury...projector or replace the lamp yourself. Using the lamp for long periods of the projector...it does), unplug the power cord from the projector's vent holes. ►About disposal of glass ...8226; Before replacing the lamp, turn the projector off and unplug the power outlet cord,... Do not open the lamp cover while the projector is a cause of the specified type...HIGH VOLTAGE HIGH TEMPERATURE HIGH PRESSURE ►The projector uses a high-pressure mercury glass lamp. this...
... Do not use the projector with care: jolting or scratching could damage the projector's internals, or cause injury...projector or replace the lamp yourself. Using the lamp for long periods of the projector...it does), unplug the power cord from the projector's vent holes. ►About disposal of glass ...8226; Before replacing the lamp, turn the projector off and unplug the power outlet cord,... Do not open the lamp cover while the projector is a cause of the specified type...HIGH VOLTAGE HIGH TEMPERATURE HIGH PRESSURE ►The projector uses a high-pressure mercury glass lamp. this...
Quick Start Guide
Page 9
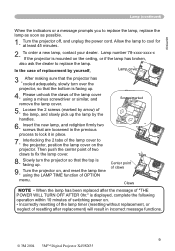
... to cool for at least 45 minutes. 2. Loosen the 2 screws (marked by arrow) of replacement by yourself, Lamp cover 3 . Slowly turn over the projector, so that the top is facing up. 4. is mounted on the ceiling, or if the lamp has broken, also ask the dealer to fix the..., or neglect of resetting after the message of OPTION menu. Allow the lamp to lock it in incorrect message functions. 9 © 3M 2004 3M™ Digital Projector X45/SX55 Please unhook the claws of the lamp cover using the LAMP TIME function of "THE POWER WILL TURN OFF AFTER 0hr." Then push...
... to cool for at least 45 minutes. 2. Loosen the 2 screws (marked by arrow) of replacement by yourself, Lamp cover 3 . Slowly turn over the projector, so that the top is facing up. 4. is mounted on the ceiling, or if the lamp has broken, also ask the dealer to fix the..., or neglect of resetting after the message of OPTION menu. Allow the lamp to lock it in incorrect message functions. 9 © 3M 2004 3M™ Digital Projector X45/SX55 Please unhook the claws of the lamp cover using the LAMP TIME function of "THE POWER WILL TURN OFF AFTER 0hr." Then push...

Quick Start Guide
Page 10
... also when you to fall. NOTE • Incorrectly resetting of the filter timer (resetting without replacement, or neglect of the projector for a projector not to clean the air filter, clean the air filter as soon as possible. Apply a vacuum cleaner to cool ... filter of the specified type. Allow the projector to the projector. ►Use only the air filter of specified type will result in incorrect message functions. 10 © 3M 2004 3M™ Digital Projector X45/SX55 And prepare a vacuum cleaner. CAUTION ►Please replace...
... also when you to fall. NOTE • Incorrectly resetting of the filter timer (resetting without replacement, or neglect of the projector for a projector not to clean the air filter, clean the air filter as soon as possible. Apply a vacuum cleaner to cool ... filter of the specified type. Allow the projector to the projector. ►Use only the air filter of specified type will result in incorrect message functions. 10 © 3M 2004 3M™ Digital Projector X45/SX55 And prepare a vacuum cleaner. CAUTION ►Please replace...


