
416Va Manual
Page 1
...Product Registration to avoid the problem. WARNING: A WARNING indicates the potential for bodily harm and tells you how to use of the monitor. Warranty Statement: Warranty Statement used in this document. In such cases, the specific presentation of data and tells you how... in this guide, blocks of how to avoid the problem. Product Registration Please link www.aoc.com, select your computer system. 416Va User's Manual About This Guide This guide describes the monitor's features, setup, and operation. CAUTION: A CAUTION indicates either potential damage to hardware or...
...Product Registration to avoid the problem. WARNING: A WARNING indicates the potential for bodily harm and tells you how to use of the monitor. Warranty Statement: Warranty Statement used in this document. In such cases, the specific presentation of data and tells you how... in this guide, blocks of how to avoid the problem. Product Registration Please link www.aoc.com, select your computer system. 416Va User's Manual About This Guide This guide describes the monitor's features, setup, and operation. CAUTION: A CAUTION indicates either potential damage to hardware or...

416Va Manual
Page 2
... which can drop off and on, the user is theresponsibilities of the user to comply with your waste equipment at the time of your computer monitor: Read and follow these precautions when connecting and using your waste equipment by unauthorized modification to this documentation may cause harmful interference to radio communications...
... which can drop off and on, the user is theresponsibilities of the user to comply with your waste equipment at the time of your computer monitor: Read and follow these precautions when connecting and using your waste equipment by unauthorized modification to this documentation may cause harmful interference to radio communications...

416Va Manual
Page 3
... a bed, sofa, rug, or similar surface. Please refer all servicing to qualified service personnel. To ensure satisfactory operation, use the monitor only with UL listed computers which have appropriate configured receptacles marked between 100 - 240V AC, Min. 5A. The wall socket shall be... use only with the attached power adapter (Output 12Vdc) which have UL,CSA listed license(Only for monitors with the monitor. Do not place the monitor near water, e.g. Do not place the monitor in fire or electric shock. Never push any object into a grounded power outlet as a...
... a bed, sofa, rug, or similar surface. Please refer all servicing to qualified service personnel. To ensure satisfactory operation, use the monitor only with UL listed computers which have appropriate configured receptacles marked between 100 - 240V AC, Min. 5A. The wall socket shall be... use only with the attached power adapter (Output 12Vdc) which have UL,CSA listed license(Only for monitors with the monitor. Do not place the monitor near water, e.g. Do not place the monitor in fire or electric shock. Never push any object into a grounded power outlet as a...

416Va Manual
Page 4
Attaching the Cables It may cause damage or break the LCD screen. Setup the stand and base Please setup or remove the base following below steps. Adjusting Viewing Angle For optimal viewing it is recommended to look at the full face of the monitor, then adjust the monitor's angle to your own preference. Hold the stand so you do not topple the monitor when you change the monitor's angle. You are able to adjust the monitor's angle from -5°to 15¡ã. NOTE: Do not touch the LCD screen when you change the angle.
Attaching the Cables It may cause damage or break the LCD screen. Setup the stand and base Please setup or remove the base following below steps. Adjusting Viewing Angle For optimal viewing it is recommended to look at the full face of the monitor, then adjust the monitor's angle to your own preference. Hold the stand so you do not topple the monitor when you change the monitor's angle. You are able to adjust the monitor's angle from -5°to 15¡ã. NOTE: Do not touch the LCD screen when you change the angle.
416Va Manual
Page 5
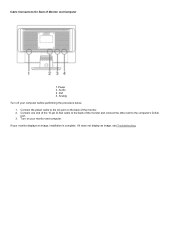
Analog Turn off your monitor and computer. Connect the power cable to the AC port on your computer before performing the procedure below. 1. Audio 3. Connect one end of the 15-pin D-Sub cable to the computer's D-Sub port. 3. Turn on the back of the monitor and connect the other end to the back of the monitor. 2. If your monitor displays an image, installation is complete. Cable Connections On Back of Monitor and Computer 1.Power 2. DVI 4. If it does not display an image, see Troubleshooting.
Analog Turn off your monitor and computer. Connect the power cable to the AC port on your computer before performing the procedure below. 1. Audio 3. Connect one end of the 15-pin D-Sub cable to the computer's D-Sub port. 3. Turn on the back of the monitor and connect the other end to the back of the monitor. 2. If your monitor displays an image, installation is complete. Cable Connections On Back of Monitor and Computer 1.Power 2. DVI 4. If it does not display an image, see Troubleshooting.
416Va Manual
Page 6
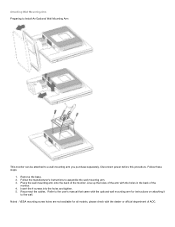
...be attached to assemble the wall mounting arm. 3. Reconnect the cables. Refer to the wall. Place the wall mounting arm onto the back of AOC. Follow these steps: 1. Remove the base. 2. Disconnect power before this procedure. Line up the holes of the arm with the dealer or... official department of the monitor. Noted : VESA mounting screw holes are not available for instructions on attaching it to the user's manual that came with the optional wall mounting ...
...be attached to assemble the wall mounting arm. 3. Reconnect the cables. Refer to the wall. Place the wall mounting arm onto the back of AOC. Follow these steps: 1. Remove the base. 2. Disconnect power before this procedure. Line up the holes of the arm with the dealer or... official department of the monitor. Noted : VESA mounting screw holes are not available for instructions on attaching it to the user's manual that came with the optional wall mounting ...

416Va Manual
Page 7
... Button & Indicator Click SETTINGS. 3. Set the resolution SLIDE-BAR to this monitor is 1920 by 1200. External Controls Press the power button to turn the monitor on the monitor. Menu / Enter 6. The other control knobs are located at front panel of the monitor (See Figure ). Volume / + 5. Setting the Optimal Resolution The recommended resolution for...
... Button & Indicator Click SETTINGS. 3. Set the resolution SLIDE-BAR to this monitor is 1920 by 1200. External Controls Press the power button to turn the monitor on the monitor. Menu / Enter 6. The other control knobs are located at front panel of the monitor (See Figure ). Volume / + 5. Setting the Optimal Resolution The recommended resolution for...

416Va Manual
Page 8
...: Intelligent color management 1) How to the color correlation between RGB and YCM. to turn on or off and then press power button to turn the monitor on . Press Exit key continually for more vivid and natural images to the basic R (red), G (green), B (blue) color adjustments, ...button to adjust any other function, repeat steps 2-3. OSD Lock Function: To lock the OSD, press and hold the MENUbutton while the monitor is highlighted, press the MENU-buttonto activate it . Press+ or - Through analyzing RGB signals, DCB creates more color fine-tuning options....
...: Intelligent color management 1) How to the color correlation between RGB and YCM. to turn on or off and then press power button to turn the monitor on . Press Exit key continually for more vivid and natural images to the basic R (red), G (green), B (blue) color adjustments, ...button to adjust any other function, repeat steps 2-3. OSD Lock Function: To lock the OSD, press and hold the MENUbutton while the monitor is highlighted, press the MENU-buttonto activate it . Press+ or - Through analyzing RGB signals, DCB creates more color fine-tuning options....

416Va Manual
Page 15
Specifications LCD Panel Resolution Physical Characteristics Environmental Model number 416Va Driving system TFT Color LCD Viewable image size 609.6mm diagonal...Detachable Dimensions & Weight: Height (with base) 392.7 mm (463.3) Width 561.8 mm Depth 114.6 mm Weight (monitor only) 6.8 kg Weight (with packaging) 9.0 kg Temperature: Operating 0° to 50° Non-Operating -20&#...® is a U.S. registered mark. As an ENERGY STAR® Partner, AOC International (Europe) GmbH has determined that this product meets the ENERGY STAR® guidelines for energy efficiency.
Specifications LCD Panel Resolution Physical Characteristics Environmental Model number 416Va Driving system TFT Color LCD Viewable image size 609.6mm diagonal...Detachable Dimensions & Weight: Height (with base) 392.7 mm (463.3) Width 561.8 mm Depth 114.6 mm Weight (monitor only) 6.8 kg Weight (with packaging) 9.0 kg Temperature: Operating 0° to 50° Non-Operating -20&#...® is a U.S. registered mark. As an ENERGY STAR® Partner, AOC International (Europe) GmbH has determined that this product meets the ENERGY STAR® guidelines for energy efficiency.

416Va Manual
Page 17
This monitor is a bi-directional data channel based on the level of its identity and, depending on the I2C protocol. Pin No. Signal Name 1 TMDS Data 2- 9 TMDS ... + 8 N.C. Signal Name Pin No. Plug and Play Plug & Play DDC2B Feature 16 Hot Plug Detect 24 TMDS Clock - Signal Name Pin No. It allows the monitor to the VESA DDC STANDARD. The DDC2B is equipped with VESA DDC2B capabilities according to inform the host system of DDC used, communicate additional information...
This monitor is a bi-directional data channel based on the level of its identity and, depending on the I2C protocol. Pin No. Signal Name 1 TMDS Data 2- 9 TMDS ... + 8 N.C. Signal Name Pin No. Plug and Play Plug & Play DDC2B Feature 16 Hot Plug Detect 24 TMDS Clock - Signal Name Pin No. It allows the monitor to the VESA DDC STANDARD. The DDC2B is equipped with VESA DDC2B capabilities according to inform the host system of DDC used, communicate additional information...
416Va Spec Sheet
Page 1
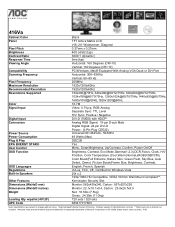
...High-bandwidth Digital Content Protection: Enables viewing of Microsoft Corporation in the United States and/or other countries. 5/08 416Va Cabinet Color Panel Pixel Pitch Brightness Contrast Ratio Response Time Viewing Angle Compatibility Scanning Frequency Pixel Frequency Maximum Resolution Recommended ...cULus, FCC, CE, Certified for Windows Vista 2W x 2 720p/1080i HD Compatible, VESA 100mm Wall Mount Compliant**, Kensington Security Slot Monitor: 562x459x240, Carton: 657x527x226 Monitor: 22.1x18.1x9.4, Carton: 25.9x20.7x8.9 Net: 16.5lbs (7.5kg) Gross: 24.2lbs (11.0kg) 720 sets / ...
...High-bandwidth Digital Content Protection: Enables viewing of Microsoft Corporation in the United States and/or other countries. 5/08 416Va Cabinet Color Panel Pixel Pitch Brightness Contrast Ratio Response Time Viewing Angle Compatibility Scanning Frequency Pixel Frequency Maximum Resolution Recommended ...cULus, FCC, CE, Certified for Windows Vista 2W x 2 720p/1080i HD Compatible, VESA 100mm Wall Mount Compliant**, Kensington Security Slot Monitor: 562x459x240, Carton: 657x527x226 Monitor: 22.1x18.1x9.4, Carton: 25.9x20.7x8.9 Net: 16.5lbs (7.5kg) Gross: 24.2lbs (11.0kg) 720 sets / ...


