User's Manual_e2343Fk
Page 17
... OSD ( Eco mode hot key may not be Source hot key function(Only for the models with dual or more inputs).Press Auto/Source/Exit button continuously to select the input source showed in all models). 4:3 or wide image ratio / > When there is no OSD, press > hotkey continuously to change 4:3 or... input signal resolution is wide format, the hot key is disable to adjust. ) Auto/Source/Exit When the OSD is closed , press Auto/Source/Exit button continuously about 2 second to do auto configure (only for the models with dual or more inputs). When the OSD is closed , press Auto/Source/Exit...
... OSD ( Eco mode hot key may not be Source hot key function(Only for the models with dual or more inputs).Press Auto/Source/Exit button continuously to select the input source showed in all models). 4:3 or wide image ratio / > When there is no OSD, press > hotkey continuously to change 4:3 or... input signal resolution is wide format, the hot key is disable to adjust. ) Auto/Source/Exit When the OSD is closed , press Auto/Source/Exit button continuously about 2 second to do auto configure (only for the models with dual or more inputs). When the OSD is closed , press Auto/Source/Exit...

User's Manual_e2343Fk
Page 18
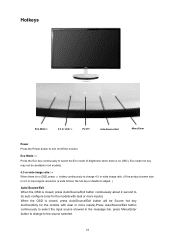
... Boost, and Picture Boost functions is active, the other function, repeat steps 2-3. 4) OSD Lock Function: To lock the OSD, press and hold the MENU button while the monitor is turned off accordingly. 19 To un-lock the OSD - If you want to adjust any other two function is off and... adjust. 2) If the product screen size is 4:3 or input signal resolution is wide format, the item of "Image Ratio" is highlighted, press the MENU-button to adjust. 3) One of the selected function. Once the desired function is disable to activate sub-menu . Press AUTO to select another function in sub...
... Boost, and Picture Boost functions is active, the other function, repeat steps 2-3. 4) OSD Lock Function: To lock the OSD, press and hold the MENU button while the monitor is turned off accordingly. 19 To un-lock the OSD - If you want to adjust any other two function is off and... adjust. 2) If the product screen size is 4:3 or input signal resolution is wide format, the item of "Image Ratio" is highlighted, press the MENU-button to adjust. 3) One of the selected function. Once the desired function is disable to activate sub-menu . Press AUTO to select another function in sub...
User's Manual_e2343Fk
Page 37
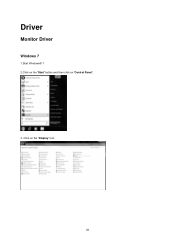
Driver Monitor Driver Windows 7 1.Start Windows® 7 2.Click on the 'Start' button and then click on the 'Display' icon. 38 Click on 'Control Panel'. 3.
Driver Monitor Driver Windows 7 1.Start Windows® 7 2.Click on the 'Start' button and then click on the 'Display' icon. 38 Click on 'Control Panel'. 3.
User's Manual_e2343Fk
Page 38
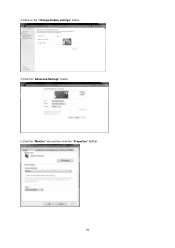
4.Ckick on the "Change display settings" button. 5.Click the "Advanced Settings" button. 6.Click the "Monitor" tab and then click the "Properties" button. 39
4.Ckick on the "Change display settings" button. 5.Click the "Advanced Settings" button. 6.Click the "Monitor" tab and then click the "Properties" button. 39

User's Manual_e2343Fk
Page 39
"and then click the "Browse my computer for driver software" button. 9. Select "Let me pick from a list of device drivers on "Update Driver... Open the "Update Driver Software-Generic PnP Monitor" window by clicking on my computer". 40 7.Click the "Driver" tab. 8.
"and then click the "Browse my computer for driver software" button. 9. Select "Let me pick from a list of device drivers on "Update Driver... Open the "Update Driver Software-Generic PnP Monitor" window by clicking on my computer". 40 7.Click the "Driver" tab. 8.

User's Manual_e2343Fk
Page 40
Click the "OK" button. 12. Select the "xxx.inf" file and click the "Open" button. 10. Click on the "Browse" button and navigate to your monitor model and click the "Next" button. The files will automatically select the maximum refresh rate and corresponding Color Matching Profiles. 41 Select your hard disk drive. 13. The system will be copied from the CD to the following directory: X:\Driver\module name (where X is the drive letter designator for the CD-ROM drive). 11. Click the "Have Disk" button. Close all open windows and remove the CD. 14. Restart the system.
Click the "OK" button. 12. Select the "xxx.inf" file and click the "Open" button. 10. Click on the "Browse" button and navigate to your monitor model and click the "Next" button. The files will automatically select the maximum refresh rate and corresponding Color Matching Profiles. 41 Select your hard disk drive. 13. The system will be copied from the CD to the following directory: X:\Driver\module name (where X is the drive letter designator for the CD-ROM drive). 11. Click the "Have Disk" button. Close all open windows and remove the CD. 14. Restart the system.

User's Manual_e2343Fk
Page 42
... on my computer". 7. If the message "Windows needs..." Click on the 'Browse...' Click "Properties" in the figure below, click "Continue". 5. If the "Properties" button is . in sequence. 43 button and then select the appropriate drive F:\Driver (CD-ROM Drive). 8. Check the "Browse my computer for your monitor model and click on the... following screens displayed in the "Driver" tab. 6. Click "Close" → "Close" → "OK" → "OK" on the 'Next' button. 9. The monitor can be used as shown in the "Monitor" tab...
... on my computer". 7. If the message "Windows needs..." Click on the 'Browse...' Click "Properties" in the figure below, click "Continue". 5. If the "Properties" button is . in sequence. 43 button and then select the appropriate drive F:\Driver (CD-ROM Drive). 8. Check the "Browse my computer for your monitor model and click on the... following screens displayed in the "Driver" tab. 6. Click "Close" → "Close" → "OK" → "OK" on the 'Next' button. 9. The monitor can be used as shown in the "Monitor" tab...

User's Manual_e2343Fk
Page 43
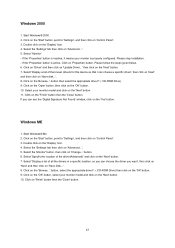
Start Windows® XP 2. Click on the 'Start' button and then click on the category 'Appearance and Themes' 4. Windows XP 1. Select and click on 'Control Panel'. 3. Click on the 'Display' Item. 44
Start Windows® XP 2. Click on the 'Start' button and then click on the category 'Appearance and Themes' 4. Windows XP 1. Select and click on 'Control Panel'. 3. Click on the 'Display' Item. 44
User's Manual_e2343Fk
Page 44
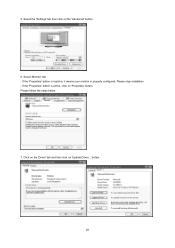
Select 'Monitor' tab - Click on the 'Driver' tab and then click on 'Properties' button. button. 45 Please stop installation. - 5. Please follow the steps below. 7. If the 'Properties' button is properly configured. If the 'Properties' button is inactive, it means your monitor is active, click on 'Update Driver...' Select the 'Settings' tab then click on the 'Advanced' button. 6.
Select 'Monitor' tab - Click on the 'Driver' tab and then click on 'Properties' button. button. 45 Please stop installation. - 5. Please follow the steps below. 7. If the 'Properties' button is properly configured. If the 'Properties' button is inactive, it means your monitor is active, click on 'Update Driver...' Select the 'Settings' tab then click on the 'Advanced' button. 6.
User's Manual_e2343Fk
Page 45
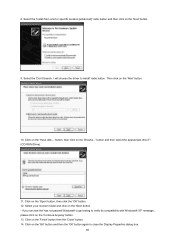
...model and click on the 'Next' button. 10. Click on the 'OK' button and then the 'OK' button again to install' radio button. Select the 'Install from a list or specific location [advanced]' radio button and then click on the 'Continue Anyway' button. 13. I will choose the driver... with Windows® XP' message, please click on the 'Next' button. 9. Click on the 'Have disk...' 8. Click on the 'Open' button, then click the 'OK' button. 12. button, then click on the 'Finish' button then the 'Close' button. 14. Select the 'Don't Search. Click on the 'Browse...'
...model and click on the 'Next' button. 10. Click on the 'OK' button and then the 'OK' button again to install' radio button. Select the 'Install from a list or specific location [advanced]' radio button and then click on the 'Continue Anyway' button. 13. I will choose the driver... with Windows® XP' message, please click on the 'Next' button. 9. Click on the 'Have disk...' 8. Click on the 'Open' button, then click the 'OK' button. 12. button, then click on the 'Finish' button then the 'Close' button. 14. Select the 'Don't Search. Click on the 'Browse...'
User's Manual_e2343Fk
Page 46
... driver(Advanced)' and click on the 'Next' button. 7. Click on the 'Open' button, then click on the 'Next' button. 7. Select the 'Settings' tab then click on 'Finish' button then the 'Close' button. 47 button. 6. Click on 'Advanced...'. 5. Double click on 'Properties' button. Please stop installation. - Click on the '...so you want', then click on 'Next' and then click on 'Update Driver...' Click on the 'OK' button. 9. Select 'Monitor' - If the 'Properties' button is properly configured. If you can choose the driver you can see the 'Digital Signature Not Found' window, ...
... driver(Advanced)' and click on the 'Next' button. 7. Click on the 'Open' button, then click on the 'Next' button. 7. Select the 'Settings' tab then click on 'Finish' button then the 'Close' button. 47 button. 6. Click on 'Advanced...'. 5. Double click on 'Properties' button. Please stop installation. - Click on the '...so you want', then click on 'Next' and then click on 'Update Driver...' Click on the 'OK' button. 9. Select 'Monitor' - If the 'Properties' button is properly configured. If you can choose the driver you can see the 'Digital Signature Not Found' window, ...
User's Manual_e2343Fk
Page 47
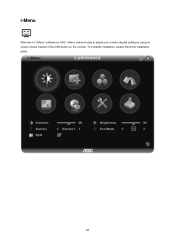
i-Menu makes it easy to "i-Menu" software by using on screen menus instead of the OSD button on the monitor. To complete installation, please follow the installation guide. 48 i-Menu Welcome to adjust your monitor display setting by AOC.
i-Menu makes it easy to "i-Menu" software by using on screen menus instead of the OSD button on the monitor. To complete installation, please follow the installation guide. 48 i-Menu Welcome to adjust your monitor display setting by AOC.

User's Manual_e2343Fk
Page 50
Troubleshoot Problem & Question Possible Solutions Power LED Is Not ON Make sure the power button is ON and the Power Cord is properly connected to a grounded power outlet and to auto adjust. If the power is on, reboot the computer ... initial screen (the login screen), which can be seen. Picture Is Fuzzy & Has Ghosting Shadowing Problem Adjust the Contrast and Brightness Controls. Make sure the AOC Monitor Drivers are using an extension cable or switch box. Make sure you see "Input Not Supported" on every model. Check the power cord connection...
Troubleshoot Problem & Question Possible Solutions Power LED Is Not ON Make sure the power button is ON and the Power Cord is properly connected to a grounded power outlet and to auto adjust. If the power is on, reboot the computer ... initial screen (the login screen), which can be seen. Picture Is Fuzzy & Has Ghosting Shadowing Problem Adjust the Contrast and Brightness Controls. Make sure the AOC Monitor Drivers are using an extension cable or switch box. Make sure you see "Input Not Supported" on every model. Check the power cord connection...

