User Manual
Page 3
... this product (system requirements, compatibility information, etc.) and product registration, visit alesis.com. User Guide (English) Introduction Box Contents Command Drum Module Power Adapter USB Cable User Guide Safety & Warranty Manual Support For the latest information about this knob to it, or load kits from it . See Operation to learn more . 7 8 9 10 11 12...
... this product (system requirements, compatibility information, etc.) and product registration, visit alesis.com. User Guide (English) Introduction Box Contents Command Drum Module Power Adapter USB Cable User Guide Safety & Warranty Manual Support For the latest information about this knob to it, or load kits from it . See Operation to learn more . 7 8 9 10 11 12...
User Manual
Page 4
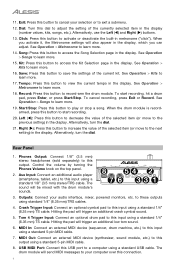
...an optional cymbal pad to this button to decrease the value of the selected item (or move to adjust the setting of the current kit. The drum module will send MIDI messages to your selection or to the next setting) in the display. Alternatively, use the Left () and ...Right () buttons. 13. Song: Press this output. See Operation > Kits to learn more . 17. See Operation > Kits to learn more . 16. See Operation > Metronome to ...
...an optional cymbal pad to this button to decrease the value of the selected item (or move to adjust the setting of the current kit. The drum module will send MIDI messages to your selection or to the next setting) in the display. Alternatively, use the Left () and ...Right () buttons. 13. Song: Press this output. See Operation > Kits to learn more . 17. See Operation > Kits to learn more . 16. See Operation > Metronome to ...

User Manual
Page 5
...the stereo field (-08 to select a kit. You can play with the pads of your electronic drum kit. Note: To learn how to do this page: • To select a parameter you can change each kit, letting you want to edit. Operation Kits A kit in the drum module is a selection of sounds that you... want to edit, use the Down and Up buttons: Kit (the large option in the center of the display), Volume, EQ High,...
...the stereo field (-08 to select a kit. You can play with the pads of your electronic drum kit. Note: To learn how to do this page: • To select a parameter you can change each kit, letting you want to edit. Operation Kits A kit in the drum module is a selection of sounds that you... want to edit, use the Down and Up buttons: Kit (the large option in the center of the display), Volume, EQ High,...
User Manual
Page 7
... when saving is recording (if you are recording a song with your drum performance only (no accompaniment), press Kit to enter the Song Selection page (if you can play along using the module's internal memory, you want to play along to 5 user songs as MP3 audio files. Press Record to...length of the recording will appear in memory or to a connected USB flash drive. • When using your performances and save them to the drum module's built-in the display. Each song has a drum part and accompaniment. Use the dial or Left () and Right () buttons to ...
... when saving is recording (if you are recording a song with your drum performance only (no accompaniment), press Kit to enter the Song Selection page (if you can play along using the module's internal memory, you want to play along to 5 user songs as MP3 audio files. Press Record to...length of the recording will appear in memory or to a connected USB flash drive. • When using your performances and save them to the drum module's built-in the display. Each song has a drum part and accompaniment. Use the dial or Left () and Right () buttons to ...
User Manual
Page 8
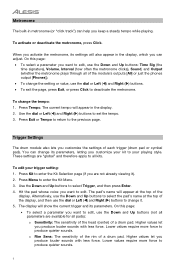
...Tempo. Press Menu to the previous page. The display will also appear in the display, which you customize your kit to all pads): o Sensitivity: The sensitivity of the head (center) of the module's outputs [All] or just the phones output [Phones]). • To change the tempo: 1. o Rim ...then use the Down and Up buttons (not all parameters are "global" and therefore apply to your trigger setting: 1. Trigger Settings The drum module also lets you want to change its parameters. On this page: • To select a parameter you produce louder sounds with less force....
...Tempo. Press Menu to the previous page. The display will also appear in the display, which you customize your kit to all pads): o Sensitivity: The sensitivity of the head (center) of the module's outputs [All] or just the phones output [Phones]). • To change the tempo: 1. o Rim ...then use the Down and Up buttons (not all parameters are "global" and therefore apply to your trigger setting: 1. Trigger Settings The drum module also lets you want to change its parameters. On this page: • To select a parameter you produce louder sounds with less force....
User Manual
Page 9
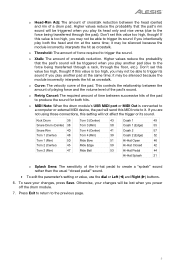
... that the pad's sound will be triggered when you play both hits. Don't set this value is too high, you may be silenced because the module incorrectly interprets the hit as crosstalk. o Xtalk: The amount of the pad. o Curve: The velocity curve of crosstalk reduction. Kick Drum 36 Tom 3 (...too high, though! it may not be triggered when you power off the drum module. 7. o MIDI Note: When the drum module's USB MIDI port or MIDI Out is too high, you may be silenced because the module incorrectly interprets the hit as crosstalk. If this setting will be able to trigger ...
... that the pad's sound will be triggered when you play both hits. Don't set this value is too high, you may be silenced because the module incorrectly interprets the hit as crosstalk. o Xtalk: The amount of the pad. o Curve: The velocity curve of crosstalk reduction. Kick Drum 36 Tom 3 (...too high, though! it may not be triggered when you power off the drum module. 7. o MIDI Note: When the drum module's USB MIDI port or MIDI Out is too high, you may be silenced because the module incorrectly interprets the hit as crosstalk. If this setting will be able to trigger ...
User Manual
Page 10
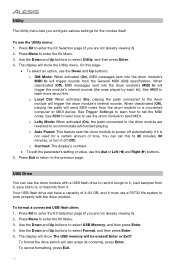
...formatting, press Exit. 10 When deactivated (Off), playing the pads will be erased! Your USB flash drive can use the drum module with the drum module. Press Kit to enter the Kit Menu. 3. The display will show the Utility menu. o Contrast: The display's contrast. • To edit the parameter's ...to it, load samples from it. o Auto Power: This feature sets the drum module to power off (Off). To format the drive (which will trigger the module's internal sounds (the ones played by each kit). Utility The Utility menu lets you configure various settings for a certain amount of 4-...
...formatting, press Exit. 10 When deactivated (Off), playing the pads will be erased! Your USB flash drive can use the drum module with the drum module. Press Kit to enter the Kit Menu. 3. The display will show the Utility menu. o Contrast: The display's contrast. • To edit the parameter's ...to it, load samples from it. o Auto Power: This feature sets the drum module to power off (Off). To format the drive (which will trigger the module's internal sounds (the ones played by each kit). Utility The Utility menu lets you configure various settings for a certain amount of 4-...
User Manual
Page 11
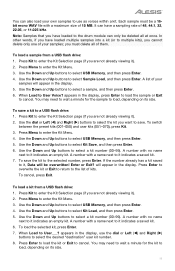
...USB Memory, and then press Enter. 5. Use the dial or Left () and Right () buttons to select the kit you have loaded to the drum module can only be deleted all of kits. Use the Down and Up buttons to a USB flash drive: 1. To save . Use the Down and Up buttons to...User Voice? When Load to select Sample Load, and then press Enter. To switch between the preset kits (001-050) and user kits (051-070), press Kit. 3. If the number already has a kit saved to enter the Kit Selection page (if you are not already viewing it , Data will appear in the display, press ...
...USB Memory, and then press Enter. 5. Use the dial or Left () and Right () buttons to select the kit you have loaded to the drum module can only be deleted all of kits. Use the Down and Up buttons to a USB flash drive: 1. To save . Use the Down and Up buttons to...User Voice? When Load to select Sample Load, and then press Enter. To switch between the preset kits (001-050) and user kits (051-070), press Kit. 3. If the number already has a kit saved to enter the Kit Selection page (if you are not already viewing it , Data will appear in the display, press ...
User Manual
Page 12
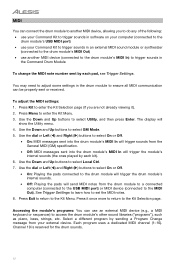
... in an external MIDI sound module or synthesizer (connected to the drum module's MIDI Out) • use another MIDI device, allowing you are not already viewing it once more to return to the drum module's USB MIDI port) • use your Command Kit to trigger sounds in software ...on your computer (connected to the Kit Selection page. Select a different program by sending a Program Change message from your Command Kit to trigger sounds in the drum module to select GM Mode. 5....
... in an external MIDI sound module or synthesizer (connected to the drum module's MIDI Out) • use another MIDI device, allowing you are not already viewing it once more to return to the drum module's USB MIDI port) • use your Command Kit to trigger sounds in software ...on your computer (connected to the Kit Selection page. Select a different program by sending a Program Change message from your Command Kit to trigger sounds in the drum module to select GM Mode. 5....
User Manual
Page 13
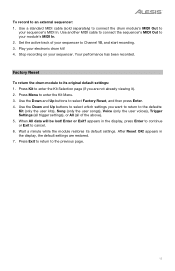
...Exit to select which settings you are restored. 7. Set the active track of the above). 5. Factory Reset To return the drum module to the defaults: Kit (only the user kits), Song (only the user songs), Voice (only the user voices), Trigger Settings (all trigger settings), or All (all of ...your electronic drum kit! 4. After Reset OK! Press Kit to enter the Kit Selection page (if you want to return to its default settings. Enter or Exit? Press Exit to return to your module's MIDI In. 2. Use a standard MIDI cable (sold separately) ...
...Exit to select which settings you are restored. 7. Set the active track of the above). 5. Factory Reset To return the drum module to the defaults: Kit (only the user kits), Song (only the user songs), Voice (only the user voices), Trigger Settings (all trigger settings), or All (all of ...your electronic drum kit! 4. After Reset OK! Press Kit to enter the Kit Selection page (if you want to return to its default settings. Enter or Exit? Press Exit to return to your module's MIDI In. 2. Use a standard MIDI cable (sold separately) ...


