User Guide
Page 3
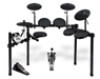
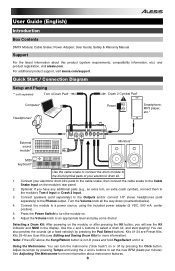
..., press and hold Page/Select until it is. Cable Snake; Press the Power Switch to turn the metronome ("click track") on the module, or after pressing the Kit button, you have any additional pads (e.g., an extra tom, an extra crash cymbal), connect them to select a drum kit, and start playing! Use the < and > buttons to the module's Tom 4 Input or Crash 2 Input. 3. Adjust its tempo by pressing the Pad Select buttons. User Guide; Power Adapter; Connect your electronic drum kit. 1. User Guide (English) Introduction Box Contents DM7X Module;
..., press and hold Page/Select until it is. Cable Snake; Press the Power Switch to turn the metronome ("click track") on the module, or after pressing the Kit button, you have any additional pads (e.g., an extra tom, an extra crash cymbal), connect them to select a drum kit, and start playing! Use the < and > buttons to the module's Tom 4 Input or Crash 2 Input. 3. Adjust its tempo by pressing the Pad Select buttons. User Guide; Power Adapter; Connect your electronic drum kit. 1. User Guide (English) Introduction Box Contents DM7X Module;
User Guide
Page 4
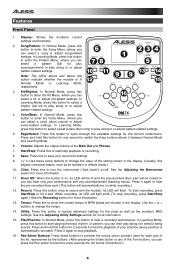
... as kit numbers or effects levels.) 10. Volume: Adjusts the output volume of your practice (every practice is in the display. Save: Press this to save your performance and any of the Tom buttons, you can hear only your current kit settings. 9. < / >: Use these buttons to change the value of that drum.) 4 Use the < or > buttons to preview the voices (drum sounds) used for the current mode/menu. Play/Practice: In Normal Mode, press this button to select...
... as kit numbers or effects levels.) 10. Volume: Adjusts the output volume of your practice (every practice is in the display. Save: Press this to save your performance and any of the Tom buttons, you can hear only your current kit settings. 9. < / >: Use these buttons to change the value of that drum.) 4 Use the < or > buttons to preview the voices (drum sounds) used for the current mode/menu. Play/Practice: In Normal Mode, press this button to select...
User Guide
Page 5
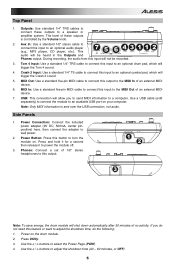
..., CD player, etc.). Power Button: Press this button to adjust the shutdown time (30 - 60 minutes, or OFF). 5 Use the < / > buttons to turn the module on. Aux In: Use a standard 1/8" stereo cable to connect this input to an optional audio player (e.g,. Crash 2 Input: Use a standard 1/4" TS cable to connect this input to an optional cymbal pad, which will not be heard in the Outputs and Phones output. Note: Only MIDI information is controlled by the Volume knob. 2. The...
..., CD player, etc.). Power Button: Press this button to adjust the shutdown time (30 - 60 minutes, or OFF). 5 Use the < / > buttons to turn the module on. Aux In: Use a standard 1/8" stereo cable to connect this input to an optional audio player (e.g,. Crash 2 Input: Use a standard 1/4" TS cable to connect this input to an optional cymbal pad, which will not be heard in the Outputs and Phones output. Note: Only MIDI information is controlled by the Volume knob. 2. The...
User Guide
Page 6
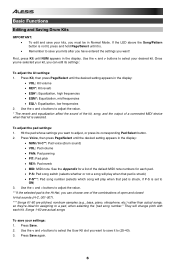
... Normal Mode. Press Save. 2. They will change pitch with each pad. • P-S: Pad song switch (selects whether or not a song will play when that pad is struck) • P-N***: Pad song number (selects which song will play when that kit is set to ON) 3. Press Voice, then press Page/Select until it to (25-40). 3. Use the < and > buttons to select the User Kit slot you must be in the display. Basic Functions Editing and Saving Drum Kits IMPORTANT: • To edit and save your kits...
... Normal Mode. Press Save. 2. They will change pitch with each pad. • P-S: Pad song switch (selects whether or not a song will play when that pad is struck) • P-N***: Pad song number (selects which song will play when that kit is set to ON) 3. Press Voice, then press Page/Select until it to (25-40). 3. Use the < and > buttons to select the User Kit slot you must be in the display. Basic Functions Editing and Saving Drum Kits IMPORTANT: • To edit and save your kits...
User Guide
Page 7
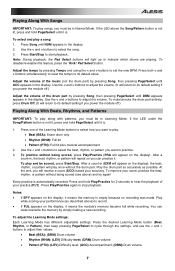
... module's memory became full while recording. Press Play/Practice again to start playback. If the LED above the Song/Pattern button is . 1. Adjust the volume of the Learning Mode buttons to select how you want to its default setting if you power the module off .) Adjust the volume of your performance (as possible. To mute/unmute the drum part entirely, press Drum Off. (It will light up to select the song. 3. Use the < and > buttons...
... module's memory became full while recording. Press Play/Practice again to start playback. If the LED above the Song/Pattern button is . 1. Adjust the volume of the Learning Mode buttons to select how you want to its default setting if you power the module off .) Adjust the volume of your performance (as possible. To mute/unmute the drum part entirely, press Drum Off. (It will light up to select the song. 3. Use the < and > buttons...
User Guide
Page 8
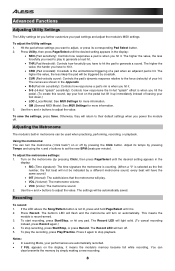
... first number, the first beat will be used when practicing, performing, recording, or playback. To save the settings, press Save. Adjust its corresponding Pad Select button. 2. If the LED above the Song/Pattern button is not lit, press and hold Page/Select until the desired setting appears in the display: • SEN (Pad sensitivity): Controls how responsive a pad is . 2. The Record LED will play. • VOL (Volume): The metronome volume. • VOC (Voice): The metronome sound. 2. The...
... first number, the first beat will be used when practicing, performing, recording, or playback. To save the settings, press Save. Adjust its corresponding Pad Select button. 2. If the LED above the Song/Pattern button is not lit, press and hold Page/Select until the desired setting appears in the display: • SEN (Pad sensitivity): Controls how responsive a pad is . 2. The Record LED will play. • VOL (Volume): The metronome volume. • VOC (Voice): The metronome sound. 2. The...
User Guide
Page 9
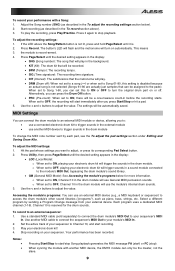
... module's programs below ). 2. Your performance has been recorded. To record your performance with another MIDI device, the DM7X module can only be the master, not the slave. 9 Use the < and > buttons to adjust the value. To adjust the MIDI settings: 1. Press Utility, then press Page/Select until the desired setting appears in the display: • LOC (Local Mode): o When set to OFF, Channel 10 in a sound module connected to your electronic drum kit! 4. o When set to OFF, playing your module's MIDI In. 2. Play...
... module's programs below ). 2. Your performance has been recorded. To record your performance with another MIDI device, the DM7X module can only be the master, not the slave. 9 Use the < and > buttons to adjust the value. To adjust the MIDI settings: 1. Press Utility, then press Page/Select until the desired setting appears in the display: • LOC (Local Mode): o When set to OFF, Channel 10 in a sound module connected to your electronic drum kit! 4. o When set to OFF, playing your module's MIDI In. 2. Play...
User Guide
Page 38
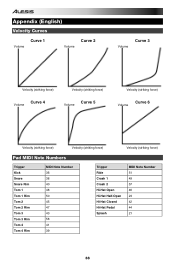
...) Velocity (striking force) Curve 4 Volume Curve 5 Volume Velocity (striking force) Curve 6 Volume Velocity (striking force) Velocity (striking force) Velocity (striking force) Pad MIDI Note Numbers Trigger Kick Snare Snare Rim Tom 1 Tom 1 Rim Tom 2 Tom 2 Rim Tom 3 Tom 3 Rim Tom 4 Tom 4 Rim MIDI Note Number 36 38 40 48 50 45 47 43 58 41 39 Trigger Ride Crash 1 Crash 2 Hi-Hat Open Hi-Hat Half-Open Hi-Hat Closed Hi-Hat Pedal Splash MIDI Note Number...
...) Velocity (striking force) Curve 4 Volume Curve 5 Volume Velocity (striking force) Curve 6 Volume Velocity (striking force) Velocity (striking force) Velocity (striking force) Pad MIDI Note Numbers Trigger Kick Snare Snare Rim Tom 1 Tom 1 Rim Tom 2 Tom 2 Rim Tom 3 Tom 3 Rim Tom 4 Tom 4 Rim MIDI Note Number 36 38 40 48 50 45 47 43 58 41 39 Trigger Ride Crash 1 Crash 2 Hi-Hat Open Hi-Hat Half-Open Hi-Hat Closed Hi-Hat Pedal Splash MIDI Note Number...
User Guide
Page 39
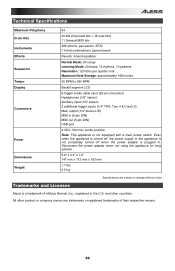
... notice. Even when the appliance is turned off, the power supply to 280 BPM Backlit segment LCD 9-trigger snake cable input (25-pin connector) Headphones (1/8" stereo) Auxiliary input (1/8" stereo) 2 additional trigger inputs (1/4" TRS; Technical Specifications Maximum Polyphony Drum Kits Instruments Effects Sequencer Tempo Display Connectors Power Dimensions Weight 64 40 kits (24 preset kits + 16 user kits) 11 General MIDI kits 385 (drums, percussion, SFX) 7 hi-hat combinations (open/closed) Reverb, 3-band equalizer Normal Mode: 80 songs Learning Mode: 20 beats, 12 rhythms, 10 patterns...
... notice. Even when the appliance is turned off, the power supply to 280 BPM Backlit segment LCD 9-trigger snake cable input (25-pin connector) Headphones (1/8" stereo) Auxiliary input (1/8" stereo) 2 additional trigger inputs (1/4" TRS; Technical Specifications Maximum Polyphony Drum Kits Instruments Effects Sequencer Tempo Display Connectors Power Dimensions Weight 64 40 kits (24 preset kits + 16 user kits) 11 General MIDI kits 385 (drums, percussion, SFX) 7 hi-hat combinations (open/closed) Reverb, 3-band equalizer Normal Mode: 80 songs Learning Mode: 20 beats, 12 rhythms, 10 patterns...


