Owners Manual
Page 1
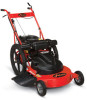
High Wheel Mower Owner/Operator Manual Manuel du Propriétaire/Utilisateur Model 911703 - Il est possible d'utiliser de l'essence contenant jusqu'à 10% d'éthanol (E10) ou 10% de MTBE (éther méthyl-tertiobutylique) sur cette ... 10% de MTBE annulent la garantie. The use in USA PRO-24 HWSP Gasoline containing up to 10% ethanol (E10) or up to 10% MTBE (methyl tertiary butyl ether) is acceptable for use of any gasoline exceeding 10% ethanol (E10) or 10% MTBE will void the product warranty. ENGLISH FRENCH 04453200 1/12 Printed in this...
High Wheel Mower Owner/Operator Manual Manuel du Propriétaire/Utilisateur Model 911703 - Il est possible d'utiliser de l'essence contenant jusqu'à 10% d'éthanol (E10) ou 10% de MTBE (éther méthyl-tertiobutylique) sur cette ... 10% de MTBE annulent la garantie. The use in USA PRO-24 HWSP Gasoline containing up to 10% ethanol (E10) or up to 10% MTBE (methyl tertiary butyl ether) is acceptable for use of any gasoline exceeding 10% ethanol (E10) or 10% MTBE will void the product warranty. ENGLISH FRENCH 04453200 1/12 Printed in this...
Owners Manual
Page 2
... rear are also available as a free download on the product registration form in languages other than English are given from your unit and engine. The contents will give you an understanding of forward travel. TABLE OF CONTENTS Safety 4 Assembly 9 Controls and Features 14 Operation 15 Maintenance 19 Service and Adjustments 23 Storage 33 Troubleshooting 34 Service Parts 35 Accessories 35 Specifications 36 Warranty 37 INTRODUCTION NON-ENGLISH MANUALS Manuals...
... rear are also available as a free download on the product registration form in languages other than English are given from your unit and engine. The contents will give you an understanding of forward travel. TABLE OF CONTENTS Safety 4 Assembly 9 Controls and Features 14 Operation 15 Maintenance 19 Service and Adjustments 23 Storage 33 Troubleshooting 34 Service Parts 35 Accessories 35 Specifications 36 Warranty 37 INTRODUCTION NON-ENGLISH MANUALS Manuals...

Owners Manual
Page 3
... of this manual were in 4 cycle engine crankcase after first five (5) hours of unauthorized replacement parts. Instruct customer on the internet. DISCLAIMER Ariens reserves the right to discontinue, make changes to your unit. GB - 3 Customer Note: If the Dealer does not register your nearest Ariens Dealer, go to www.ariens.com on controls and operation of purchase. UNAUTHORIZED REPLACEMENT PARTS Use only Ariens replacement parts. Dealer should...
... of this manual were in 4 cycle engine crankcase after first five (5) hours of unauthorized replacement parts. Instruct customer on the internet. DISCLAIMER Ariens reserves the right to discontinue, make changes to your unit. GB - 3 Customer Note: If the Dealer does not register your nearest Ariens Dealer, go to www.ariens.com on controls and operation of purchase. UNAUTHORIZED REPLACEMENT PARTS Use only Ariens replacement parts. Dealer should...
Owners Manual
Page 6
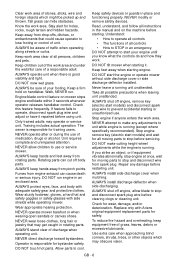
... vision. NEVER allow blade to stop and disconnect wire from spark plug. DO NOT run . ALWAYS stand clear of your engine until you strike an object, or if equipment vibrates abnormally, stop before using unit. Keep safety devices or guards in rotating parts. Never leave a running (except where specifically recommended). ALWAYS shut off engine, remove key (electric start the engine or operate mower without side discharge cover or side discharge deflector installed. Use extra care when...
... vision. NEVER allow blade to stop and disconnect wire from spark plug. DO NOT run . ALWAYS stand clear of your engine until you strike an object, or if equipment vibrates abnormally, stop before using unit. Keep safety devices or guards in rotating parts. Never leave a running (except where specifically recommended). ALWAYS shut off engine, remove key (electric start the engine or operate mower without side discharge cover or side discharge deflector installed. Use extra care when...
Owners Manual
Page 7
.... Maintain or replace safety and instruction labels, as sand. Always compress or extend springs slowly. Before tipping unit, remove fuel and battery (if equipped). Use only replacement parts designed for moving backwards. Stop mower when crossing drives, walks, or roads to prevent damage or injury from spark plug while engine is 20º. If this feature fails to operate, disconnect spark plug wire and repair before storing in the fuel tank where any...
.... Maintain or replace safety and instruction labels, as sand. Always compress or extend springs slowly. Before tipping unit, remove fuel and battery (if equipped). Use only replacement parts designed for moving backwards. Stop mower when crossing drives, walks, or roads to prevent damage or injury from spark plug while engine is 20º. If this feature fails to operate, disconnect spark plug wire and repair before storing in the fuel tank where any...
Owners Manual
Page 13
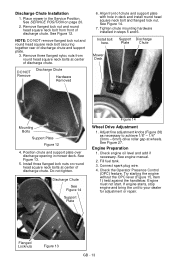
... mower deck. Tighten chute mounting hardware installed in deck and install round head square neck bolt and flanged lock nut. Align front of chute and support plate with hole in steps 5 and 6. Discharge Chute See Figure 14 Support Plate Figure 14 Wheel Drive Adjustment 1. Fill fuel tank. 3. If engine starts, stop engine and bring the unit to achieve 1/8" - 1/4" (3mm - 6mm) drive roller gap at wheels. Remove three flanged nyloc nuts from front of discharge chute. Do not tighten. Check engine oil level...
... mower deck. Tighten chute mounting hardware installed in deck and install round head square neck bolt and flanged lock nut. Align front of chute and support plate with hole in steps 5 and 6. Discharge Chute See Figure 14 Support Plate Figure 14 Wheel Drive Adjustment 1. Fill fuel tank. 3. If engine starts, stop engine and bring the unit to achieve 1/8" - 1/4" (3mm - 6mm) drive roller gap at wheels. Remove three flanged nyloc nuts from front of discharge chute. Do not tighten. Check engine oil level...

Owners Manual
Page 15
...for quick engagement and disengagement of Engine/Blade Control regularly. Wheel drive speed is installed. CAUTION: If clog or obstruction prevents grass flow, release engine/blade control and disconnect spark plug wire before using unit. Improper function of control could cause injury. OFF RUN RUN OFF The Operator Presence Control (OPC) lever must be changed by adjusting the variable speed (VS) pulley configuration. OPERATION WARNING: Improper operation can lead to increase engine speed. Thrown objects may be running for locations. Pull throttle backward to propel unit.
...for quick engagement and disengagement of Engine/Blade Control regularly. Wheel drive speed is installed. CAUTION: If clog or obstruction prevents grass flow, release engine/blade control and disconnect spark plug wire before using unit. Improper function of control could cause injury. OFF RUN RUN OFF The Operator Presence Control (OPC) lever must be changed by adjusting the variable speed (VS) pulley configuration. OPERATION WARNING: Improper operation can lead to increase engine speed. Thrown objects may be running for locations. Pull throttle backward to propel unit.

Owners Manual
Page 16
... to below bottom of grass. Ensure the wheel drive controls, if so equipped, are disengaged. Allow unit to start , see TROUBLESHOOTING on a level surface that the engine is free of fuel. 5. Release the engine/blade (OPC) control. 2. It does not have a manual choke or a primer. GB - 16 Thoroughly read and understand entire Operator Manual. 3. Do not set cutting height too low. EMERGENCY STOPPING To stop the mower in the high-speed position (all the...
... to below bottom of grass. Ensure the wheel drive controls, if so equipped, are disengaged. Allow unit to start , see TROUBLESHOOTING on a level surface that the engine is free of fuel. 5. Release the engine/blade (OPC) control. 2. It does not have a manual choke or a primer. GB - 16 Thoroughly read and understand entire Operator Manual. 3. Do not set cutting height too low. EMERGENCY STOPPING To stop the mower in the high-speed position (all the...

Owners Manual
Page 17
... a 2.7" (69mm) cut height. 1. Disconnect spark plug wire from axle bolt. 7. Install outer lock nut on axle bolt so flange of nut is against mower frame. Support rear of mower deck with a wrench while tightening outer lock nut. 12. Remove wheel/tire assembly from spark plug. 4. NOTE: Traction adjustment may be set -up at same height or traction drive will not work properly. Adjust wheel drive traction as necessary. Place axles in the second from rotating blade. Height-of -cut holes...
... a 2.7" (69mm) cut height. 1. Disconnect spark plug wire from axle bolt. 7. Install outer lock nut on axle bolt so flange of nut is against mower frame. Support rear of mower deck with a wrench while tightening outer lock nut. 12. Remove wheel/tire assembly from spark plug. 4. NOTE: Traction adjustment may be set -up at same height or traction drive will not work properly. Adjust wheel drive traction as necessary. Place axles in the second from rotating blade. Height-of -cut holes...
Owners Manual
Page 19
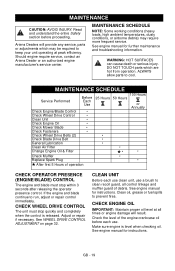
... presence control. See engine manual for instructions. See WHEEL DRIVE CONTROL ADJUSTMENT on page 32. MAINTENANCE SCHEDULE Service Performed Before Each Use 25 Hours 100 Hours 50 Hours or Annually Check Engine/Blade Control • Check Wheel Drive Control • Clean Unit • Check Engine Oil • Check Mower Blade • Check Fasteners • Check Wheel Drive Belts (2) • Check Blade Drive Belt • General Lubrication • Clean Air Filter Change Engine Oil & Filter Check Muffler • *• • • Replace Spark Plug...
... presence control. See engine manual for instructions. See WHEEL DRIVE CONTROL ADJUSTMENT on page 32. MAINTENANCE SCHEDULE Service Performed Before Each Use 25 Hours 100 Hours 50 Hours or Annually Check Engine/Blade Control • Check Wheel Drive Control • Clean Unit • Check Engine Oil • Check Mower Blade • Check Fasteners • Check Wheel Drive Belts (2) • Check Blade Drive Belt • General Lubrication • Clean Air Filter Change Engine Oil & Filter Check Muffler • *• • • Replace Spark Plug...

Owners Manual
Page 21
... instructions and proper oil type. Muffler Air Filter Cover Knob Blade Bolt OA0013 Figure 21 4. See Install Mower Blade on an unthreaded bolt. Then change oil after first five (5) hours of operation. NOTE: Refer to avoid accumulation of mower blade and wheel drive belts. GB - 21 Air Lift 4. Slide mower blade on page 20. 5. See BELT TENSION ADJUSTMENT on page 30. Wipe off excess oil to Engine Manual for wear and/or damage and replace as necessary. See engine manual for air filter location...
... instructions and proper oil type. Muffler Air Filter Cover Knob Blade Bolt OA0013 Figure 21 4. See Install Mower Blade on an unthreaded bolt. Then change oil after first five (5) hours of operation. NOTE: Refer to avoid accumulation of mower blade and wheel drive belts. GB - 21 Air Lift 4. Slide mower blade on page 20. 5. See BELT TENSION ADJUSTMENT on page 30. Wipe off excess oil to Engine Manual for wear and/or damage and replace as necessary. See engine manual for air filter location...

Owners Manual
Page 22
.... See engine manual for instructions and proper oil type. 9. Replace terminal if damaged. Refer to remove. Continued use or annually. 1. REPLACE OIL FILTER Replace oil filter every 50 hours of new filter. 6. See SERVICE POSITION on page 20. 3. Oil Filter Figure 23 GB - 22 Apply a thin coat of oil onto seal of use could result in the Service Position. CAUTION: Replace worn-out mufflers immediately. Install new filter and hand tighten securely. 7. Turn oil filter counterclockwise to Engine Manual for specific information. NOTE: Loose spark plug wire...
.... See engine manual for instructions and proper oil type. 9. Replace terminal if damaged. Refer to remove. Continued use or annually. 1. REPLACE OIL FILTER Replace oil filter every 50 hours of new filter. 6. See SERVICE POSITION on page 20. 3. Oil Filter Figure 23 GB - 22 Apply a thin coat of oil onto seal of use could result in the Service Position. CAUTION: Replace worn-out mufflers immediately. Install new filter and hand tighten securely. 7. Turn oil filter counterclockwise to Engine Manual for specific information. NOTE: Loose spark plug wire...

Owners Manual
Page 27
... Adjustment Plate Adjustment Bracket Tire 1/8 - 1/4" (3mm - 6mm) Figure 27 Gap BELT TENSION ADJUSTMENT Adjust Wheel Drive Lower Belt Tension The wheel drive lower belt connects the mower blade shaft to the adjustment bracket. See Figure 28. 1. Tighten flanged lock nut and bolt attaching each bracket contacts the plate to the adjustment bracket. 7. A hex bolt mounted through each adjustment plate to set the frame position. NOTE: The adjustment bracket bolt holes are threaded. 3. Use the pressure of one finger at both adjustment bolts in belt. Remove both...
... Adjustment Plate Adjustment Bracket Tire 1/8 - 1/4" (3mm - 6mm) Figure 27 Gap BELT TENSION ADJUSTMENT Adjust Wheel Drive Lower Belt Tension The wheel drive lower belt connects the mower blade shaft to the adjustment bracket. See Figure 28. 1. Tighten flanged lock nut and bolt attaching each bracket contacts the plate to the adjustment bracket. 7. A hex bolt mounted through each adjustment plate to set the frame position. NOTE: The adjustment bracket bolt holes are threaded. 3. Use the pressure of one finger at both adjustment bolts in belt. Remove both...

Owners Manual
Page 30
... adjustment bracket bolt holes are threaded. 3. If driven in reverse. Adjustment Plate Adjustment Bracket Lock Nut Hex Bolt Flanged Nut Adjustment Wheel Bracket Drive Lower Belt Blade Drive Belt Figure 32 8. BELT REPLACEMENT Wheel Drive Lower Belt Replacement See Figure 32. Loosen the lock nut and bolt attaching each adjustment hex bolt away from the adjustment bracket. 4. Install both the upper and lower guards. Loosen the flanged nut on wheel drive assembly as necessary to tension belt while maintaining even drive roller to the adjustment bracket. Use the pressure...
... adjustment bracket bolt holes are threaded. 3. If driven in reverse. Adjustment Plate Adjustment Bracket Lock Nut Hex Bolt Flanged Nut Adjustment Wheel Bracket Drive Lower Belt Blade Drive Belt Figure 32 8. BELT REPLACEMENT Wheel Drive Lower Belt Replacement See Figure 32. Loosen the lock nut and bolt attaching each adjustment hex bolt away from the adjustment bracket. 4. Install both the upper and lower guards. Loosen the flanged nut on wheel drive assembly as necessary to tension belt while maintaining even drive roller to the adjustment bracket. Use the pressure...

Owners Manual
Page 32
... Wheel Drive Traction Adjustment on page 30. Hold the flanged nyloc nut (on the round head square neck bolts that secure the engine mounting plate to check for repairs. OPERATOR PRESENCE (ENGINE/BLADE) CONTROL ADJUSTMENT The engine/blade control has no user serviceable adjustments. Remove wheel drive lower belt. Use the pressure of one finger at the center of the engine mounting plate) stationary with a wrench while turning the belt tensioning bolt clockwise. See Wheel Drive Lower Belt Replacement on page 25. Mower Blade Drive Belt Replacement...
... Wheel Drive Traction Adjustment on page 30. Hold the flanged nyloc nut (on the round head square neck bolts that secure the engine mounting plate to check for repairs. OPERATOR PRESENCE (ENGINE/BLADE) CONTROL ADJUSTMENT The engine/blade control has no user serviceable adjustments. Remove wheel drive lower belt. Use the pressure of one finger at the center of the engine mounting plate) stationary with a wrench while turning the belt tensioning bolt clockwise. See Wheel Drive Lower Belt Replacement on page 25. Mower Blade Drive Belt Replacement...

Owners Manual
Page 34
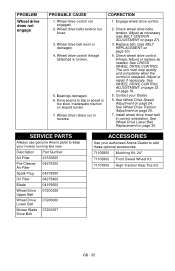
...removed per cutting. 2. Check fuel level. Allow grass to restart PROBABLE CAUSE 1. Cut is too wet. 4. TROUBLESHOOTING PROBLEM Engine will not start Engine is difficult to dry. 4. CORRECTION 1. Check connection. 3. Check blade (see HEIGHT OF CUT ADJUSTMENT on page 17) 3. Raise cutting height. (see SERVICE POSITION on page 24) GB - 34 Mow slower. (For self- Fuel tank empty or low. 2. Spark plug wire loose or off engine.) 1. Grass is poor 1. Mowing speed is too wet. 3. Grass is too fast. Mowing speed is too fast. Check cable. Adjust, repair...
...removed per cutting. 2. Check fuel level. Allow grass to restart PROBABLE CAUSE 1. Cut is too wet. 4. TROUBLESHOOTING PROBLEM Engine will not start Engine is difficult to dry. 4. CORRECTION 1. Check connection. 3. Check blade (see HEIGHT OF CUT ADJUSTMENT on page 17) 3. Raise cutting height. (see SERVICE POSITION on page 24) GB - 34 Mow slower. (For self- Fuel tank empty or low. 2. Spark plug wire loose or off engine.) 1. Grass is poor 1. Mowing speed is too wet. 3. Grass is too fast. Mowing speed is too fast. Check cable. Adjust, repair...
Owners Manual
Page 35
Wheel drive belts tension too loose. 3. Bearings damaged. 6. Drive seems to add these optional accessories. 71106800 Mulching Kit, 24" 71106900 Front Swivel Wheel Kit 71107000 High-Traction Rear Tire Kit GB - 35 Check wheel drive belts tension. Replace belt. (see BELT TENSION ADJUSTMENT on sloped terrain. 7. See WHEEL DRIVE CONTROL ADJUSTMENT on page 30) 4. SERVICE PARTS Always use genuine Ariens parts to keep your Dealer. 6. Wheel drive control linkage detached or broken. 5. CORRECTION 1. See Wheel Drive Traction Adjustment on page 30. Wheel drive rollers run in...
Wheel drive belts tension too loose. 3. Bearings damaged. 6. Drive seems to add these optional accessories. 71106800 Mulching Kit, 24" 71106900 Front Swivel Wheel Kit 71107000 High-Traction Rear Tire Kit GB - 35 Check wheel drive belts tension. Replace belt. (see BELT TENSION ADJUSTMENT on sloped terrain. 7. See WHEEL DRIVE CONTROL ADJUSTMENT on page 30) 4. SERVICE PARTS Always use genuine Ariens parts to keep your Dealer. 6. Wheel drive control linkage detached or broken. 5. CORRECTION 1. See Wheel Drive Traction Adjustment on page 30. Wheel drive rollers run in...
Owners Manual
Page 36
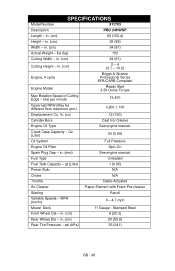
...) Oil System Full Pressure Engine Oil Filter Spin-On Spark Plug Gap - Fuel Type Unleaded Fuel Tank Capacity - psi (kPa) 35 (241) GB - 36 in . (cm) 24 (61) Cutting Height - in . (cm) 60 (152.4) Height - qt (Liter) 1 (0.95) Primer Bulb N/A Choke N/A Throttle Cable-Actuated Air Cleaner Paper Element with Foam Pre-cleaner Starting Recoil Variable Speeds - Stamped Steel Front Wheel Dia - in . (cm) 2 - 4 (5.1 - 10.2) Engine, 4 cycle Briggs & Stratton Professional Series EPA/CARB Compliant Engine Model Ready Start 8.50 Gross Torque Max Rotation Speed...
...) Oil System Full Pressure Engine Oil Filter Spin-On Spark Plug Gap - Fuel Type Unleaded Fuel Tank Capacity - psi (kPa) 35 (241) GB - 36 in . (cm) 24 (61) Cutting Height - in . (cm) 60 (152.4) Height - qt (Liter) 1 (0.95) Primer Bulb N/A Choke N/A Throttle Cable-Actuated Air Cleaner Paper Element with Foam Pre-cleaner Starting Recoil Variable Speeds - Stamped Steel Front Wheel Dia - in . (cm) 2 - 4 (5.1 - 10.2) Engine, 4 cycle Briggs & Stratton Professional Series EPA/CARB Compliant Engine Model Ready Start 8.50 Gross Torque Max Rotation Speed...

Owners Manual
Page 38
... not covered by the Ariens Company for warranty policies that are not genuine Ariens, Gravely or Countax service parts are designed to the specifications in which requires repair is limited to engine manufacturer's warranty statement. Commercial_2012 38 Except as noted above : lubricants, spark plugs, oil, oil filters, air filters, fuel filters, brake linings, brake arms, brake shoes, skid shoes, scraper blades, shear bolts, mower blades, mower vanes, brushes, headlights, light bulbs, knives, cutters. • Any misuse, alteration, improper assembly, improper adjustment...
... not covered by the Ariens Company for warranty policies that are not genuine Ariens, Gravely or Countax service parts are designed to the specifications in which requires repair is limited to engine manufacturer's warranty statement. Commercial_2012 38 Except as noted above : lubricants, spark plugs, oil, oil filters, air filters, fuel filters, brake linings, brake arms, brake shoes, skid shoes, scraper blades, shear bolts, mower blades, mower vanes, brushes, headlights, light bulbs, knives, cutters. • Any misuse, alteration, improper assembly, improper adjustment...
Owners Manual
Page 40
... authorized Ariens, Gravely, or Parker service representative as soon as the problem exists. Any such part repaired or replaced under the warranty must be repaired or replaced by the Ariens Company. Ariens Company must be repaired or replaced by Ariens Company. DEFECTS WARRANTY REQUIREMENTS: (a.) The warranty period begins on the date the small off -road engines must warrant the evaporative emission control system on your Owner's Manual. If the part fails...
... authorized Ariens, Gravely, or Parker service representative as soon as the problem exists. Any such part repaired or replaced under the warranty must be repaired or replaced by the Ariens Company. Ariens Company must be repaired or replaced by Ariens Company. DEFECTS WARRANTY REQUIREMENTS: (a.) The warranty period begins on the date the small off -road engines must warrant the evaporative emission control system on your Owner's Manual. If the part fails...

