ROG SWIFT PG348Q Monitor Arm - Asus
ROG SWIFT PG348Q Monitor Arm
View Results Below
Free Asus ROG SWIFT PG348Q manuals!
Problems with Asus ROG SWIFT PG348Q?
Ask a Question
Free Asus ROG SWIFT PG348Q manuals!
Problems with Asus ROG SWIFT PG348Q?
Ask a Question
Related Manual Pages

Similar Questions

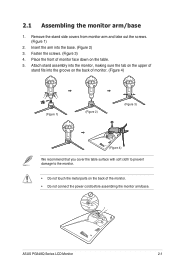
Remove Arm
Hi I need instructions on how to remove the arm from the monitor. I have removed 2 screws and have p...
Hi I need instructions on how to remove the arm from the monitor. I have removed 2 screws and have p...
(Posted by rtt 8 years ago)

New Monitor With Only Vga Port
I got a new monitor with only a VGA port and i got a VGA to HDMI cable to connect to my xbox 360, bu...
I got a new monitor with only a VGA port and i got a VGA to HDMI cable to connect to my xbox 360, bu...
(Posted by 1995kirby 10 years ago)

How To Remove The Monitor Stand?
i was able to remove the base however the stand is still attached to the monitor. i cannot unscrew i...
i was able to remove the base however the stand is still attached to the monitor. i cannot unscrew i...
(Posted by lesliejerry 11 years ago)