Users Manual
Page 3
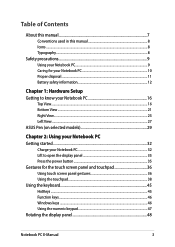
... Bottom View...21 Right View...23 Left View...27 ASUS Pen (on selected models 29 Chapter 2: Using your Notebook PC Getting started...32 Charge your Notebook PC 32 Lift to open the display panel 35 Press the power button 35 Gestures for the touch screen panel and touchpad 36 Using touch screen panel gestures 36 Using the touchpad...38 Using the keyboard...45 HotKeys...45 Function keys...46 Windows keys...46 Using the numeric keypad 47 Rotating the display panel 48 Notebook PC E-Manual 3
... Bottom View...21 Right View...23 Left View...27 ASUS Pen (on selected models 29 Chapter 2: Using your Notebook PC Getting started...32 Charge your Notebook PC 32 Lift to open the display panel 35 Press the power button 35 Gestures for the touch screen panel and touchpad 36 Using touch screen panel gestures 36 Using the touchpad...38 Using the keyboard...45 HotKeys...45 Function keys...46 Windows keys...46 Using the numeric keypad 47 Rotating the display panel 48 Notebook PC E-Manual 3
Users Manual
Page 4
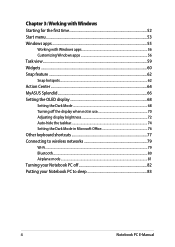
... Action Center...64 MyASUS Splendid...66 Setting the OLED display 68 Setting the Dark Mode 68 Turning off the display when not in use 70 Adjusting display brightness 72 Auto-hide the taskbar...74 Setting the Dark Mode in Microsoft Office 76 Other keyboard shortcuts 77 Connecting to wireless networks 79 Wi-Fi...79 Bluetooth...80 Airplane mode...81 Turning your Notebook PC off 82 Putting your Notebook PC to sleep 83 4 Notebook PC E-Manual
... Action Center...64 MyASUS Splendid...66 Setting the OLED display 68 Setting the Dark Mode 68 Turning off the display when not in use 70 Adjusting display brightness 72 Auto-hide the taskbar...74 Setting the Dark Mode in Microsoft Office 76 Other keyboard shortcuts 77 Connecting to wireless networks 79 Wi-Fi...79 Bluetooth...80 Airplane mode...81 Turning your Notebook PC off 82 Putting your Notebook PC to sleep 83 4 Notebook PC E-Manual

Users Manual
Page 5
... Self-Test (POST) The Power-On Self-Test (POST 86 Using POST to access BIOS and Troubleshoot 86 BIOS...86 Accessing BIOS...86 Recovering your system 87 Performing a recovery option 88 Tips and FAQs Useful tips for your Notebook PC 92 Hardware FAQs...94 Software FAQs...97 Appendices Internal Modem Compliancy 100 Overview...100 Network Compatibility Declaration 101 Non-Voice Equipment...101 Federal Communications ...106 Déclaration de conformité de Innovation, Sciences et Développement économique Canada (ISED 106 Caution...107 Mise en garde...107 Notebook PC E-Manual 5
... Self-Test (POST) The Power-On Self-Test (POST 86 Using POST to access BIOS and Troubleshoot 86 BIOS...86 Accessing BIOS...86 Recovering your system 87 Performing a recovery option 88 Tips and FAQs Useful tips for your Notebook PC 92 Hardware FAQs...94 Software FAQs...97 Appendices Internal Modem Compliancy 100 Overview...100 Network Compatibility Declaration 101 Non-Voice Equipment...101 Federal Communications ...106 Déclaration de conformité de Innovation, Sciences et Développement économique Canada (ISED 106 Caution...107 Mise en garde...107 Notebook PC E-Manual 5
Users Manual
Page 7
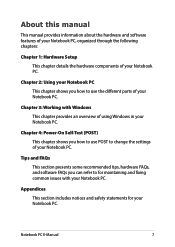
... using Windows in your Notebook PC. Chapter 4: Power-On Self-Test (POST) This chapter shows you how to use POST to change the settings of your Notebook PC. Chapter 2: Using your Notebook PC This chapter shows you how to for your Notebook PC. About this manual This manual provides information about the hardware and software features of your Notebook PC, organized through the following chapters: Chapter 1: Hardware Setup...
... using Windows in your Notebook PC. Chapter 4: Power-On Self-Test (POST) This chapter shows you how to use POST to change the settings of your Notebook PC. Chapter 2: Using your Notebook PC This chapter shows you how to for your Notebook PC. About this manual This manual provides information about the hardware and software features of your Notebook PC, organized through the following chapters: Chapter 1: Hardware Setup...
Users Manual
Page 10
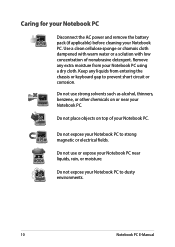
... on or near liquids, rain, or moisture. Keep any extra moisture from entering the chassis or keyboard gap to strong magnetic or electrical fields. Caring for your Notebook PC Disconnect the AC power and remove the battery pack (if applicable) before cleaning your Notebook PC. Use a clean cellulose sponge or chamois cloth dampened with warm water or a solution...
... on or near liquids, rain, or moisture. Keep any extra moisture from entering the chassis or keyboard gap to strong magnetic or electrical fields. Caring for your Notebook PC Disconnect the AC power and remove the battery pack (if applicable) before cleaning your Notebook PC. Use a clean cellulose sponge or chamois cloth dampened with warm water or a solution...
Users Manual
Page 12
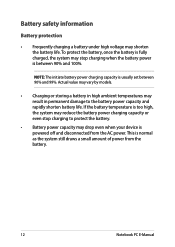
... even when your device is normal as the system still draws a small amount of power from the AC power. Actual value may vary by models. • Charging or storing a battery in high ambient temperatures may shorten the battery life. This is powered off and disconnected from the battery. 12 Notebook PC E-Manual To protect the battery, once the battery is fully charged, the system...
... even when your device is normal as the system still draws a small amount of power from the AC power. Actual value may vary by models. • Charging or storing a battery in high ambient temperatures may shorten the battery life. This is powered off and disconnected from the battery. 12 Notebook PC E-Manual To protect the battery, once the battery is fully charged, the system...
Users Manual
Page 18
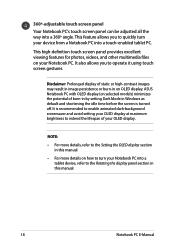
This high-definition touch screen panel provides excellent viewing features for photos, videos, and other multimedia files on selected models) minimizes the potential of burn-in by setting Dark Mode in Windows as default and shortening the idle time before the screen is recommended to enable animated dark-background screensaver and avoid setting your OLED display at maximum brightness to quickly turn your OLED display. It is turned off. It also...
This high-definition touch screen panel provides excellent viewing features for photos, videos, and other multimedia files on selected models) minimizes the potential of burn-in by setting Dark Mode in Windows as default and shortening the idle time before the screen is recommended to enable animated dark-background screensaver and avoid setting your OLED display at maximum brightness to quickly turn your OLED display. It is turned off. It also...
Users Manual
Page 19
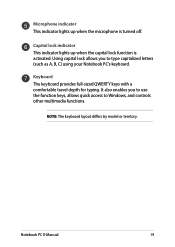
... lock allows you to use the function keys, allows quick access to type capitalized letters (such as A, B, C) using your Notebook PC's keyboard. Keyboard The keyboard provides full-sized QWERTY keys with a comfortable travel depth for typing. NOTE: The keyboard layout differs by model or territory. Microphone indicator This indicator lights up when the capital lock function is turned off. Capital lock indicator This indicator lights up when the microphone is activated. It also enables you to Windows, and controls other multimedia functions. Notebook PC E-Manual...
... lock allows you to use the function keys, allows quick access to type capitalized letters (such as A, B, C) using your Notebook PC's keyboard. Keyboard The keyboard provides full-sized QWERTY keys with a comfortable travel depth for typing. NOTE: The keyboard layout differs by model or territory. Microphone indicator This indicator lights up when the capital lock function is turned off. Capital lock indicator This indicator lights up when the microphone is activated. It also enables you to Windows, and controls other multimedia functions. Notebook PC E-Manual...
Users Manual
Page 25
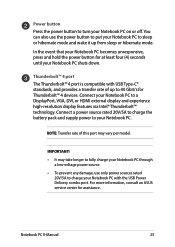
... ASUS service center for Thunderbolt™ 4 devices. Power button Press the power button to turn your Notebook PC to a DisplayPort, VGA, DVI, or HDMI external display and experience high-resolution display features via Intel® Thunderbolt™ technology. Connect a power source rated 20V/5A to charge the battery pack and supply power to put your Notebook PC with USB Type-C® standards, and provides a transfer rate of this port may vary per model. Notebook PC E-Manual...
... ASUS service center for Thunderbolt™ 4 devices. Power button Press the power button to turn your Notebook PC to a DisplayPort, VGA, DVI, or HDMI external display and experience high-resolution display features via Intel® Thunderbolt™ technology. Connect a power source rated 20V/5A to charge the battery pack and supply power to put your Notebook PC with USB Type-C® standards, and provides a transfer rate of this port may vary per model. Notebook PC E-Manual...
Users Manual
Page 34
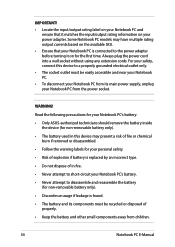
... the power cord into a wall socket without using any extension cords. IMPORTANT! • Locate the input/output rating label on your Notebook PC and ensure that your Notebook PC's battery. • Never attempt to disassemble and reassemble the battery (for the first time. Read the following precautions for your Notebook PC's battery: • Only ASUS-authorized technicians should remove the battery inside the device...
... the power cord into a wall socket without using any extension cords. IMPORTANT! • Locate the input/output rating label on your Notebook PC and ensure that your Notebook PC's battery. • Never attempt to disassemble and reassemble the battery (for the first time. Read the following precautions for your Notebook PC's battery: • Only ASUS-authorized technicians should remove the battery inside the device...
Users Manual
Page 45
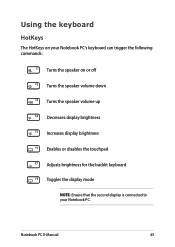
Notebook PC E-Manual 45 Using the keyboard HotKeys The HotKeys on your Notebook PC's keyboard can trigger the following commands: Turns the speaker on or off Turns the speaker volume down Turns the speaker volume up Decreases display brightness Increases display brightness Enables or disables the touchpad Adjusts brightness for the backlit keyboard Toggles the display mode NOTE: Ensure that the second display is connected to your Notebook PC.
Notebook PC E-Manual 45 Using the keyboard HotKeys The HotKeys on your Notebook PC's keyboard can trigger the following commands: Turns the speaker on or off Turns the speaker volume down Turns the speaker volume up Decreases display brightness Increases display brightness Enables or disables the touchpad Adjusts brightness for the backlit keyboard Toggles the display mode NOTE: Ensure that the second display is connected to your Notebook PC.
Users Manual
Page 52
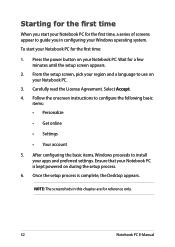
After configuring the basic items, Windows proceeds to guide you in this chapter are for reference only. 52 Notebook PC E-Manual To start your Notebook PC for the first time, a series of screens appear to install your Notebook PC for the first time: 1. Carefully read the License Agreement. Follow the onscreen instructions to use on your Notebook PC. Ensure that your Notebook PC is complete, the...
After configuring the basic items, Windows proceeds to guide you in this chapter are for reference only. 52 Notebook PC E-Manual To start your Notebook PC for the first time, a series of screens appear to install your Notebook PC for the first time: 1. Carefully read the License Agreement. Follow the onscreen instructions to use on your Notebook PC. Ensure that your Notebook PC is complete, the...
Users Manual
Page 53
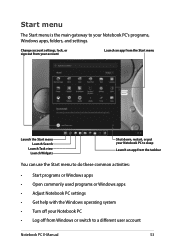
... user account Notebook PC E-Manual 53 Change account settings, lock, or sign out from your account Launch an app from the Start menu Launch the Start menu Launch Search Launch Task view Launch Widgets Shut down, restart, or put your Notebook PC to sleep Launch an app from the taskbar You can use the Start menu to do these common activities: • Start programs or Windows apps • Open...
... user account Notebook PC E-Manual 53 Change account settings, lock, or sign out from your account Launch an app from the Start menu Launch the Start menu Launch Search Launch Task view Launch Widgets Shut down, restart, or put your Notebook PC to sleep Launch an app from the taskbar You can use the Start menu to do these common activities: • Start programs or Windows apps • Open...
Users Manual
Page 66
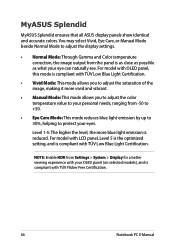
... mode reduces blue light emission by up to 30%, helping to adjust the display settings. • Normal Mode: Through Gamma and Color temperature correction, the image output from Settings > System > Display for a better viewing experience with TÜV Flicker Free Certification. 66 Notebook PC E-Manual You may select Vivid, Eye Care, or Manual Mode beside Normal Mode to protect your eyes. NOTE: Enable HDR from the panel...
... mode reduces blue light emission by up to 30%, helping to adjust the display settings. • Normal Mode: Through Gamma and Color temperature correction, the image output from Settings > System > Display for a better viewing experience with TÜV Flicker Free Certification. 66 Notebook PC E-Manual You may select Vivid, Eye Care, or Manual Mode beside Normal Mode to protect your eyes. NOTE: Enable HDR from the panel...
Users Manual
Page 68
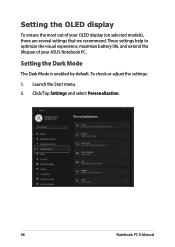
Launch the Start menu. 2. To check or adjust the settings: 1. Setting the OLED display To ensure the most out of your OLED display (on selected models), there are several settings that we recommend. These settings help to optimize the visual experience, maximize battery life, and extend the lifespan of your ASUS Notebook PC. Click/Tap Settings and select Personalization. 68 Notebook PC E-Manual Setting the Dark Mode The Dark Mode is enabled by default.
Launch the Start menu. 2. To check or adjust the settings: 1. Setting the OLED display To ensure the most out of your OLED display (on selected models), there are several settings that we recommend. These settings help to optimize the visual experience, maximize battery life, and extend the lifespan of your ASUS Notebook PC. Click/Tap Settings and select Personalization. 68 Notebook PC E-Manual Setting the Dark Mode The Dark Mode is enabled by default.
Users Manual
Page 86
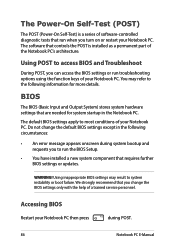
... troubleshooting options using the function keys of a trained service personnel. The Power-On Self-Test (POST) The POST (Power-On Self-Test) is installed as a permanent part of the Notebook PC's architecture. The software that controls the POST is a series of software-controlled diagnostic tests that run the BIOS Setup. • You have installed a new system component that you turn on or restart your Notebook PC. Accessing BIOS Restart your Notebook PC. Do not change the BIOS settings...
... troubleshooting options using the function keys of a trained service personnel. The Power-On Self-Test (POST) The POST (Power-On Self-Test) is installed as a permanent part of the Notebook PC's architecture. The software that controls the POST is a series of software-controlled diagnostic tests that run the BIOS Setup. • You have installed a new system component that you turn on or restart your Notebook PC. Accessing BIOS Restart your Notebook PC. Do not change the BIOS settings...

Users Manual
Page 92
... the latest settings for ASUS exclusive applications, drivers, and utilities. • Use an anti-virus software to protect your data and keep this updated too. • Unless absolutely necessary, refrain from using force shutdown to turn off your Notebook PC. • Always backup your data and make it a point to create a backup data in an external storage drive. • If you are not using your Notebook PC for...
... the latest settings for ASUS exclusive applications, drivers, and utilities. • Use an anti-virus software to protect your data and keep this updated too. • Unless absolutely necessary, refrain from using force shutdown to turn off your Notebook PC. • Always backup your data and make it a point to create a backup data in an external storage drive. • If you are not using your Notebook PC for...
Users Manual
Page 94
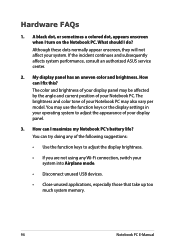
...? You may use the function keys or the display settings in your operating system to adjust the appearance of the following suggestions: • Use the function keys to adjust the display brightness. • If you are not using any of your system. My display panel has an uneven color and brightness. Hardware FAQs 1. What should I fix this? A black dot, or sometimes a colored dot, appears onscreen when I maximize my Notebook PC's battery life?
...? You may use the function keys or the display settings in your operating system to adjust the appearance of the following suggestions: • Use the function keys to adjust the display brightness. • If you are not using any of your system. My display panel has an uneven color and brightness. Hardware FAQs 1. What should I fix this? A black dot, or sometimes a colored dot, appears onscreen when I maximize my Notebook PC's battery life?
Users Manual
Page 95
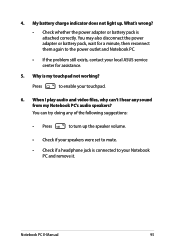
... any sound from my Notebook PC's audio speakers? What's wrong? • Check whether the power adapter or battery pack is my touchpad not working? When I hear any of the following suggestions: • Press to turn up . My battery charge indicator does not light up the speaker volume. • Check if your speakers were set to mute. • Check if a headphone jack is connected to enable your local ASUS service center...
... any sound from my Notebook PC's audio speakers? What's wrong? • Check whether the power adapter or battery pack is my touchpad not working? When I hear any of the following suggestions: • Press to turn up . My battery charge indicator does not light up the speaker volume. • Check if your speakers were set to mute. • Check if a headphone jack is connected to enable your local ASUS service center...

Users Manual
Page 97
... restart."? Press any key to fix this message: "Remove disks or other media. Notebook PC E-Manual 97 Contact your Notebook PC by pressing the power button for at least four (4) seconds. What should I turn on my screen. What can I do when my screen displays this ? You can try doing any of the following suggestions: • Remove all connected USB devices then restart your Notebook PC. • Remove any of the...
... restart."? Press any key to fix this message: "Remove disks or other media. Notebook PC E-Manual 97 Contact your Notebook PC by pressing the power button for at least four (4) seconds. What should I turn on my screen. What can I do when my screen displays this ? You can try doing any of the following suggestions: • Remove all connected USB devices then restart your Notebook PC. • Remove any of the...


