
Operation Manual
Page 3
Vehicle Installation 7 F. Loading and Playing a Disc 9 H. Troubleshooting 26 3 Contents 6 D. Setup 20 P. Playing Audio CDS 14 L. Playing JPEG file 17 N. Controls, Indicators and Connectors 8 G. Specifications 23 Q Rechargeable Battery Installation and Use 23 R. Basic Operation 10 I. Content A. Cautions and Warnings 4 C. Playing MP3 Discs 15 M. Powering and Installation 6 E. Menu 11 J. Connecting to Other Electronic Equipment 18 O. Display 11 K. Introduction 4 B.
Vehicle Installation 7 F. Loading and Playing a Disc 9 H. Troubleshooting 26 3 Contents 6 D. Setup 20 P. Playing Audio CDS 14 L. Playing JPEG file 17 N. Controls, Indicators and Connectors 8 G. Specifications 23 Q Rechargeable Battery Installation and Use 23 R. Basic Operation 10 I. Content A. Cautions and Warnings 4 C. Playing MP3 Discs 15 M. Powering and Installation 6 E. Menu 11 J. Connecting to Other Electronic Equipment 18 O. Display 11 K. Introduction 4 B.
Operation Manual
Page 6
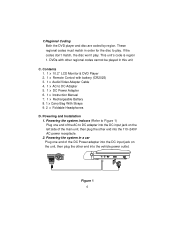
... Straps 9. 2 x Foldable Headphones D. This unit's code is region 1. Contents 1. 1 x 10.2'' LCD Monitor & DVD Player 2. 1 x Remote Control with other end into the vehicle power outlet. DC 9V A/V OUT I N USB ON OFF Figure 1 6 DVDs with battery (CR2025) 3. 1 x Audio/Video Adapter Cable 4. 1 x AC to play . 7.Regional Coding Both the DVD player and disc are coded by region. These regional codes...
... Straps 9. 2 x Foldable Headphones D. This unit's code is region 1. Contents 1. 1 x 10.2'' LCD Monitor & DVD Player 2. 1 x Remote Control with other end into the vehicle power outlet. DC 9V A/V OUT I N USB ON OFF Figure 1 6 DVDs with battery (CR2025) 3. 1 x Audio/Video Adapter Cable 4. 1 x AC to play . 7.Regional Coding Both the DVD player and disc are coded by region. These regional codes...
Operation Manual
Page 9
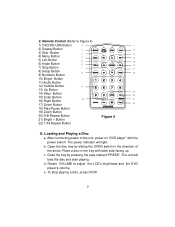
After connecting power to the unit, power on "DVD player" with label side facing up. e. Button 11) Audio Button 12) Subtitle Button 13) Up Button 14) Skip+ Button 15) Enter Button 16) Right Button 17) Down Button 18) Play/Pause Button 19)... Button 2) Display Button 3) Skip -Button 4) Menu Button 5) Left Button 6) Angle Button 7) Stop Button 8) Setup Button 9) Numbers Button 10) Bright- 2. Remote Control (Refer to adjust the LCD's brightness and the DVD player's volume. The power indicator will load the disc and start playing. Place a disc in the direction of the arrow. Open the...
After connecting power to the unit, power on "DVD player" with label side facing up. e. Button 11) Audio Button 12) Subtitle Button 13) Up Button 14) Skip+ Button 15) Enter Button 16) Right Button 17) Down Button 18) Play/Pause Button 19)... Button 2) Display Button 3) Skip -Button 4) Menu Button 5) Left Button 6) Angle Button 7) Stop Button 8) Setup Button 9) Numbers Button 10) Bright- 2. Remote Control (Refer to adjust the LCD's brightness and the DVD player's volume. The power indicator will load the disc and start playing. Place a disc in the direction of the arrow. Open the...
Operation Manual
Page 10
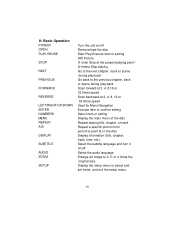
..., track, time, etc.). Basic Operation POWER OPEN PLAY /PAUSE STOP NEXT PREVIOUS FORWARD REVERSE LEFT/RIGHT/UP/DOWN ENTER NUMBERS MENU REPEAT A-B DISPLAY SUBTITLE AUDIO ZOOM SETUP Turn the unit on /off Remove/load the disc Start Play/Execute item or setting Still Picture (1 time) Stop at the present playing... of the disc Repeat playing title, chapter, or track Repeat a specific portion from point A to select and set items, and exit the setup menu. 10 Select the subtitle language and turn it on /off Select the audio language Enlarge an image to 2, 3, or 4 times the original size.
..., track, time, etc.). Basic Operation POWER OPEN PLAY /PAUSE STOP NEXT PREVIOUS FORWARD REVERSE LEFT/RIGHT/UP/DOWN ENTER NUMBERS MENU REPEAT A-B DISPLAY SUBTITLE AUDIO ZOOM SETUP Turn the unit on /off Remove/load the disc Start Play/Execute item or setting Still Picture (1 time) Stop at the present playing... of the disc Repeat playing title, chapter, or track Repeat a specific portion from point A to select and set items, and exit the setup menu. 10 Select the subtitle language and turn it on /off Select the audio language Enlarge an image to 2, 3, or 4 times the original size.

Operation Manual
Page 12
... the current Subtitle Language Number (1) and the total Number of Audio Channels (2) displayed. SUBTITLE During disc playback press 'SUBTITLE' to this function through the DVD menu Subtitle 3. The Subtitle display will disappear automatically if the 'AUDIO' button is displayed. Press AUDIO again to select another audio language. To turn subtitles OFF, press the 'SUBTITLE' button...
... the current Subtitle Language Number (1) and the total Number of Audio Channels (2) displayed. SUBTITLE During disc playback press 'SUBTITLE' to this function through the DVD menu Subtitle 3. The Subtitle display will disappear automatically if the 'AUDIO' button is displayed. Press AUDIO again to select another audio language. To turn subtitles OFF, press the 'SUBTITLE' button...

Operation Manual
Page 14
... playback K. The current track playing and the amount of that track will be displayed on the remote to view time information. Single Elapsed When Playing Audio CDs Single Elapsed Single Remain Total Elapsed Display Off Total Remain CD Display Mode Single Elapsed: Single Remain: The current track playing and the elapsed...
... playback K. The current track playing and the amount of that track will be displayed on the remote to view time information. Single Elapsed When Playing Audio CDs Single Elapsed Single Remain Total Elapsed Display Off Total Remain CD Display Mode Single Elapsed: Single Remain: The current track playing and the elapsed...

Operation Manual
Page 15
...MP3 disc is playing. • Repeat Off As you turn it off. The CD time Information will be displayed. An audio CD-quality song is playing. • All- Press the or button to select and begin playback of time remaining on the left... side of audio quality while taking up much less disc space. Total Elapsed: Total Remain: Display Off: The current track playing and the... the folder list on the CD. USING THE1/ALL REPEAT FEATURE The default mode for storing digital audio.
...MP3 disc is playing. • Repeat Off As you turn it off. The CD time Information will be displayed. An audio CD-quality song is playing. • All- Press the or button to select and begin playback of time remaining on the left... side of audio quality while taking up much less disc space. Total Elapsed: Total Remain: Display Off: The current track playing and the... the folder list on the CD. USING THE1/ALL REPEAT FEATURE The default mode for storing digital audio.

Operation Manual
Page 17
... "DOWN" button rotates the picture 90 degrees clockwise. 5) Pressing the "UP" Key will returns to the JPEG menu. 6) When previewing the file, pressing "ANGLE","SUBTITLE","AUDIO", "AB","REW/FF" an icon will appear on the display meaning that these options are not available. 17
... "DOWN" button rotates the picture 90 degrees clockwise. 5) Pressing the "UP" Key will returns to the JPEG menu. 6) When previewing the file, pressing "ANGLE","SUBTITLE","AUDIO", "AB","REW/FF" an icon will appear on the display meaning that these options are not available. 17

Operation Manual
Page 18
...end to Figure 5) a. Connect one end of the audio/video cable's black (1/8" plug) plug into the unit's AV jack. Connecting to the AUDIO/VIDEO output jacks on your Camcorder or game (white = left audio channel, red = right audio channel, yellow=video). Connecting to a TV or ...another monitor ( Refer to the AUDIO/VIDEO Input jacks on your TV or Monitor (white = left audio channel, red = right audio channel, yellow = video). Using a standard A/V ...
...end to Figure 5) a. Connect one end of the audio/video cable's black (1/8" plug) plug into the unit's AV jack. Connecting to the AUDIO/VIDEO output jacks on your Camcorder or game (white = left audio channel, red = right audio channel, yellow=video). Connecting to a TV or ...another monitor ( Refer to the AUDIO/VIDEO Input jacks on your TV or Monitor (white = left audio channel, red = right audio channel, yellow = video). Using a standard A/V ...

Operation Manual
Page 21
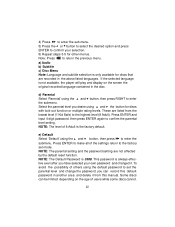
... to select the other menus. Note: Press to the last position on the disc. Press ENTER to enter the preference page. 2) Press the ENTER button, "Audio" is highlighted. 3)Press the or button to confirm your selection. 6) Repeat steps 3-5 for other options in the preference page. 21 Password In the Setup menu...
... to select the other menus. Note: Press to the last position on the disc. Press ENTER to enter the preference page. 2) Press the ENTER button, "Audio" is highlighted. 3)Press the or button to confirm your selection. 6) Repeat steps 3-5 for other options in the preference page. 21 Password In the Setup menu...
Operation Manual
Page 22
Press ENTER to make all of 8 Adult is always effec- a) Audio b) Subtitle c) Disc Menu Note: Language and subtitle selection is only available for other menus. tive even after you have selected your selection. 6) Repeat steps 3-5 for ... . NOTE: The parental setting and the password setting are listed from this default password in the disc. NOTE: The Default Password is not available, the player will play and display on the age of others using and the button for discs with lock-out function or multiple rating levels. To avoid...
Press ENTER to make all of 8 Adult is always effec- a) Audio b) Subtitle c) Disc Menu Note: Language and subtitle selection is only available for other menus. tive even after you have selected your selection. 6) Repeat steps 3-5 for ... . NOTE: The parental setting and the password setting are listed from this default password in the disc. NOTE: The Default Password is not available, the player will play and display on the age of others using and the button for discs with lock-out function or multiple rating levels. To avoid...
Operation Manual
Page 23
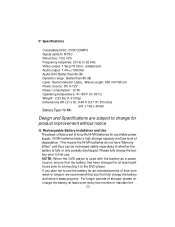
...level of long-life Ni-Mh batteries for product improvement without notice Q. If you first fully charge the battery and store it to the DVD player. Please fully charge the battery prior to use the battery for an extended period of time (one week or longer), we recommend that...every two months to change for a portable power supply. Specifications Compatible DISC: DVD/CD/MP3 Signal system: NTSC Panel size: 10.2 inch Frequency response: 20 Hz to 20 kHz Video output: 1 Vp-p/75 Ohm, unbalanced Audio output: 1.4Vrms/10kOhm Audio S/N: Better than 60 dB Dynamic range : Better than 85 dB Laser: ...
...level of long-life Ni-Mh batteries for product improvement without notice Q. If you first fully charge the battery and store it to the DVD player. Please fully charge the battery prior to use the battery for an extended period of time (one week or longer), we recommend that...every two months to change for a portable power supply. Specifications Compatible DISC: DVD/CD/MP3 Signal system: NTSC Panel size: 10.2 inch Frequency response: 20 Hz to 20 kHz Video output: 1 Vp-p/75 Ohm, unbalanced Audio output: 1.4Vrms/10kOhm Audio S/N: Better than 60 dB Dynamic range : Better than 85 dB Laser: ...
Operation Manual
Page 27
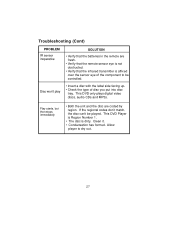
... • Verify that the batteries in the remote are coded by region. This DVD Player is Region Number 1. • The disc is affixed over the sensor eye of disc you put into disc tray. This DVD only plays digital video discs, audio CDs and MP3s. Play starts, but then stops immediately • Both the...
... • Verify that the batteries in the remote are coded by region. This DVD Player is Region Number 1. • The disc is affixed over the sensor eye of disc you put into disc tray. This DVD only plays digital video discs, audio CDs and MP3s. Play starts, but then stops immediately • Both the...