Owners Manual
Page 8
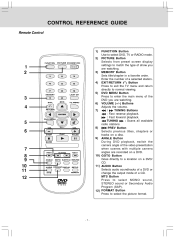
... Press to enter the main menu of the DVD you are watching. 3) MEMORY Button Sets title/chapter in a favorite order. CONTROL REFERENCE GUIDE Remote Control PICTURE 1 2 1 4 7 2 5 8 0 EXIT TV MENU 3 6 9 LAST CH 3 4 RETURN DVD MENU MUTE 5 6 STOP BAND 7 8 9 10 11 12 SOUND FORMAT MTS FUNCTION Button ...Use to select DVD, TV or RADIO mode. 2) PICTURE Button Selects from preset screen display settings to match the type of show you are recorded on a DVD. 10) GOTO Button Goes directly to a location...
... Press to enter the main menu of the DVD you are watching. 3) MEMORY Button Sets title/chapter in a favorite order. CONTROL REFERENCE GUIDE Remote Control PICTURE 1 2 1 4 7 2 5 8 0 EXIT TV MENU 3 6 9 LAST CH 3 4 RETURN DVD MENU MUTE 5 6 STOP BAND 7 8 9 10 11 12 SOUND FORMAT MTS FUNCTION Button ...Use to select DVD, TV or RADIO mode. 2) PICTURE Button Selects from preset screen display settings to match the type of show you are recorded on a DVD. 10) GOTO Button Goes directly to a location...
Owners Manual
Page 9
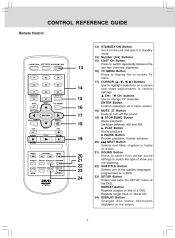
CH- CONTROL REFERENCE GUIDE Remote Control PICTURE 13 1 4 7 2 5 8 0 EXIT TV MENU 3 6 14 9 LAST CH 15 16 13) STANDBY/ON Button Turns on the unit and puts it in standby mode. 14) Number (0-9) ...
CH- CONTROL REFERENCE GUIDE Remote Control PICTURE 13 1 4 7 2 5 8 0 EXIT TV MENU 3 6 14 9 LAST CH 15 16 13) STANDBY/ON Button Turns on the unit and puts it in standby mode. 14) Number (0-9) ...
Owners Manual
Page 15
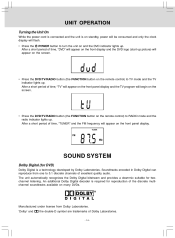
... many DVDs. Manufactured under license from one to 5.1 discrete channels of time, "DVD" will appear on the front display and the DVD logo (start-up picture) will appear on the screen. • Press the DVD/TV/RADIO button (the FUNCTION button on the remote control) to TV mode and the TV...
... many DVDs. Manufactured under license from one to 5.1 discrete channels of time, "DVD" will appear on the front display and the DVD logo (start-up picture) will appear on the screen. • Press the DVD/TV/RADIO button (the FUNCTION button on the remote control) to TV mode and the TV...
Owners Manual
Page 17
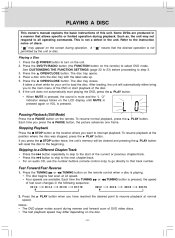
... differ depending on the disc. - 16 - A " permitted by the unit or disc. To resume playback at the location where you press the PAUSE button, the picture advances one frame. Fast Forward/Fast Reverse 1. Press the DVD/TV/RADIO button (the FUNCTION button on the remote. Press the 4. PLAY button. The disc...
... differ depending on the disc. - 16 - A " permitted by the unit or disc. To resume playback at the location where you press the PAUSE button, the picture advances one frame. Fast Forward/Fast Reverse 1. Press the DVD/TV/RADIO button (the FUNCTION button on the remote. Press the 4. PLAY button. The disc...
Owners Manual
Page 21
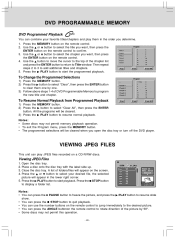
... in the order you open the disc tray or turn off the DVD player. Notes: • You can press the PAUSE button to freeze the picture, and press the PLAY button to resume slide show. • You can press the STOP button to quit playback. • You can use the number... buttons on a CD-R/RW discs. Viewing JPEG Files 1. Place a disc onto the disc tray with the label side up. 3. Press the picture will appear on the remote control. 4. Use the button to move the cursor to program the new title and chapter. VIEWING JPEG FILES This unit...
... in the order you open the disc tray or turn off the DVD player. Notes: • You can press the PAUSE button to freeze the picture, and press the PLAY button to resume slide show. • You can press the STOP button to quit playback. • You can use the number... buttons on a CD-R/RW discs. Viewing JPEG Files 1. Place a disc onto the disc tray with the label side up. 3. Press the picture will appear on the remote control. 4. Use the button to move the cursor to program the new title and chapter. VIEWING JPEG FILES This unit...
Owners Manual
Page 24
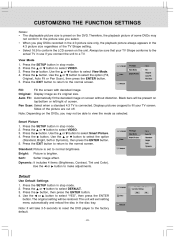
...you connect the unit to the factory default. - 23 - Sides of the TV Shape setting. • Select 16:9 to normal brightness. Press the button. Standard: Picture is connected. Default Use Default Settings 1. 2. 3. 4. Note: It will be able to the actual TV in stop mode. Softer image effect. 1. 2. 3. 4....to return to select the option Press the (Standard, Bright, Soft or Dynamic), then press the ENTER button. 5. Bright: Soft: Picture is preset on screen without distortion. Use the or button to select "YES", then press the ENTER button. Press the button, then...
...you connect the unit to the factory default. - 23 - Sides of the TV Shape setting. • Select 16:9 to normal brightness. Press the button. Standard: Picture is connected. Default Use Default Settings 1. 2. 3. 4. Note: It will be able to the actual TV in stop mode. Softer image effect. 1. 2. 3. 4....to return to select the option Press the (Standard, Bright, Soft or Dynamic), then press the ENTER button. 5. Bright: Soft: Picture is preset on screen without distortion. Use the or button to select "YES", then press the ENTER button. Press the button, then...
Owners Manual
Page 26
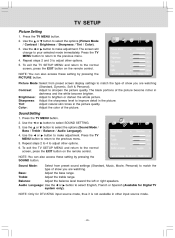
... control. To exit the TV SETUP MENU and return to your selected mode immediately. Tint : Adjust natural skin tones in the picture. Use the or button to adjust other options. 5. Repeat steps 2 and 3 to make adjustment. Color : Adjust the color of the...return to select the options (Sound Mode / Bass / Treble / Balance / Audio Language). 4. NOTE: You can also access these setting by pressing the PICTURE button. Sound Mode : Standard 50 50 0 English ADJUST "MENU":EXIT Select from preset screen display settings to select English, French or Spanish (Available for DTV...
... control. To exit the TV SETUP MENU and return to your selected mode immediately. Tint : Adjust natural skin tones in the picture. Use the or button to adjust other options. 5. Repeat steps 2 and 3 to make adjustment. Color : Adjust the color of the...return to select the options (Sound Mode / Bass / Treble / Balance / Audio Language). 4. NOTE: You can also access these setting by pressing the PICTURE button. Sound Mode : Standard 50 50 0 English ADJUST "MENU":EXIT Select from preset screen display settings to select English, French or Spanish (Available for DTV...
Owners Manual
Page 27
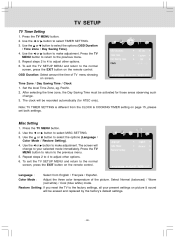
... set both settings. Repeat steps 2 to 4 to the normal screen, press the EXIT button on screen. OSD Duration: Select amount the time of the picture. Time Zone / Day Saving Time / Clock 1. Set the local Time Zone, eg. Misc Setting 1. To exit the TV SETUP MENU and return to...3. Adjust the three color temperature of TV menu showing on the remote control. Language : Color Mode : Select from the CLOCK & COOKING TIMER setting on picture & sound will be erased and replaced by the factory's default settings. - 26 - Press the TV MENU button to return to select the options (Language...
... set both settings. Repeat steps 2 to 4 to the normal screen, press the EXIT button on screen. OSD Duration: Select amount the time of the picture. Time Zone / Day Saving Time / Clock 1. Set the local Time Zone, eg. Misc Setting 1. To exit the TV SETUP MENU and return to...3. Adjust the three color temperature of TV menu showing on the remote control. Language : Color Mode : Select from the CLOCK & COOKING TIMER setting on picture & sound will be erased and replaced by the factory's default settings. - 26 - Press the TV MENU button to return to select the options (Language...

Owners Manual
Page 28
... Air ADJUST "MENU":EXIT Auto Scan Add CH: The stored channels can select Cable System (AUTO / STD / HRC / IRC) in the sub menu as the picture shown. Channel Label: You may switch ON/OFF the skip function of each channel. 1. button to move and edit for each stored channel by selecting...
... Air ADJUST "MENU":EXIT Auto Scan Add CH: The stored channels can select Cable System (AUTO / STD / HRC / IRC) in the sub menu as the picture shown. Channel Label: You may switch ON/OFF the skip function of each channel. 1. button to move and edit for each stored channel by selecting...
Owners Manual
Page 30
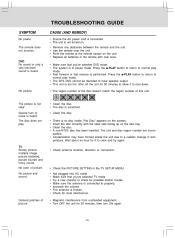
...8226; The unit is not turned on the disc tray. Use the remote near the unit. Press the PLAY button to return to properly. No picture The picture is not clear Severe hum or noise is broken. Clean the disc. Make sure the antenna is connected to normal play mode. • Fast... to allow it to cool down. • The region number of the disc doesn't match the region number of this unit. TV Snowy picture, multiple image, picture distorted, picture blurred and noisy sound. Try a new channel to a sudden change in pause mode. Insert the disc correctly with new ones. Wait about ...
...8226; The unit is not turned on the disc tray. Use the remote near the unit. Press the PLAY button to return to properly. No picture The picture is not clear Severe hum or noise is broken. Clean the disc. Make sure the antenna is connected to normal play mode. • Fast... to allow it to cool down. • The region number of the disc doesn't match the region number of this unit. TV Snowy picture, multiple image, picture distorted, picture blurred and noisy sound. Try a new channel to a sudden change in pause mode. Insert the disc correctly with new ones. Wait about ...

