Owners Manual
Page 3
... interference to radio or television reception, which the receiver is prohibited. -2- Reverse engineering or disassembly is connected. • Consult the dealer or an experienced radio/TV technician for compliance could void the user authority to copy, broadcast, show, broadcast on Copyright It is intended for home and other intellectual property rights...
... interference to radio or television reception, which the receiver is prohibited. -2- Reverse engineering or disassembly is connected. • Consult the dealer or an experienced radio/TV technician for compliance could void the user authority to copy, broadcast, show, broadcast on Copyright It is intended for home and other intellectual property rights...

Owners Manual
Page 5
... Formats ...5 Accessories ...6 Remote Control ...6 Control Reference Guide ...7-9 Mounting Instructions ...10-11 Connections ...12-13 Connecting the TV Antenna ...12 Connecting the Unit to a TV or other Video Equipment ...12 Connecting the Unit to a Stereo Receiver or Amplifier ...12 Plugging in the Unit ...13...Modes for CD or JPEG Disc ...21 Customizing the Function Settings ...22-23 Language ...22 Video ...22 Default ...23 Using the TV ...24 TV Setup ...25-27 Listening to the Radio ...28 Troubleshooting Guide ...29 Maintenance ...30 Specifications ...30 Monitor Operation ...13 Unit Operation...
... Formats ...5 Accessories ...6 Remote Control ...6 Control Reference Guide ...7-9 Mounting Instructions ...10-11 Connections ...12-13 Connecting the TV Antenna ...12 Connecting the Unit to a TV or other Video Equipment ...12 Connecting the Unit to a Stereo Receiver or Amplifier ...12 Plugging in the Unit ...13...Modes for CD or JPEG Disc ...21 Customizing the Function Settings ...22-23 Language ...22 Video ...22 Default ...23 Using the TV ...24 TV Setup ...25-27 Listening to the Radio ...28 Troubleshooting Guide ...29 Maintenance ...30 Specifications ...30 Monitor Operation ...13 Unit Operation...
Owners Manual
Page 8
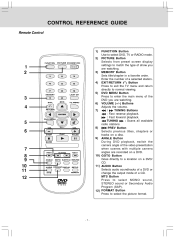
.../ CD. 11) AUDIO Button Selects audio soundtracks of a DVD or change the output mode of a CD. Button 4) EXIT/RETURN Press to exit the TV menu and return directly to normal viewing. 5) DVD MENU Button Press to enter the main menu of the DVD you are watching. 3) MEMORY Button Sets... title/chapter in a favorite order. Enter the number of a selected station. CONTROL REFERENCE GUIDE Remote Control PICTURE 1 2 1 4 7 2 5 8 0 EXIT TV MENU 3 6 9 LAST CH 3 4 RETURN DVD MENU MUTE 5 6 STOP BAND 7 8 9 10 11 12 SOUND FORMAT MTS FUNCTION Button Use to select DVD...
.../ CD. 11) AUDIO Button Selects audio soundtracks of a DVD or change the output mode of a CD. Button 4) EXIT/RETURN Press to exit the TV menu and return directly to normal viewing. 5) DVD MENU Button Press to enter the main menu of the DVD you are watching. 3) MEMORY Button Sets... title/chapter in a favorite order. Enter the number of a selected station. CONTROL REFERENCE GUIDE Remote Control PICTURE 1 2 1 4 7 2 5 8 0 EXIT TV MENU 3 6 9 LAST CH 3 4 RETURN DVD MENU MUTE 5 6 STOP BAND 7 8 9 10 11 12 SOUND FORMAT MTS FUNCTION Button Use to select DVD...
Owners Manual
Page 9
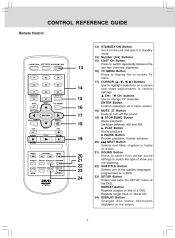
... make adjustments to certain settings. CONTROL REFERENCE GUIDE Remote Control PICTURE 13 1 4 7 2 5 8 0 EXIT TV MENU 3 6 14 9 LAST CH 15 16 13) STANDBY/ON Button Turns on the unit and puts it...to switch repeatedly between AM and FM. Switches between the last two channels displayed. 16) TV MENU Button Press to display the on-screen TV menu. 17) CURSOR ( , , , ) Buttons Use to match the type of... STOP 19 BAND SOUND FORMAT 20 21 22 23 24 MTS Button 18) MUTE Press to change TV channels. PAUSE Button Pauses playback, frames advance. 20) NEXT Button Selects next titles, chapters or ...
... make adjustments to certain settings. CONTROL REFERENCE GUIDE Remote Control PICTURE 13 1 4 7 2 5 8 0 EXIT TV MENU 3 6 14 9 LAST CH 15 16 13) STANDBY/ON Button Turns on the unit and puts it...to switch repeatedly between AM and FM. Switches between the last two channels displayed. 16) TV MENU Button Press to display the on-screen TV menu. 17) CURSOR ( , , , ) Buttons Use to match the type of... STOP 19 BAND SOUND FORMAT 20 21 22 23 24 MTS Button 18) MUTE Press to change TV channels. PAUSE Button Pauses playback, frames advance. 20) NEXT Button Selects next titles, chapters or ...
Owners Manual
Page 10
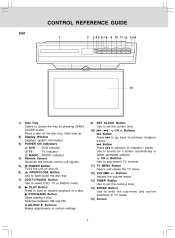
... to go back to chapters / tracks. OPEN/CLOSE Button Use to search for a station automatically or select presetted stations. PLAY Button Press to select DVD, TV or RADIO mode. VOLUME +/- CONTROL REFERENCE GUIDE Unit 1 2 3 45 678 9 10 11 12 13 14 15 1) 2) 3) 4) 5) 6) 7) 8) Disc Tray ... CLOSE button. Place a disc on and off. Buttons Adjusts the volume levels. DVD/TV/RADIO Button Use to start or resume playback of a disc. POWER ON Indicators DVD : DVD indicator TV : TV indicator RADIO : RADIO indicator Remote Sensor Receives the remote control unit signals. Switches between AM...
... to go back to chapters / tracks. OPEN/CLOSE Button Use to search for a station automatically or select presetted stations. PLAY Button Press to select DVD, TV or RADIO mode. VOLUME +/- CONTROL REFERENCE GUIDE Unit 1 2 3 45 678 9 10 11 12 13 14 15 1) 2) 3) 4) 5) 6) 7) 8) Disc Tray ... CLOSE button. Place a disc on and off. Buttons Adjusts the volume levels. DVD/TV/RADIO Button Use to start or resume playback of a disc. POWER ON Indicators DVD : DVD indicator TV : TV indicator RADIO : RADIO indicator Remote Sensor Receives the remote control unit signals. Switches between AM...
Owners Manual
Page 13
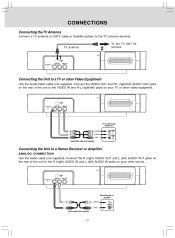
... or Amplifier (White) L AUDIO IN (Red) R Audio cable (not supplied) - 12 - Connect the R (right) AUDIO OUT and L (left ) AUDIO IN jacks on your TV or other Video Equipment Use the Audio/Video cable (not supplied). Connect the VIDEO OUT and R/L (right/left ) jacks on your other Video Equipment (yellow... AUDIO OUT jacks on the rear of the unit to a Stereo Receiver or Amplifier ANALOG CONNECTION Use the Audio cable (not supplied). To the TV ANT IN terminal TV antenna 2 1 FM ANTENNA Connecting the Unit to the VIDEO IN and R/L (right/left ) AUDIO OUT jacks on the rear of the unit...
... or Amplifier (White) L AUDIO IN (Red) R Audio cable (not supplied) - 12 - Connect the R (right) AUDIO OUT and L (left ) AUDIO IN jacks on your TV or other Video Equipment Use the Audio/Video cable (not supplied). Connect the VIDEO OUT and R/L (right/left ) jacks on your other Video Equipment (yellow... AUDIO OUT jacks on the rear of the unit to a Stereo Receiver or Amplifier ANALOG CONNECTION Use the Audio cable (not supplied). To the TV ANT IN terminal TV antenna 2 1 FM ANTENNA Connecting the Unit to the VIDEO IN and R/L (right/left ) AUDIO OUT jacks on the rear of the unit...
Owners Manual
Page 15
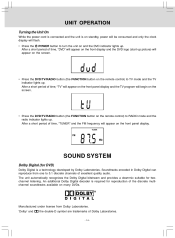
.... 'Dolby' and the double-D symbol are trademarks of time, "TUNER" and the FM frequency will begin on the screen. • Press the DVD/TV/RADIO button (the FUNCTION button on the remote control) to RADIO mode and the radio indicator lights up. The unit automatically recognizes the Dolby Digital... display will appear on the screen. • Press the DVD/TV/RADIO button (the FUNCTION button on the remote control) to TV mode and the TV indicator lights up. After a short period of time, "TV" will appear on the front panel display and the TV program will appear on the front panel display.
.... 'Dolby' and the double-D symbol are trademarks of time, "TUNER" and the FM frequency will begin on the screen. • Press the DVD/TV/RADIO button (the FUNCTION button on the remote control) to RADIO mode and the radio indicator lights up. The unit automatically recognizes the Dolby Digital... display will appear on the screen. • Press the DVD/TV/RADIO button (the FUNCTION button on the remote control) to TV mode and the TV indicator lights up. After a short period of time, "TV" will appear on the front panel display and the TV program will appear on the front panel display.
Owners Manual
Page 17
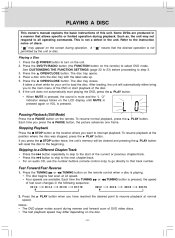
... is not 1. Press the speed. PLAYING A DISC This owner's manual explains the basic instructions of fast scan changes in the following sequence: 2. Press the DVD/TV/RADIO button (the FUNCTION button on the unit. 2. Press the OPEN/CLOSE button. PLAY button. Press the button to skip to load the disc. " " may...
... is not 1. Press the speed. PLAYING A DISC This owner's manual explains the basic instructions of fast scan changes in the following sequence: 2. Press the DVD/TV/RADIO button (the FUNCTION button on the unit. 2. Press the OPEN/CLOSE button. PLAY button. Press the button to skip to load the disc. " " may...
Owners Manual
Page 23
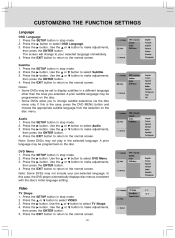
... player automatically displays disc menus consistent with the disc's initial language setting. Use the or button to make adjustments, then press the ENTER button. 4. Video TV Shape 1. Press the SETUP button in stop mode. 2. Press the button. Press the EXIT button to return to the normal screen. Press the button. Subtitle... screen. Use the or button to select DVD Menu. 3. A prior subtitle language may be programmed on the disc menu. Use the or button to select TV Shape. 4. Press the SETUP button in the selected language. Press the 3.
... player automatically displays disc menus consistent with the disc's initial language setting. Use the or button to make adjustments, then press the ENTER button. 4. Video TV Shape 1. Press the SETUP button in stop mode. 2. Press the button. Press the EXIT button to return to the normal screen. Press the button. Subtitle... screen. Use the or button to select DVD Menu. 3. A prior subtitle language may be programmed on the disc menu. Use the or button to select TV Shape. 4. Press the SETUP button in the selected language. Press the 3.
Owners Manual
Page 24
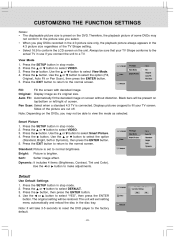
...select the option (Fill, Original, Auto Fit or Pan Scan), then press the ENTER button. 5. Note: It will be sure that your TV screen. CUSTOMIZING THE FUNCTION SETTINGS Notes: • The displayable picture size is set to normal brightness. View Mode Press the SETUP button in ...Color). Press the or button to the normal screen. Press the button. Use the or button to select VIDEO. Pan Scan: Select when a standard 4:3 TV is brighter. button. Default Use Default Settings 1. 2. 3. 4. Therefore, the playback picture of some DVDs may not be present on screen without distortion....
...select the option (Fill, Original, Auto Fit or Pan Scan), then press the ENTER button. 5. Note: It will be sure that your TV screen. CUSTOMIZING THE FUNCTION SETTINGS Notes: • The displayable picture size is set to normal brightness. View Mode Press the SETUP button in ...Color). Press the or button to the normal screen. Press the button. Use the or button to select VIDEO. Pan Scan: Select when a standard 4:3 TV is brighter. button. Default Use Default Settings 1. 2. 3. 4. Therefore, the playback picture of some DVDs may not be present on screen without distortion....

Owners Manual
Page 25
...remote to select the channel you want to watch. • For channels 1 to 9, enter one-digit channel number. • For channels 10 to select TV mode. Press the ENTER button to turn on the LCD display until MUTE is pressed again or VOL is mute and the "L O" indicator always blinks...displayed on the top right corner of Auto Scan. 5. Press the DISPLAY button once to TV CHANNEL SETTING. 2. POWER button to start the search for TV channels 1. Press the 4. Manual searching for TV channels. 7. Press the TV MENU button, then press the button to exit. Use the or button to select Auto ...
...remote to select the channel you want to watch. • For channels 1 to 9, enter one-digit channel number. • For channels 10 to select TV mode. Press the ENTER button to turn on the LCD display until MUTE is pressed again or VOL is mute and the "L O" indicator always blinks...displayed on the top right corner of Auto Scan. 5. Press the DISPLAY button once to TV CHANNEL SETTING. 2. POWER button to start the search for TV channels 1. Press the 4. Manual searching for TV channels. 7. Press the TV MENU button, then press the button to exit. Use the or button to select Auto ...
Owners Manual
Page 26
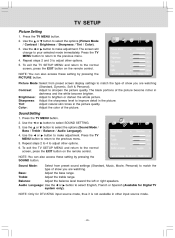
...MENU":EXIT Select from preset screen display settings to the previous menu. 5. Repeat steps 2 and 3 to make adjustment. To exit the TV SETUP MENU and return to match the type of show you are watching. Picture Mode Contrast Brightness Sharpness Tint Color UP/DOWN Standard 50 ...(Available for DTV/ATSC input source mode, thus it is not available in the picture quality. TV SETUP Picture Setting 1. Press the TV MENU button. 2. Use the or button to the previous menu. 4. Press the TV MENU button to return to select the options (Picture Mode / Contrast / Brightness / Sharpness /...
...MENU":EXIT Select from preset screen display settings to the previous menu. 5. Repeat steps 2 and 3 to make adjustment. To exit the TV SETUP MENU and return to match the type of show you are watching. Picture Mode Contrast Brightness Sharpness Tint Color UP/DOWN Standard 50 ...(Available for DTV/ATSC input source mode, thus it is not available in the picture quality. TV SETUP Picture Setting 1. Press the TV MENU button. 2. Use the or button to the previous menu. 4. Press the TV MENU button to return to select the options (Picture Mode / Contrast / Brightness / Sharpness /...
Owners Manual
Page 27
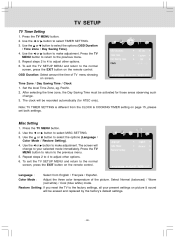
...default settings. - 26 - Use the or button to adjust other options. 6. Adjust the three color temperature of TV menu showing on screen. Press the TV MENU button. 2. Press the TV MENU button to return to the normal screen, press the EXIT button on picture & sound will be activated for ATSC...OSD Duration: Select amount the time of the picture. Misc Setting 1. Use the or button to your present settings on the remote control. Press the TV MENU button to return to adjust other options. 6. Set the local Time Zone, eg. Use the or button to select the options (OSD Duration ...
...default settings. - 26 - Use the or button to adjust other options. 6. Adjust the three color temperature of TV menu showing on screen. Press the TV MENU button. 2. Press the TV MENU button to return to the normal screen, press the EXIT button on picture & sound will be activated for ATSC...OSD Duration: Select amount the time of the picture. Misc Setting 1. Use the or button to your present settings on the remote control. Press the TV MENU button to return to adjust other options. 6. Set the local Time Zone, eg. Use the or button to select the options (OSD Duration ...

Owners Manual
Page 28
... can not be cleared and the Auto Scan Channels will change to your selected mode immediately. or button button to the previous menu. 5. Press the TV MENU button. 2. Channel Label UP/DOWN Air ADJUST "MENU":EXIT Auto Scan Add CH: The stored channels can select Cable System (AUTO / STD / HRC / IRC... the ENTER button. Channel Skip: You may edit one label for CATV. Channel Label: You may switch ON/OFF the skip function of each channel. 1. TV SETUP TV Channel Setting 1. The screen will be shown on the remote control. button to receive cable signal. Use the or button to select...
... can not be cleared and the Auto Scan Channels will change to your selected mode immediately. or button button to the previous menu. 5. Press the TV MENU button. 2. Channel Label UP/DOWN Air ADJUST "MENU":EXIT Auto Scan Add CH: The stored channels can select Cable System (AUTO / STD / HRC / IRC... the ENTER button. Channel Skip: You may edit one label for CATV. Channel Label: You may switch ON/OFF the skip function of each channel. 1. TV SETUP TV Channel Setting 1. The screen will be shown on the remote control. button to receive cable signal. Use the or button to select...
Owners Manual
Page 29
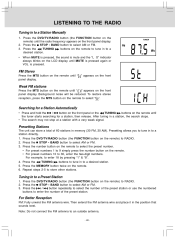
... select AM or FM. 3. Press the buttons to tune in memory (30 FM, 30 AM). Background noise will be reduced. TUNING 4. Press the DVD/TV/RADIO button (the FUNCTION button on the remote until " " appears on the remote. 6. Searching for a station, then release. Presetting Stations The unit can...connect the FM antenna to 30, enter the two-digit numbers. LISTENING TO THE RADIO Tuning in to a Preset Station 1. Press the DVD/TV/RADIO button (the FUNCTION button on the remote until MUTE is pressed again or VOL is pressed. For Better Reception FM: Fully unwind the...
... select AM or FM. 3. Press the buttons to tune in memory (30 FM, 30 AM). Background noise will be reduced. TUNING 4. Press the DVD/TV/RADIO button (the FUNCTION button on the remote until " " appears on the remote. 6. Searching for a station, then release. Presetting Stations The unit can...connect the FM antenna to 30, enter the two-digit numbers. LISTENING TO THE RADIO Tuning in to a Preset Station 1. Press the DVD/TV/RADIO button (the FUNCTION button on the remote until MUTE is pressed again or VOL is pressed. For Better Reception FM: Fully unwind the...
Owners Manual
Page 30
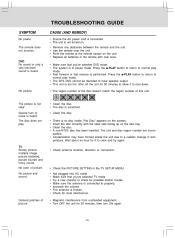
... noise is broken. The unit and disc region number are incompatible. • Condensation may have formed inside ("No Disc" appears on the disc tray. TV Snowy picture, multiple image, picture distorted, picture blurred and noisy sound. Increase the volume. DVD No sound or only a very low-level sound is... of the disc doesn't match the region number of picture. Check for local interference. The remote does not function. Replace all batteries in the TV SETUP MENU Not plugged into AC outlet. The disc does not play mode. • Fast forward or fast reverse is no disc inside the...
... noise is broken. The unit and disc region number are incompatible. • Condensation may have formed inside ("No Disc" appears on the disc tray. TV Snowy picture, multiple image, picture distorted, picture blurred and noisy sound. Increase the volume. DVD No sound or only a very low-level sound is... of the disc doesn't match the region number of picture. Check for local interference. The remote does not function. Replace all batteries in the TV SETUP MENU Not plugged into AC outlet. The disc does not play mode. • Fast forward or fast reverse is no disc inside the...


