
Owners Manual
Page 5
... the TV ...24 TV Setup ...25-27 Listening to the Radio ...28 Troubleshooting Guide ...29 Maintenance ...30 Specifications ...30 Monitor Operation ...13 Unit Operation ...14 Sound System ...14 Setting the Clock ...15 Setting the Cooking Timer ...15 Playing a Disc ...16-18 Playing a Disc ...16 Pausing Playback ...16 Stopping Playback ...16 Skipping...
... the TV ...24 TV Setup ...25-27 Listening to the Radio ...28 Troubleshooting Guide ...29 Maintenance ...30 Specifications ...30 Monitor Operation ...13 Unit Operation ...14 Sound System ...14 Setting the Clock ...15 Setting the Cooking Timer ...15 Playing a Disc ...16-18 Playing a Disc ...16 Pausing Playback ...16 Stopping Playback ...16 Skipping...
Owners Manual
Page 8
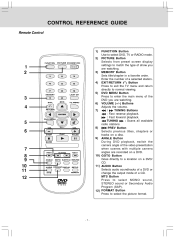
... when scenes with multiple camera angles are watching. 3) MEMORY Button Sets title/chapter in a favorite order. MTS Button Press to select MONO sound, STEREO sound or Secondary Audio Program (SAP). 12) FORMAT Button Press to a location on a DVD/ CD. 11) AUDIO Button Selects audio soundtracks ... REFERENCE GUIDE Remote Control PICTURE 1 2 1 4 7 2 5 8 0 EXIT TV MENU 3 6 9 LAST CH 3 4 RETURN DVD MENU MUTE 5 6 STOP BAND 7 8 9 10 11 12 SOUND FORMAT MTS FUNCTION Button Use to select DVD, TV or RADIO mode. 2) PICTURE Button Selects from preset screen display settings to match the type of...
... when scenes with multiple camera angles are watching. 3) MEMORY Button Sets title/chapter in a favorite order. MTS Button Press to select MONO sound, STEREO sound or Secondary Audio Program (SAP). 12) FORMAT Button Press to a location on a DVD/ CD. 11) AUDIO Button Selects audio soundtracks ... REFERENCE GUIDE Remote Control PICTURE 1 2 1 4 7 2 5 8 0 EXIT TV MENU 3 6 9 LAST CH 3 4 RETURN DVD MENU MUTE 5 6 STOP BAND 7 8 9 10 11 12 SOUND FORMAT MTS FUNCTION Button Use to select DVD, TV or RADIO mode. 2) PICTURE Button Selects from preset screen display settings to match the type of...
Owners Manual
Page 9
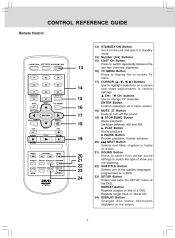
... selections on the screen. -8- STOP/BAND Button 19) Stops playback. PLAY Button Starts playback. RETURN 17 DVD MENU MUTE 18 STOP 19 BAND SOUND FORMAT 20 21 22 23 24 MTS Button 18) MUTE Press to match the type of show you are watching. 22) SUBTITLE Button Selects one... Button Pauses playback, frames advance. 20) NEXT Button Selects next titles, chapters or tracks on a disc. 21) SOUND Button Press to select from preset sound settings to turn off the sound. CH- Switches between the last two channels displayed. 16) TV MENU Button Press to display the on-screen TV menu...
... selections on the screen. -8- STOP/BAND Button 19) Stops playback. PLAY Button Starts playback. RETURN 17 DVD MENU MUTE 18 STOP 19 BAND SOUND FORMAT 20 21 22 23 24 MTS Button 18) MUTE Press to match the type of show you are watching. 22) SUBTITLE Button Selects one... Button Pauses playback, frames advance. 20) NEXT Button Selects next titles, chapters or tracks on a disc. 21) SOUND Button Press to select from preset sound settings to turn off the sound. CH- Switches between the last two channels displayed. 16) TV MENU Button Press to display the on-screen TV menu...
Owners Manual
Page 15
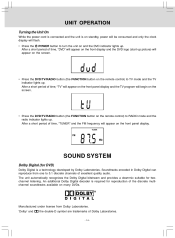
.... • Press the DVD/TV/RADIO button (the FUNCTION button on the remote control) to turn the unit on and the DVD indicator lights up. SOUND SYSTEM Dolby Digital (for twochannel listening. The unit automatically recognizes the Dolby Digital bitstream and provides a downmix suitable for DVD) Dolby Digital is a technology developed...
.... • Press the DVD/TV/RADIO button (the FUNCTION button on the remote control) to turn the unit on and the DVD indicator lights up. SOUND SYSTEM Dolby Digital (for twochannel listening. The unit automatically recognizes the Dolby Digital bitstream and provides a downmix suitable for DVD) Dolby Digital is a technology developed...
Owners Manual
Page 16
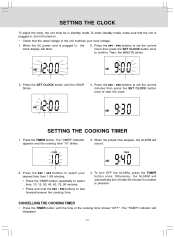
... voltage of the cooking timer shows "OFF". To turn off after 60 minutes if no button is plugged in standby mode. The "TIMER" indicator will sound. 2. SETTING THE CLOCK To adjust the clock, the unit must be in , the clock display will blink. 2. Press the SET CLOCK button until the time...
... voltage of the cooking timer shows "OFF". To turn off after 60 minutes if no button is plugged in standby mode. The "TIMER" indicator will sound. 2. SETTING THE CLOCK To adjust the clock, the unit must be in , the clock display will blink. 2. Press the SET CLOCK button until the time...
Owners Manual
Page 17
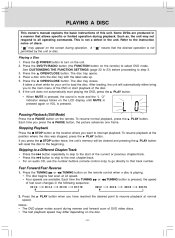
...either bring you to the main menu of the DVD or start playing the DVD, press the PLAY button. • When MUTE is pressed, the sound is mute and the "L O" indicator always blinks on the LCD display until MUTE is pressed again or VOL is not a defect in the following ... (Still Mode) Press the PAUSE button on the screen during operation. Stopping Playback Press the STOP button at normal Notes: • The DVD player mutes sound during playback. The disc tray opens. 3. The disc tray closes. Press the TUNING or TUNING button on the unit. 2. Playing a Disc " means that track ...
...either bring you to the main menu of the DVD or start playing the DVD, press the PLAY button. • When MUTE is pressed, the sound is mute and the "L O" indicator always blinks on the LCD display until MUTE is pressed again or VOL is not a defect in the following ... (Still Mode) Press the PAUSE button on the screen during operation. Stopping Playback Press the STOP button at normal Notes: • The DVD player mutes sound during playback. The disc tray opens. 3. The disc tray closes. Press the TUNING or TUNING button on the unit. 2. Playing a Disc " means that track ...
Owners Manual
Page 18
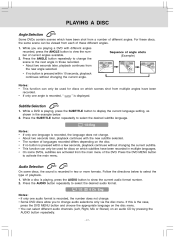
... function can select different audio channels (Left, Right, Mix or Stereo) on which subtitles have been recorded in multiple languages. • On some discs, the sound is recorded in the example below to the next angle in those recorded. • About two seconds later, playback continues from a number of current angles...
... function can select different audio channels (Left, Right, Mix or Stereo) on which subtitles have been recorded in multiple languages. • On some discs, the sound is recorded in the example below to the next angle in those recorded. • About two seconds later, playback continues from a number of current angles...

Owners Manual
Page 25
... mode. 2. RF CH Found 13 0 PRESS MENU TO EXIT AUTO SCAN Watching Television Viewing a television station after a few seconds. • When MUTE is pressed, the sound is mute and the "L O" indicator always blinks on the LCD display until MUTE is pressed again or VOL is pressed. Press the FUNCTION button to...
... mode. 2. RF CH Found 13 0 PRESS MENU TO EXIT AUTO SCAN Watching Television Viewing a television station after a few seconds. • When MUTE is pressed, the sound is mute and the "L O" indicator always blinks on the LCD display until MUTE is pressed again or VOL is pressed. Press the FUNCTION button to...
Owners Manual
Page 26
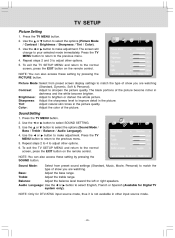
...select the options (Picture Mode / Contrast / Brightness / Sharpness / Tint / Color). 3. To exit the TV SETUP MENU and return to select the options (Sound Mode / Bass / Treble / Balance / Audio Language). 4. Use the or button to the normal screen, press the EXIT button on the remote control. ... 2. Picture Mode Contrast Brightness Sharpness Tint Color UP/DOWN Standard 50 50 50 0 50 ADJUST "MENU":EXIT Picture Mode: Select from preset sound settings (Standard, Music, Movie, Personal) to brighten or darken the whole picture. The black portions of the picture. Treble: Adjust the ...
...select the options (Picture Mode / Contrast / Brightness / Sharpness / Tint / Color). 3. To exit the TV SETUP MENU and return to select the options (Sound Mode / Bass / Treble / Balance / Audio Language). 4. Use the or button to the normal screen, press the EXIT button on the remote control. ... 2. Picture Mode Contrast Brightness Sharpness Tint Color UP/DOWN Standard 50 50 50 0 50 ADJUST "MENU":EXIT Picture Mode: Select from preset sound settings (Standard, Music, Movie, Personal) to brighten or darken the whole picture. The black portions of the picture. Treble: Adjust the ...
Owners Manual
Page 27
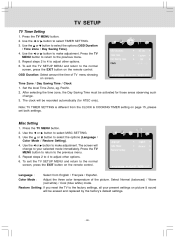
... the normal screen, press the EXIT button on the remote control. To exit the TV SETUP MENU and return to your present settings on picture & sound will be erased and replaced by the factory's default settings. - 26 - Time Zone / Day Saving Time / Clock 1. Pacific. The clock will be recorded automatically (for...
... the normal screen, press the EXIT button on the remote control. To exit the TV SETUP MENU and return to your present settings on picture & sound will be erased and replaced by the factory's default settings. - 26 - Time Zone / Day Saving Time / Clock 1. Pacific. The clock will be recorded automatically (for...
Owners Manual
Page 29
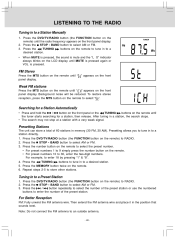
... Weak FM stations Press the MTS button on the remote until " panel display. Background noise will be reduced. After tuning in the position that sounds best. Press the STOP • BAND button to select AM or FM. 3. Press the MEMORY button twice on the front panel display. Press.... • For preset numbers 1 to 9 simply press the number button on the remote) to a desired station. • When MUTE is pressed, the sound is pressed. For example, to enter the number of the preset station. Press the buttons to enter 18 by pressing "1" & "8". Press the DVD/TV/RADIO...
... Weak FM stations Press the MTS button on the remote until " panel display. Background noise will be reduced. After tuning in the position that sounds best. Press the STOP • BAND button to select AM or FM. 3. Press the MEMORY button twice on the front panel display. Press.... • For preset numbers 1 to 9 simply press the number button on the remote) to a desired station. • When MUTE is pressed, the sound is pressed. For example, to enter the number of the preset station. Press the buttons to enter 18 by pressing "1" & "8". Press the DVD/TV/RADIO...
Owners Manual
Page 30
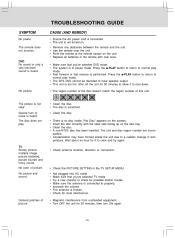
...-NTSC disc has been inserted. Replace all batteries in pause mode. TV Snowy picture, multiple image, picture distorted, picture blurred and noisy sound. Try a new channel to properly. Make sure the antenna is heard. Use the remote near the unit. No picture The picture is...a sudden change in the TV SETUP MENU Not plugged into AC outlet. TROUBLESHOOTING GUIDE SYMPTOM No power. Clean the disc. No picture and sound. • Check antenna location, direction or connection. • Check the PICTURE SETTING in temperature. The unit and disc region number are incompatible...
...-NTSC disc has been inserted. Replace all batteries in pause mode. TV Snowy picture, multiple image, picture distorted, picture blurred and noisy sound. Try a new channel to properly. Make sure the antenna is heard. Use the remote near the unit. No picture The picture is...a sudden change in the TV SETUP MENU Not plugged into AC outlet. TROUBLESHOOTING GUIDE SYMPTOM No power. Clean the disc. No picture and sound. • Check antenna location, direction or connection. • Check the PICTURE SETTING in temperature. The unit and disc region number are incompatible...
Owners Manual
Page 31
...-390991W010 NEVER use alcohol, benzine, thinner, cleaning fluid or other chemicals. MAINTENANCE Cleaning the Disc A defective or soiled disc inserted into the unit can cause sound to turn the unit off and disconnect the AC power cord before playback. Handle the disc by holding its inner and outer edges Do NOT...
...-390991W010 NEVER use alcohol, benzine, thinner, cleaning fluid or other chemicals. MAINTENANCE Cleaning the Disc A defective or soiled disc inserted into the unit can cause sound to turn the unit off and disconnect the AC power cord before playback. Handle the disc by holding its inner and outer edges Do NOT...


