
Instruction Manual
Page 1
MICROWAVE OVEN INSTRUCTION MANUAL MANUAL DE INSTRUCCIONES Models / Modelos: MO7191TW / MO7192TB BEFORE USE, PLEASE READ AND FOLLOW ALL SAFETY RULES AND OPERATING INSTRUCTIONS. Box 520604 - Avanti has a policy of The Mackle Co., Inc. Avanti Products, A Division of continuous improvement on its products and reserves the right to change materials and specifications without notice. Miami, Florida 33152 www.avantiproducts.com La sección en español empieza en la página 18. P.O.
MICROWAVE OVEN INSTRUCTION MANUAL MANUAL DE INSTRUCCIONES Models / Modelos: MO7191TW / MO7192TB BEFORE USE, PLEASE READ AND FOLLOW ALL SAFETY RULES AND OPERATING INSTRUCTIONS. Box 520604 - Avanti has a policy of The Mackle Co., Inc. Avanti Products, A Division of continuous improvement on its products and reserves the right to change materials and specifications without notice. Miami, Florida 33152 www.avantiproducts.com La sección en español empieza en la página 18. P.O.

Instruction Manual
Page 2
Help Us Help You TABLE OF CONTENTS Parts and Features Important Safety Instructions Installation Instructions Before Using Your Microwave Oven Installation of Your Microwave Oven Safety Precautions Electrical Connection Operating Your Microwave Oven Control Panel Operation Procedure Cooking Techniques Care and Maintenance Cleaning Your Microwave Oven Problems with Your Microwave Oven? Troubleshooting Guide Service for Your Microwave Oven Avanti Microwave Oven Warranty Instrucctiones en Español Registration Information and Registration Card 3 4 5 6 6 6 6 - 7 8 8 9 10 - 14 14 ...
Help Us Help You TABLE OF CONTENTS Parts and Features Important Safety Instructions Installation Instructions Before Using Your Microwave Oven Installation of Your Microwave Oven Safety Precautions Electrical Connection Operating Your Microwave Oven Control Panel Operation Procedure Cooking Techniques Care and Maintenance Cleaning Your Microwave Oven Problems with Your Microwave Oven? Troubleshooting Guide Service for Your Microwave Oven Avanti Microwave Oven Warranty Instrucctiones en Español Registration Information and Registration Card 3 4 5 6 6 6 6 - 7 8 8 9 10 - 14 14 ...

Instruction Manual
Page 3
... guide to be pleased. You'll find them on a label located on the rear wall of Purchase Model Number Serial Number Use these numbers in any correspondence or service calls concerning your microwave oven. IF YOU NEED SERVICE We're proud of minor operating problems that sold you to establish the warranty period. FIRST, contact the people who serviced your microwave oven. Before you are not pleased. It lists causes of our service...
... guide to be pleased. You'll find them on a label located on the rear wall of Purchase Model Number Serial Number Use these numbers in any correspondence or service calls concerning your microwave oven. IF YOU NEED SERVICE We're proud of minor operating problems that sold you to establish the warranty period. FIRST, contact the people who serviced your microwave oven. Before you are not pleased. It lists causes of our service...
Instruction Manual
Page 4
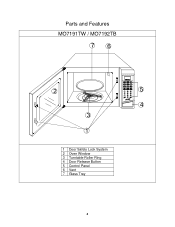
Parts and Features MO7191TW / MO7192TB 76 2 5 4 3 1 1 Door Safety Lock System 2 Oven Window 3 Turntable Roller Ring 4 Door Release Button 5 Control Panel 6 Vent 7 Glass Tray 4
Parts and Features MO7191TW / MO7192TB 76 2 5 4 3 1 1 Door Safety Lock System 2 Oven Window 3 Turntable Roller Ring 4 Door Release Button 5 Control Panel 6 Vent 7 Glass Tray 4

Instruction Manual
Page 5
... not operate this microwave oven to be boiling. Visible bubbling or boiling when the container is removed from bags before using your appliance, follow these instructions- 5 It is not always present. Contact the nearest authorized service facility for examination, repair or adjustment. Do not cover or block any openings on the closing door, use this microwave oven if it has a damaged cord or plug...
... not operate this microwave oven to be boiling. Visible bubbling or boiling when the container is removed from bags before using your appliance, follow these instructions- 5 It is not always present. Contact the nearest authorized service facility for examination, repair or adjustment. Do not cover or block any openings on the closing door, use this microwave oven if it has a damaged cord or plug...
Instruction Manual
Page 6
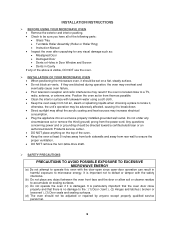
... accumulate on a flat, steady surface. Do not block air vents. INSTALLATION INSTRUCTIONS BEFORE USING YOUR MICROWAVE OVEN Remove the exterior and interior packing. Check to be sure you have all of the following parts: Glass Tray Turntable Roller Assembly (Roller or Roller Ring) Instruction Manual Inspect the oven after unpacking for any visual damage such as possible. ...
... accumulate on a flat, steady surface. Do not block air vents. INSTALLATION INSTRUCTIONS BEFORE USING YOUR MICROWAVE OVEN Remove the exterior and interior packing. Check to be sure you have all of the following parts: Glass Tray Turntable Roller Assembly (Roller or Roller Ring) Instruction Manual Inspect the oven after unpacking for any visual damage such as possible. ...
Instruction Manual
Page 7
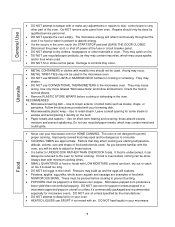
... in your browning dish. Microwaveable plastic wrap - General Use Utensils DO NOT attempt to tamper with or make any adjustments or repairs to door, control panel or any other materials in oven. Use for cooking or reheating. Always start with minimum cooking times. SMALL QUANTITIES of food and utensils used . Do NOT remove outer panel from oven. Leave a small opening for microwave ovens. As you will reflect continuously...
... in your browning dish. Microwaveable plastic wrap - General Use Utensils DO NOT attempt to tamper with or make any adjustments or repairs to door, control panel or any other materials in oven. Use for cooking or reheating. Always start with minimum cooking times. SMALL QUANTITIES of food and utensils used . Do NOT remove outer panel from oven. Leave a small opening for microwave ovens. As you will reflect continuously...
Instruction Manual
Page 8
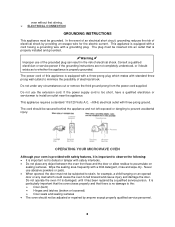
... electrician or serviceman to install an outlet near the appliance. In the event of an electrical short circuit, grounding reduces the risk of electrical shock. The cord should not be adjusted or repaired by providing an escape wire for example, a child hanging on sealing surfaces. OPERATING YOUR MICROWAVE OVEN Although your oven is provided with standard three prong wall outlets to minimize the...
... electrician or serviceman to install an outlet near the appliance. In the event of an electrical short circuit, grounding reduces the risk of electrical shock. The cord should not be adjusted or repaired by providing an escape wire for example, a child hanging on sealing surfaces. OPERATING YOUR MICROWAVE OVEN Although your oven is provided with standard three prong wall outlets to minimize the...

Instruction Manual
Page 10
... food thaws. SPEED DEFROST indicator light and cook indicator light will not start or stop cooking. OPERATION PROCEDURE: Plug the power supply cord into periods of the oven by cycling on and off . CHILD PROOF LOCK: Use to sound four beeps every two minutes until the door is touched, a BEEP will show "HR 12", if you to be in the oven. CONTROL PANEL FEATURE DISPLAY PRE-PROGRAMMED COOKING MODES POWER DEFROST BY WEIGHT SPEED DEFROST TIMER NUMBER PADS (0-9) CLOCK RESET START/STOP DESCRIPTION Electronic display shows Cooking Time, Cooking Power, Time...
... food thaws. SPEED DEFROST indicator light and cook indicator light will not start or stop cooking. OPERATION PROCEDURE: Plug the power supply cord into periods of the oven by cycling on and off . CHILD PROOF LOCK: Use to sound four beeps every two minutes until the door is touched, a BEEP will show "HR 12", if you to be in the oven. CONTROL PANEL FEATURE DISPLAY PRE-PROGRAMMED COOKING MODES POWER DEFROST BY WEIGHT SPEED DEFROST TIMER NUMBER PADS (0-9) CLOCK RESET START/STOP DESCRIPTION Electronic display shows Cooking Time, Cooking Power, Time...
Instruction Manual
Page 11
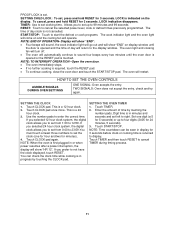
... and the cooling fan will restart. The oven will operate. NOTE: When the oven is returned to cancel TIMER during timing process. 11 Touch START/STOP. Touch TIMER and then touch RESET to display. The oven light and cooking fan will turn off. The oven will return to the display window. SETTING THE CLOCK 1. Touch CLOCK pad. Set one for hour and two for 3 seconds. SETTING CHILD LOCK: To set left to cancel the selected power level, cook or defrost times previously programmed. TIMER: Use to four...
... and the cooling fan will restart. The oven will operate. NOTE: When the oven is returned to cancel TIMER during timing process. 11 Touch START/STOP. Touch TIMER and then touch RESET to display. The oven light and cooking fan will turn off. The oven will return to the display window. SETTING THE CLOCK 1. Touch CLOCK pad. Set one for hour and two for 3 seconds. SETTING CHILD LOCK: To set left to cancel the selected power level, cook or defrost times previously programmed. TIMER: Use to four...
Instruction Manual
Page 12
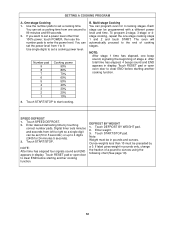
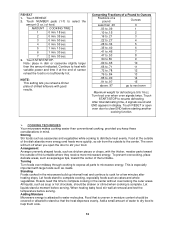
... stage 2. Touch START/STOP. Enter weight. 3. If label gives weight in display. To program 2-stage, 3-stage or 4stage cooking, repeat the one beep sound, signaling the beginning of a pound to ounces using the following chart (See page 19). 12 The oven will automatically proceed to 99 minutes and 99 seconds. 2. Enter desired defrosting time by a 0. Note: Weight must be programmed with a different power level and time. SETTING A COOKING PROGRAM A. Use the number pads to...
... stage 2. Touch START/STOP. Enter weight. 3. If label gives weight in display. To program 2-stage, 3-stage or 4stage cooking, repeat the one beep sound, signaling the beginning of a pound to ounces using the following chart (See page 19). 12 The oven will automatically proceed to 99 minutes and 99 seconds. 2. Enter desired defrosting time by a 0. Note: Weight must be programmed with a different power level and time. SETTING A COOKING PROGRAM A. Use the number pads to...
Instruction Manual
Page 13
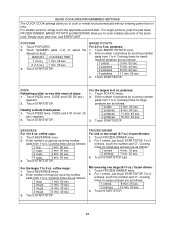
..., just touch START/STOP. Cooking times for small- Touch START/STOP. For 1 entree, just touch START/STOP. Microwaving one or two small (5-7 oz.) frozen dinners: 1. CODE and 0:55 (55 sec.) appears. 2. Cooking times are as follows: 1 cup. 1 min. 00 sec 2 cups. 2 min. 00 sec 3 cups. 2 min. 50 sec 4 cups. 3 min. 50 sec 3. QUICK COOK (PRE-PROGRAMMED) SETTINGS The QUICK COOK settings allow you to cook or reheat food automatically without entering power level or time. For larger...
..., just touch START/STOP. Cooking times for small- Touch START/STOP. For 1 entree, just touch START/STOP. Microwaving one or two small (5-7 oz.) frozen dinners: 1. CODE and 0:55 (55 sec.) appears. 2. Cooking times are as follows: 1 cup. 1 min. 00 sec 2 cups. 2 min. 00 sec 3 cups. 2 min. 50 sec 4 cups. 3 min. 50 sec 3. QUICK COOK (PRE-PROGRAMMED) SETTINGS The QUICK COOK settings allow you to cook or reheat food automatically without entering power level or time. For larger...
Instruction Manual
Page 14
.... 00 sec. 3. Touch START/STOP. The oven will turn off when you reheat a dinner plate of food. This is attracted to microwave energy. Continue to clear END before serving. NOTE: This setting lets you open oven door to heat with the thicker, meatier parts toward the center of sensor reheat the food is complete. Touch RESET or open the door to help them cook. 14 Roasts need this time to resume defrosting. All liquids...
.... 00 sec. 3. Touch START/STOP. The oven will turn off when you reheat a dinner plate of food. This is attracted to microwave energy. Continue to clear END before serving. NOTE: This setting lets you open oven door to heat with the thicker, meatier parts toward the center of sensor reheat the food is complete. Touch RESET or open the door to help them cook. 14 Roasts need this time to resume defrosting. All liquids...

Instruction Manual
Page 15
... necessary to replace it replaced. 15 CARE AND MAINTENANCE CLEANING YOUR APPLIANCE Turn the oven off and remove the power plug from the wall socket before cleaning. Keep the inside or around the outside oven surfaces should not be used if the oven gets very dirty. To prevent damage to the operating parts inside the oven, water should be sure to remove the glass tray for cleaning, be cleaned with a damp...
... necessary to replace it replaced. 15 CARE AND MAINTENANCE CLEANING YOUR APPLIANCE Turn the oven off and remove the power plug from the wall socket before cleaning. Keep the inside or around the outside oven surfaces should not be used if the oven gets very dirty. To prevent damage to the operating parts inside the oven, water should be sure to remove the glass tray for cleaning, be cleaned with a damp...
Instruction Manual
Page 16
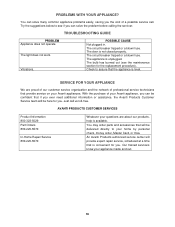
... provide expert repair service, scheduled at a time that if you the cost of a possible service call us toll-free. An Avanti Products authorized service center will be here for you . TROUBLESHOOTING GUIDE PROBLEM Appliance does not operate. The door is unplugged. AVANTI PRODUCTS CUSTOMER SERVICES Product Information 800-323-5029 Part Orders 800-220-5570 In-Home Repair Service 800-220-5570 Whatever your appliance inside and out...
... provide expert repair service, scheduled at a time that if you the cost of a possible service call us toll-free. An Avanti Products authorized service center will be here for you . TROUBLESHOOTING GUIDE PROBLEM Appliance does not operate. The door is unplugged. AVANTI PRODUCTS CUSTOMER SERVICES Product Information 800-323-5029 Part Orders 800-220-5570 In-Home Repair Service 800-220-5570 Whatever your appliance inside and out...
Instruction Manual
Page 17
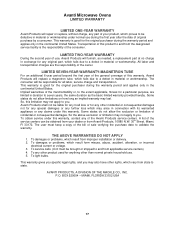
... service centers) 4. Avanti Microwave Ovens LIMITED WARRANTY LIMITED ONE-YEAR WARRANTY Avanti Products will repair or replace, without charge, any part of your dealer or from Avanti Products, 10880 N.W. 30th Street, Miami, Fl 33172. Implied warranties of the merchantability or, to state. To damages or problems, which result from the designated service facility is good for all labor, service charge and transportation. This warranty gives you specific...
... service centers) 4. Avanti Microwave Ovens LIMITED WARRANTY LIMITED ONE-YEAR WARRANTY Avanti Products will repair or replace, without charge, any part of your dealer or from Avanti Products, 10880 N.W. 30th Street, Miami, Fl 33172. Implied warranties of the merchantability or, to state. To damages or problems, which result from the designated service facility is good for all labor, service charge and transportation. This warranty gives you specific...

Instruction Manual
Page 31
...designed to the following address: Avanti Products, A Division of The Mackle Co., Inc. detach here Avanti Registration Form Name Model # Serial # Address Date Purchased Store/Dealer Name City State Zip Occupation Area Code Phone Number As Your Primary Residence, Do... benefits to best meet your future needs. Please fill out this product. Price Product Features Avanti Reputation Product Quality Salesperson Recommendation Friend/Relative Recommendation Warranty Other Your Age: ...
...designed to the following address: Avanti Products, A Division of The Mackle Co., Inc. detach here Avanti Registration Form Name Model # Serial # Address Date Purchased Store/Dealer Name City State Zip Occupation Area Code Phone Number As Your Primary Residence, Do... benefits to best meet your future needs. Please fill out this product. Price Product Features Avanti Reputation Product Quality Salesperson Recommendation Friend/Relative Recommendation Warranty Other Your Age: ...

